background image

P

RODUCT OVERVIEW


Page 12 

CineMonitor

HD 

Evolution


User interface 

The CineMonitorHD Evolution family offers a user interface common to all sizes. Some functions are 
directly accessible from the "direct functions" keypad, others from the menu with use of the rotating 
knob. 
 
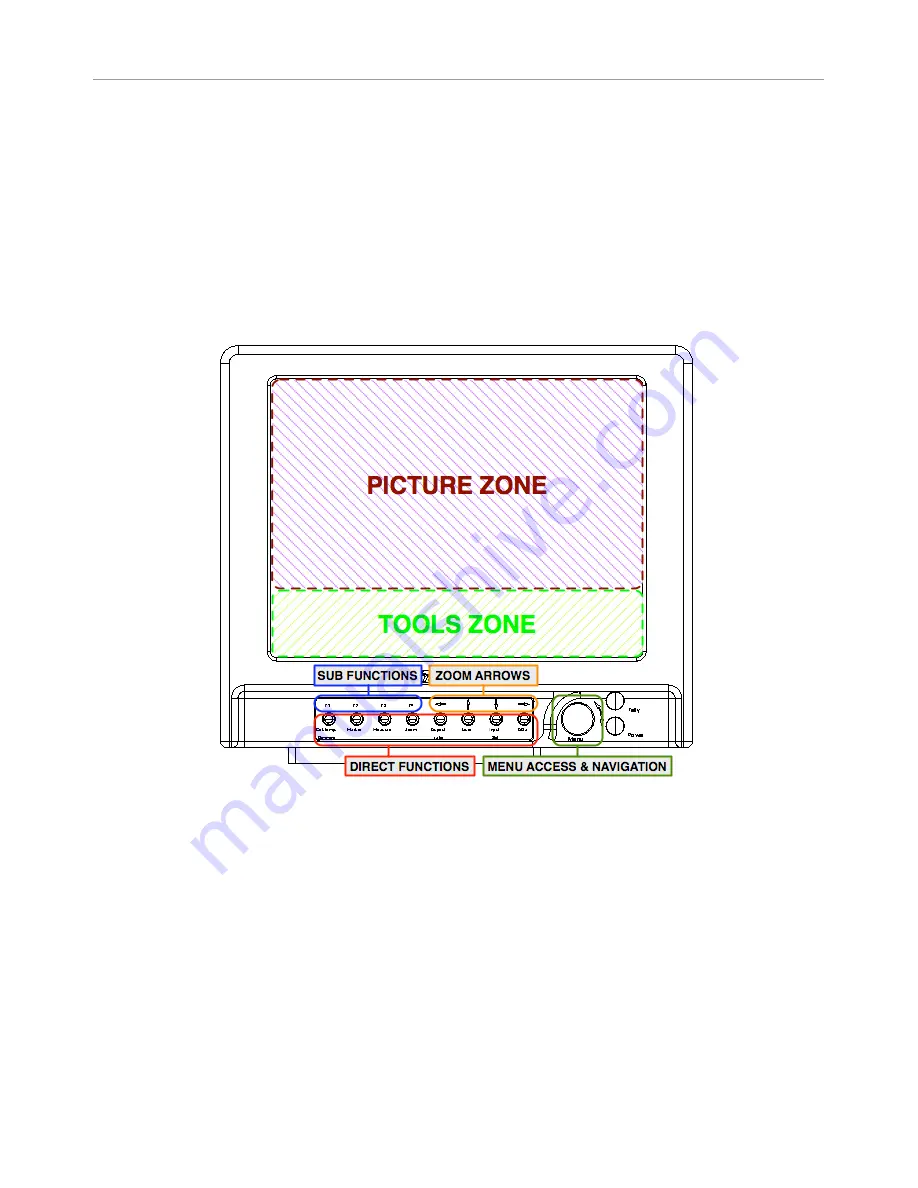
The CineMonitorHD screen is partitioned in two areas: 

  The picture zone displays the picture from the camera in 16/9 format  

  The tools zone displays tools and measurements in the remaining area of the screen. 

 
Figure 3 show the front of a 8” CineMonitorHD Evolution. 


Figure 3: CineMonitorHD8 Evolution front 


Direct functions  

Several direct functions are available from the keypad. 
 
One short press on a key gives access to the function. 
 
One long press (more than 2 seconds) on a key gives access to the sub functions of the related 
function (if any). Pressing F1…F4 enables to adjust those sub functions. 
 
Depending of the function, options and environment, the content of F1…F4 may differ. Pressing a key 
will activate or deactivate the sub function. An activated sub function is highlighted by an orange text 
while an inactivated function prompts in white. 
In some specific case, F4 may extend the selection to a second page of sub menu. 

Summary of Contents for CineMonitorHD Evolution

Page 1: ...Rev 3 5 April 2014 751TS0027 CineMonitorHD Evolution Operator Manual ...

Page 2: ...on 10 HD Monitor SuperBright CineMonitorHD12 SB Evolution 12 HD Monitor SuperBright CineMonitorHD15 SBL Evolution 15 HD Monitor SuperBright CineMonitorHD15 Studio Evolution 15 HD Monitor Studio version If the physical electrical and optical characteristics of the products are different the user interface is the same Several configurations are optionally available for this family of products There ...

Page 3: ...minal penalties and will be prosecuted to the maximum extent possible under the law CAUTION Warranty is void is the product is opened The unit contains electrostatic sensitive devices which can be damaged or destroyed if you touch them Very high voltage is present in the product and there is some risk of electric shock if opened by a non accredited technician Standard ESD procedures must be strict...

Page 4: ...RODUCT OVERVIEW 10 Parts identification 10 User interface 12 Direct functions 12 Rotating knob 13 USING THE DIRECT FUNCTIONS 14 Color Temperature Dimming 14 Markers 15 Measurements 16 Waveform 16 Histogram 17 Vectorscope 17 Zoom 18 Zoom pixel to pixel 18 1 33x zoom 18 Zoom in SD 18 Aspect Ratio and Anamorphic desqueeze 18 Assign user key 19 Input Selection 20 Display adjustments 20 ...

Page 5: ... CANON LOG 22 LOG C 22 BLACK LEVEL 23 LOCK 23 TOOLS 23 BLUETOOTH 23 AUDIO 24 TIMECODE 24 LENS READER 24 FOCUS HELPER 26 FRAMELINE 26 HORIZON 27 LIMITS 28 MEASUREMENTS 29 TALLY 30 PICTURE FX 31 SCAN 31 TECHNICAL 32 CVBS STD SELECT 32 NTSC 32 ACCESSORY 32 HDMI MODE CANON NORMAL 32 GPI 32 VOLTAGE ALARM 33 REVERSE SCROLLING 33 EXIT TEMPO 33 LIGHTS 33 MEMORY 34 MEM 1 MEM 4 34 PRESET 34 ...

Page 6: ...tips 35 Cleaning 35 Full reset 35 Hardware Software and Firmware 36 Updating your CineMonitorHD Evolution 36 Color Calibration 37 Product Return 37 SPECIFICATIONS 38 Common Characteristics 38 List of Standards per Input 39 Specific Characteristics 39 TRANSVIDEO EQUIPMENT LIMITED WARRANTY 41 ...

Page 7: ...e protective glass is not broken and that the connector do not have missing pins foreign objects inside the housing The CineMonitorHD needs to be in a ventilated area for a proper cooling Prolonged use in confined environment without ventilation can damage the monitor Cables The cables must be in good condition and adapted to the environment where you are working A bad quality or wrong wired cable...

Page 8: ...eo AL63 The input power voltage range is extremely wide from 10 to 36 V DC except specified differently Power instructions The power consumption slightly varies with the input voltage the operating temperature and the equipment configuration The internal power supply is protected against reverse polarity Over voltage may cause severe damages to the equipment and or to other equipment connected to ...

Page 9: ...ery socket from to enjoy the benefits of the FuelReader On 10 12 and 15 CineMonitorHD Evolution you need to order the monitor with the Anton Bauer Gold Mount socket WARNING RISK OF FIRE It is always recommended to remove the power source from the monitor when you do not use it and or when you travel Especially if you place the monitor in a closed environment bag box Start up Connect an appropriate...

Page 10: ...r the connectors and their location may differ The CineMonitorHD Evolution family offers a video connector panel common to all sizes 10 to 15 monitors also provide a power out connector and a battery plate more details in chapter SPECIFICATIONS Figure 1 to 2 show the backs of a 10 and a 8 CineMonitorHD Evolution Figure 1 CineMonitorHD10 Evolution back ...

Page 11: ...PRODUCT OVERVIEW Operator Manual Rev 3 5 Page 11 Figure 2 CineMonitorHD8 Evolution back ...

Page 12: ...front of a 8 CineMonitorHD Evolution Figure 3 CineMonitorHD8 Evolution front Direct functions Several direct functions are available from the keypad One short press on a key gives access to the function One long press more than 2 seconds on a key gives access to the sub functions of the related function if any Pressing F1 F4 enables to adjust those sub functions Depending of the function options a...

Page 13: ...ons by turning or pushing it One sort press on the knob gives access to the menu Rotating the knob enables to navigate between the menu items Pushing the knob gives access to the sub menu of the highlighted menu item Selecting EXIT exits from the current menu level to the previous if any A long push on the knob exits from the menu Exiting the menu is also possible by automatic temporization adjust...

Page 14: ...ng to the settings of MENU COLORIMETRY USER SET turning the rotating knob adjusts the brightness from 10 to 100 while color calibration is preserved Allows having a reduced power mode between two takes Long push on Col Temp Dimming accesses the settings of the Standard Calibrated mode Press F1 to choose D56 calibration Press F2 to choose D65 calibration Press F3 to choose manual calibration Adjust...

Page 15: ...eactivate 14 9 marker Press F3 to activate deactivate 16 9 marker Press F4 to access next page Second page Press F1 to activate deactivate safe area Press F4 to access previous page This menu is contextual some functions can be unavailable depending of the video standard When SAFE AREA is selected in the sub menu one short press on the Marker key displays TURN TO ADJUST SAFE AREA XX Rotating the k...

Page 16: ...here is a risk of overexposure or of loss of black details Waveform Long push on Measure measurement selection Selecting F1 WAVE gives access to the selection of the waveform modes Press F1 to display the waveform in line mode Press F2 to display the waveform in parade mode Press F3 to display the waveform in frame mode Press rotating knob to exit from menu Then a short push on Measure toggles the...

Page 17: ... F2 HISTO displays the histogram Press rotating knob to exit from menu Then a short push on Measure gives the possibility to adjust the scale of the histogram by using the rotating knob Vectorscope Long push on Measure measurement selection Selecting F3 VECTOR displays the vectorscope Press rotating knob to exit from menu ...

Page 18: ...n t exist This is why the pixel to pixel mode 1 1 zoom is the higher magnification ratio in a Transvideo monitor 1 33x zoom The 1 33x zoom mode magnifies the active 16 9 area of the picture output by the Arri Alexa in 4 3 mode Zoom in SD In SD the picture is displayed in full screen In this case there is an important magnification ratio applied to the original picture The resultant picture include...

Page 19: ...re Control as configured in MENU TOOLS LIMITS FOCUS and EXPO may be selected simultaneously If both are activated pressing User key set up a FOCUS EXPO b FOCUS c EXPO d nothing Press F4 to access next page Second page Press F1 to select High Low high or low light details as the user function In high mode the 50 100 grey scale is shifted to 0 50 to enhance the high light details In low mode the 0 5...

Page 20: ...r deactivate HDMI Inactivating the accessory input reduces the power consumption of the CineMonitorHD of about 4 Watts The format of the ACC input can be configured in MENU TECHNICAL when ACC input is selected It is possible to select between component YPrPb component RGB or CVBS Display adjustments Short push on ADJ toggles parameters to adjust Brightness Contrast Saturation Hue NTCS only Adjust ...

Page 21: ...vanced functions for monitor updates For experts only DISPLAY MODE Gives access to 3 display modes COLOR GREEN and B W COLOR Standard mode displays the picture with 16 million colors 256 gray levels GREEN Display the picture in green color only TINT and SATURATION are not working in this mode This mode has been invented by Transvideo in 1990 and is used since this time in Film Night Vision systems...

Page 22: ...7 y 0 3290 INPUT PROFILE AUTO Adjusts the response of the monitor according to the SDI metadata information if any This menu disappears if no metadata are found LINEAR Adjusts the response of the monitor with a linear gamma correction REC709 Adjusts the response of the monitor to a video signal using REC709 encoding S LOG Adjusts the response of the monitor to a video signal using S Log encoding S...

Page 23: ...nu or to access a direct function Pressing the rotating knob for more than 5 seconds gives the user access to the menu where she he will be able to deselect LOCK IMPORTANT Input Sel key is never locked TOOLS BLUETOOTH Bluetooth activation and device selection Available only if the monitor is equipped with a Bluetooth module Contact us for more information BLUETOOTH ON OFF Activates or deactivates ...

Page 24: ...E ON OFF Activates or deactivates the function ATC AUTO LTC VITC1 VITC2 Selection of the displayed ATC When AUTO is selected the first time code present is displayed 1 LTC 2 VITC1 3 VITC2 POSITION Allows the user to place the tool in different position of the screen When USER is selected use arrows and the rotating knob to move the tools DEFAULT replaces the tool at the factory preset LENS READER ...

Page 25: ... up or Sony PMW F3 F5 F55 F65 hardware firmware dependent 5 I S4 I can also be connected to the monitor through RS232 Fujinon Cabrio series through the SDI outputs of Arri Alexa SUP 8 1 and up or Sony PMW F3 F5 F55 F65 hardware firmware dependent MODULE ON OFF Activates or deactivates the function RING MOBILE STATIC Toggles between mobile and static rings display IRIS DECIMAL FRACTIONS Toggles the...

Page 26: ...ator CROSS CROSS ON OFF Activation of the cross COLOR Selection of the color of the lines WIDTH Selection of the width of the lines V POS Vertical position of the cross H POS Horizontal position of the cross FRAME 1 3 FRAME 1 3 ON OFF Activation of the frame CENTER ON OFF Activation of the center cross COLOR Modification of the color of the frame DOT Modification of the structure of the frame SEND...

Page 27: ...tes the Cal on Tap functionality When activated tap on screen or on Transvideo logo to zero calibrate the horizon 0 CAL ON TAP THRESHOLD 4 Adjust the threshold level of the Cal on Tap Level 4 requests a tough tap to trigger the 0 CAL while level 1 requests a soft tap POSITION Allows the user to place the tool in different position of the screen When USER is selected use arrows and the rotating kno...

Page 28: ...from 6 9 IRE to 36 IRE All information below the limit will be displayed in violet on measurement tools and or on the picture SORIN s MARKER Adjusts the central value of the marker in IRE SORIN s MARKER WIDTH Adjusts symmetrically the thickness of the marker within the limits of the white and black clipping values All information within the Sorin s marker limits will be displayed in green on measu...

Page 29: ... the measurement tools BLACK LIMITS ON OFF Activates or deactivates the black limits zoning on the measurement tools 1 LINE Displays the measurement of one line selected with the rotating knob 12 LINES Displays the measurement of a group of 12 lines The first line is selected with the rotating knob ALL LINES Displays the measurement of the whole picture BACKGROUNG INTENSITY Adjusts the overlay tra...

Page 30: ...gns a specific Tally mode for the ACC Lemo8 connector Possible configurations OFF ON AIR MODE CUSTOM MODE TALLY GPI Assigns a specific Tally mode for the GPI Sub D9 connector Possible configurations OFF CUSTOM MODE TALLY SDI Assigns a specific Tally mode for the SDI embedded Tally signal Possible configurations OFF REC MODE ON AIR MODE CUSTOM MODE CUSTOM MODE Custom Tally mode selection Includes R...

Page 31: ...FLIP Returns the picture horizontally PICTURE REVERSE Returns the picture horizontally and vertically 180 rotation of the picture AUTO REVERSE Makes a MONITOR REVERSE automatically if the monitor is up side down MONITOR REVERSE Returns the picture tools and menus horizontally and vertically AUTO FLIP REVERSE Returns the picture automatically vertical axis only if the monitor is up side down ...

Page 32: ...le when HDMI input is selected Improves the video standard switching when shooting with a Canon DSLR GPI Assigns functions and trigger conditions to the ACC Tally pin and to the 4 GPIs ACC Set the trigger condition of the Tally activated through ACCessory connector ACTIVE LOW ACTIVE HIGH or LIGHT SENSOR FUNCTION Assigns a function to the pin of the GPI connector J002 Available functions NONE TALLY...

Page 33: ...he threshold value Under this value a security alert can inform the user when it is time to swap the battery on the monitor POSITION Allows the user to place the tool in different position of the screen When USER is selected use arrows and the rotating knob to move the tools DEFAULT replaces the tool at the factory preset REVERSE SCROLLING Reverses the scrolling direction in the menus EXIT TEMPO S...

Page 34: ... in the memory including picture and tools settings RECALL Recalls the settings stored in the memory The standard settings a factory loaded in this memory they will be replaced at the first SAVE from the user PRESET Sets the default values in the setting registers PRESET does not erase the user presets PRESET ALL INPUTS Presets the active input and other inputs of the monitor PRESET SELECTED INPUT...

Page 35: ... The microfiber cloth delivered with the CineMonitorHD is strongly recommended to clean the glass Remove dust and particles of the glass before using the cloth No liquid is normally necessary If there is some dirt on the screen it is possible to remove it with clean warm water The microfiber cloth collects grease particle in its structure It is necessary to wash it when necessary with water and so...

Page 36: ...rdware 3 xx and Software 7 xx only Step 1 Get the last software update package for your CineMonitorHD Evolution An update package is a zip file that contains softwares and firmwares that are compatible each other It can be downloaded on our website for registered users by visiting www transvideo eu support You can also ask it directly to your local Transvideo representative Step 2 Uncompress the z...

Page 37: ...klight unit or if you need to match a large inventory of your RainbowHD after hundreds hours of use To perform the calibration you need to send the product to the factory Fees may apply if needed Product Return For repairs and technical operation you may return the product to the factory Please use the following procedure Ask for a RAN Return Authorization Number Log in to our website using your u...

Page 38: ...9 5 D56 Color space Rec ITU R BT 709 5 Power In XLR4 XLR4 connector 1 4 10 36 VDC Power Out Phoenix 3pts except 6 and 8 monitors 1 GND 3 12V out 500mA max 4 Connect to GND ACCessory Lemo8 1 GND 5 Pr R 2 11 to 36V in out 6 Pb B 3 Y CVBS2 G 7 Run low 0 9v DC high 3 7v DC 4 GND Video 8 GND Run J001 RS232 1 NC 6 GND 2 RX 7 RTS 3 TX 8 CTS 4 NC 9 12V out 5 GND J002 GPI 1 to 4 Input 0 18v DC low 2v DC hi...

Page 39: ...1 CVBS NTSC M NTSC J NTSC 4 43 PAL B G H I D PAL M PAL N SECAM ACC YPrPb RGB 720x480i 60 Hz SMPTE 253M 720x576i 50Hz 1280x720p 50 59 94 60 Hz 1920x1080i 50 59 94 60 Hz SMPTE 240M 1920x1080psf 25 29 97 30 Hz 1920x1080p 23 97 24 25 29 94 30 Hz HDMI 720x480i 59 94 60 Hz 720x576i 50Hz 720x480p 59 94 60 Hz 720x576p 50Hz 1280x720p 50 59 94 60 Hz 1920x1080i 50 59 94 60 Hz 1920x1080psf 25 29 97 30 Hz 1920...

Page 40: ...inches Weight 2710g 6 0lbs Power Consumption 31W Contrast ration Viewing angle Brightness Max 600 1 80 H 65 V 1000Nits 12 HD Monitor SuperBright Dimensions l x h x d 298 x 255 x 90 mm 11 7 x 10 0 x 3 4 inches Weight 3500g 7 72lbs Power Consumption 34W Contrast ration Viewing angle Brightness Max 600 1 80 H 60 80 V 1000Nits 15 HD Monitor SuperBright 15 HD Monitor Studio Dimensions l x h x d 344 x 3...

Page 41: ...re sold AS IS without warranty of any kind by Transvideo including any implied warranty regarding merchantability or fitness for a particular purpose The manufacturer or producer gives the sole warranty with respect to such non transvideo brand items Thereof Transvideo shall have no responsibility under this limited warranty for use of Transvideo product in conjunction with incompatible equipment ...

Page 42: ... LIABLE FOR LOSS OF REVENUES OR PROFITS EXPENSE FOR SUBSTITUTE EQUIPMENT OR SERVICE STORAGE CHARGES LOSS OF DATA OR ANY OTHER SPECIAL INCIDENTAL OR CONSEQUENTIAL DAMAGES CAUSED BY THE USE MISUSE OR INABILITY TO USE THE PRODUCT REGARDLESS OF THE LEGAL THEORY ON WHICH THE CLAIM IS BASED AND EVEN IF TRANSVIDEO HAS BEEN ADVISED OF THE POSSIBILITY OF SUCH DAMAGES NOR SHALL RECOVERY OF ANY KIND AGAINST ...

Page 43: ...NOTES Operator Manual Rev 3 5 Page 43 ...

Page 44: ...Rev 3 5 April 2014 751TS0027 TRANSVIDEO S A Zone Industrielle F 27135 Verneuil sur Avre Tel 33 2 3232 2761 Fax 33 2 32 601479 Email info transvideo eu http www transvideo eu http www hd4dp com ...

Reviews: