background image

RT-SVX24J-EN

21

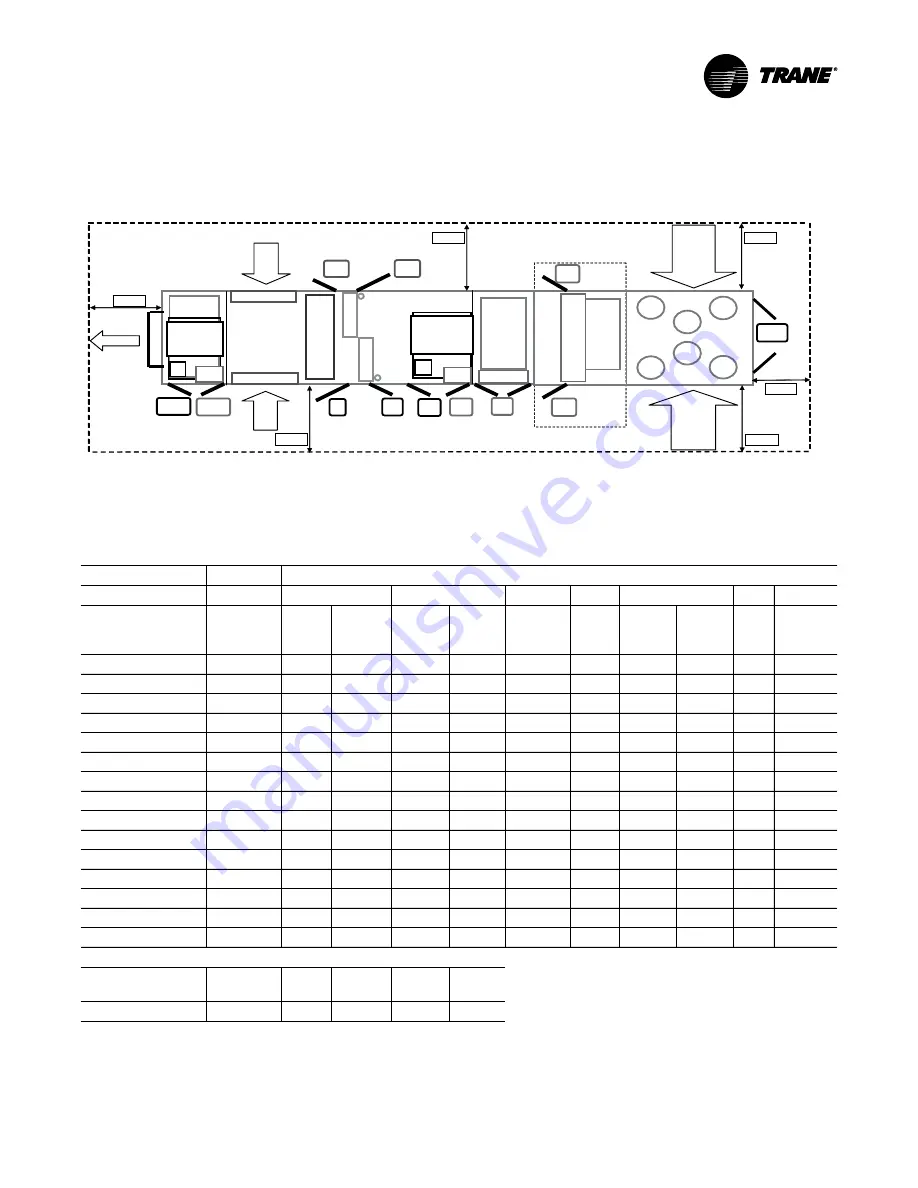
Unit Clearances

Figure 10.

Minimum required clearance

(a)

(a) Unit drawing is representative only and may not accurately depict all models.

Filters

VFD

VFD

Heat

Rtn/Exh

Mtr

Rtn/Exh

VFD

Evp

(F)

Fltr

(F)

Sup

Mtr

Sup
VFD

Fltr

(R)

Evp

(R)

Heat

(L&R

Option

Option

As Req.

As Req.

As Req.

Std

Std

Std

Std

Blank Section

Final 

Filter

Fnl
Fltr 

As Req.

Fnl
Fltr 

As Req.

Ctrl Box

(L&R)

Std

Outside

Air

Outside

Air

  Exhaust

Condenser

Condenser

Exh

AH  R

CBox

AH  L

Cond L

Cond R

Left Side

Table 4.

Minimum required clearance

Unit Option Selection (Door Swing 

Ft. and In.

)

Standard

VFD

Two-side Access

Door Location

Availability 90-118 120-162

Return/ 
Exhaust Supply

Heat

Reheat 90-118 120-162 

Final 

Filter

Energy 

Recovery

Exhaust/Ret Motor

Std

2' 2"

2' 2"

*

*

*

*

*

*

*

Exhaust/Ret VFD

As Req.

*

*

2' 2"

*

*

*

*

*

*

ERW Fltr

(a)

 (L & R) (F)

Option

*

*

*

*

*

*

*

*

*

2' 2"

ERW Fltr

(a)

 (L & R) (R)

Option

*

*

*

*

*

*

*

*

*

2' 2"

Filter (Front)

Std

2' 8"

2' 8"

*

*

*

*

*

*

*

Filter (Rear)

Option

*

*

*

*

*

*

2' 2"

2' 8"

*

Evap (Front)

Std

2' 2"

2' 2"

*

*

*

*

*

*

*

Evap (Rear)

Std

2' 8"

*

*

*

*

*

*

*

*

or Evap (Rear)

Option

*

*

*

*

*

2' 2

*

2' 2"

*

Supply Motor

Std

2' 8"

2' 8"

*

*

*

*

*

*

*

Supply VFD

As Req.

*

*

*

2' 2"

*

*

*

*

*

Heat (Left & Right)

As Req.

*

*

*

*

2' 2"

*

*

*

*

Final Filter (Front)

As Req.

*

*

*

*

*

*

*

*

2' 2"

Final Filter (Rear)

As Req.

*

*

*

*

*

*

*

*

2' 2"

Control Box (L & R)

Std

3' 2"

3' 2"

*

*

*

*

*

*

*

Minimum Required Clearance (Ft.)

AH_L

AH_R

Exh

Cond_L Cond_R

Control 

Box

8'

8'

8'

8'

8'

6'

(a) See Unit Dimensions for Energy Recovery Wheel location.

Summary of Contents for SEHJ090-162

Page 1: ... altered equipment by an unqualified person could result in death or serious injury When working on the equipment observe all precautions in the literature and on the tags stickers and labels that are attached to the equipment IntelliPak II Commercial Single Zone Rooftop Air Conditioners with CV VAV SZVAV or RR Controls August 2013 RT SVX24J EN Installation Operation and Maintenance F0 and later d...

Page 2: ...it owner for use by maintenance personnel These units are equipped with electronic Unit Control Modules UCM Refer to the Startup and Test Mode procedures within this Installation Operation and Maintenance manual and the latest edition of the appropriate programming manual for Constant Volume CV Rapid Restart RR Variable Air Volume VAV or Single Zone Variable Air Volume SZ VAV applications before a...

Page 3: ...the appropriate service literature ships inside the control panel of each unit It is important that periodic maintenance be performed to help assure trouble free operation Should equipment failure occur contact a qualified service organization with qualified experienced HVAC technicians to properly diagnose and repair this equipment Note Do Not release refrigerant to the atmosphere If adding or re...

Page 4: ...stalled Control Wiring 63 Requirements for Electric Heat Units 63 Requirement for Gas Heat 63 Requirements for Hot Water Heat 63 Requirements for Steam Heat 63 O A Pressure Sensor and Tubing Installation 63 Condensate Drain Connections 63 Units with Gas Furnace 64 Removing Compressor Assembly Shipping Hardware 64 Removing Supply and Exhaust Fan Shipping Channels 64 Spring Isolators 64 Remove Evapo...

Page 5: ...ith or without Variable Frequency Drive 118 Airside Pressure Drop Standard Evaporator Coil 120 Exhaust Fan Performance 122 Return Fan Performance 123 Component Static Pressure Drops 125 Pressure Curves 134 Components 143 Standard Unit without Energy Recovery Wheel 143 Standard Unit with Energy Recovery Wheel 146 Energy Recovery Wheel ERW 151 Service and Repair 156 Seal Adjustment 158 Compressor St...

Page 6: ...4 Two Piece Unit w o Blank Section 5 Two Piece Unit w 4 Blank Section 6 Two Piece Unit w 8 Blank Section 7 Three Piece unit w o Blank Section 8 Three Piece Unit w 4 Blank Section 9 Three Piece Unit w 8 Blank Section DIGIT 13 AIRFLOW DIRECTION 1 Downflow Supply Upflow Return 2 Downflow Supply Horiz End Return 3 Downflow Supply Horiz Right Return 4 Right Side Horiz Supply Upflow Return 5 Right Side ...

Page 7: ... 90 95 Low Pressure Drop Cartridge w Prefilters C 90 95 Cartridge Filters w Prefilters D 90 95 HighTemp Cartridge w Prefilters E HEPA w Prefilters F HighTemp HEPA w Prefilters DIGIT 25 ENERGY RECOVERY WHEEL 0 None 1 Low CFM ERW w Bypass Defrost 2 Standard CFM ERW w Bypass Defrost DIGIT 26 UNIT MOUNTED POWER CONNECTION SELECTION A Terminal Block B Non Fused Disconnect C Non Fused Disconnect w Power...

Page 8: ...GIT 37 SERVICE ENHANCEMENTS 0 Single Side Access Door A Dual Side Access Door B Single Side Access Doors Marine Lights C Dual Side Access Doors Marine Lights DIGIT 38 MISCELLANEOUS OPTIONS 0 None 1 Belt Guards 2 Burglar Bars 3 Belt Guards Burglar Bars Tip EXAMPLE Model number SXHJ10540AA715MFDE81 D1100A1BA1000AA1A1 describes a unit with the following characteristics DX Cooling No Heat Extended Cas...

Page 9: ...curb and temporary heat is provided in the building Isolate all side panel service entrances and base pan openings e g conduit holes S A and R A openings and flue openings from the ambient air until the unit is ready for startup Note Do not use the unit heater for temporary heat without first completing the startup procedure detailed under Unit Startup p 96 Trane will not assume any responsibility...

Page 10: ...Talk Communication Interface for IntelliPak LH Left hand MCM Multiple compressor module MDM Modulating Dehumidification Module MPM Multipurpose module MWU Morning warm up NSB Night setback O A Outside air psig Pounds per square inch gauge pressure PTFE Polytetrafluoroethylene Teflon R A Return air RAH Return air humidity RH Right hand RHV Reheat valve RPM Revolutions per minute RTM Rooftop module ...

Page 11: ...d during the ventilation operation If more than one ventilation sequence is activated the one with the highest priority is initiated Interprocessor Communications Board IPCB Optional used with the Optional Remote Human Interface The Interprocessor Communication Board expands communications from the rooftop unit UCM network to a Remote Human Interface Panel DIP switch settings on the IPCB module fo...

Page 12: ... control as well as the Reheat Pumpout Coil Relay output The Modulating Dehumidification control algorithm provides control requests to the MDM to accomplish proper Dehumidification control Ventilation Control Module VCM The Ventilation Control Module VCM is located in the filter section of the unit and is linked to the unit UCM network Using a velocity pressure sensing ring located in the outside...

Page 13: ...rn air temperature and compares it to the outdoor temperature to establish which temperature is best suited to maintain the cooling requirements It is mounted in the return air section and is connected to the ECEM Leaving EvaporatorTemperature Sensor An analog input device used with CV andVAV applications that monitors the refrigerant temperature inside the evaporator coil to prevent coil freezing...

Page 14: ... will trip and interrupt the power supply to the motors if the current exceeds the breaker s must trip value The rooftop module RTM will shut all system functions Off when an open fan proving switch is detected Low Pressure Control Low Pressure Control is accomplished using a binary input device on CV andVAV applications LP cutouts are located on the suction lines near the scroll compressors The L...

Page 15: ...ssor lockout the compressors are not allowed to operate if the temperature of the outside air falls below the lockout setpoint When the temperature rises 5 F above the lockout setpoint the compressors are allowed to operate The factory preset is 50 F These compressors come equipped with a protection module that monitors phase loss phase sequencing and motor temperature Space PressureTransducer An ...

Page 16: ...ply to the compressors if the current exceeds the breakers must trip value During a request for compressor operation if the Compressor Module detects a problem outside normal parameters it turns any operating compressor s on that circuit Off locks out all compressor operation for that circuit and initiates a manual reset diagnostic compressor trip Constant Volume CV Units ZoneTemperature Cooling R...

Page 17: ...t the heat will turn off when the occ zone heat setpoint is reached but it will stay in DWU mode and cycle the heat to maintain setpoint Unoccupied Heating ZoneTemperature When aVAV unit is equipped with gas electric or hydronic heat and is in the unoccupied mode the zone temperature will be controlled to within the customer specified setpoint deadband During an unoccupied mode for aVAV unit the V...

Page 18: ... panels and customer binary contacts to satisfy the applicable request for economizing mechanical cooling heating and ventilation Figure 9 illustrates the typical location of each designated module Figure 7 Unit component layout and ship with locations Return Exhaust Fan Outside Air Dampers Supply Fan Condenser Fans Compressor Section Heating Section Exhaust Damper Hood Evap Coil Evap Coil Control...

Page 19: ...utput at 0VDC the fan speed output is 37 22Hz from theVFD by default and at 10VDC the fan speed output is 100 60Hz The control scales the 0 10VDC VFD output from the RTM linearly to control between the 37 100 range The VFD will modulate the supply fan motor speed accelerating or decelerating as required to maintain the zone temperature to the zone temperature setpoint When subjected to high ambien...

Page 20: ...The Supply fan speed during staged heat control will be forced to 100 as on normal CV units Occupied Heating Operation Occupied heating operation has two separate control sequences staged and modulated All staged heating types will drive the supply fan to maximum flow and stage heating to control to the Zone Heating Setpoint For units with Hydronic and Gas heat modulated SZVAV Heating On an initia...

Page 21: ...n Selection Door Swing Ft and In Standard VFD Two side Access Door Location Availability 90 118 120 162 Return Exhaust Supply Heat Reheat 90 118 120 162 Final Filter Energy Recovery Exhaust Ret Motor Std 2 2 2 2 Exhaust Ret VFD As Req 2 2 ERW Fltr a L R F Option 2 2 ERW Fltr a L R R Option 2 2 Filter Front Std 2 8 2 8 Filter Rear Option 2 2 2 8 Evap Front Std 2 2 2 2 Evap Rear Std 2 8 or Evap Rear...

Page 22: ...tside air intake 2 Cooling tower should be 5 feet above or 20 feet away from the outside air intake For additional information see 2007 ASHRAE Handbook HVAC Applications page 44 4 Figure 11 Multiple unit placement Outdoor Air Intake Outdoor Air Intake Exhaust Air Outdoor Air Intake Outdoor Air Intake Exhaust Air Outdoor Air Intake Outdoor Air Intake Exhaust Air Minimum distance between units must ...

Page 23: ...RT SVX24J EN 23 Dimensional Data Figure 12 UnitTop Front View 1 1 4 NPT DRAIN 2X TYP LEFT RIGHT SIDES OF UNIT Detail A ...

Page 24: ... 16 66 269 6 16 N A 63 2 16 139 13 16 143 8 16 120 150 High Heat Gas Models Only None 540 15 16 197 1 16 66 269 6 16 N A 63 2 16 139 13 16 143 8 16 Tonnage Blank Section Unit Height Return Fan Exhaust Fan O P R J K 90 150 None 103 12 16 97 9 16 103 7 16 29 3 16 17 90 150 4 ft 103 12 16 97 9 16 103 7 16 29 3 16 17 90 150 8 ft 103 12 16 97 9 16 103 7 16 29 3 16 17 ONE PIECE Dimensions with Energy Re...

Page 25: ... Heat Gas Models 8 ft 642 7 16 197 1 16 492 1 16 148 6 16 66 269 6 16 481 6 16 N A 120 150 High Heat Gas Models Only None 558 197 1 16 407 10 16 148 6 16 66 269 6 16 396 15 16 N A Tonnage Blank Section Lug Locations Unit Width Unit Height Condenser Side D1 D2 M N O P R 90 None 16 112 7 16 139 13 16 143 8 16 103 12 16 97 9 16 103 7 16 90 4 ft 16 112 7 16 139 13 16 143 8 16 103 12 16 97 9 16 103 7 1...

Page 26: ...475 8 16 121 6 16 66 201 1 16 349 4 16 464 13 16 90 8 ft 647 2 16 256 5 16 523 12 16 121 6 16 66 201 1 16 349 4 16 513 105 None 568 11 16 256 5 16 427 5 16 139 6 16 66 201 1 16 349 4 16 N A 105 4 ft 616 14 16 256 5 16 475 8 16 139 6 16 66 201 1 16 349 4 16 464 13 16 105 8 ft 665 2 16 256 5 16 523 12 16 139 6 16 66 201 1 16 349 4 16 513 120 150 All Units ExceptHigh Heat Gas Models None 642 7 16 293...

Page 27: ...16 139 13 16 143 8 16 103 12 16 97 9 16 103 7 16 120 150 All Units ExceptHigh Heat Gas Models 4 ft 16 139 7 16 139 13 16 143 8 16 103 12 16 97 9 16 103 7 16 120 150 All Units ExceptHigh Heat Gas Models 8 ft 16 139 7 16 139 13 16 143 8 16 103 12 16 97 9 16 103 7 16 120 150 High Heat Gas Models Only None 16 139 7 16 139 13 16 143 8 16 103 12 16 97 9 16 103 7 16 Tonnage Blank Section Return Fan Exhau...

Page 28: ...Gas Models 8 ft 636 11 16 197 1 16 492 1 16 142 10 16 66 269 6 16 481 6 16 N A 128 162 High Heat Gas Models Only None 552 5 16 197 1 16 407 10 16 142 10 16 66 269 6 16 396 15 16 N A Tonnage Blank Section Lug Locations Condenser Side Unit Width Unit Height D1 D2 M N O P R 100 118 None 16 133 11 16 139 13 16 143 8 16 103 12 16 97 9 16 102 12 16 100 118 4 ft 16 133 11 16 139 13 16 143 8 16 103 12 16 ...

Page 29: ...5 16 427 5 16 142 10 16 66 201 1 16 349 4 16 N A 100 118 4 ft 620 3 16 256 5 16 475 8 16 142 10 16 66 201 1 16 349 4 16 464 13 16 100 118 8 ft 668 6 16 256 5 16 523 12 16 142 10 16 66 201 1 16 349 4 16 513 128 162 All Units Except High Heat Gas Models None 636 11 16 293 8 16 492 1 16 142 10 16 66 238 5 16 365 5 16 480 14 16 128 162 All Units Except High Heat Gas Models 4 ft 684 15 16 293 8 16 540 ...

Page 30: ... Gas Models 4 ft 16 133 11 16 139 13 16 143 8 16 103 12 16 97 9 16 102 12 16 128 162 All Units Except High Heat Gas Models 8 ft 16 133 11 16 139 13 16 143 8 16 103 12 16 97 9 16 102 12 16 128 162 High Heat Gas Models Only None 16 133 11 16 139 13 16 143 8 16 103 12 16 97 9 16 102 12 16 Tonnage Blank Section Return Fan Exhaust Fan J K 100 118 None N A 17 100 118 4 ft N A 17 100 118 8 ft N A 17 128 ...

Page 31: ...ft 667 15 16 222 9 16 517 9 16 161 2 16 356 7 16 148 6 16 11 14 16 N A 120 150 High Heat Gas Models Only None 583 8 16 222 9 16 433 2 16 161 2 16 272 148 6 16 11 14 16 N A Tonnage Blank Section Lug Locations Unit Width Air Handler Side Condenser Side C3 C4 C5 C6 D1 D2 M N 90 None 138 9 16 151 6 16 272 339 11 16 16 112 7 16 139 13 16 143 8 16 90 4 ft 138 9 16 151 6 16 272 387 14 16 16 112 7 16 139 ...

Page 32: ...1 E2 F C1 C2 90 None 569 15 16 275 10 16 446 9 16 241 6 16 205 3 16 121 6 16 17 12 16 201 1 16 90 4 ft 618 3 16 275 10 16 494 13 16 241 6 16 253 7 16 121 6 16 17 12 16 201 1 16 90 8 ft 666 6 16 275 10 16 543 241 6 16 301 10 16 121 6 16 17 12 16 201 1 16 105 None 587 15 16 275 10 16 446 9 16 241 6 16 205 3 16 139 6 16 17 12 16 201 1 16 105 4 ft 636 3 16 275 10 16 494 13 16 241 6 16 253 7 16 139 6 1...

Page 33: ...391 5 16 555 4 16 16 139 7 16 139 13 16 143 8 16 120 150 All Units Except High Heat Gas Models 8 ft 252 12 16 263 12 16 391 5 16 603 7 16 16 139 7 16 139 13 16 143 8 16 120 150 High Heat Gas Models Only None 252 12 16 263 12 16 391 5 16 519 1 16 16 139 7 16 139 13 16 143 8 16 Tonnage Blank Section Unit Height Return Fan Exhaust Fan O P R J K 90 None 103 12 16 97 9 16 103 7 16 N A 17 90 4 ft 103 12...

Page 34: ...22 9 16 517 9 16 161 2 16 356 7 16 142 10 16 11 14 16 N A 128 162 High Heat Gas Models Only None 577 12 16 222 9 16 433 2 16 161 2 16 272 142 10 16 11 14 16 N A Tonnage Blank Section Lifting Lug Locations Unit Width Air Handler Side Condenser Side C3 C4 C5 C6 D1 D2 M N 100 118 None 138 9 16 151 6 16 272 339 11 16 16 133 11 16 139 13 16 143 8 16 100 118 4 ft 138 9 16 151 6 16 272 387 14 16 16 133 1...

Page 35: ...Lifting Lug Locations Air Handler Side A B E E1 E2 F C1 C2 100 118 None 591 4 16 275 10 16 446 9 16 241 6 16 205 3 16 142 10 16 17 12 16 201 1 16 100 118 4 ft 639 7 16 275 10 16 494 13 16 241 6 16 253 7 16 142 10 16 17 12 16 201 1 16 100 118 8 ft 687 10 16 275 10 16 543 241 6 16 301 10 16 142 10 16 17 12 16 201 1 16 128 162 All Units Except High Heat Gas Models None 662 3 16 318 15 16 517 9 16 257...

Page 36: ...hree piece unit evaporative condenser continued Table 10 Downflow horizontal airflow configuration dimensions in air cooled AC and evap condenser EC without energy recovery wheel ERW Tonnage Blank Section Gas Heat DOWNFLOW Opening Dimensions Return Opening with or without Exhaust Fan Return Opening with Return Fan X1 Y1 W1 L1 X1 Y1 W1 L1 90 105 100 118 None None 14 13 16 8 14 16 48 3 16 121 15 16 ...

Page 37: ...16 54 12 16 84 15 16 6 5 16 8 3 16 35 3 16 127 2 16 90 105 100 118 None Low Med 9 5 16 10 10 16 54 12 16 84 15 16 6 5 16 8 3 16 35 3 16 127 2 16 90 105 100 118 8 ft Low Med 9 5 16 10 10 16 54 12 16 84 15 16 6 5 16 8 3 16 35 3 16 127 2 16 120 150 128 162 None Low Med 9 5 16 10 10 16 54 12 16 84 15 16 6 5 16 8 3 16 35 3 16 127 2 16 120 150 128 162 8 ft Low Med 9 5 16 10 10 16 54 12 16 84 15 16 6 5 1...

Page 38: ...105 100 118 None None 352 8 16 371 12 16 13 47 14 16 102 8 16 90 105 100 118 4 ft None 400 11 16 420 13 47 14 16 102 8 16 90 105 100 118 8 ft None 448 15 16 468 3 16 13 47 14 16 102 8 16 120 150 128 162 None None 417 4 16 442 11 16 13 47 14 16 102 8 16 120 150 128 162 4 ft None 465 7 16 490 14 16 13 47 14 16 102 8 16 120 150 128 162 8 ft None 513 10 16 539 2 16 13 47 14 16 102 8 16 90 105 100 118 ...

Page 39: ...28 162 8 ft None 512 6 16 537 13 16 10 10 16 54 12 16 84 15 16 90 105 100 118 None Low Med 351 3 16 370 7 16 10 10 16 54 12 16 66 11 16 90 105 100 118 8 ft Low Med 447 10 16 466 14 16 10 10 16 54 12 16 84 15 16 120 150 128 162 None Low Med 415 15 16 441 6 16 10 10 16 54 12 16 66 11 16 120 150 128 162 8 ft Low Med 512 6 16 537 13 16 10 10 16 54 12 16 84 15 16 120 150 128 162 None High 415 15 16 441...

Page 40: ...Dimensional Data 40 RT SVX24J EN Figure 13 Evaporative condenser water connection locations RIGHT SIDE VIEW ...

Page 41: ...ails in 16 603 4 711 4 76 1 4 811 4 46 1 16 48 1 16 613 4 44 Ø3 5 8 Ø1 1 16 Ø 7 8 6 5 16 5 5 16 Marine lights customer supplied power service entrance Unit power External customer connection points Outside edge of base rail 515 8 5311 16 31 11 16 Ø11 2 Bottom View ...

Page 42: ...924 Evaporative Condensing Coil a 4566 4329 4129 4109 4029 Evap Coil Std Cap 1034 1300 1664 1892 2564 Evap Coil Hi Cap 1382 1462 2564 2496 N A Reheat Coil Tubing 292 294 367 367 367 Replaceable Core Filter Driers 26 25 35 35 35 HGBP 46 49 53 53 53 Supply Fan Assembly Supply Fan Fan Board Assembly Low CFM 25 1159 32 1361 32 1361 32 1361 32 1361 Supply Fan Fan Board Assembly Std CFM 36 1490 36 1490 ...

Page 43: ...41 841 Hot Water Heat High 818 818 897 897 897 Filters Filter Rack Throwaway Filters 181 181 191 191 191 Filter Rack Bag Filters 395 395 395 395 395 Filter Rack Cartridge Filters 662 662 662 662 662 Final Filters Bag Filters 392 392 392 392 392 Final Filters Cartridge Filters w 2 pre filter 607 607 607 607 607 Final Filters Cartridge Filters w 4 pre filter 638 638 638 638 638 Final Filters High Te...

Page 44: ...140 150 162 Size Weight Size Weight Size Weight Size Weight Size Weight Table 14 Roof curb weights air cooled AC and evaporative condensing EC Tonnage AC EC Energy Recovery Wheel Blank Section One Piece Unit a Two Three Piece Unit 90 105 100 118 No None 907 1055 90 105 100 118 No 4 ft 988 1136 90 105 100 118 No 8 ft 1069 1217 90 105 100 118 Yes None 1093 1240 90 105 100 118 Yes 4 ft 1174 1321 90 1...

Page 45: ... entry is located at the bottom right hand corner of the control panel Figure 16 p 46 illustrates the location for the electrical entrance through the base in order to enter the control panel If the power supply conduit penetrates the building roof beneath this opening it is recommended that a pitch pocket be installed before the unit is placed onto the roof curb The center line dimensions shown i...

Page 46: ...of Curb 2Pc Table 15 Pitch pocket dimensions in One Piece Two Three Piece One Two or Three Piece Tonnages A1 A2 B1 B2 B3 90 113 8 129 9 1 68 875 73 875 78 875 105 131 8 147 9 1 68 875 73 875 78 875 120 130 150 140 8 156 9 1 68 875 73 875 78 875 100 118 128 14 0 162 N A 135 0 1 68 875 73 875 78 875 Figure 17 Ductwork conversion ...

Page 47: ...ove Panel 1 and Post from the left side Remove gaskets from the base rail flange at the bottom 5 Remove the top duct adapter side duct adapters header and footer in this order from the right side Remove gaskets from post side flanges and the base rail flange at the bottom 6 Assemble gaskets header footer side duct adapters and top duct adapter in this order to the left side See Figure 17 p 46 for ...

Page 48: ...Installation 48 RT SVX24J EN Figure 18 Ductwork conversion ...

Page 49: ...e curb rail while lowering the unit onto the curb Make sure that the gasket on the curb is not damaged while positioning the unit The pedestal simply supports the unit condenser section A cross section of the juncture between the unit and the roof curb is shown in Figure 19 WARNING Heavy Objects Ensure that all the lifting equipment used is properly rated for the weight of the unit being lifted Ea...

Page 50: ...unit rigging one piece unit with four lifting lugs per side a 15 ft min 20 ft min Turnbuckle or Chain Adjustment for each lug Figure 22 Typical unit rigging two piece unit with two lifting lugs per side a Turnbuckle or Chain Adjustment for each lug ...

Page 51: ...24J EN 51 Figure 23 Typical unit rigging two piece unit with three lifting lugs per air handler side a a Turnbuckle or Chain Adjustment required for each lifting point 24 ft min Turnbuckle or Chain Adjustment for each lug ...

Page 52: ...channel and butyl tape to the base rail edge of the evaporator section 8 Remove and discard shipping protection panels and top block off from outside air section 9 Rig and set outside air section onto roof curb using the rail guides as an alignment aid Outside air section must be within 2 0 from the evaporator section 10 Use 0 75 x 24 threaded rod nuts washers and backing plate provided to pull an...

Page 53: ...long the roof seam 17 Attach roof cap over roof seam and butyl tape with screws Figure 25 Rail guide locations Attach rail guides as shown Figure 26 Evaporator section shipping protection removal Discard shipping protection Figure 27 Evaporator section side panel and roof cap removal Save side panels and roof cap for reassembly Discard shipping protection ...

Page 54: ...Installation 54 RT SVX24J EN Figure 28 Evaporator section gasket locations Rail guides Gasket Butyl Tape Figure 29 Outside air section shipping protection removal Discard shipping protection ...

Page 55: ...Installation RT SVX24J EN 55 Figure 30 Base rail connection Threaded rod Lifting lug Backing Plate Figure 31 Roof rail connection Brackets ...

Page 56: ...ing the rail splice bracket as an alignment aid to connect the Low and high side units The Low and high side unit rails should be butted together with a maximum 2 separation 7 Remove the left upper and lower louvered panels and the corner panels on each side to aid in tubing and wiring connections Figure 32 Roof panel splice plate connection Figure 33 Side panel and roofcap reinstallation Apply sp...

Page 57: ...anel shipping position Top cover shipping position Filler panel shipping position Note Remove the filler panels and top cover before putting the Indoor and Outdoor sections together and screw to both Indoor and Outdoor panels on each side as shown in fig 6 Finally the top cover is assembled in space 3 Unconnected tubes 4 ...

Page 58: ...Installation 58 RT SVX24J EN Figure 36 5 Connected tubes 6 install panels Connected tubes 5 6 ...

Page 59: ...being brazed Note Additional care should be taken when brazing near the wire bundle 4 Sweat the copper caps off both the high and low side of the suction and liquid lines of both circuits If present also sweat off the copper caps from hot gas bypass or hot gas reheat lines 5 Clean the joints of weld puddles to avoid insertion problems 6 Cut the appropriate interconnecting tube to a length approxim...

Page 60: ...ure charge for the section of the tubing being worked on 5 Place wet rags on the flow ball valve on the high side when suction tubes are being brazed Note Additional care should be taken when brazing near the wire bundle 6 Sweat the copper caps off both the high and low side of the suction and liquid lines of both circuits 7 Clean the joints of weld puddles to avoid insertion problems 8 Cut the ap...

Page 61: ...h side Figure 39 p 62 Power and Control Wiring Connections Note Complete Power and Control Wiring Connections after the tubing connections are complete 1 Discard the clamps and the wire shield which hold the power and control wires 2 Make the power and the control wire connections and route the wires such that they route straight from the hole at the bottom of the air handler turn at right angles ...

Page 62: ...s as shown in Figure 41 p 64 Ducting attached to the unit should be self supporting Do not use the unit to support the weight of the ducting Install pitch pocket for power supply through building roof If applicable Figure 39 Wire routing and connections Electric Heat Power Wires Routed through the hole at the air handler side end wall Route wires one by one and connect to the electric heat termina...

Page 63: ... All gas piping joints properly sealed Drip leg Installed in the gas piping near the unit Gas piping leak checked with a soap solution If piping connections to the unit are complete do not pressurize piping in excess of 0 50 psig or 14 inches w c to prevent component failure Main supply gas pressure adequate FlueTubes clear of any obstructions Factory supplied flue assembly installed on the unit C...

Page 64: ...aust Fan Shipping Channels Each supply fan assembly and exhaust fan assembly is equipped with spring isolators Shipping channels are installed beneath each fan assembly and must be removed To locate and remove these channels refer to Figure 42 p 65 and use the following procedures Spring Isolators Spring isolators for the supply and or exhaust fan are shipped with the isolator adjusting bolt backe...

Page 65: ...old the bracket with one hand and remove remaining two screws 9 Remove the bracket and all the removed screws from the unit Important Make sure there are no screws remaining in the coil area 10 Reinstall inlet louvers mist eliminators and louvers 11 Check that the direction of arrow on the inlet louver is correct Figure 42 Removing fan assembly shipping hardware Figure 43 Removing compressor shipp...

Page 66: ...tall the provided L mounting bracket as shown in the figure 3 Place the sensor mounting slotted bracket to the L mounting bracket with the slot located to the top 4 Install the sensor vertically to the slotted bracket and secure it with provided bolt and nut 5 Connect one end of factory provided tubing to the top port of sensor and pass it through the two slots in the mount and the other end to th...

Page 67: ...iner with a 80 to 100 mesh screen is required The inlet line should be flushed prior to connection to the unit whether or not there is a strainer Note Backflow preventer is field installed and should only be installed by qualified personnel Water Drain Schedule 80 PVC pipe of 1 is normally adequate for sump water drain Periodically the sump is emptied and flushed to eliminate accumulated dirt debr...

Page 68: ...ble potential flame outages and possible gas valve damage If a single pressure regulator serves more than one rooftop unit it must be sized to ensure that the inlet gas pressure does not fall below 7 w c with all the furnaces operating at full capacity The gas pressure must not exceed 14 w c when the furnaces are off 9 Provide adequate support for all field installed gas piping to avoid stressing ...

Page 69: ...t cubic feet hr and the total length when determining the appropriate gas pipe size 3 Obtain the Specific Gravity and BTU Cu Ft from the gas company 4 The following example demonstrates the considerations necessary when determining the actual pipe size Example A 40 pipe run is needed to connect a unit with a 850 MBH furnace to a natural gas supply having a rating of 1 000 BTU Cu Ft and a specific ...

Page 70: ... tube sections together and center the pipe clamp over joint 6 Using the pre punch hole in the flue assembly extension and the vertical support install the appropriate number of mounting brackets Refer to the installation instructions that ship with the flue assembly Figure 47 Modulating 850 2500 Mbh heaters and two stage 1800 2500 Mbh heaters natural gas train Ignition control board Ignition tran...

Page 71: ... K 1 7 8 11 5 8 W D 2 5M 1 8M W 16 1 8in D 14 11 16in 1 1M 0 8M W 9 15 16in D 9 12 16in H C 21 19 20 7 16 B Horizontal gas pipe inlet Pipe type Black pipe sch 40 Condensate drain outlet Pipe type cpvc Hole at the base Ø3 Unit end plane Edge of mist eliminator Top View Side View ...

Page 72: ... 214 11 16 327 14 16 330 1 16 339 7 16 90 118 ERW 1 2 Pc 1800 164 11 16 351 5 16 362 10 16 371 1 16 90 118 ERW 1 2 Pc 1100 164 8 16 360 6 16 361 12 16 371 1 16 90 118 ERW 1 2 Pc 850 164 8 16 360 6 16 361 12 16 371 1 16 120 162 ERW 1 2 Pc 2500 219 13 16 417 7 16 433 14 16 435 14 16 120 162 ERW 1 2 Pc 1800 220 416 2 16 427 7 16 435 14 16 120 162 ERW 1 2 Pc 1100 219 13 16 424 5 16 426 8 16 435 14 16 ...

Page 73: ... provide sufficient water velocity 9 Install a Globe type valve in the Bypass line as shown in Figure 51 on page 75 Steam Heat Units Steam heating coils are factory installed inside the heater section of the unit The coils are pitched within the units to provide the proper condensate flow from the coil To maintain the designed degree of pitch for the coil the unit must be level Once the unit is se...

Page 74: ...e stacked together and must be piped in a parallel arrangement The steps listed below should be used in addition to the previous steps Figure 52 p 75 illustrates the recommended piping configuration for the steam coils 13 Install a strainer in each return line before the steam trap 14 Trap each steam coil separately as described in steps 10 and 11 to prevent condensate backup in one or both coils ...

Page 75: ...Installation RT SVX24J EN 75 Figure 51 Hot water coil piping Figure 52 Steam coil piping ...

Page 76: ...igure 54 p 77 Use the information provided in Table 24 p 80 and the Power Wire Sizing Protection Device Equations to determine the appropriate wire size and Maximum Over current Protection for the heaters unit Note Each power supply must be protected from short circuit and ground fault conditions To comply with NEC protection devices must be sized according to the Maximum Over current Protection M...

Page 77: ...mum Circuit Ampacity MCA the Maximum Over current Protection MOP device the Recommended Dual Element fuse size RDE 1 Locationfortheelectricalserviceentranceisillustrated in Figure 54 p 77 Complete the unit power wiring connections onto either the main terminal block or the factory mounted non fused disconnect switch inside the unit control panel Refer to the customer connection diagram that shippe...

Page 78: ... wiring Figure 56 Customer connection wire range Note Non fused disconnect switch size is calculated by selecting the size greater than or equal to 1 15 X sum of unit loads See unit literature for unit load values See following page for circuit breaker sizing ...

Page 79: ...cooling mode use the equations given in Set 1 Then calculate the MCA MOP and RDE values as if the unit were in the heating mode as follows Keep in mind when determining LOADS that the compressors don t run while the unit is in the heating mode MCA 1 25 x LOAD1 LOAD2 LOAD4 LOAD3 The nameplate MCA value will be the larger of the cooling mode MCA value or the heating mode MCA value calculated above M...

Page 80: ...133 7 265 166 318 8 255 252 2 300 188 360 8 288 7 285 6 Table 25 Electrical service sizing data control power transformer heating mode only Nominal Tons Digit 2 Unit Function Voltages 460 575 380 FLA FLA FLA 90 150 100 162 E L S X 3 3 4 90 105 100 118 F 850 MBH 4 4 5 90 105 100 118 F 1100 MBH 4 4 5 90 105 100 118 F 1800 MBH 4 4 5 120 150 128 162 F 1100 MBH 4 4 5 120 150 128 162 F 1800 MBH 4 4 5 12...

Page 81: ...ocations provided on the unit and Table 33 p 81 for conductor sizing guidelines and e Use standard copper conductor thermostat wire unless otherwise specified f Ensure that the wiring between the controls and the unit termination point does not exceed two and a half 2 5 ohms conductor for the length of the run Note Resistance in excess of 2 5 ohms per conductor can cause deviations in the accuracy...

Page 82: ...eriod The occupied cooling setpoint ranges between 40 and 80 F The warm up setpoint ranges between 50 and 90 F with a 2 degree deadband The Unoccupied cooling setpoint ranges between 45 and 98 F The heating setpoint ranges between 43 and 96 F Theliquidcrystaldisplay LCD displayszonetemperature temperature setpoints week day time and operational mode symbols The DIP switches on the subbase are used...

Page 83: ...d for any Emergency Override sequence Each Emergency Override sequence commands the unit operation as follows 1 PRESSURIZE_EMERG Supply Fan On Supply Fan VFD Open Max if so equipped Exhaust Fan Off Exhaust Dampers Closed if so equipped OA Dampers Open Return Damper Closed Heat All heat stages off Mod Heat output at 0VDC Occupied Unoccupied VAV box output Energized VOM Relay Energized if so equippe...

Page 84: ... equipped OA Bypass Dampers Open if so equipped Exhaust Bypass Dampers Open if so equipped 2 PRESSURIZE sequence B Perhaps a positively pressurized space is desired instead of a negatively pressurized space In this case the supply fan should be turned on with VFD at 100 speed and exhaust fan should be turned off Supply Fan On Supply Fan VFD Max if so equipped Exhaust Fan Off Exhaust Dampers Closed...

Page 85: ... proper connection terminals in the unit control panel The switch must be rated for 12 ma 24 VDC minimum External Stop Input A normally closed N C switch wired to the RTM may be used during emergency situations to shut down all unit operations When opened an immediate shutdown occurs When the contacts are closed the unit will resume normal operation after minimum delays have occurred Refer to the ...

Page 86: ...units without an economizer Refer to the appropriate illustrations in Figure 58 p 88Figure 59 p 89 for the proper connection terminals in the unit control panel Refer to Table 34 p 85 forTemperature vs Resistance coefficient Generic Building Automation System The Generic BuildingAutomation System GBAS module allows a non Trane building control system to communicate with the rooftop unit and accept...

Page 87: ...Installation RT SVX24J EN 87 Figure 57 Typical field wiring diagram for 90 to 162 ton CV control options ...

Page 88: ...Installation 88 RT SVX24J EN Figure 58 Typical ventilation override binary output for 90 to 162 ton CV control options ...

Page 89: ...Installation RT SVX24J EN 89 Figure 59 Typical field wiring diagram for 90 to 162 ton VAV control options ...

Page 90: ...Installation 90 RT SVX24J EN Figure 60 Typical field wiring diagram notes for 90 to 162 ton VAV and CV control options ...

Page 91: ...Installation RT SVX24J EN 91 Figure 61 Typical GBAS analog input wiring diagram for 90 to 162 ton CV and VAV control options Note See Figure 64 p 99 ...

Page 92: ...Setpoint 0 5 to 4 5 VDC 0 5 to 9 5 VDC 50 to 90 F Econ Dry Bulb Enable Setpoint 0 5 to 4 5 VDC 0 5 to 9 5 VDC 50 to 140 F SA_Reheat_Setpoint 0 5 to 4 5 VDC 0 5 to 9 5 VDC 60 to 90 F Minimum Position Setpoint 3 0 5 to 4 5 VDC 0 5 to 9 5 VDC 0 to 100 Occ Dehumidification Setpoint 0 5 to 4 5 VDC 0 5 to 9 5 VDC 40 to 65 Unocc Dehumidification Setpoint 0 5 to 4 5 VDC 0 5 to 9 5 VDC 40 to 65 Occ Humidif...

Page 93: ...to be assembled later Rig and set the high side unit on roof curb pedestal Lift the unit and position it over the pedestal Use the rail splice bracket as an alignment aid to connect the Low and high side units The Low and high side unit rails should be butted together with a maximum 2 preferably 1 separation Remove the left upper and lower louvered panels of the high side unit as well as the corne...

Page 94: ...piping through the base of the unit into the heating section Install the factory supplied 2 way modulating valve Complete the valve actuator wiring Install 1 2 15 degree swing check vacuum breaker s at the top of each coil section Vent breaker s to the atmosphere ormergewithreturn mainatdischargeside of steam trap Position the steam trap discharge at least 12 below the outlet connection on the coi...

Page 95: ...ery Wheel Verify that the wheel turns freely though a full rotation Confirm that all wheel segments are fully engaged in the wheel frame and that the segment retainers are completely fastened Confirmthesealadjustmentandproperbelttrackingon the wheel rim ...

Page 96: ...itioning betweenactivecoolingstages compressorsmayenergize prior to the supply fan reaching the minimum speed for the associated step 1 2 Stage DX Cooling The minimum fan speed for units with 2 stages of DX Cooling will be 37 of the unit s full airflow capacity At Stage 1 of DX Cooling the minimum Fan Speed will be 37 and at Stage 2 of DX Cooling the Fan Speed will be at a minimum of 67 2 3 Stage ...

Page 97: ... greater than 40 F on units without sump heat Once the fill solenoid is energized the sump will begin to fill The minimum water level switch will close and the fill relay will be de energized The sump water temperature sensor is invalid unless the minimum water level switch is closed If the sump water temperature is less than the setpoint default is 38 F the sump heater will be energized until the...

Page 98: ...enoid valve closed If the minimum water level switch opens during a blowdown cycle the unit will de energize the sump pump in order to protect the compressors and sump heater from insufficient water levels Once the water level reaches the minimum level input and this input closes for 10 seconds the compressors and sump heater operations will be allowed to restart Evaporative Condenser Drain Valve ...

Page 99: ...or will have the conductivity sensor installed into the inch tee with the other tees plugged For all other units A B and C will be plugged see Figure 65 Ensure the ball valve is in the open position when water treatment is being operated in the system to make sure water flows through the tree and transports treatment to the unit sump Conductivity Controller Upon startup the conductivity controller...

Page 100: ...ow key to enter the edit mode 13 Adjust the conductivity on the controller to match the actual conductivity rating of the liquid 14 Press the ENTER key to save the conductivity rating and return to the CALIBRATE menu 15 When finished calibrating the controller press the UP and DOWN key simultaneously to return to normal operating mode Procedure to set purge setpoints on the conductivity controller...

Page 101: ...e preheat binary output used to control a field installed heater The output will be deactivated when the temperature rises 5 above the Preheat Actuate Temperature Setpoint When the optional CO2 sensor is installed and DCV is enabled the OA damper will be modulated to control CO2 concentrations If the CO2 concentration is greater than the Design Minimum CO2 Setpoint the OA damper will be opened to ...

Page 102: ...ed for cooling mode Outdoor AirTemp is less then 40 F or greater the 100 F Humidity Sensor Failure For VAV units in occupied dehumidification will be disabled if space temp is less than the Dehumid Override Low Zone Setpoint or higher than the Dehumid Override High Zone Setpoint If dehumidification is inactive it will not be allowed until it space temp rises higher than the Dehumid Override Low Zo...

Page 103: ...olled to discharge air temperature The damper is modulated to keep the supply air temp at the SupplyAir Heating setpoint for VAV control or for CV control supply air temp will be controlled to a calculated Supply Air Heat Setpoint based on conditions in the space If the wheel is active supplemental heat electric hydronic gas control algorithms will be disabled until the exhaust air bypass damper i...

Page 104: ... Air Intake Damper Mist Eliminator not shown Exhaust Air Leaving Energy Recovery Wheel Path to Exhaust Fan Building Return Air Outside Air Bypass Damper Unit Return Airflow Exhaust Air Bypass Damper Energy Recovery Wheel Conditioned Outside Air Return Air Damper Path to Filters Coil ERW Unit Entering Air Mixed Return Air Conditioned Outside Air ...

Page 105: ...l operate in the low heat mode until an additional call for heat is established by closing the contacts on the Heat Module The sequencing time delay relay will energize the combustion blower motor relay which switches the combustion blower motor to high speed and energizes the 2nd stage solenoid on the gas valve after approximately 60 seconds If the flame rod does not detect a pilot flame within t...

Page 106: ...Modulating Gas heat is available during both occupied and unoccupied operation When there is a call for heat the heat module energizes the combustion blower which causes the combustion air flow switch to close The ignition control board will energize providing that the indoor air flow switch high limit and low and high pressure gas switches are closed The ignition control board then causes the com...

Page 107: ...y be opened further to satisfy the cooling request If the space CO2 level is greater than the DCV Minimum CO2 Setpoint and less than the Design Minimum CO2 Setpoint the outdoor air damper position is modulated proportionally to the space CO2 level relative to a target position between the DCV Minimum CO2 Setpoint and the Design Minimum CO2 Setpoint If there is a call for economizer cooling the dam...

Page 108: ...l of the procedures described in this section before starting the unit for the first time Turn the field supplied disconnect switch located upstream of the rooftop unit to the Off position Turn the 115 volt control circuit switch 1S2 to the Off position It is located in the secondary of the 1T1 transformer Turn the 24 volt control circuit switch 1S3 to the Off position It is located in the seconda...

Page 109: ...Imbalance Excessive three phase voltage imbalance between phases will cause motors to overheat and eventually fail The maximum allowable voltage imbalance is 2 Measure and record the voltage between phases 1 2 and 3 and calculate the amount of imbalance as follows Voltage Imbalance where AV Average Voltage V1 V2 V3 Line Voltage Readings VD Line Voltage reading that deviates the farthest from the a...

Page 110: ... OFF OFF OFF OFF OFF OFF 1B 1C OFF OFF OFF 1A Off 1B On 1C On 2A Off 2B Off 2C Off OFF OFF OFF OFF OFF OFF OFF 2A OFF OFF OFF 1A Off 1B Off 1C Off 2A On 2B Off 2C Off OFF OFF OFF OFF OFF OFF OFF 2B 2C OFF OFF OFF 1A On 1B Off 1C Off 2A Off 2B On 2C On OFF OFF OFF OFF OFF OFF OFF 120 150 Ton Air Cooled 1A OFF OFF OFF 1A On 1B Off 1C Off 1D Off 2A Off 2B Off 2C Off 2D Off OFF OFF OFF OFF OFF OFF OFF...

Page 111: ...Stage 1 ON ON OFF ALL OFF ON OFF OFF OFF OFF OFF OFF Stage 2 ON ON OFF ALL OFF OFF ON OFF OFF OFF OFF OFF Stage 3 ON ON OFF ALL OFF OFF OFF ON OFF OFF OFF OFF HYDRONIC HEAT OFF OFF OFF ALL OFF 100 Select OFF OFF OFF OFF OUTSIDE AIR DAMPERS OFF OFF OFF ALL OFF 100 Select OFF OFF OFF OFF EXHAUST DAMPERS OFF OFF OFF ALL OFF 100 Select OFF OFF OFF OFF EVAP COND Sump Pump OFF OFF OFF ALL OFF 100 Select...

Page 112: ...t OFF OFF 1C 1D Closed Closed 0 Default OFF OFF 2A Closed Closed 0 Default OFF OFF 2B 2C Closed Closed 0 Default OFF OFF 2D Closed Closed 0 Default OFF OFF 100 118 128 140 162 Ton Evaporative Cooled 1A Closed Closed 0 Default OFF OFF 2A Closed Closed 0 Default OFF OFF SUPPLY FAN Closed Closed 100 Unocc OFF OFF RETURN FAN Closed Closed 100 Default OFF OFF EXHAUST FAN Closed Closed 100 Default OFF O...

Page 113: ...aust and Condenser fans can be programmed to be On if desired Refer to Figure 69 p 114 for the condenser fan locations and the Human Interface designator 6 Once the configuration for the Fans is complete press the NEXT key until the LCD displays the Start test in __Sec screen Press the key to designate the delay before the test is to start This service test will begin after theTEST START key is pr...

Page 114: ...eldsupplieddisconnectswitchupstream of the rooftop unit Lock the disconnect switch in the open position while working at the unit c Interchange any two of the fan motor leads at the contactor for each fan that is rotating backwards WARNING Hazardous Voltage Disconnect all electric power including remote disconnects before servicing Follow proper lockout tagout procedures to ensure the power can no...

Page 115: ...heoretical BHP Actual Motor Amps X Motor HP Motor Nameplate Amps c Plot this data onto the appropriate Fan Performance Curve beginning with Figure 62 p 98 Where the two points intersect read straight down to the CFM line Use this data to assist in calculating a new fan drive if the CFM is not at design specifications An alternate method with less accuracy is to measure the static pressure drop acr...

Page 116: ...l This can be accomplished by a drilling a small hole through the unit casing on each side of the coil Note Coil damage can occur if care is not taken when drilling holes in this area b Measure the difference between the pressures at both locations c Plot this value onto the appropriate pressure drop curve beginning with Figure 71 p 118 Use the data in Table 40 p 125 Component Static Pressure Drop...

Page 117: ... economizer 1 Open the Human Interface access door located in the unit control panel and press the SERVICE MODE key to display the first service screen Refer to the latest edition of the appropriate programming manual for applications for the SERVICETEST screens and programming instructions 2 Use Table 37 p 110 to program the following system components for Economizer operation by scrolling throug...

Page 118: ...4J EN Performance Data Supply Fan with or without Variable Frequency Drive Figure 70 Supply fan performance LOW CFM 90 100 tons 25 supply fan Figure 71 Supply fan performance STANDARD CFM 90 100 and 105 118 tons 36 supply fan ...

Page 119: ...Unit Startup RT SVX24J EN 119 Figure 72 Supply fan performance LOW CFM 105 162 ton 32 supply fan Figure 73 Supply fan performance STANDARD CFM 120 162 tons 40 supply fan ...

Page 120: ...side Pressure Drop Standard Evaporator Coil Figure 74 Wet airside pressure drop at 0 075 lb cu ft 90 162 tons standard evaporator coil Figure 75 Dry airside pressure drop at 0 075 lb cu ft 90 162 tons standard capacity evaporator coil ...

Page 121: ...up RT SVX24J EN 121 Figure 76 Wet airside pressure drop at 0 075 lb cu ft 90 140 tons high capacity evaporator coil Figure 77 Dry airside pressure drop at 0 075 lb cu ft 90 140 tons high capacity evaporator coil ...

Page 122: ...Unit Startup 122 RT SVX24J EN Exhaust Fan Performance Figure 78 Exhaust fan performance LOW CFM 90 100 tons Figure 79 Exhaust fan performance STANDARD CFM 90 100 tons LOW CFM 105 162 tons ...

Page 123: ...Unit Startup RT SVX24J EN 123 Return Fan Performance Figure 80 Exhaust fan performance STANDARD CFM 105 162 tons Figure 81 Return fan performance LOW CFM 90 162 tons ...

Page 124: ...Unit Startup 124 RT SVX24J EN Figure 82 Return fan performance STANDARD CFM 90 118 tons Figure 83 Return fan performance STANDARD CFM 120 162 tons ...

Page 125: ...21000 0 09 0 12 0 18 0 23 0 04 0 05 0 10 0 17 26000 0 13 0 16 0 25 0 32 0 06 0 09 0 15 0 26 31000 0 17 0 21 0 34 0 43 0 08 0 12 0 22 0 36 36000 0 21 0 27 0 43 0 55 0 10 0 17 0 30 0 49 41000 0 26 0 34 0 53 0 67 0 12 0 22 0 39 0 64 46000 0 32 0 40 0 64 0 81 0 15 0 28 0 49 0 80 51000 0 38 0 48 0 75 0 95 0 18 0 35 0 61 0 99 54000 0 41 0 52 0 83 1 05 0 20 0 39 0 68 1 11 130 140 23000 0 14 0 18 0 21 0 2...

Page 126: ...36000 0 07 0 00 0 48 0 00 0 57 0 00 0 67 0 33 0 22 0 33 0 24 41000 0 09 0 00 0 62 0 00 0 74 0 00 0 86 0 42 0 28 0 41 0 30 46000 0 11 0 00 0 78 0 00 0 93 0 00 1 09 0 50 0 34 0 50 0 37 51000 0 13 0 00 0 96 0 00 1 15 0 00 1 34 0 60 0 41 0 59 0 44 54000 0 15 0 00 1 07 0 00 1 28 0 01 1 50 0 66 0 45 0 65 0 49 130 140 23000 0 03 0 00 0 20 0 00 0 23 0 01 0 27 0 16 0 10 0 15 0 10 26000 0 03 0 00 0 25 0 00 ...

Page 127: ... 1 15 105 118 19000 0 10 0 27 0 30 0 37 0 27 0 40 0 32 0 40 0 62 0 55 23000 0 11 0 29 0 32 0 39 0 29 0 42 0 34 0 42 0 66 0 58 28000 0 18 0 49 0 49 0 56 0 51 0 61 0 54 0 68 1 01 0 88 33000 0 23 0 61 0 61 0 67 0 65 0 73 0 69 0 86 1 22 1 06 38000 0 28 0 74 0 76 0 78 0 81 0 86 0 86 1 06 43000 0 33 0 89 0 92 0 91 0 98 1 00 1 05 1 30 45000 0 36 0 95 0 99 0 96 1 05 1 06 1 13 1 40 120 128 21000 0 10 0 30 ...

Page 128: ... 2 Hi Temp Prefilter f 150 162 23000 0 10 0 32 0 37 0 44 0 36 0 47 0 40 0 49 0 77 0 68 26000 0 14 0 43 0 47 0 54 0 48 0 58 0 52 0 64 0 97 0 85 30000 0 17 0 55 0 59 0 64 0 62 0 70 0 66 0 82 1 18 1 02 35000 0 21 0 69 0 73 0 76 0 78 0 83 0 82 1 02 1 40 1 20 40000 0 26 0 84 0 89 0 88 0 94 0 97 1 01 1 25 45000 0 30 1 00 1 07 1 02 1 13 1 12 1 22 1 51 50000 0 35 1 17 1 27 1 16 1 33 55000 0 41 1 36 1 55 5...

Page 129: ...2 0 24 1 41 16000 0 27 0 29 20000 0 40 0 42 25000 0 59 0 60 30000 0 80 0 80 33000 0 94 0 94 36000 1 08 1 07 40000 1 30 1 27 105 118 9000 0 09 0 88 0 11 0 79 12000 0 16 1 20 0 19 1 16 14000 0 21 1 42 0 24 1 41 16000 0 27 0 29 19000 0 36 0 39 23000 0 51 0 52 28000 0 71 0 72 33000 0 94 0 94 38000 1 19 1 18 43000 1 46 1 41 45000 1 58 1 52 120 128 9000 0 09 0 78 0 11 0 69 12000 0 16 1 06 0 18 1 02 1500...

Page 130: ...0 36 0 40 23000 0 46 0 49 26000 0 57 0 60 30000 0 72 0 75 35000 0 93 0 97 40000 1 16 1 20 45000 1 40 1 43 50000 1 67 1 69 55000 1 95 1 96 58000 2 12 2 12 Nom Tons CFM Outside Air Bypass Damper Open Outside Air Bypass Damper Closed Exhaust Air Bypass Damper Open Exhaust Air Bypass Damper Closed Standard CFM Energy Recovery Wheel 90 100 8000 0 06 0 54 0 07 0 44 9000 0 08 0 61 0 10 0 53 10000 0 10 0 ...

Page 131: ...56 0 11 0 50 12000 0 14 0 69 0 16 0 63 15000 0 20 0 89 0 23 0 85 18000 0 27 1 10 0 29 1 05 21000 0 35 1 33 0 38 1 28 24000 0 43 1 57 0 47 1 51 26000 0 50 0 54 31000 0 66 0 72 36000 0 84 0 91 41000 1 04 1 11 46000 1 26 1 34 51000 1 49 1 56 54000 1 63 1 71 130 162 13000 0 16 0 59 0 17 0 53 15000 0 20 0 69 0 22 0 63 18000 0 26 0 86 0 28 0 79 21000 0 33 1 04 0 36 0 96 23000 0 38 1 16 0 42 1 06 26000 0...

Page 132: ...3 28000 0 37 0 49 33000 0 51 0 69 38000 0 68 0 91 43000 0 87 1 17 45000 0 96 1 29 120 128 21000 0 22 0 18 26000 0 32 0 27 31000 0 45 0 39 36000 0 61 0 53 41000 0 79 0 69 46000 1 00 0 87 51000 1 24 1 07 54000 1 40 1 20 130 162 23000 0 25 0 21 26000 0 32 0 27 30000 0 42 0 36 35000 0 57 0 50 40000 0 75 0 65 45000 0 96 0 83 50000 1 19 1 02 55000 1 45 1 24 58000 1 63 1 38 Table 41 Energy recovery wheel...

Page 133: ...00 1 09 71 1 0 96 73 4 0 87 75 0 0 73 77 4 0 67 78 4 0 59 79 8 13000 1 18 69 5 1 04 72 0 0 94 73 7 0 79 76 4 0 73 77 4 0 64 79 0 0 48 74 7 14000 1 12 70 6 1 02 72 4 0 85 75 3 0 79 76 5 0 69 78 1 0 51 72 9 15000 1 20 69 2 1 09 71 1 0 91 74 3 0 84 75 5 0 74 77 3 0 55 71 9 16000 1 16 69 8 0 97 73 2 0 90 74 5 0 79 76 4 0 58 71 0 17000 1 24 68 5 1 03 72 1 0 95 73 5 0 83 75 6 0 61 70 0 18000 1 09 71 1 1...

Page 134: ... EN Pressure Curves 60 Hz Air Cooled Condensers Figure 84 Operating pressure curve all comp and cond fans per ckt on 90 tons std capacity Figure 85 Operating pressure curve all comp and cond fans per ckt on 90 tons high capacity ...

Page 135: ...Startup RT SVX24J EN 135 Figure 86 Operating pressure curve all comp and cond fans per ckt on 105 tons std capacity Figure 87 Operating pressure curve all comp and cond fans per ckt on 105 tons high capacity ...

Page 136: ...Startup 136 RT SVX24J EN Figure 88 Operating pressure curve all comp and cond fans per ckt on 120 tons std capacity Figure 89 Operating pressure curve all comp and cond fans per ckt on 120 tons high capacity ...

Page 137: ... Startup RT SVX24J EN 137 Figure 90 Operating Pressure Curve All Comp and Cond Fans per ckt on 130Tons Std Capacity Figure 91 Operating Pressure Curve All Comp and Cond Fans per ckt on 130Tons High Capacity ...

Page 138: ... pressure curves are not relevant If operating pressures at certain conditions are needed contact a localTrane sales representative Figure 92 Operating pressure curve all comp and cond fans per ckt on 150 ton std capacity Figure 93 Operating pressure curve all comp and cond fans per ckt on 90 tons standard capacity ...

Page 139: ...artup RT SVX24J EN 139 Figure 94 Operating pressure curve all comp and cond fans per ckt on 90 tons high capacity Figure 95 Operating pressure curve all comp and cond fans per ckt on 105 tons standard capacity ...

Page 140: ...rtup 140 RT SVX24J EN Figure 96 Operating pressure curve all comp and cond fans per ckt on 105 tons high capacity Figure 97 Operating pressure curve all comp and cond fans per ckt on 120 tons standard capacity ...

Page 141: ...rtup RT SVX24J EN 141 Figure 98 Operating pressure curve all comp and cond fans per ckt on 120 tons high capacity Figure 99 Operating pressure curve all comp and cond fans per ckt on 130 tons standard capacity ...

Page 142: ...essure curves are not relevant If operating pressures at certain conditions are needed contact a localTrane sales representative Figure 100 Operating pressure curve all comp and cond fans per ckt on 130 tons high capacity Figure 101 Operating pressure curve all comp and cond fans per ckt on 150 tons standard capacity ...

Page 143: ... 3 Turn the 115 volt control circuit switch and the 24 volt control circuit switch to the On position 4 Open the Human Interface access door located in the unit control panel and press the SERVICE MODE key to display the first service screen Refer to the latest edition of the applicable programming manual for applications for the SERVICETEST screens and programming instructions 5 Use Table 37 p 11...

Page 144: ...re drop against the return static pressure use the following steps If no adjustment is necessary proceed to step 17 12 Remove the drive rod and swivel from the crank arm s If only one hole requires changing loosen only that end 13 Manually open the return air dampers to the full open position 14 Manually close the outside air dampers 15 Reattach the drive rod and swivel to the appropriate hole s T...

Page 145: ...Unit Startup RT SVX24J EN 145 Figure 103 Outside air and return air economizer assembly w TRAQ dampers TRAQ Damper Linkage Top view Jackshaft TRAQ damper ...

Page 146: ...er Pos 0 Table 43 Standard unit no ERW economizer outside air damper travel adjustment pressure drop inches w c Damper Position Economizer Linkage Set up 1 2 3 4 5 6 Jackshaft rod end location 1 1 2 2 2 2 Damper lever configuration A B B B B B Damper lever rod end location 1 2 3 4 5 6 120 162 Ton w Economizer includes mist eliminator CFM Pressure Drop inches w c 58500 0 80 1 64 2 96 54000 0 68 1 4...

Page 147: ... to determine the new open and closed positions 17 Return the actuator control signal dial to 2 10 VDC Modulating input signal position 18 Plug the holes drilled in the cabinet after the proper airfow has been established To Adjust the Return Damper Actuators 19 Support or secure the damper blades in the wide open position Note Gravity will cause the damper to close Support or secure the damper bl...

Page 148: ... TRAQ E T E T E T E T E T E T E T E T 19000 1 80 1 22 2 12 0 99 1 46 0 89 1 16 0 83 0 88 0 81 0 88 0 63 0 62 0 59 0 56 0 52 0 48 0 44 0 27 23000 2 63 1 76 1 44 2 12 1 29 1 68 1 21 1 27 1 17 1 26 0 90 0 88 0 85 0 80 0 74 0 68 0 62 0 37 28000 2 57 2 09 1 86 2 45 1 74 1 84 1 69 1 82 1 28 1 25 1 21 1 14 1 05 0 95 0 86 0 50 33000 2 86 2 54 2 38 2 50 2 30 2 48 1 73 1 70 1 63 1 54 1 41 1 28 1 15 0 65 380...

Page 149: ... 0 68 1 02 0 61 0 81 0 57 0 61 0 55 0 60 0 43 0 42 0 40 0 38 0 35 0 32 0 29 0 17 20000 1 95 1 30 2 30 1 05 1 57 0 93 1 24 0 88 0 93 0 85 0 92 0 64 0 63 0 61 0 57 0 52 0 48 0 43 0 25 25000 2 00 1 62 2 42 1 43 1 90 1 34 1 42 1 30 1 41 0 97 0 95 0 92 0 86 0 79 0 71 0 64 0 35 30000 2 84 2 28 2 02 2 69 1 89 1 99 1 82 1 97 1 35 1 32 1 27 1 19 1 08 0 97 0 87 0 46 33000 2 74 2 42 2 26 2 38 2 18 2 36 1 61 ...

Page 150: ...2 39 2 24 2 01 1 70 1 39 54000 2 74 2 65 2 48 2 22 1 87 1 52 130 162 Ton Standard CFM ERW Field measured plenum pressure inches wc OA Actuator Reading Degrees RA Actuator Reading Degrees 60 50 40 30 20 10 0 10 20 30 35 40 45 CFM Econ TRAQ Econ TRAQ Econ TRAQ Econ TRAQ Econ TRAQ Econ TRAQ E T E T E T E T E T E T E T 23000 1 73 1 18 1 92 0 97 1 18 0 87 0 96 0 82 0 93 0 80 0 78 0 58 0 56 0 53 0 48 0 ...

Page 151: ... or biohazards Failure to follow this instruction could result in death or serious injury CAUTION Motor Failure Do not install a variable frequency drive VFD to control the energy wheel speed This could result in failure of the energy wheel motor WARNING Confined Space Hazards Do not work in confined spaces where refrigerant or other hazardous toxic or flammable gas may be leaking Refrigerant or o...

Page 152: ...Maintenance Cleaning the Energy Wheel Disconnect all electrical power then use a vacuum or brush to remove accumulated material from the face of the wheel Examine the energy wheel monthly for material build up on the wheel If more aggressive cleaning is needed removed the wheel segments and follow these steps 1 Wash the segments or the wheel in a five percent solution of non acid base coil cleaner...

Page 153: ...tch See Figure 106 For the first or for an individual segment removal it will be necessary to do so on both sides of the segment 4 Remove the forked segment retainer s See Figure 106 Again for the first or for an individual segment removal it will be necessary to do so on both sides of the segment 5 Remove the segment from the wheel frame It may be necessary to gently pry the segment out of the wh...

Page 154: ...he unit is operating Failure to disconnect power before servicing could result in death or serious injury WARNING Rotating Components The following procedure involves working with rotating components Disconnect all electric power including remote disconnects before servicing Follow proper lockout tagout procedures to ensure the power can not be inadvertently energized Failure to disconnect power b...

Page 155: ...Protect hands and the belt from possible sharp edges of the hole in the bearing support beam Failure to follow recommendations could result in minor to moderate injury or product damage CAUTION Added Support Required Before laying across the energy wheel place a rigid board across the span of the energy wheel cassette Failure to do so could result in personal injury and or damage to the energy whe...

Page 156: ...ssembly 4 Rotate the access panel downwards 5 Reach in past the damper wall to access the flexible filter puller s Pull them towards the evaporator coil enough to reach the second filter in each slot of the filter rack Refer to Table 45 p 156 for filter information Note Inspect these filters monthly and clean them as necessary Bearing and Motor Lubrication The wheel drive motor and wheel support s...

Page 157: ...e belt retainer from the replacement kit at the pulley location Place it between the segment retainer latch pivot point and the wheel spoke see Figure 111 p 158 left of the spoke Important To avoid release of the segment latch do not insert retainer on the other side of spoke 9 Manually rotate the wheel counter clockwise to position the belt retainer clip close to the center beam and diameter seal...

Page 158: ...all electrical power 2 Remove the belt from the pulley and position it temporarily around the wheel rim 3 Measure and record the distance from the inner edge of the pulley to the mounting wall 4 Loosen the set screw in the wheel drive pulley using an Allen wrench and remove the pulley from the motor drive shaft 5 While supporting the weight of the drive motor in one hand loosen and remove the four...

Page 159: ...as started verify that the rotation is correct If a scroll compressor is rotating backwards it will not pump and a loud rattling sound can be observed Check the electrical phasing at the load side of the compressor contactor If the phasing is correct before condemning the compressor interchange any two leads to check the internal motor phasing If the compressor runs backward for an extended period...

Page 160: ...or burnout If the oil is black and contains metal flakes a mechanical failure has occurred This symptom is often accompanied by a high compressor amperage draw If a motor burnout is suspected use an acid test kit to check the condition of the oil Test results will indicate an acid level exceeding 0 05 mg KOH g if a burnout occurred The scroll compressor uses Trane OIL00079 one quart container or O...

Page 161: ...portant Remove fan shipping brackets before startup Failure to remove brackets could result in fan damage Evaporative condensers are shipped with fan shipping brackets to reduce damage caused by vibration during shipment The fan shipping brackets must be removed prior to unit startup To remove the shipping brackets start from the side opposite to the drain actuator 1 Loosen the screw for the brack...

Page 162: ...re 113 Fan shipping bracket removal Mist Eliminator Fan Shipping Bracket Screws Fan Shipping Bracket Access Doors Inlet Louvers Actuator Side Figure 114 Float bracket setting Fill sump so float shuts off when water is within these slots ...

Page 163: ...tion adjust superheat only in the cooling mode of operation Charging by Subcooling The outdoor ambient temperature must be between 65 and 105 F and the relative humidity of the air entering the evaporator must be above 40 percent When the temperatures are outside of these ranges measuring the operating pressures can be meaningless Make sure hot gas bypass if applicable is not flowing when taking p...

Page 164: ...rvice technics i e amperage readings delta tees etc 9 Press the STOP key at the Human Interface Module in the unit control panel to stop the system operation Gas Furnace Startup Constant Volume and Variable Air Volume Systems It is important to establish and maintain the appropriate air fuel mixture to assure that the gas furnace operates safely and efficiently Since the proper manifold gas pressu...

Page 165: ...n analyzer and measure the percentage of oxygen in the flue gas Take several samples to assure an accurate reading Compare the measured oxygen level to the combustion curve in Figure 116 p 166 The oxygen content of the flue gas should be 4 to 5 If the oxygen level is outside this range adjust the combustion air damper to increase or decrease the amount of air entering the combustion chamber Refer ...

Page 166: ...4 5 6 7 8 9 10 11 12 13 14 15 16 17 18 19 20 21 Percent Oxygen Percent Carbon Dioxide Curve Fuel A 1 000 BTU per cu ft of Natural Gas A Table 48 Recommended manifold pressures and CO2 levels during furnace operation 2 STAGE MODULATING MBH FIRING RATES CO2 NAT GAS MANIF PRESS W C CO2 PROPANE MANIF PRESS W C MBH FIRING RATE CO2 NAT GAS MANIF PRESS W C CO2 PROPANE MANIF PRESS W C 850 100 8 0 9 0 3 0 ...

Page 167: ...anual gas valve located in the gas heat section 2 Once the configuration for the appropriate heating system is complete press the NEXT key until the LCD displays the Start test in __Sec screen Press the key to designate the delay before the test is to start This service test will begin after theTEST START key is pressed and the delay designated in this step has elapsed Press the ENTER key to confi...

Page 168: ...lue gas If the measured carbon dioxide level is in the ranges shown in the Guide Values Table 48 p 166 no adjustment is necessary Note It is normal for the low fire CO2 to be lower than the high fire 9 If the measured carbon dioxide level is below the recommended values for low heat return the burner to 90 fire rate and repeat step 6 to achieve optimum combustion 10 Program the burner for 100 oper...

Page 169: ...e secured in place Multi piece Unit Trane Startup Once the IntelliPak II multi piece unit has been installed all shipped with items have been installed all utilities and drain pipes have been connected the refrigeration piping has been reconnected and refrigerant charge has been adequately distributed throughout the system and all ductwork has been attached to the unit Trane will provide unit star...

Page 170: ...that the flue assembly is secure and properly installed sufficient gas pressure exists according to pipe size no leaks exist in gas supply line the gas heat piping includes a drip leg condensate line and the combustion air CO2 and O2 levels are normal Units equipped with hot water heat will be checked to ensure that the hot water pipes are properly routed sized and leak free for the presence of sw...

Page 171: ...nt 9 All field control wiring for CV SZVAV or VAV controls completed 10 All automation and remote controls installed wired 11 Unit clearances adequate for service and to avoid air recirculation etc 12 All unit drain lines and traps proper 13 All coil fins inspected and straightened 14 Shipping hardware for compressors removed 15 Hold down bolts and channels from fan sections removed 16 Fan section...

Page 172: ...s greased 42 Heat wheel rotates freely by hand 43 Reenergize power Phase sequence A B C proper for compressor rotation 44 Incoming voltage balanced 45 All panels doors secured prior to startup Start unit 46 Service test guide used to operate unit components 47 Fan amperages within nameplate specs 48 Verify system airflow 49 Dampers open and close properly 50 Adjust outside air damper travel 51 On ...

Page 173: ...ht without proper personal protective equipment Polymer materials commonly found in HVAC equipment that could be susceptible include insulation on electrical wiring fan belts thermal insulation various fasteners and bushings Degradation of these materials can result in serious damage to the equipment Trane accepts no responsibility for the performance or operation of our equipment in which ultravi...

Page 174: ... HZ 240 200 Table 52 Electric Heat Selection Limits Tons Indoor Fan Option Electric Heat Option Supply Discharge Linear Limit Open Temp Fan Fail Limit Open Temp 120 162 Ton High 40 High 300 kW Downflow 185F 185F Hz right 185F 185F Low 140 kW Downflow 150F 185F Hz right 150F 185F Low 32 High 300 kW Downflow 205F 185F Hz right 185F 185F Low 140 kW Downflow 150F 185F Hz right 150F 185F 105 118 Ton Hi...

Page 175: ...Must Hold Must Trip Must Hold Must Trip Must Hold Must Trip 90 105 1A 2A CSHN250 41 5 47 7 33 2 38 2 41 4 47 6 1B 2B CSHN250 41 5 47 7 33 2 38 2 41 4 47 6 105 118 1A 2A CSHN250 41 5 47 7 33 2 38 2 41 4 47 6 1B 2B CSHN315 54 4 62 6 43 6 50 1 54 3 62 4 120 128 1A 2A CSHN315 57 7 66 4 46 3 53 2 57 3 66 1B 2B CSHN315 54 4 62 6 43 6 50 1 54 3 62 4 130 140 1A 2A CSHN315 57 7 66 4 46 3 53 2 57 3 66 1B 2B...

Page 176: ...Service and Maintenance 176 RT SVX24J EN Note See fuse replacement table onVFD panel forVFD power fuses F40 F41 F42 Table 54 Unit Internal Fuse Replacement Data VFD Factory Settings ...

Page 177: ...80 5 15x24x2 5 12x24x2 5 12x24x19 5 12x24x2 5 12x24x12 5 12x24x2 5 12x24x12 105 118 21 20x24x2 80 21 20x24x2 21 20x24x19 80 21 20x24x2 21 20x24x12 80 21 20x24x2 21 20x24x12 80 5 15x24x2 5 12x24x2 5 12x24x19 5 12x24x2 5 12x24x12 5 12x24x2 5 12x24x12 120 128 28 20x24x2 93 21 20x24x2 21 20x24x19 80 21 20x24x2 21 20x24x12 80 21 20x24x2 21 20x24x12 80 5 12x24x2 5 12x24x19 5 12x24x2 5 12x24x12 5 12x24x2...

Page 178: ...24x4 15 24x24x12 74 15 24x24x2 15 24x24x19 74 15 24x24x2 15 24x24x12 74 7 12x24x4 7 12x24x12 7 12x24x2 7 12x24x19 7 12x24x2 7 12x24x12 Unit Model AC EC 90 95 High Temp Cartridge Filters with Prefilters HEPA Filters with Prefilters High Temp HEPA Filters with Prefilters Pre filters High Temp Cartridge Filters Prefilters HEPA Filters Prefilters High HEPA Temp Filters Qty Size Qty Size Face Area ft 2...

Page 179: ...i Cap Evap Enhanced 1 2 5 168 73 75 Internally Finned Condenser Enhanced 25 mm 1 240 134 Microchannel 105 Evaporator Internally Finned 1 2 4 168 73 75 Internally Finned Hi Cap Evap Internally Finned 1 2 6 168 73 75 Internally Finned Condenser Enhanced 25 mm 1 240 161 Microchannel 120 Evaporator Internally Finned 1 2 3 168 106 25 Internally Finned Hi Cap Evap Internally Finned 1 2 6 168 106 25 Inte...

Page 180: ...move the belt tension gauge The small O ring now indicates a number other than zero on the plunger s force scale This number represents the force in pounds required to give the needed deflection 6 Compare the force scale reading Step 5 with the appropriate force value listed in Table 59 p 181 If the force reading is outside the range readjust the belt tension Note Actual belt deflection force must...

Page 181: ...the unit is leak free use a standing vacuum test The maximum allowable rise over a 15 minute period is 200 microns If the rise exceeds this there is either still moisture in the system or a leak is present Note Do Not release refrigerant to the atmosphere If adding or removing refrigerant is required the service technician must comply with all Federal State and local laws Table 59 BeltTension Meas...

Page 182: ... buttons to adjust the digit j Press Cancel button to disregard change or press OK to accept change and enter the new setting 4 Repeat step 3 for each menu selection setting in Table 60 p 183 5 To reset all programming parameters back to the factory defaults a Go to parameter 14 22 Operation Mode b Press OK c Select Initialization d Press OK e Cut off the mains supply and wait until the display tu...

Page 183: ...t and check motor bearings for wear Verify that all of the fan mounting hardware is tight Inspect the F A R A damper hinges and pins to ensure that all moving parts are securely mounted Keep the blades clean as necessary Table 60 Supply and Exhaust VFD Programming Parameters Menu Parameter Description Setting Description Load Motor 1 21 Motor Power Set Based on Motor Nameplate Set only for applica...

Page 184: ...he service technician must comply with all federal state and local laws Heating Season Before completing the following checks turn the unit OFF and lock the main power disconnect switch open Inspect the unit air filters If necessary clean or replace them Check supply fan motor bearings repair or replace the motor as necessary Lubricate the supply fan shaft bearings with a lithium based grease Refe...

Page 185: ... water or air ONLY 5 Pour the cleaning solution into the sprayer If a high pressure sprayer is used a The minimum nozzle spray angle is 15 degrees b Do not allow sprayer pressure to exceed 600 psi WARNING Hazardous Gases and Flammable Vapors Exposure to hazardous gases from fuel substances have been shown to cause cancer birth defects or other reproductive harm Improper installation adjustment alt...

Page 186: ... and solenoid valves are used to control the incoming water If the incoming water contains contaminants sand or other objects it is best to insert an incoming line strainer having a mesh of 80 to 100 The inlet line should be flushed prior to connection to the unit whether or not there is a strainer There is an air gap between the water inlet float valve and sump water level to prevent back flow ho...

Page 187: ...ortant Do not use chlorine tablets directly on stainless steel surface as it can adversely affect its corrosion resistance Always consult local codes for water treatment and waste water removal requirements Consult a water treatment expert for water analysis and chemical treatment methods and recommendations for specific applications If deemed necessary after consultation with local water experts ...

Page 188: ...mponent Problem Check Fix Fan Motor Does not run Condenser Fan Relay closure and control voltage indicating a call from compressor control panel for the condenser fan to operate Sump Pump Overload Trip Fan Motor Overload Trip Fan fuse trip Check each motor overload and reset if necessary Check amp draw for each leg Sump Pump Does not run Sump Pump Overload Trip Low Water Level or faulty float swit...

Page 189: ...g kPa Disch Press Psig kPa Liquid Press Psig kPa Super heat F C Sub cool F C Compr Oil Level Suct Press Psig kPa Disch Press Psig kPa Liquid Press Psig kPa Super heat F C Sub cool F C ok low ok low ok low ok low ok low ok low ok low ok low ok low ok low ok low ok low ok low ok low ok low ok low ok low ok low ok low ok low ok low ok low ok low ok low ok low ok low ok low ok low ...

Page 190: ...ower w Sup Exh Rtn VFD 2 Pc 2313 0828 90 150T Schematic Power 3 Pc w Supply VFD 2313 0829 90 150T Schematic Power 3 Pc w Exhaust Return VFD 2313 0830 90 150T Schematic Power 3 Pc w Sup Exh Rtn VFD 2313 0836 90T 105T Schematic Power 2 Pc w Supply VFD w Low Ambient 2313 0837 90T 105T Schematic Power 2 Pc w Exhaust Return VFD w Low Ambient 2313 0838 90T 105T Schematic Power 2 Pc w Sup Exh Rtn VFD w L...

Page 191: ...ontrol Box w Sup Exh Rtn VFD Air Handler 2313 0902 90 150T Air Handler Connection Common Control Modules w Return VFD 2313 0903 100 162T Connection Common Control Modules w Return VFD 2309 3787 90 150T Connection Raceway Devices Condenser Zone Air Cooled 2313 0816 100 162T Connection Raceway Devices Condenser Zone Evap Cooled 2309 3789 Air Handler Connection Raceway Devices Condenser Zone Air Hand...

Page 192: ...nection Raceway Devices Evap Module w Supply VFD 2 Pc 2309 3762 90 162 Ton Connection Raceway Devices Evap Module w Exh Rtn VFD 2 Pc 2309 3763 90 162 Ton Connection Raceway Devices Evap Module w Sup Exh Rtn VFD 2 Pc Option Modules 1 Piece 2313 0314 All Tonnages Air Handler Schematic Controls RTM w Supply VFD 2309 3627 All Tonnages Air Handler Schematic Controls RTM w Exh Rtn VFD 2309 3628 All Tonn...

Page 193: ...dard w Low Ambient 2313 0839 90T 105T Schematic Power 3 Pc Standard w Low Ambient 2313 0847 120T 130T 150T Schematic Power 2 Pc Standard w Low Ambient 2313 0851 120T 130T 150T Schematic Power 3 Pc Standard w Low Ambient 2313 0859 100 162T Schematic Power 3 Pc Standard Controls 1 Piece 2309 3652 All Tonnages Air Handler Notes and Specs 2313 0817 All Tonnages Air Handler Field Connection CV 2313 086...

Page 194: ...ages Air Handler Schematic LHI ECEM VCM MPM w o Exh or Rtn VFD 2309 3648 All Tonnages Schematic LHI ECEM VCM MPM 2 Pc w o Exh or Rtn VFD 2309 3772 All Tonnages Schematic LHI ECEM VCM MPM 3 Pc w o Exh or Rtn VFD 2313 0867 All Tonnages Air Handler Schematic VOM LCI IPCB GBAS 0 5V GBAS 0 10V BCI WCI Multi Piece 2313 0315 All Tonnages Schematic Controls RTM 2 Pc Std 2313 0317 All Tonnages Schematic Co...

Page 195: ...atic Connection 2 Stage Natural Gas Heat 1800 mbh 2309 3670 90 118T HIGH 120 162T MED HIGH Schematic Connection 2 Stage Natural Gas Heat 1800 2500mbh 2309 3671 All Tonnages Air Handler Schematic Connection Modulating Natural Gas Heat 1800 2500 MBH 2309 3672 90 118T LOW MED 120 162T LOW Schematic Connection 2 Stage Natural Gas Heat 1800 mbh 2 3 Pc 2309 3673 90 118T HIGH 120 162T MED HIGH Schematic ...

Page 196: ...of lost refrigerant No liability whatever shall attach to the Company until said products have been paid for and then said liability shall be limited to the purchase price of the equipment shown to be defective The Company makes certain further warranty protection available on an optional extra cost basis Any further warranty must be in writing signed by an officer of the Company The warranty and ...

Page 197: ...P control devices See Figure 26 66 Ductwork 62 E Economizer 101 Economizer Damper Adjustment 143 Efficiency check point setting 14 Electric Heat 106 Electric Heat Selection Limits 174 Electric Steam and Hot Water Start Up 164 Electrical Phasing 108 Emergency Stop Switch 85 Energy Recovery Sequence of Operation 103 Energy Recovery Wheel ERW 151 Energy Recovery Wheel Component Static Pressure Drops ...

Page 198: ... condensing temperature falls 14 Scroll Compressor Replacement 181 Sequence of Operation with TRAQ 107 Service and Maintenance 173 Sizing Natural Gas Pipe Mains Branches See Table 16 69 Some Fans are rotating backwards See Fan Rotation 114 Space Humidity Sensor 15 Space pressure and duct 67 Space Pressure Transducer See Figure 3 15 Space Temperature Averaging 17 Standard Ambient Dampers 163 Status...

Page 199: ... RT SVX24J EN 199 Voltage Imbalance 109 Voltage Supply 109 Voltage Supply and Voltage Imbalance 109 W Warranty and Liability Clause 196 Wet Heat 108 Z Zone Temperature Cooling 16 Zone Temperature Heating 16 ...

Page 200: ...ed controls and HVAC systems comprehensive building services and parts For more information visit www Trane com Trane has a policy of continuous product and product data improvement and reserves the right to change design and specifications without notice We are committed to using environmentally conscious print practices that reduce waste 2013Trane All rights reserved RT SVX24J EN 20 Aug 2013 Sup...

Reviews: