background image

TX-6610 

1-Port Gigabit GPON Terminal User Guide 


4.3.3  LAN Setting 

Choose “

Network Setting

LAN Setting

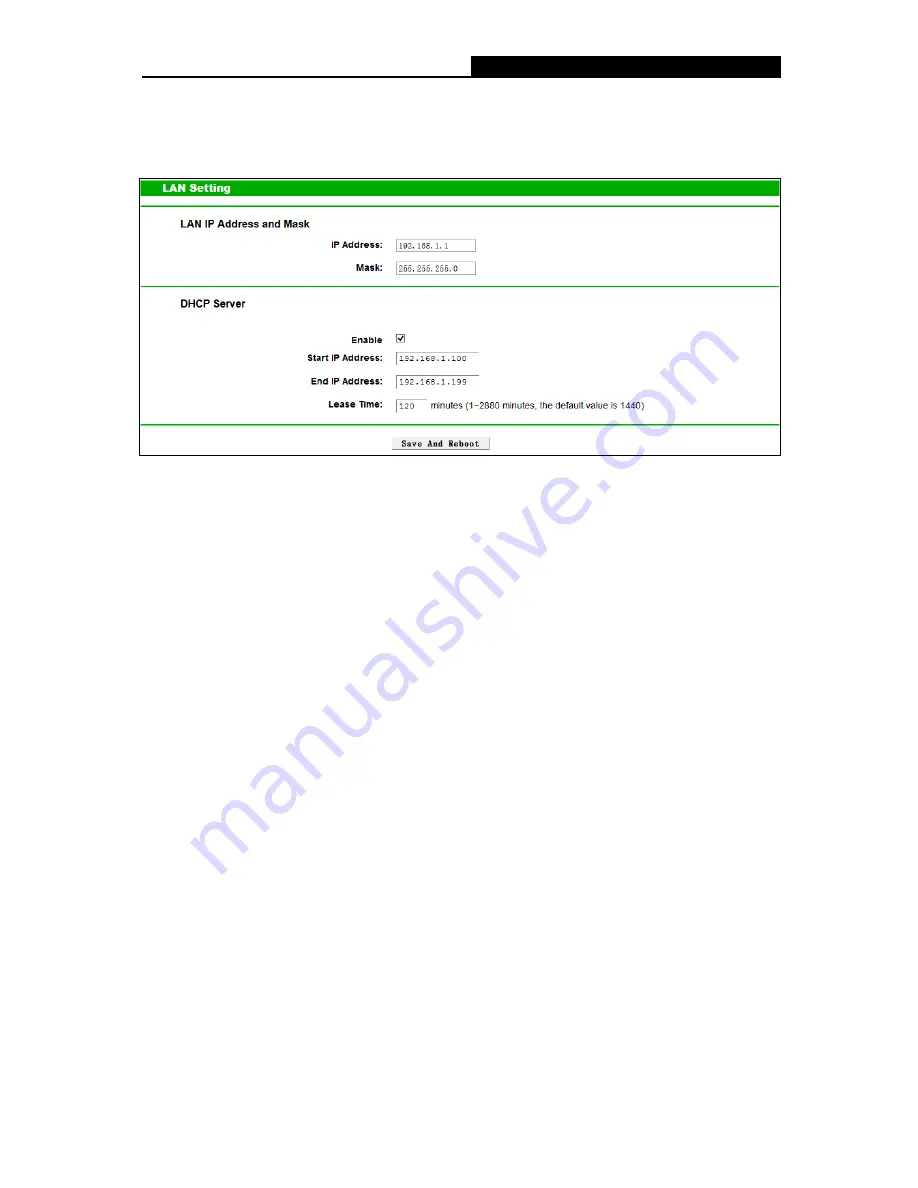
” menu and you will see the LAN screen as shown in 

Figure 4-4. You can change the LAN IP address on this page. 


Figure 4-4 


LAN IP Address and Mask:


IP  Address: 

Enter the Terminal’s local IP Address, then you can access to the 

Web-based Utility via the IP Address, the default value is 192.168.1.1.


Mask: 

Enter the Terminal’s Subnet Mask, the default value is 255.255.255.0. 


DHCP Server:

  These settings allow you to configure the Terminal‘s Dynamic Host 

Configuration Protocol (DHCP) server function. The DHCP server is enabled by default for the 

Terminal’s Ethernet LAN interface. DHCP service will supply IP settings to computers which 

are configured to automatically obtain IP settings that are connected to the Terminal though 

the Ethernet port. Keep in mind that if you change the IP address of the Terminal, you must 

change the range of IP addresses in the pool used for DHCP on the LAN.


Start IP Address:

Enter a value for the DHCP server to start with when issuing IP 

addresses. Because the default IP address for the Terminal is 192.168.1.1, the default 

Start IP Address is 192.168.1.2, and the Start IP Address must be 192.168.1.2 or greater, 

but smaller than 192.168.1.254.


End IP Address:

  Enter a value for the DHCP server to end with when issuing IP 

addresses. The End IP Address must be smaller than 192.168.1.254.


Lease  Time: 

The Lease  Time is the amount of time in which a network user will be 

allowed connection to the Terminal  with their current dynamic IP address. Enter the 

amount of time, then the user will be “lease” this dynamic IP address. After the dynamic 

IP address has expired, the user will be automatically  assigned a new dynamic IP 

address. 


Click 

Save And Reboot 

to make the settings take effect. 


Note:


If you change the IP Address of LAN, you must use the new IP Address to log in the Terminal.   

15 

Summary of Contents for TX-6610

Page 1: ...TX 6610 1 Port Gigabit GPON Terminal REV 3 0 0 1910011424...

Page 2: ...are trademarks or registered trademarks of their respective holders No part of the specifications may be reproduced in any form or by any means or used to make any derivative such as translation tran...

Page 3: ...or more of the following measures Reorient or relocate the receiving antenna Increase the separation between the equipment and receiver Connect the equipment into an outlet on a circuit different fro...

Page 4: ...u run the risk of electric shock and voiding the limited warranty If you need service please contact us Avoid water and wet locations Adapter shall be installed near the equipment and shall be easily...

Page 5: ...es 2004 108 EC Directives 2006 95 EC Directives 2011 65 EU The above product is in conformity with the following standards or other normative documents EN 55022 2010 AC 2011 EN 55024 2010 EN 60950 1 2...

Page 6: ...2 3 Connecting the Terminal 4 Chapter 3 Quick Installation Guide 6 3 1 TCP IP Configuration 6 3 2 Quick Installation Guide 9 Chapter 4 Configuring the Terminal 11 4 1 Login 11 4 2 Status 11 4 3 Networ...

Page 7: ...es of up to 2 488Gbps one GPON port and one Gigabit Ethernet port the TX 6610 provides high performance forwarding capabilities to ensure smooth VoIP HD video streaming experiences In this guide Termi...

Page 8: ...planation LED Explanation Name Status Indication Power On Power is on Off Power is off GPON On The Terminal is registered with the ISP Flashing The Terminal is trying to register with the ISP Off The...

Page 9: ...power adapter RESET There are two ways to reset the Terminal s factory defaults Method one With the Terminal powered on use a pin to press and hold the Reset button for at least 5 seconds And the Term...

Page 10: ...ectromagnetic sensitive 2 3 Connecting the Terminal Before installing the device please make sure your broadband service provided by your ISP is available If there is any problem please contact your I...

Page 11: ...TX 6610 1 Port Gigabit GPON Terminal User Guide Figure 2 1 5...

Page 12: ...Switch which has connected to the Terminal you need to configure your PC s IP address We use the procedures in Windows 7 as an example for other systems refer to T4 for instructions Step 1 Right click...

Page 13: ...TX 6610 1 Port Gigabit GPON Terminal User Guide Step 3 In the prompt page that showed below double click on the Internet Protocol Version 4 TCP IPv4 Figure 3 2 7...

Page 14: ...e command prompt to verify the network connection Please click the Start menu on your desktop select run tab type cmd or command in the field and press Enter Type ping 192 168 1 1 on the next screen a...

Page 15: ...nfigure and manage the TX 6610 1 Port Gigabit GPON Terminal The Web based utility can be used on any Windows Macintosh or UNIX OS with a Web browser such as Microsoft Internet Explorer Mozilla Firefox...

Page 16: ...see the Login screen as shown in Figure 3 8 Click Network Setting PON Certification to complete the PON setting You are required to enter GPON Password or GPON SN or both provided by your ISP to pass...

Page 17: ...1 Login After your successful login you will see the main menus on the left of the Web based utility On the right there are the corresponding explanations and instructions The detailed explanations f...

Page 18: ...TX 6610 1 Port Gigabit GPON Terminal User Guide Figure 4 1 12...

Page 19: ...this page 4 3 Network Setting Choose Network Setting there are three submenus under the main menu Click any one of them and you will be able to configure the corresponding function 4 3 1 PON Certifica...

Page 20: ...By OLT OLT Optical Line Terminal In this mode your ISP can remotely control the Terminal VLAN TAG Mode In this mode a VLAN tag will be added to an upstream data without it and removed from a downstre...

Page 21: ...that if you change the IP address of the Terminal you must change the range of IP addresses in the pool used for DHCP on the LAN Start IP Address Enter a value for the DHCP server to start with when i...

Page 22: ...sword of the Terminal in the next screen as shown in Figure 4 5 TX 6610 provides two users admin admin and user user Both can be used to log in the management page Figure 4 5 It is strongly recommende...

Page 23: ...s are posted at http www tp link com and can be downloaded for free There is no need to upgrade the firmware unless the new firmware has a new feature you want to use However when experiencing problem...

Page 24: ...is box the current PON settings will be deleted when you restore the configurations of the Terminal to its factory defaults Click the Restore button to reset all configuration settings to their defaul...

Page 25: ...00m EIA TIA 568 100 STP maximum 100m 1000Base TX UTP category 5e 6 cable maximum 100m EIA TIA 568 100 STP maximum 100m GPON Class C G 652 single mode fiber maximum 20km GPON Parameter Interface SC APC...

Page 26: ...P and type a Connection name to identify your connection and then click Connect For Windows XP 1 Click Start All Programs Accessories Communications New connection wizard to launch the wizard Then cli...

Page 27: ...lick the Apple icon on the upper left corner of the taskbar 2 Go to System Preferences Network 3 Select Ethernet in the left panel 4 Under Configure IPv4 select Using DHCP 5 Click Apply For Windows 7...

Page 28: ...the Internet 1 Make sure that all cables are connected properly and securely to the Terminal 2 Check the GPON LED and make sure that it is lit and stable indicating that the Terminal is registered wit...

Reviews: