background image

Note:

TL-WA7110ND

150Mbps High Power Wireless Access Point User Guide

It is strongly recommended to restart the Cable Modem after the Quick Setup is done. This
important operation will solve most issues.

2)

Choose to clone MAC address or not, if you are unsure, please select YES. Then click

Next

,

and you will come to the page shown in Figure 3-18.

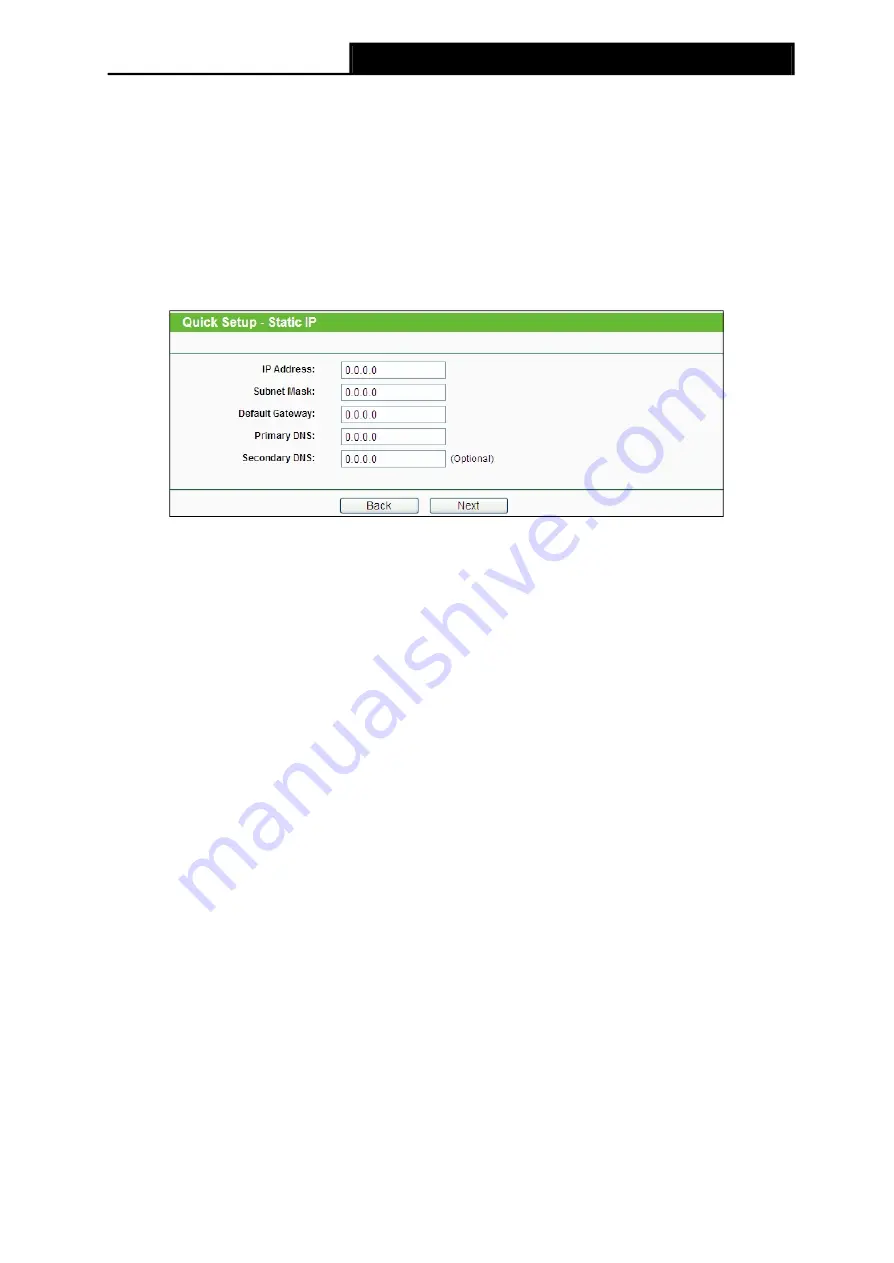
Static IP

- In this type, you should manually fill in the

IP address

,

Subnet Mask

,

Default

Gateway

, and

DNS

IP address, which are specified by your ISP.

1)

If you choose

Static IP

in Figure 3-16 and then click

Next

, Figure 3-20 will appear.

Figure 3-20 Static IP

IP Address

- This is WAN IP address as seen by external users on the Internet (including your

ISP). Enter the IP address in the field.

Subnet Mask

- It is used for the WAN IP address, which is usually 255.255.255.0.

Default Gateway

- Enter the default gateway in the blank if required.

Primary DNS

- Enter the DNS IP address in the blank if required.

Secondary DNS

- If your ISP provides another DNS IP address, enter it in this field.

Note:

The IP parameters should have been provided by your ISP.

After you have entered the above necessary parameters and then click

Next

, Figure 3-18 will then

appear.

2. When you finish the wireless setting in Figure 3-18 and click

Next

, then Figure

3-21 will appear, where you can click

Finish

button to complete the

Quick Setup

.

21

Summary of Contents for TL-WA7110ND

Page 1: ...TL WA7110ND 150Mbps High Power Wireless Access Point REV1 0 0 1910011047...

Page 2: ...are trademarks or registered trademarks of their respective holders No part of the specifications may be reproduced in any form or by any means or used to make any derivative such as translation tran...

Page 3: ...ion is subject to the following two conditions 1 This device may not cause harmful interference 2 This device must accept any interference received including interference that may cause undesired oper...

Page 4: ...elow and having a maximum gain of 5 dBi Antennas not included in this list or having a gain greater than 5 dBi are strictly prohibited for use with this device The required antenna impedance is 50 ohm...

Page 5: ...nect the product or the power adapter from the power source Don t disassemble the product or make repairs yourself You run the risk of electric shock and voiding the limited warranty If you need servi...

Page 6: ...EC Directives 2011 65 EU The above product is in conformity with the following standards or other normative documents EN 300 328 V1 7 1 2006 EN 301 489 1 V1 9 2 2011 EN 301 489 17 V2 2 1 2012 EN 55022...

Page 7: ...2 AP Router 7 2 3 3 Access Point 7 2 3 4 Multi SSID 8 2 3 5 Repeater and Universal Repeater 8 2 3 6 Bridge with AP 8 2 3 7 Client 9 Chapter 3 Quick Installation Guide 10 3 1 Configure the Device 10 3...

Page 8: ...ddress Reservation 55 4 9 System Tools 56 4 9 1 SNMP 57 4 9 2 Time Settings 58 4 9 3 Diagnostic 59 4 9 4 Ping Watch Dog 61 4 9 5 Speed Test 61 4 9 6 Firmware Upgrade 62 4 9 7 Factory Defaults 63 4 9 8...

Page 9: ...Z 100 5 9 4 UPnP 100 5 10 Security 101 5 10 1 Basic Security 101 5 10 2 Advanced Security 103 5 10 3 Local Management 104 5 10 4 Remote Management 105 5 11 Parental Control 105 5 12 Access Control 107...

Page 10: ...re Upgrade 123 5 17 4 Factory Defaults 124 5 17 5 Backup Restore 124 5 17 6 Reboot 125 5 17 7 Password 125 5 17 8 System log 126 5 17 9 Statistics 128 Appendix A FAQ 130 Appendix B Configuring the PC...

Page 11: ...power Adapter for TL WA7110ND 150Mbps High Power Wireless Access Point One Power Injector Mounting Kits Quick Installation Guide One Resource CD for TL WA7110ND 150Mbps High Power Wireless Access Poin...

Page 12: ...ess LAN 64 128 152 bit WEP encryption security and WPA WPA2 and WPA PSK WPA2 PSK authentication as well as TKIP AES encryption security It also supports VPN pass through for sensitive data secure tran...

Page 13: ...restore and firmware upgrade Supports Web management Supports Remote Management Supports UPnP Dynamic DNS Static Routing VPN Pass through Supports Virtual Server Special Application and DMZ host Built...

Page 14: ...l LED Explanation Figure 1 1 Front Panel sketch Name Status Indication Off No Power On Power on Off The device has a system error On The device is initialising Flashing The device is working properly...

Page 15: ...the RESET function press it for more than five seconds Used as RESET button There are two ways to reset to the Router s factory defaults 1 Use the Factory Defaults function on System Tools Factory De...

Page 16: ...to the Ethernet 2 2 Installation Environment Requirements Operating temperature 30 70 Operating Humidity 10 90 RH Non condensing 2 3 Connecting the Device To connect the AP please follow the steps bel...

Page 17: ...hernet cable 3 Plug one end of the Power Adapter into the DC jack on the Power Injector and the other end in electrical wall socket 4 Power on the PC s and other connected devices such as the ADSL mod...

Page 18: ...3 5 Repeater and Universal Repeater Figure 2 5 Hardware Installation of the TL WA7110ND in Universal Repeater mode 1 Connect the MAIN PoE port of TL WA7110ND to the POE port of the Power Injector with...

Page 19: ...ou connect a PC notebook to the LAN port of the Device with an Ethernet cable and then login the Device from the PC notebook to set the Device in Bridge with AP mode 2 3 7 Client Figure 2 7 Hardware I...

Page 20: ...as an example we use the default values for description in this guide Connect the local PC to the LAN ports of the AP There are then two ways to configure the IP address for your PC Configure the IP...

Page 21: ...layed is similar to that shown in Figure 3 2 it means that your PC has not connected to the AP Figure 3 2 Failure result of Ping command Please check the connection following these steps 1 Is the conn...

Page 22: ...11...

Page 23: ...creen does not pop up it means that your Web browser has been set to a proxy Go to Tools menu Internet Options Connections LAN Settings in the screen that appears cancel the Using Proxy checkbox and c...

Page 24: ...devices can share together especially for a home office or hotel where only wired network is available Multi SSID In this mode the device can create up to 4 wireless networks labeled with different SS...

Page 25: ...c IP When the Device connects to a DHCP server or the ISP supplies you with DHCP connection please choose this type The Device will get the IP address automatically from the DHCP server or the WISP if...

Page 26: ...region where the wireless function of the Device can be used It may be illegal to use the wireless function of the Device in a region other than one of those specified in this filed If your country or...

Page 27: ...rnal users on the Internet including your ISP Enter the IP address into the field Subnet Mask It is used for the WAN IP address which is usually 255 255 255 0 Default Gateway Enter the default gateway...

Page 28: ...ings for the local wireless network as the remote WISP station the page will show as below You can choose the Wireless Security Mode and fill in Wireless Password for the Local Wireless Network Figure...

Page 29: ...teps 1 Click Next in Figure 3 7 and then WAN Connection Type page will appear as shown in Figure 3 16 Figure 3 16 WAN Connection Type PPPoE If you have applied ADSL to realize Dial up service you shou...

Page 30: ...18...

Page 31: ...rity But it is recommended strongly that you change your networks name SSID to a different value This value is case sensitive For example MYSSID is NOT the same as MySsid Region Select your region fro...

Page 32: ...the format of the WEP key Wireless Password If the AP your Device is going to connect needs password you need to fill the password in this blank Dynamic IP When the Device connects to a DHCP server or...

Page 33: ...ear Figure 3 20 Static IP IP Address This is WAN IP address as seen by external users on the Internet including your ISP Enter the IP address in the field Subnet Mask It is used for the WAN IP address...

Page 34: ...3 22 Wireless Wireless Network Name Enter a string of up to 32 characters The same Name SSID must be assigned to all wireless devices in your network The default SSID is set to be TP LINK _xxxxxx xxx...

Page 35: ...d on none pre shared passphrase No Security The wireless security function is disabled The wireless stations will be able to connect the Device without encryption Auth Type This option should be chose...

Page 36: ...o wirelessly connect to the Device 2 The Network Setting page will appear then It is recommended that you keep the default settings on this page Click Next Figure 3 23 Network 3 When you finish the wi...

Page 37: ...ch your wireless stations will operate In an elevated location such as a high shelf Away from the potential sources of interference such as PCs microwaves and cordless phones With the Antenna in the u...

Page 38: ...your local government agency for assistance When you select your local region from the pull down list the Note Dialog of TERMS OF USE will pop up Select I agree to these terms of use and click Accept...

Page 39: ...less Access Point User Guide Figure 3 26 Network 3 When you finish the wireless setting in Figure 3 26 and click Next then Figure 3 27 will appear where you can click Finish button to complete the Qui...

Page 40: ...niversal Repeater In Universal Repeater mode the AP with WDS disabled will relays data to an associated root AP AP function is enabled meanwhile The wireless repeater relays signal between its station...

Page 41: ...he Security Mode is WEP It indicates the format of the WEP key WEP Index This option should be chosen if the Security Mode is WEP It indicates the index of the WEP key Wireless Password If the AP your...

Page 42: ...ease confirm it and enter the same password as is on your router or access point then click Next 3 The Network Setting page will appear then It is recommended that you keep the default settings on thi...

Page 43: ...ure 3 31 Finish page When you choose Bridge with AP on Operation Mode page in Figure 3 7 take the following steps 1 Click Next in Figure 3 7 and then Wireless page will appear as shown in Figure 3 32...

Page 44: ...cal government agency for assistance When you select your local region from the pull down list the Note Dialog of TERMS OF USE will pop up Select I agree to these terms of use and click Accept to cont...

Page 45: ...otential sources of interference such as PCs microwaves and cordless phones With the Antenna in the upright position Away from large metal surfaces Failure to follow these guidelines can result in sig...

Page 46: ...appear then It is recommended that you keep the default settings on this page Click Next Figure 3 35 Network 5 When you finish the wireless setting in Figure 3 35 and click Next then Figure 3 36 will...

Page 47: ...of the AP your Device is going to connect to as a client You can also use the survey function to select the SSID to join Mac Address of Remote AP The Mac Address of the AP your Device is going to con...

Page 48: ...35...

Page 49: ...ot AP Key Format This option should be chosen if the Security Mode is WEP It indicates the format of the WEP key WEP Index This option should be chosen if the Security Mode is WEP It indicates the ind...

Page 50: ...ease confirm it and enter the same password as is on your router or access point then click Next 3 The Network Setting page will appear then It is recommended that you keep the default settings on thi...

Reviews: