24
7
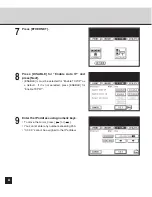
Press [ETHERNET].
8
Press [DISABLE] for “Enable Auto IP” and
press [Next].
• [ENABLE] is must be selected for “Enable TCP/IP” as
a default. If it is not selected, press [ENABLE] for
“Enable TCP/IP”.
9
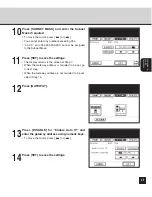
Enter the IP address using numeric keys.
• To move the cursor, press [
] or [
].
• You cannot enter any number exceeding 255.
• “0.0.0.0” cannot be assigned to the IP address.
Summary of Contents for e-STUDIO28
Page 1: ......
Page 6: ...4 AppleTalk Setting 126 Other Setting 126 ...
Page 7: ...SETUP FLOW 5 SETUP FLOW ...
Page 12: ...10 ...
Page 13: ...CONNECTING THE PRINTER 11 CONNECTING TO THE PRINTER ...
Page 16: ...14 ...
Page 17: ...PREPARING TO USE THE TOPACCESS 15 PREPARING TO USE THE TOPACCESS ...
Page 33: ...PREPARING TO USE THE TOPACCESS 31 4 The Administrator Page is displayed ...
Page 34: ...32 ...
Page 35: ...SETTING UP THE PROTOCOLS 33 SETTING UP THE PROTOCOLS ...
Page 47: ...SETTING UP THE PROTOCOLS 45 17Wait for a few minutes until the printer completes initializing ...
Page 55: ...SETTING UP THE PRINT SERVICE 53 SETTING UP THE PRINT SERVICE ...
Page 62: ...60 ...
Page 63: ...INSTALLING THE PRINTER DRIVER 61 INSTALLING THE PRINTER DRIVER ...
Page 121: ...119 INSTALLING THE PRINTER DRIVER 6 Click on OK ...
Page 122: ...120 ...
Page 123: ...APPENDIX 121 APPENDIX ...
Page 129: ......
Page 130: ...Copyright TOSHIBA TEC CORPORATION 2002 ALL RIGHTS RESERVED 6LA50221000 R01112004801 TG ...


