background image

100

LX177 (E/F) Web 213:276

Chapter 8: Using the THINC

 home network feature

9

You can use the 

Profile Lock

 to protect your profile 

settings and prevent other users from viewing your 
personal e-mails.

Note: 

Each of the four e-mail profiles must be locked 

individually.

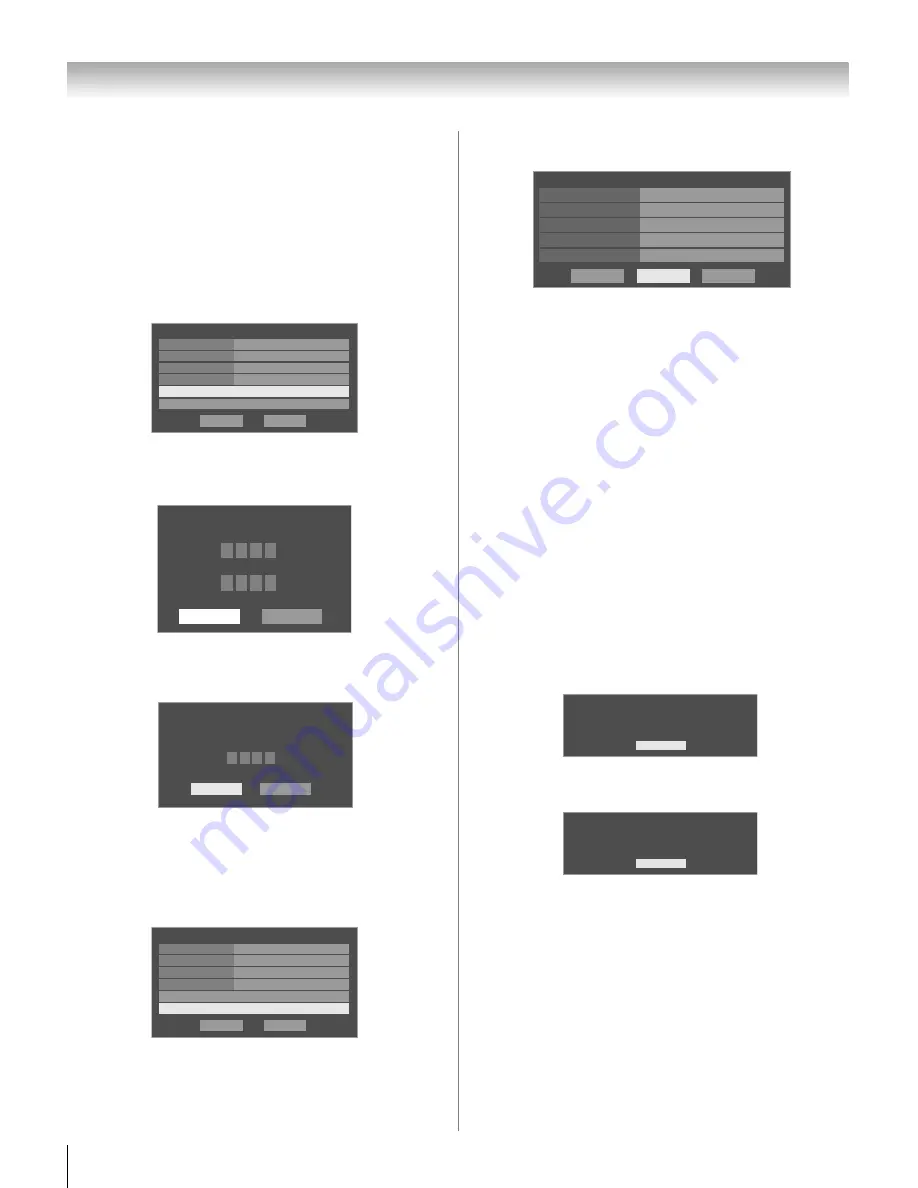
To lock an e-mail profile:

a) Press 

b

 to highlight the 

Profile Lock

 field.

b) Press 

C

 or 

c

 to select 

Enabled

.

c) Highlight the 

Enter PIN Code

 field and press 

T

.

d) Use the Number buttons to enter a four-digit PIN code.

e) Enter the code a second time to confirm, and then press 

T

.

Note: 

If the profile is already locked, the

 E-mail Profile 

Unlock

 window will appear. You must enter the correct 

PIN code to unlock the account.

If you cannot remember your PIN code, while the 

E-mail 

Profile


Unlock

 window is displayed, press 

E

 four (4) 

times within five (5) seconds. The PIN code will be cleared 
and you can enter a new PIN code.

10

Highlight the 

E-mail Account Setup

 field, and 

press

T

The 

E-mail Account Setup

 window appears 

(illustrated below).

11

Highlight a field and press 

T

. The software keyboard will 

appear (as shown in step 6).

Note: 

The software keyboard layout will vary based on the 

buttons that are available for the current item.

Using the software keyboard, enter the appropriate 
information in the fields.

E-mail Address

POP3 Server Address

POP3 Port Number (uses default if left blank)

POP3 User Name (same as e-mail account login)

POP3 Password: password

See “Description of fields in the E-mail Account Setup 
window” (

-

 page 101) for details on the settings for 

these fields.

12

Highlight 

Test

 and press 

T

 to confirm that the e-mail 

account settings work correctly.

13

When testing is finished, a message will appear indicating 
whether the e-mail account test passed or not.

If the e-mail account test succeeds, the following 
message appears:

If the e-mail account test fails, the following message 
appears:

Make sure you entered the correct information for the 
fields in the 

E-mail Account Setup

 window.

14

Press 

T

.

15

To exit the window and save your settings, highlight 

Done

 and press 

T

.

To exit the window without saving your settings, highlight 

Cancel

 and press 

T

.

Done

E-mail Profile Setup

Display Name

Check for New Mail

Cancel

Profile Lock

E-mail Account Setup

Enter PIN Code

Enabled

Disabled

Time Zone

Eastern

Please enter a 4 digit PIN code

Confirm PIN code

Cancel

Done

E-mail Account Setup

*

*

*

*

*

*

*

*

E-mail Profile Unlock

Please enter the 4 digit PIN code

Cancel

* * * *

Done

Done

E-mail Profile Setup

Display Name

Check for New Mail

Cancel

Profile Lock

E-mail Account Setup

Enter PIN Code

Enabled

Disabled

Time Zone

Eastern

Cancel

E-mail Account Setup

tvtest2

E-mail Address

POP3 Server Address

POP3 Port Number

POP3 User Name

Test

Done

POP3 Password

E-Mail Account Test

All tests were successful.

OK

E-Mail Account Test

All tests failed.

OK

42LX177_EN.book  Page 100  Tuesday, May 15, 2007  1:58 PM

Summary of Contents for 42LX177 - 42" LCD TV

Page 1: ... these numbers whenever you communicate with your Toshiba dealer about this TV Model number Serial number For an overview of steps for setting up your new TV see page 10 Note To display a High Definition picture the TV must be receiving a High Definition signal such as an over the air High Definition TV broadcast a High Definition digital cable program or a High Definition digital satellite progra...

Page 2: ...propriate furniture large enough to support the weight of your TV and other electronic components a Use appropriate angle braces straps and anchors to secure your furniture to the wall but never screw anything directly into the TV a Carefully read and understand the other enclosed instructions for proper use of this product a Do not allow children to climb on or play with furniture and TVs a Avoid...

Page 3: ... If the liquid comes in contact with your mouth or eyes or your skin is cut by broken glass rinse the affected area thoroughly with water and consult your doctor ALWAYS contact a service technician to inspect the TV any time it has been damaged or dropped 15 CAUTION To reduce the risk of electric shock do not use the polarized plug with an extension cord receptacle or other outlet unless the blade...

Page 4: ...om the TV if you leave the TV unattended or unused for long periods of time 34 During normal use the TV may make occasional snapping or popping sounds This is normal especially when the unit is being turned on or off If these sounds become frequent or continuous unplug the power cord and contact a Toshiba Authorized Service Center 35 WARNING RISK OF SERIOUS PERSONAL INJURY OR EQUIPMENT DAMAGE Neve...

Page 5: ...he LCD TV page 2 1 CAUTION Two people are required for installation 2 Unplug and remove any cables and or other component connectors from the rear of the TV 3 Follow the instructions provided with your wall bracket Before proceeding make sure the appropriate bracket s are attached to the wall and the back of the TV as described in the instructions provided with the wall bracket 4 After attaching t...

Page 6: ...e receiver is connected Consult the dealer or an experienced radio TV technician for help Caution Changes or modifications to this equipment not expressly approved by Toshiba could void the user s authority to operate this equipment Important notes about your LCD TV The following symptoms are technical limitations of LCD Display technology and are not an indication of malfunction therefore Toshiba...

Page 7: ...nel memory 45 Setting the Auto Input feature 46 Labeling channels 47 Setting the HDMI audio mode 48 Viewing the digital signal meter 49 Viewing the system status 49 Selecting the Power On Mode 50 Selecting the Demo Mode 50 Chapter 6 Using the TV s features 51 Selecting the video input source to view 51 Labeling the video input sources 52 Tuning channels 53 Tuning channels using the Channel Browser...

Page 8: ...twork address 88 Automatically setting up the network address 88 Manually setting up the network address 89 Resetting the network address 90 C Setting up file sharing on your PC 90 Compatible operating systems 90 Setting up file sharing on a PC with Microsoft Windows XP Service Pack 2 or higher 90 Setting up file sharing on a PC with Microsoft Windows 2000 92 D Setting up file sharing on the TV 93...

Page 9: ...ynchronization automatically Deep Color feature allows to HDMI source to increase available colors bits within the boundaries defined by the RGB or YCbCr color space xvYCC feature expands the acceptable color range limits in the HDMI signals then allows sending wider color signals from HDMI source Two sets of ColorStream HD high resolution component video inputs page 17 SRS WOW and Dolby Virtual a...

Page 10: ...es in the remote control page 26 7 See Learning about the remote control page 27 for an overview of the buttons on the remote control 8 Program the remote control to operate your other device s pages 31 39 9 AFTER connecting all cables and devices plug in the power cords for your TV and other devices The yellow LED will blink until the TV goes into standby mode When the TV is in standby mode press...

Page 11: ...g to the controls on the remote control or TV control panel and you cannot turn off the TV press and hold the POWER button on the TV control panel for 5 or more seconds to reset the TV 5 ARROWS BbC c When a menu is on screen these buttons function as up down left right menu navigation buttons 6 MENU ENTER Press to access the menu system pages 40 41 When a menu is on screen the MENU button on the T...

Page 12: ... video cables carry only video information separate audio cables are required for a complete connection 3 VIDEO 1 IN Standard composite video and standard audio inputs plus optional S video inputs for connecting devices with composite video or S video output Note Standard composite video and S video cables carry only video information separate audio cables are required for a complete connection 4 ...

Page 13: ... system For connecting the TV to your home network See boxed note below 12 Service port For service use only Used for updating the television s firmware HDMI the HDMI logo and High Definition Multimedia Interface are trademarks or registered trademarks of HDMI Licensing LLC Manufactured under license from Dolby Laboratories Dolby Pro Logic and the double D symbol are registered trademarks of Dolby...

Page 14: ...mponent video cables provide better picture performance than a standard composite video or S video cable HDMI cable with HDMI Logo HDMI High Definition Multimedia Interface cable is for use with devices with an HDMI output An HDMI cable delivers digital audio and video in its native format This cable carries both video and audio information therefore separate audio cables are not required for a co...

Page 15: ...rmance will be unacceptable If you have a mono VCR connect L MONO on the TV to your VCR s audio out terminal using the white audio cable only To view the antenna or Cable signal Select the ANT video input source on the TV To view the VCR Turn ON the VCR Select the VIDEO 1 video input source on the TV To select the video input source press INPUT on the remote control page 27 To program the TV remot...

Page 16: ... Note When you use a Cable box you may not be able to use the remote control to program or access certain features on the TV To view basic and premium Cable channels Turn OFF the VCR Select the ANT video input source on the TV Tune the TV to channel 3 or 4 whichever channel the Cable box output is set to Use the Cable box controls to change channels To view the VCR Turn ON the VCR Select the VIDEO...

Page 17: ...can be used with Progressive 480p 720p and Interlaced 480i 1080i scan systems A 1080i signal will provide the best picture performance 1080p is not supported If your DVD player or satellite receiver does not have component video connect a standard A V cable to VIDEO 2 on the side panel If your DVD player has HDMI video see page 20 To view antenna or Cable channels Select the ANT video input source...

Page 18: ...V s IR OUT terminal To control the device s Point either the device s remote control or the TV remote control that you previously programmed to operate the device Chapter 3 toward the front of the TV and press the button for the desired function The signal passes from the remote control through the TV to the device via the IR blaster cable Note If you use the device s remote control to operate the...

Page 19: ... camcorder You will need standard A V cables For better picture performance if your camcorder has S video connect an S video cable plus the audio cables to VIDEO 1 on the TV back instead of the VIDEO 2 on the TV right side panel To view the camcorder video Select the VIDEO 2 video input source on the TV To select the video input source press INPUT on the remote control page 27 To program the TV re...

Page 20: ...bles are not required see illustration See Setting the HDMI audio mode page 48 To view the HDMI device video Select the HDMI 1 HDMI 2 or HDMI 3 video input source on the TV To select the video input source press INPUT on the remote control page 27 To program the TV remote control to operate other devices see Chapter 3 To connect a DVI device you will need one HDMI to DVI adapter cable HDMI type A ...

Page 21: ...nect an Audio Receiver and Playback Device you will need three HDMI cables page 20 Note If several devices are connected the CE Link feature may not operate properly For proper operation it is recommended that you use HDMI cables with the HDMI Logo Before controlling the device s After completing the above connections set the CE Link Setup menu as you desire page 75 The connected devices must also...

Page 22: ... damage speakers or headphones THIS DAMAGE IS NOT COVERED BY YOUR WARRANTY The DIGITAL AUDIO OUT terminal may not output some digital audio sources because of copy restrictions Manufactured under license from Dolby Laboratories Dolby Pro Logic and the double D symbol are registered trademarks of Dolby Laboratories Connecting an audio system This connection allows you to use external speakers with ...

Page 23: ...skipped or you may not be able to pause during multi angle scenes Signal names for mini D sub 15 pin connector NC Not connected To connect a PC to the HDMI terminal on the TV When connecting a PC to the HDMI terminal on the TV use an HDMI to DVI adapter cable and analog audio cables If connecting a PC with an HDMI terminal use an HDMI cable type A connector Separate analog cables are not necessary...

Page 24: ...sing personal e mails file sharing the JPEG Picture Viewer and the MP3 Audio Player Note The TV s home network feature is compatible with Microsoft Windows 2000 and the Home or Professional version of Microsoft Windows XP Service Pack 2 or higher See Chapter 8 for details The TV s home network connection allows access to file sharing only You will NOT be able to use the TV to access the Internet I...

Page 25: ...one cable depending on your modem standard Ethernet RJ 45 cables router switch 1 modem DSL or cable 2 1 Your router switch may be part of your DSL or cable modem Your switch may be separate from your router For assistance contact your ISP or an IT professional 2 Coaxial or telephone cable depending on your modem type 3 Standard Ethernet RJ 45 cable 4 Do NOT connect a phone jack directly to the TV ...

Page 26: ...n accordance with applicable laws and regulations If the remote control does not operate correctly or if the operating range becomes reduced replace batteries with new ones When necessary to replace batteries in the remote control always replace both batteries with new ones Never mix battery types or use new and used batteries in combination Always remove the batteries from the remote control if t...

Page 27: ...junction with the THINC features page 94 6 Channel Numbers 0 9 100 directly tune channels The button is used to tune digital channels page 55 or to edit the Favorites List page 53 7 INPUT selects the video input source page 51 8 FAV BROWSER accesses the Favorites List in the Channel Browser page 53 9 MENU accesses the main TV menu system pages 40 and 41 10 ENTER activates highlighted items in the ...

Page 28: ...The audio selector is not available for analog channels page 63 By using this button it is also possible to select TV mode and view one program while another is being recorded 24 POP opens the POP double window page 59 25 FREEZE freezes the picture Press again to restore to moving picture page 59 26 PIC SIZE cycles through the picture sizes Natural TheaterWide 1 2 3 Full 4 3 HD and Native page 56 ...

Page 29: ...igit 8 Digit 8 Digit 8 Digit 8 Cassette Digit 8 Digit 8 9 w x y z Digit 9 2 Digit 9 Digit 9 Digit 9 Digit 9 Aux Digit 9 Digit 9 0 Digit 0 2 Digit 0 Digit 0 Digit 0 Digit 0 Digit 0 10 Digit 0 100 10 digital separator 2 10 100 100 10 100 INPUT TV Video select 2 s TV s TV s TV s TV Input s TV s TV PIC SIZE Selects the image shape s TV s TV s TV s TV s TV s TV s TV MENU Menu Guide Menu Menu Menu Menu ...

Page 30: ... channel DVD RTN RECALL On screen display s TV s TV s TV s TV s TV s TV s TV MUTE Sound mute Sound mute 3 Sound mute 3 Sound mute 3 Sound mute 3 Sound mute Sound mute Sound mute 3 SLOW Slow FWD Slow REW Slow FWD Slow REW Slow FWD Slow REW Slow FWD Slow REW SKIP z SKIP Z DAY 2 DAY 2 Skip FWD Skip REW Skip FWD Skip REW REW Rewind Rewind Rewind Rewind Rewind Rewind Rewind PAUSE STEP Pause Pause Pause...

Page 31: ...l blink one long blink 4 Point the remote control at the device and press p to test the code If the device responds to the remote control you have entered the correct code If the device does not respond to the remote control repeat steps 3 and 4 using another code Note After programming the remote control make sure all necessary keys on the TV remote control in addition to p operate your device If...

Page 32: ...lume even when TV is not the current device mode This includes all remote control device modes except AUX 1 and AUX 2 If you unlock the remote control s volume keys each device mode will have its own volume if the device ID has volume data The remote control will operate the volume of the device associated with the current device mode This includes all remote control device modes If you lock the r...

Page 33: ...rcable 10276 Supermax 10883 Thomson 11256 Tocom 10012 Torx 10003 Toshiba 10000 Tristar 10883 United Cable 10276 10003 10014 US Electronics 10276 10003 10008 10017 V2 10883 Videoway 10000 Viewmaster 10883 Vision 10883 Vortex View 10883 Zenith 10000 10525 10899 10017 Brand Code AlphaStar 10772 Bell ExpressVu 10775 Chaparral 10216 Coolsat1 1806 Crossdigital1 1109 DirecTV 11377 10392 10566 10639 11639...

Page 34: ...099 21158 21304 21730 Go Vision 21071 21072 GoldStar 20741 20801 20869 Goodmans 20790 Gradiente 20490 20651 Greenhill 20717 Grundig 20539 20705 Harman Kardon 20582 20702 Hitachi 20573 20664 21247 Hiteker 20672 Humax 21588 iLo 21348 Initial 20717 Insignia 21268 Integra 20571 20627 IRT 20783 JBL 20702 Jensen 21016 JMB 20695 JVC 20558 20623 20867 21164 Kawasaki 20790 Kenwood 20490 20534 KLH 20717 207...

Page 35: ...ion 20833 20869 Daewoo 20833 20869 Emerson 20675 Funai 20675 Go Video 20744 20715 20741 20833 20869 21044 21075 GoldStar 20741 Hitachi 20664 JVC 20867 21164 LG 20741 Magnavox 20675 Memorex 20695 Panasonic 21762 Philips 20675 21267 Polaroid 21061 Presidian 20675 RCA 20522 20822 Samsung 20820 21044 21075 Sansui 20695 Sanyo 20670 20873 Sharp 20630 Sony 20864 21033 21070 21431 Sylvania 20675 Symphonic...

Page 36: ... 30041 Janeil 30240 Jensen 30067 30041 JVC 30067 30041 30008 30061 31162 KEC 30037 30278 Kenwood 30067 30041 30038 30046 KLH 30072 Kodak 30035 30037 KTV 30000 LG 30037 30240 30038 31037 Linksys 31972 Lloyd s 30240 30000 30072 30038 30208 Loewe 30081 Logik 30240 30000 30072 Lumatron 30278 Luxor 30046 30106 LXI 30037 30000 30042 30067 M Electronic 30240 Magnasonic 30037 30240 30000 30072 30278 30020...

Page 37: ...Shintom 30039 30240 30000 30072 30208 Shogun 30240 Siemens 30037 30104 Signature 30060 30035 30037 30048 30000 30149 30046 30479 Singer 30037 30240 30072 Sonic Blue 30614 30616 Sonographe 30046 Sony 30035 30047 30032 30033 30000 30067 30046 30636 31032 31232 31972 Soundmaster 30000 Stack 9 31972 STS 30042 30105 SV2000 30000 30072 SVA 30000 Sylvania 30035 30081 30000 30043 30593 31593 31781 Symphon...

Page 38: ...0739 Philips 30739 Samsung 30739 Brand Code Adcom 40577 Bose 40674 Carver 40892 Curtis Mathes 40300 GE 40078 Harman Kardon 40892 JVC 40331 Left Coast 40892 Marantz 40892 NEC 40264 Optimus 40013 40300 40823 Philips 40892 Pioneer 40013 40300 40823 Polk Audio 40892 RCA 40013 40300 40823 Realistic 40013 Shure 40264 Sony 40689 40815 Soundesign 40078 Victor 40331 Wards 40078 40013 Yamaha 40354 40133 Bra...

Page 39: ...41306 Hitachi 41273 41801 Integra 40135 40842 41298 41320 JBL 40110 41306 JVC 41058 40074 41374 41495 41811 Kawasaki 41390 Kenwood 41313 41570 41569 40186 KLH 41390 41428 Koss 41366 41497 LG 41293 Linn 40189 Liquid Video 41497 Magnavox 41189 41269 40189 40531 41266 41514 Marantz 41189 41269 40189 40891 41289 McIntosh 41289 Micromega 41189 40189 Mitsubishi 41393 Myryad 41189 Nakamichi 41313 Onkyo 4...

Page 40: ...ings S Opens the Advanced Audio Settings menu 84 Audio Setup S Opens the Audio Setup menu 64 CC Selector S Launches the temporary CC Selector 63 Base CC Mode S Off CC1 CC2 CC3 CC4 T1 T2 T3 T4 62 Digital CC Settings S Opens the Digital CC Setup menu 63 Auto Input S Opens the Auto Input Setup menu 46 Input Labeling S Opens the Input Labeling menu 52 Channel Labeling S Opens the Channel Labeling menu...

Page 41: ...Meter menu 49 Basic Network Setup S Opens the Basic Network Setup menu 88 Personal E mail Setup S Opens the Personal E mail Setup menu 99 Home File Server Setup S Opens the Home File Server Setup menu 93 Software Upgrade S Opens the Software Upgrade menu 94 System Information S Opens the System Information screen 49 Terrestrial Network System Status THINC menu The THINC menu provides access to the...

Page 42: ...nu settings or select a highlighted item A highlighted menu item appears in a different color in the menu All menus close automatically if you do not make a selection within 60 seconds except the signal meter menu which closes automatically after about 5 minutes To close a menu instantly press O Note The menu background may sometimes appear black depending on the signal the TV is receiving This is...

Page 43: ...estart if you do not make a selection within 120 seconds To exit the demo mode Press MENU and VOLUMEC buttons on the TV control panel at the same time and hold for about 2 seconds or set Demo Mode to Off in the Setup menu page 50 Selecting the menu language You can choose from three different languages English French and Spanish for the on screen display of menus and messages To select the menu la...

Page 44: ...nnels that were previously programmed into the TV s memory If the Antenna input signal type is set to Antenna the automatic channel programming process adds newly found channels to the existing set of programmed channels and does NOT erase channels that were previously programmed into the TV s memory To remove an Antenna source channel from the memory you must manually delete it To tune the TV to ...

Page 45: ... remote control to enter the channel number for example 56 1 If the channel is found the number will be added to the list and the box will be checked If the channel is not found a message will appear To remove a channel from the channel memory Highlight the checked box next to the channel number you want to remove and then press T to uncheck the box To save your new settings Highlight Done and pre...

Page 46: ...and then press C or c to select On 4 Press B or b to select the mode field you want to set 5 Press C or c to select the desired input source for that mode 6 Repeat steps 4 and 5 for other modes 7 To save your settings highlight Done and press T To turn off the Auto Input Select Off in step 3 Note Setting the feature to Off will not cancel any settings however all items will be grayed out To reset ...

Page 47: ...are keyboard will appear 4 Repeatedly press the corresponding key on the remote control to highlight the desired character on the on screen software keyboard 5 The highlighted character is entered after you either press a different key press c key or after a two second pause 6 Repeat steps 4 and 5 until you have entered all desired text 7 When finished press T 8 New labels will be added to the lis...

Page 48: ...ing an HDMI or DVI device to the HDMI input page 20 Note Because the PC and HDMI 1 inputs share the same set of analog audio inputs the PC Audio menu setting influences the HDMI 1 Audio menu setting If PC Audio is set to No the HDMI 1 Audio setting changes to Auto If PC Audio is set to Yes the HDMI 1 Audio setting is set to Digital and is grayed out in the menu Also see item 5 on page 12 and Setti...

Page 49: ...menu highlight System Information and press T 4 Press C c to scroll through the menu bar to select the Software Version and view the related information To close the screen and return to the Installation menu Highlight Done and press T To return to normal viewing Press O Reset Factory Defaults To reset all settings and channels to their factory default values 1 Press Y and open the Setup menu 2 Hi...

Page 50: ...he Setup menu 2 Highlight Power On Mode and press c 3 Press B or b to select either Power Saving or Fast Selecting the Demo Mode You can select the TV s demo mode on or off This feature is provided for demonstrational purposes only To select the Demo Mode 1 Press Y and open the Setup menu 2 Highlight Demo Mode and press c 3 Press B or b to select either On or Off Note If the demo mode has been set...

Page 51: ...pability e g Audio Receiver is connected to the HDMI input Press on the remote or TV control panel repeatedly to highlight HDMI 1 HDMI 2 or HDMI 3 If the connected CEC device has any connected devices a separate device selection popup window will appear Press repeatedly to highlight a desired input source and then press O Note If you select the CE Link input source from the popup window using some...

Page 52: ...ow left shows the default Input Selection screen with none of the inputs labeled as a specific device The screen below right is an example of how you could label the inputs if you connected a VCR to VIDEO 1 Cable TV to VIDEO 2 a video recorder to ColorStream HD1 a DTV set top box to HDMI 1 a satellite DSS set top box to HDMI 2 and a DVD player to HDMI 3 Also note that the ColorStream HD2 input is ...

Page 53: ...el or input will appear in the list Picture snapshots will be taken when a source change occurs from the Channel Browser Up to 32 picture previews can be stored in the Channel Browser across all lists If you add a new picture when the total 32 the oldest thumbnail will be deleted One thumbnail is counted only once against the total no matter how many times it appears in various lists Turning off t...

Page 54: ... To tune to a channel or input in Select mode 1 While watching TV press 3 C or c to open the Channel Browser and surf back to a previous item or forward to the next item in the list In Select mode when you stop on an item in the Channel Browser it will be highlighted but you must press T to tune the TV to the highlighted item 2 Press T to tune the TV to the highlighted item 3 Press O to close the ...

Page 55: ...he first channel you want to view 2 Select a second channel using the Channel Number buttons and the dash button if selecting a digital channel 3 Press R on the remote control The previous channel will display Each time you press R the TV will switch back and forth between the last two channels that were tuned Note If you press R from a non antenna input the TV will return to the last viewed input...

Page 56: ...ture sizes the top and bottom edges of the picture including subtitles or captions may be hidden To view the hidden edges either scroll the picture TheaterWide 2 and 3 only or try viewing the program in Full or Natural picture size Natural picture size The image is displayed close to its originally formatted proportion Some program formats will display with sidebars and or bars at the top and bott...

Page 57: ...al spaces Picture is not distorted from original size Native picture size for 720p 1080i and 1080p signal programs If receiving a 720p 1080i or 1080p signal program Native mode scales the video to display the entire picture within the borders of the screen i e no overscanning This is especially useful for external HD sources such as HD DVD DVHS movies or PC graphics Note Native picture size is ava...

Page 58: ...80p 720p 1080i 1080p or VGA signal from the HDMI input Note The auto aspect ratio feature is not applicable to antenna or cable input sources To turn on the auto aspect ratio feature 1 Press Y and open the Video menu 2 Highlight Theater Settings and press T 3 In the Auto Aspect Ratio field select On 4 To save the new settings highlight Done and press T To revert to the factory defaults highlight R...

Page 59: ...he current source displays in yellow Left window ANT input is selectable Right window ColorStream HD1 and HD2 only for 480p 1080i and 720p and HDMI 1 HDMI 2 HDMI 3 are selectable Note The message Current video format cannot be displayed will appear if you press P when the TV is in ColorStream HD1 or HD2 mode and is receiving a 480i format signal The FREEZE feature is not available when the POP dou...

Page 60: ...ure settings from different modes as described below Note Document mode is available for HDMI input sources only grayed out for other input sources To select the picture mode 1 Press Y and open the Video menu 2 Highlight Mode and press T 3 Press B or b to select the picture mode you prefer and press T Note The picture mode you select affects the current input only You can select a different pictur...

Page 61: ...you select picture mode Pro 1 or Pro 2 and then change a picture quality setting those values are saved in picture mode Pro 1 or Pro 2 Using the TheaterLock feature The TheaterLock feature allows you to lock all items that affect the picture mode setting In other words those settings that when adjusted cause the Mode setting to automatically change to Preference will be grayed out and unavailable ...

Page 62: ...the primary language in your area Note If the program or video you selected is not closed captioned no captions will display on screen To view text Highlight T1 T2 T3 or T4 Note If text is not available in your area a black rectangle may appear on screen If this happens set the Base CC Mode to Off To turn off the closed caption mode Select Off in step 3 above Note A closed caption signal may not d...

Page 63: ...ress O Using the Closed Caption button on the remote control If you press when an analog channel is tuned The CC selector will be active and will display CC1 4 and T1 4 as the options The audio selector will be disabled If you press when a digital channel is tuned The CC selector will be active and will display the possible caption options available languages for that channel or service For exampl...

Page 64: ...ity stereo sound MTS can also transmit a second audio program SAP containing a second language music or other audio information when provided by individual stations When the TV receives a stereo or SAP broadcast the word STEREO or SAP appears on screen when E is pressed The MTS feature is not available when the TV is in VIDEO mode To listen to stereo sound 1 Press Y and open the Audio menu 2 Highl...

Page 65: ...ss or treble weaker or increases the balance in the left channel depending on the item selected c makes the bass or treble stronger or increases the balance in the right channel depending on the item selected 5 To save the new settings highlight Done and press T To reset the settings to the factory defaults highlight Reset and press T Using the StableSound feature The StableSound feature limits th...

Page 66: ...hlight Reset and press T Using the Dolby Digital Dynamic Range Control feature This dynamic range control feature causes the ATSC dynamic range to be further compressed allowing you to switch from ATSC to analog broadcasts at the same dynamic range To use the Dolby Digital Dynamic Range Control 1 Press Y and open the Audio menu 2 Highlight Audio Setup and press T 3 In the Dolby Digital Dynamic Ran...

Page 67: ... If you cannot remember your PIN code While the PIN code entering screen is displayed press E four times within five seconds The PIN code will be cleared and you can enter a new PIN code Changing your PIN code 1 Press Y and highlight the Locks menu icon 2 Press b to display the PIN code entering screen 3 Enter your four digit PIN code and press T 4 Press b to highlight New PIN Code and press T 5 P...

Page 68: ...er your four digit PIN code and press T 4 Press b to highlight Enable Rating Blocking 5 Press c and b to select On and press T 6 Press b to highlight Edit Rating Limits and press T The Edit Rating Limits screen appears 7 Highlight Alt RS and press T The Edit Alternate Ratings screen will appear Note The Alt RS button will only be available if an additional rating system is currently available It m...

Page 69: ...esigned to be viewed by adults and therefore may be unsuitable for children under 17 L Crude or indecent language S Explicit sexual activity V Graphic violence TV 14 Parents Strongly Cautioned This program contains some material that many parents would find unsuitable for children under 14 years of age D Intensely suggestive dialog L Strong coarse language S Intense sexual situations V Intense vio...

Page 70: ...uts VIDEO 1 VIDEO 2 ColorStream HD 1 ColorStream HD 2 HDMI 1 HDMI 2 HDMI 3 and PC and channels 3 and 4 You will not be able to view the input sources or channels until you unlock the inputs To lock unlock the video inputs 1 Press Y and highlight the Locks menu icon 2 Press b to display the PIN code entering screen 3 Enter your four digit PIN code and press T 4 Press b to highlight Input Lock and p...

Page 71: ...er had been activated and you will have to deactivate the Input Lock as described above Using the control panel lock feature You can lock the control panel to prevent your settings from being changed accidentally by children for example When the control panel lock is On none of the controls on the TV control panel will operate except POWER To lock the control panel 1 Press Y and highlight the Lock...

Page 72: ...s to reduce noise and minimize periodic vertical stripes on the screen The adjustment range is within 5 from center The default settings may vary depending on the input signal format Setting the PC Audio This function allows you to output the sound from your PC if connected or mute the sound from your PC and output the sound from your HDMI DVI connection page 23 To set the PC Audio 1 Press Y and o...

Page 73: ...C technology and allows you to control Toshiba CE Link compatible devices from the TV remote via HDMI connection page 21 When the Enable CE Link item in the CE Link setup menu page 74 is set to On individual CE Link functions also set to On will be activated CE Link playback device HD DVD player etc control With your TV s remote control or using the CE Link Control menu you can control the connect...

Page 74: ... that a connected CE Link device such as HD DVD player etc is selected for the Audio Receiver input source You can also use this function when the audio receiver is connected to the TV s DIGITAL AUDIO OUT terminal not HDMI connection In this case select a digital audio input mode on the Audio Receiver These functions depend on the device connected Other CE Link functions When the Enable CE Link is...

Page 75: ...bCr color space xvYCC On This feature expands the acceptable color range limits in the HDMI signals then allows sending wider color signals from HDMI source All above HDMI settings need proper HDMI source device If HDMI source products does not support these features the TV may not work properly by activating these features Note If your HDMI connection is capable of 1080p and or your TV is capable...

Page 76: ...ff air digital channels if applicable Title Duration Detailed description Note The location of the banner can be moved to the top or bottom of the screen by pressing B or b while the RECALL or INFO display is on screen The last position will be stored to memory Understanding the auto power off feature The TV will automatically turn itself off after approximately 15 minutes if it is tuned to a vaca...

Page 77: ... the setting is moved in the minus direction the detail of black colors will be decreased If the setting is moved in the plus direction the detail of black colors will be increased 5 To save the new settings highlight Done and press T To revert the factory defaults highlight Reset and press T Note If you select one of the factory set picture modes Sports Standard Movie or Document and then change ...

Page 78: ...he Vertical Edge Enhancer feature The Vertical Edge Enhancer feature strengthens video contour To turn on the Vertical Edge Enhancer feature 1 Press Y and open the Video menu 2 Highlight Picture Settings and press T 3 Highlight Advanced Picture Settings and press T 4 In the Vertical Edge Enhancer field select the mode you prefer Off Low Middle or High 5 To save the new settings highlight Done and ...

Page 79: ... from 60 frames per second to 120 frames per second virtually eliminating motion blur without adding flicker or reducing image brightness To turn on the ClearFrame 1 Press Y and open the Video menu 2 Highlight Picture Settings and press T 3 Highlight Advanced Picture Settings and press T 4 In the ClearFrame field select On 5 To save the new settings highlight Done and press T To revert to the fact...

Page 80: ...cast with a weak signal especially a Cable channel or playing a noisy video tape or disc To change the CableClear settings 1 Press Y and open the Video menu 2 Highlight Noise Reduction and press T 3 In the CableClear field select your desired setting Note If the current input is ANT VIDEO 1 or VIDEO 2 the menu will display the text CableClear The available selections are Off Auto Low Middle and Hi...

Page 81: ...aster Pro 1 Press Y and open the Video menu 2 Highlight ColorMaster Pro and press T 3 In the ColorMaster Pro field select On Note If you select one of the factory set picture modes Sports Standard Movie or Document and then change the ColorMaster Pro setting the picture mode automatically changes to Preference To turn off ColorMaster Pro Select Off in Step 3 above Using Color Palette Adjustment Wh...

Page 82: ...r and then press T The video on screen will automatically freeze and the cross hairs will appear on the video Note Release the video anytime by pressing B 4 Press BbC c to move the cross hairs to the color you want to adjust and then press T 5 Press B or b to select either Hue Saturation or Brightness and then press C or c to adjust the setting Note You can reset the Hue Saturation and Brightness ...

Page 83: ...eation and high action games This feature is more effective for 480i and 1080i input signals Note To use the Game Mode feature the current video input must be Video 1 Video 2 ColorStream HD1 ColorStream HD2 HDMI 1 HDMI 2 or HDMI 3 The Game Mode cannot be turned on when any other video input is selected To turn on Game Mode 1 Press Y and open the Video menu 2 Press B or b to highlight the Game Mode...

Page 84: ...he factory defaults highlight Reset and press T WOW TruSurround SRS and l symbol are trademarks of SRS Labs Inc WOW and TruSurround technologies are incorporated under license from SRS Labs Inc Using the virtual surround sound feature Dolby Virtual and SRS TruSurround The Dolby Virtual and SRS TruSurround feature allows you to enjoy virtual surround sound from the TV s speakers To turn on the Dolb...

Page 85: ...ernal devices Tuning Issues related to tuning of various types of channels Miscellaneous Important issues that do not fit into the other categories Press B or b to select your desired category and press T The subgroups menu will appear see below Help Subgroups Each major category will consist of the following 3 sub groups FAQ List Frequently Asked Questions provides answers to common user question...

Page 86: ...wn After you select OK the window will transition back to the previous list with the last item still highlighted Customer Assistance No audio output regardless of input selected No incorrect audio on some channels Poor Audio Quality Stable Sound has little effect Audio lags leads video No digital audio output sometimes Audio Diagnostics List Browse EXIT Exit ENTER Select CHRTN Back INFO Info No in...

Page 87: ...egistered trademarks or trademarks of Microsoft Corporation in the United States and or other countries A Connecting the TV to your home network 1 Connect the TV to your home network via the TV s RJ 45 Ethernet port See pages 24 and 25 for connection instructions 2 If you want to use file sharing only and do not have Internet service in your home Go to section B Setting up the network address on t...

Page 88: ... Skip to section C Setting up file sharing on your PC page 90 8 If the automatic network address setup is not successful the following screen will appear a Make sure all cables for your home network are securely connected b Make sure your home network is set up properly See page 24 for TV connection information Also consult the owner s manuals for your other components c Make sure the DHCP and sec...

Page 89: ...ht No and press T 6 The Basic Network Setup menu appears Press B or b to highlight the IP Address field and then use the Number buttons on the remote control to input the IP address 7 Press b to highlight the Subnet Mask field and then use the Number buttons to input the Subnet Mask 8 Press b to highlight the Gateway Router field and then use the Number buttons to input the Gateway Router address ...

Page 90: ... 92 No other operating systems are compatible with the TV Note The name of any directory folder on your PC that you are setting up for file sharing with the TV cannot be longer than 12 characters and cannot contain any special characters See Media specifications page 95 for details on compatible JPEG and MP3 files The network NETBIOS name of your PC that you are setting up for file sharing must be...

Page 91: ...ile sharing on the TV on page 93 a Click to display the Sharing tab b Click to select Share this folder on the network c Click OK which will close the Permissions window for the selected folder a Click to display the Sharing tab b Click to select Share this folder c Click Permissions which will open the Permissions window for the selected folder d Click OK to close the window c Click Apply a Click...

Page 92: ...ght click the folder to be shared b Click Sharing which will open the Properties window for the selected folder a Click to display the Sharing tab b Click to select Share this folder c Click Permissions which will open the Permissions window for the selected folder d Click OK which closes the Permissions window c Click Apply a Click Add and then select the user to be given sharing privileges This ...

Page 93: ...sitive 7 Press Bb to highlight either JPEG Picture Directory or MP3 Music Directory Note The first time you highlight either of these fields the message Please Wait will appear until the field is populated with the files in your PC s shared folder s 8 Press C c to select the shared folder on your PC that contains the JPEG and or MP3 files you want to view play on the TV Note Make sure you select t...

Page 94: ...s screen Note Help instructions are provided in the on screen display and include specific remote control key functions that are applicable only in certain views For example x X page up and down Z Home z End of Line T New Line O Closes the screen WITHOUT saving entries About the Software Upgrade feature Home Network This feature allows you to download software updates to your television from a sha...

Page 95: ...ze 32 MB JPEG files larger than 32 MB will not display Maximum JPEG image resolution 1920 5 1080 pixels Images with a resolution higher than 1920 5 1080 pixels will be scaled The Picture Viewer is designed to display only pictures stored in compatible JPEG formats with a file extension of jpg JPEG images processed and or edited on a personal computer PC may not display properly or at all Some digi...

Page 96: ...g pages 87 93 also see pages 24 and 25 2 Press Y and open the Applications menu 3 Highlight Picture Viewer and press T If the network is available it will retrieve the JPEG picture list via the network 4 Press B or b to access the folder or directory that contains the JPEG pictures you want to view To expand a particular folder to view a list of images press c on the folder To close the folder or ...

Page 97: ... show interval 1 Press O to close the Picture Viewer if it is open 2 Press Y and open the Setup menu 3 Highlight Slide Show Interval and press T 4 Select the interval from the menu sidebar 2 5 10 15 or 20 seconds To close the Picture Viewer Press O to close the Picture Viewer and return to normal TV watching EXIT ENTER CH RTN Rotate Next Picture Viewer Exit Slide Show File Select ALLENMPC Pics Dir...

Page 98: ...rst MP3 file in the list Press BbC c to navigate to the rewind pause fast forward skip backward skip forward volume and mute buttons or to select another MP3 file and then press T During playback To stop playback press A To resume playback press S To restart the same song from the beginning press F Pressing F repeatedly skips to previous songs in the song list Pressing G skips to the next song in ...

Page 99: ...sing the software keyboard on page 94 7 Press b to highlight Time Zone then press C or c to select your desired setting You can choose from the following options Eastern Central Mountain Pacific Alaska Hawaii Atlantic Newfoundland 8 Press b to highlight Check for New Mail then press C or c to select your desired setting You can choose to have the TV check for new e mail every 5 15 30 minutes or 1 ...

Page 100: ... Port Number uses default if left blank POP3 User Name same as e mail account login POP3 Password password See Description of fields in the E mail Account Setup window page 101 for details on the settings for these fields 12 Highlight Test and press T to confirm that the e mail account settings work correctly 13 When testing is finished a message will appear indicating whether the e mail account t...

Page 101: ...yboard to enter the e mail account login Depending on your ISP this may be the entire e mail address or just the characters in the e mail address before the sign POP3 Password Use the software keyboard to enter the password for the e mail account Note To help protect your other personal Internet or e mail accounts create a password that is significantly different from any of your usual passwords a...

Page 102: ...n Elements of the Inbox 1 PIP window When the Inbox is open you can continue watching the current channel in the PIP picture in picture window in the upper left corner of the screen You can change channels in the PIP window by pressing on the remote control 2 From Received and Subject information 3 User name 4 Scroll arrows Press Bb to scroll through messages one by one Press x X to scroll through...

Page 103: ... illustrated below will appear From the Read view press B b to scroll up and down to view the entire message To view a JPEG attachment using the Picture Viewer highlight the Paperclip icon and press T To return to the Read View from the Picture Viewer press O To return to the Inbox View from the Read view press R To close the Personal E mail feature and return to normal TV watching on the last cha...

Page 104: ...ote control or TV press a second time which will change to the next video input source and display the Input Selection window Cannot view external signals or channel 3 or 4 If you cannot view signals from external devices connected to VIDEO 1 VIDEO 2 ColorStream HDMI 1 HDMI 2 HDMI 3 PC or from channels 3 or 4 make sure the Input Lock is set to Off page 70 Poor color or no color The station may hav...

Page 105: ...l unable to tune digital channels clear all channels from the channel list page 45 and reprogram channels into the channel memory page 44 If you are still unable to tune digital channels use the Reset Factory Defaults procedure page 49 Also see TV stops responding to controls and Other problems page 104 Closed caption problems If the program or video you selected is not closed captioned no caption...

Page 106: ...files in the networked PC s shared folder s Basic network setup and Home server setup were not successfully performed Picture is not displayed Rectangle containing X is displayed instead The picture file does not meet the specifications for the Picture Viewer Media specifications in Chapter 8 Picture is not listed at all There are no picture files in the networked PC s shared folder s The number o...

Page 107: ...s displayed but the shared folder s are not displayed The networked PC does not have shared folders set up correctly See Setting up file sharing on your PC in Chapter 8 for details The TV s user name and password do not match the PC s Make sure the user name and password settings in the TV exactly match the settings in the networked PC User names and passwords are generally case sensitive Personal...

Page 108: ...owser to www toshiba ca click Home Entertainment and then click Support LED Indication Condition Solution 1 Green is ON solid The TV is operating properly 2 Yellow is ON solid Standby with Power On Mode set to Fast See Selecting the Power On Mode page 50 3 Yellow blinks Fan stopped 57LX177 only Turn OFF the TV and unplug the power cord Plug the power cord in again and turn ON the TV 4 Green blinks...

Page 109: ... Y 1V p p 75 ohm PR 0 7 V p p 75 ohm PB 0 7 V p p 75 ohm Suggested formats 1080i 720p 480p 480i AUDIO 150 mV rms 22 k ohm or greater HDMI INPUT HDMI compliant type A connector HDCP compliant E EDID compliant Audio Lip Sync supported Deep Color supported 10 bit 4 4 4 12 bit 4 4 4 xvYCC supported Suggested formats See table below HDMI Audio 2 channel Linear PCM 32 44 1 48 kHz sampling frequency 16 2...

Page 110: ...0 mm 57LX177 Width 53 3 4 inches 1 365 mm Height 35 3 8 inches 896 mm Depth 15 3 8 inches 390 mm Mass weight 42LX177 61 5 lbs 27 9 kg 46LX177 78 7 lbs 35 7 kg 52LX177 103 2 lbs 46 8 kg 57LX177 125 2 lbs 56 8 kg Operating conditions Temperature 32ºF 95ºF 0ºC 35ºC Humidity 20 80 no moisture condensation Supplied Accessories Remote control with two size AA alkaline batteries Owner s manual this book ...

Page 111: ...co 4 Labor service charges for set installation setup adjustment of customer controls and installation or repair of antenna systems are not covered by this warranty Reception problems caused by inadequate antenna systems misaligned satellite dishes cable television distribution VCRs DVD players recorders personal computer level IEEE 1394 devices and any other connected signal source device are you...

Page 112: ...quired Depending on the type of repair required the service will either be performed on site or the Television will be taken to an ASP for repair and returned at no cost to you ON SITE SERVICE ONLY APPLIES WITHIN 100 KILOMETERS OF AN ASP IF YOU ARE NOT WITHIN 100 KILOMETERS OF AN ASP YOU MUST DELIVER THE ENTIRE TELEVISION TO AN ASP YOU MUST PAY FOR ALL TRANSPORTATION AND INSURANCE CHARGES FOR THE ...

Page 113: ...s the Dispute shall be referred to and resolved by final and binding arbitration to the exclusion of the courts To the extent not precluded by law you agree to waive any right that you may have to commence or participate in any representative or class proceeding against the Related Parties relating to any Dispute If and where applicable and to the extent not precluded by law you further agree to o...

Page 114: ...ND ANY EXPRESSED OR IMPLIED WARRANTIES INCLUDING BUT NOT LIMITED TO THE IMPLIED WARRANTIES OF MERCHANTABILITY AND FITNESS FOR A PARTICULAR PURPOSE ARE DISCLAIMED IN NO EVENT SHALL THE OpenSSL PROJECT OR CONTRIBUTORS BE LIABLE FOR ANY DIRECT INDIRECT INCIDENTAL SPECIAL EXEMPLARY OR CONSEQUENTIAL DAMAGES INCLUDING BUT NOT LIMITED TO PROCUREMENT OF SUBSTITUTE GOODS OR SERVICES LOSS OF USE DATA OR PRO...

Page 115: ...REEZE 59 Front of the TV 11 G Game Mode feature 83 GameTimer 71 H HDMI audio mode 48 HDMI cable 14 HDMI settings 75 Deep Color 75 Lip Sync Latency 75 xvYCC 75 HDMI connection 20 Help feature 85 Home file server setup 93 Home network connection 24 I INFO button 76 INPUT button 51 Installation care and service 3 Installation setup 10 Integrated digital tuning 9 Internet service provider 87 IR blaste...

Page 116: ...Sound 65 Stereo sound 64 SurfLock 55 S video cable 14 System status 49 T TheaterLock feature 61 TheaterWide picture size 56 THINC button 27 THINC system 13 Troubleshooting 104 TV status information 76 V V Chip blocking Locks menu 67 VCR connection 15 16 17 Vertical Edge Enhancer 78 Video cables 14 Video input label 52 Video input lock 70 W Warranty Canada 112 U S 111 WOW SRS 3D 84 WOW SRS Focus 84...

Page 117: ...117 Notes ...

Page 118: ...urfLock DynaLight ColorMaster ClearFrame TheaterLock and THINC are trademarks of Toshiba America Consumer Products L L C REGZA is a trademark of Toshiba Corporation MANUFACTURED BY HEAD OFFICE 191 McNABB STREET MARKHAM ONTARIO L3R 8H2 CANADA TEL 905 470 5400 SERVICE CENTERS TORONTO 191 McNABB STREET MARKHAM ONTARIO L3R 8H2 CANADA TEL 905 470 5400 MONTREAL 18050 TRANS CANADA KIRKLAND QUEBEC H9J 4A1...

Reviews: