6. Turn the tank right side up and use compressed air
to blow out any debris deposited in the tank.
Important:
Debris left inside a tank can clog
and damage the spray system during operation.
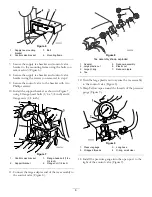
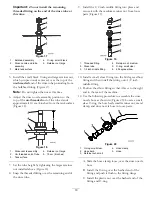
7. Insert the bulkhead fitting through top opening and
maneuver it into place so that the seal side of the
bulkhead fitting is in contact with the interior of the
drilled tank opening (Figure 12).
2
3
7
5
1
2
3
7
4
6
4
6
G005789
Figure 12
1.
Rinse tank
5.
Retainer fork holes,
correct orientation
2.
Bulkhead
6.
Retainer fork
3.
O-ring, clear
7.
Sump, rinse tank
4.
Plastic nut
8. Secure the new bulkhead fitting to the rinse tank
using the plastic nut in loose parts as shown in
Figure 12.
Note:
The seal must be seated between the fitting
and tank around the entire circumference of the hole
edge (Figure 12).
Note:
Orientate the bulkhead so that the retainer
fork will come from the front to the back of the
machine (Figure 12).
9. Install the rinse tank cap.
10. Install the rinse tank assembly with the new fitting
to the machine.
11. Secure the tank using the front tank strap and
fasteners removed previously.
6
Installing the Rinse Nozzle
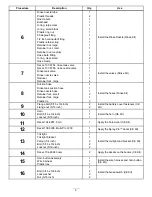
Parts needed for this procedure:
1
Rinse nozzle tube
2
Plastic threads
1
Nozzle bulb
1
Bulkhead
1
O-ring, large clear
1
O-ring, small black
1
Plastic ring nut
1
60 degree fitting
1
1/2 inch connector fitting
1
Plastic retainer ring
1
Retainer nut, large
1
Retainer nut, small
1
Retainer nut, medium
1
Hose barb fitting
2
O-ring, clear small
1
Hose clamp
Drilling the Main Tank
1. Open the tank lid and remove the strainer basket.
2. Locate the tank ridge area to the back and right of
the main tank lid.
3. Measure 6.4 cm (2-1/2 inches) from the ridge edges
as shown in Figure 13. Mark the tank at that spot.
Note:
The tank may already have a drill point at
the spot being measured. Use this indentation, if
present, to drill the hole.
8

