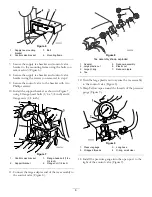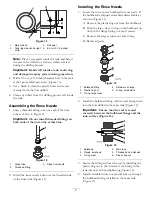
Figure 42
1.
Pressure gauge
3.
Tee bracket
2.
Reducer
4.
Reducer nut and coupler
2. Apply sealer tape to threads of the new pressure
gauge and install it into the reducer. Use a wrench
to hold reducer while tightening the new pressure
gauge.
3. Position the gauge so it can be viewed by the
operator.
Note:
The reducer nut may need to be loosened and the
whole assembly turned to allow the gauge to be viewed.
18
Assembling the Pressure Filter
Parts needed for this procedure:
1
Pressure filter
1
Spring
1
Ball
1
Reducer, red
1
Hose, filter flush
Procedure
1. Locate the pressure filter in loose parts. Locate the
small spring, ball and red reducer in loose parts.
Locate the filter flush hose in loose parts; refer to
Figure 1.
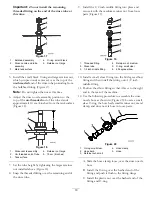
2. Install the spring, ball, and red plug then elbow on
hose assembly into the vertical pressure inlet on the
bottom of the filter (Figure 43).
Figure 43
1.
Pressure filter
4.
Reducer, red
2.
Spring
5.
Filter flush hose
3.
Ball
3. Secure the parts internal by connecting the threaded
nut side of filter flush hose to pressure inlet on the
bottom of the filter (Figure 43).
19
Mounting the Pressure Filter
Parts needed for this procedure:
1
Pressure filter mount
4
Bolt (5/16 x 1 inch)
4
Washer (5/16 inch)
4
Flange nut (5/16 inch)
Procedure
1. Locate the pressure filter mount bracket in loose
parts.
2. Mount the pressure filter assembly as shown in
Figure 44 to the filter bracket using two bolts (5/16
x 1 inch), two washers (5/16 inch) and two lock nuts
(5/16 inch).
20


