


Assembling the Gear Box Assembly (continued)
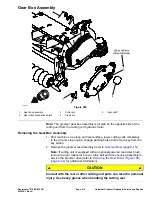
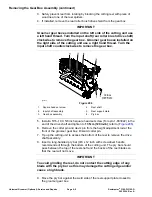
8. Fit gear box cover over dowel pins and install four (4) socket head screws.
Tighten screws from
2 to 4 N·m (15 to 40 in-lb)
. In an alternating cross
pattern, tighten four (4) socket head screws from
8 to 9 N-m (75 to 85 in-lb)
.
9. Fill the gear box with 80W-90 gear oil and tighten drain/fill plug from
4 to 5
N·m (32 to 52 in-lb)
.
Gear box oil capacity for 7 in. reel cutting units = 90 cc (3 oz.)
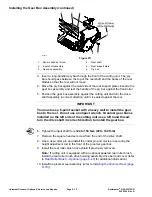
CAUTION
Use the 1-3/8” flats on the input shaft to prevent the input shaft from
rotating during adapter installation. DO NOT use the 1/2” hex on the
input shaft to secure the shaft during adapter installation or input
shaft damage may occur.
10. If removed, install the threaded adapter in the input shaft. If reusing a
previously installed threaded adapter, apply medium strength thread locker to
the smaller (5/8-11) threads only. Tighten threaded adapter from
156-196
N·m (115-125 ft-lb)
.
11. Operate groomer gear box by hand to check for proper operation prior ro
installation.
Installing the Gear Box Assembly
1. Park machine on a clean and level surface, lower cutting units completely
to the ground, stop engine, engage parking brake and remove key from the
key switch.
CAUTION
Contact with the reel or other cutting unit parts can result in personal
injury. Use heavy gloves when handling the cutting reel.
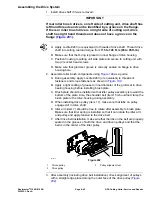
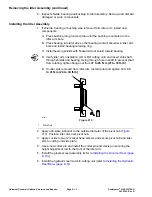
2. Safely prevent reel from rotating by blocking the cutting reel with piece of
wood near one of the reel spiders.
IMPORTANT
Groomer gear boxes installed on the left side of the cutting unit
use a left hand thread. Turn the input shaft (rear roller brush drive
shaft) counterclockwise to install the gear box. Groomer gear boxes
installed on the right side of the cutting unit use a right hand thread.
Turn the input shaft clockwise to install the gear box.
Reelmaster
®
3100-D/3105-D
Page 9–11
Universal Groomer (Optional): Service and Repairs
20252SL Rev A
Summary of Contents for 03200 Reelmaster 3100-D
Page 4: ...NOTES NOTES Page 4 Reelmaster 3100 D 3105 D 20252SL Rev A ...
Page 6: ...g341979 Figure 1 Preface Page 6 Reelmaster 3100 D 3105 D 20252SL Rev A ...
Page 10: ...Preface Page 10 Reelmaster 3100 D 3105 D 20252SL Rev A ...
Page 20: ...Safety Safety and Instructional Decals Page 1 10 Reelmaster 3100 D 3105 D 20252SL Rev A ...
Page 44: ...Specifications and Maintenance Special Tools Page 2 24 Reelmaster 3100 D 3105 D 20252SL Rev A ...
Page 224: ...Hydraulic System Service and Repairs Page 5 148 Reelmaster 3100 D 3105 D 20252SL Rev A ...
Page 385: ......