10
STEP 15: Adjust the carriage cable tension. This is accomplished by tightening the near nut
on top of each carriage. The near carriage adjustment nut adjusts the opposite post carriage
height. The left post carriage nut adjusts the right column carriage, and the right column
carriage nut adjusts the left column carriage. Adjust each cable to approximately 1/2” side-to-
side play. Check the latch releases to insure the carriage is still engaged in the appropriate
latch.
STEP 16: Install the half moon gear locks on each swing arm. Position the swing arms on the
carriages using the included 1 1/2” diameter pins (2 short for the front arms and 2 long for
the rear arms). Check for proper engagement of the arm lock – the rack on the lock should
fully engage the gear on the arm.
STEP 17:
Remove the fill cap from the power unit and fill the oil tank reservoir. To fill the oil
tank reservoir, the lift must be completely lowered. Fill the oil tank with a premium quality
ISO-32, or AW-46 Hydraulic Oil, or premium quality ATF-DEXRON-III / MERCON.
STEP 18: Make the electrical hookup to the power unit. (220V Single Phase). It is
recommended that a 220 Volt, 30 Amp twist lock plug be installed in the power line just
ahead of the power unit. Size wire for 30-amp circuit.
Warning:
The wiring must comply with local code. Have a certified electrician make
the electrical hook-up to the power unit. Protect each circuit with time delay fuse or circuit
breaker; 208V-230V single phase. 60 Hz 30 amp.
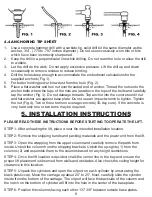
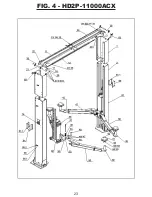
STEP 19: Install the shut-off mechanism for the 11000ACX model (Fig. 4). Install limit switch
(16) and height-limit lever (12) to the bottom of the cross beam support.
STEP 20: Do not place any vehicle on the lift at this time. Cycle the lift up and down several
times to insure latches click together and all air is removed from the system. Insure all
hydraulic fittings are tight and not leaking. To lower the lift, latch releases must be manually
released. Latches will automatically reset once the lift ascends approximately 17” from base.
If latches click out of sync, tighten the cable on the one that clicks first.
WARNING: DO NOT PERFORM ANY MAINTENANCE OR INSTALLATION
OF ANY COMPONENTS WITHOUT FIRST ENSURING THAT ELECTRICAL POWER
HAS BEEN DISCONNECTED AT THE SOURCE OR PANEL AND CANNOT BE
REENERGIZED UNTIL ALL MAINTENANCE AND/OR INSTALLATION PROCEDURES
ARE COMPLETED.
DANGER: DO NOT RUN POWER UNIT WITHOUT FLUID. DAMAGE TO PUMP
CAN OCCUR. THE POWER UNIT MUST BE KEPT DRY. DAMAGE TO POWER UNIT
CAUSED BY WATER OR OTHER LIQUIDS SUCH AS DETERGENTS, ACID ETC., IS
NOT COVERED UNDER WARRANTY.


