13
7.
WARNING:
Do not lift the vehicle if you cannot establish secure and level
lifting points. Do not use sub-standard shims or other devices in place of approved and
recommended rubber pad adapters. Never use the lift without the rubber pads in place on
each plate and in contact with the lifting points of a vehicle.
8. Press up button and raise vehicle to desired height. Do not go under vehicle until load
rests on level safety locks.
10. While lifting the vehicle a clicking sound should be noticeable which indicates the safety
mechanism is operating. If this sound is not heard, immediately cease using the lift and call
an authorized service agent.
9. When lift reaches maximum height, a limit switch will come into operation and stop the lift.
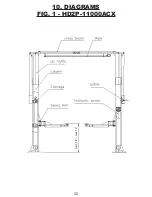
When lift has stopped, press and hold the lowering handle (Fig. 1) until load rests on level
safety locks.
11. Once the repair work to the vehicle is complete, make sure to remove all tools, safety
jack stands, and materials from under the vehicle and lift. Also, make sure the work area is
clear and it is safe to lower the vehicle.
12. Lower vehicle by pressing the Up button to disengage the safety locks. Pull and hold
down the safety lock release handle (Fig. 2) to release the safety locks then press the
lowering handle (Fig. 1) until the lift is completely lowered.
13. Move the lifting arms outward, out of the path of the vehicle. Clear all bystanders, and
any objects from work area and direction of vehicle.
14. Disengage the vehicle parking brake. Start the vehicle’s engine, and drive the vehicle off
the lift slowly and carefully.
WARNING: THE OPERATOR MUST BE TRAINED AND AUTHORIZED TO
OPERATE THE LIFT.
WARNING: DO NOT GO UNDER VEHICLE UNDER ANY CIRCUMSTANCES
WHILE VEHICLE IS BEING RAISED OR LOWERED.
WARNING: LOAD MUST BE EVENLY DISTRIBUTED BETWEEN BOTH
LIFTING PLATFORMS. IF LOAD IS UNBALANCED, REPOSITION VEHICLE. DO NOT
LOWER ON TO LOCKS AT DIFFERENT HEIGHTS.


