42
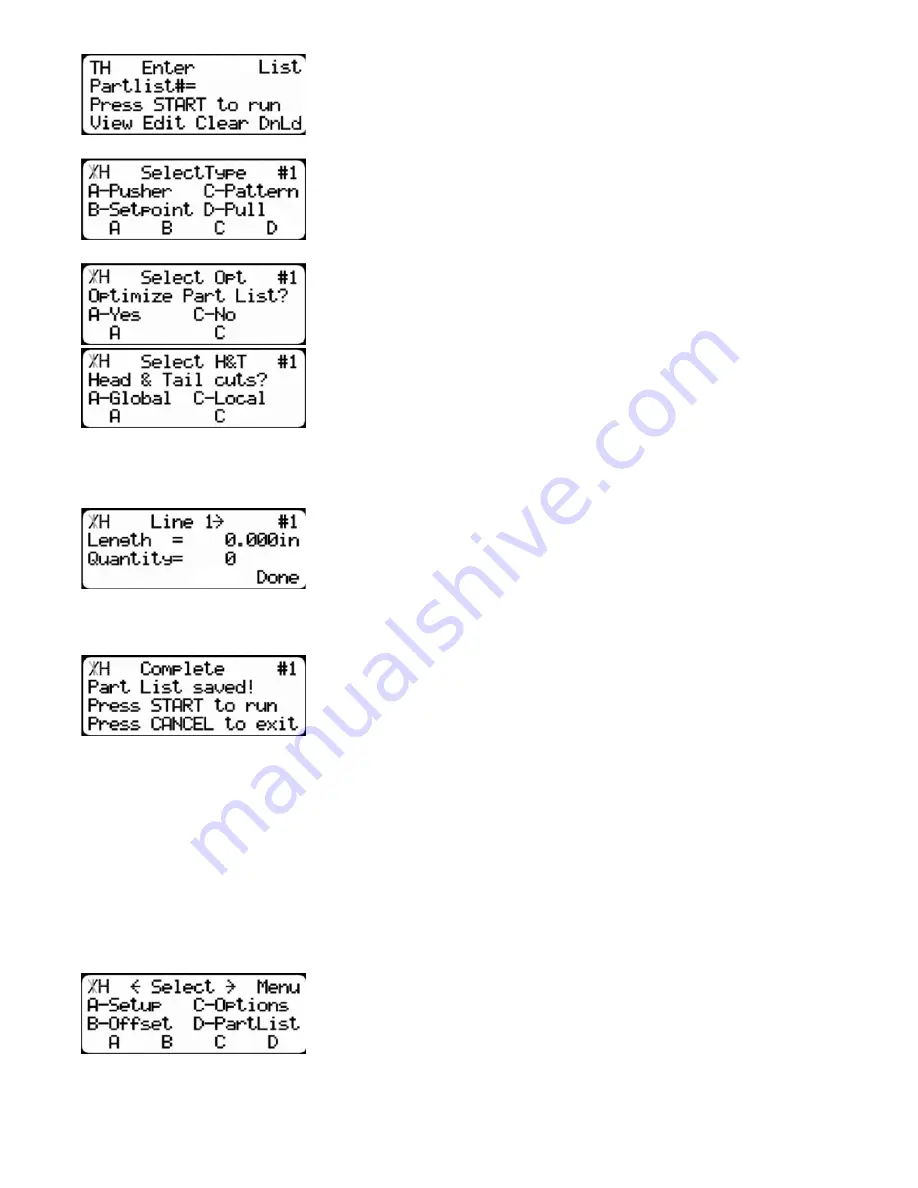
1.At the list interface, enter the list number you wish to program and
press the [Edit] soft key.
2.Press the [Pusher] soft key.
3.you will be asked to select if this is an optimized list. Press the [Yes]
soft key.
4.Select if you want to use a global or a local head and tail cut.
Note: Head and tail cuts are trim cuts at the beginning and end of your stock mate-
rial. It is used to eliminate defects and square up the end of the
material.
Global - Uses the head and tail cut setting from the part list menu as your head and tail cut values.
Local - Allows you to set a custom head and tail cut that is used for this list only.
5.Once at Line 1, your cursor will be on the length line. Enter the total
amount of defected material you would like. Then press the [OK] but-
ton.
The cursor will now move to the Quantity line. Enter a quantity of 1 and press the [Done] soft key.
6.The list has now been saved. You can press [Start] to run it.
Now use the UV crayon to mark boards and process them as you normally would.
Using Panel Optimization Mode
The panel optimization feature allows the user to quickly process panel stock for cabinet doors,
while defecting at the same time. Once the total width needed is entered, TigerSaw 1000 will cut the
proper number of parts to fulfil the needed width.
Turn Panel Optimization ON
The Quantity setting will turn on panel optimization for parts lists.
7.At the menu select screen, press the [PartList] soft key to access
the Part List menu.
Summary of Contents for TigerSaw 1000
Page 1: ......
Page 2: ......
Page 8: ...5 TigerSaw Cap Guard TigerSaw Guard Back ...
Page 9: ...6 TigerSaw Guard Sides ...
Page 10: ...7 TigerSaw Blade Access Door In Feed and Out Feed Table ...
Page 11: ...8 Pusher Foot ...
Page 15: ...12 1 Assemble table legs ...
Page 24: ...21 7 Attach the Printer Stand M8 X 35 ...
Page 66: ......
Page 67: ......


