Portable Optical Tweezers Kit
Chapter 5: Setup and Adjustment
Rev B, February 15, 2022
Page 49
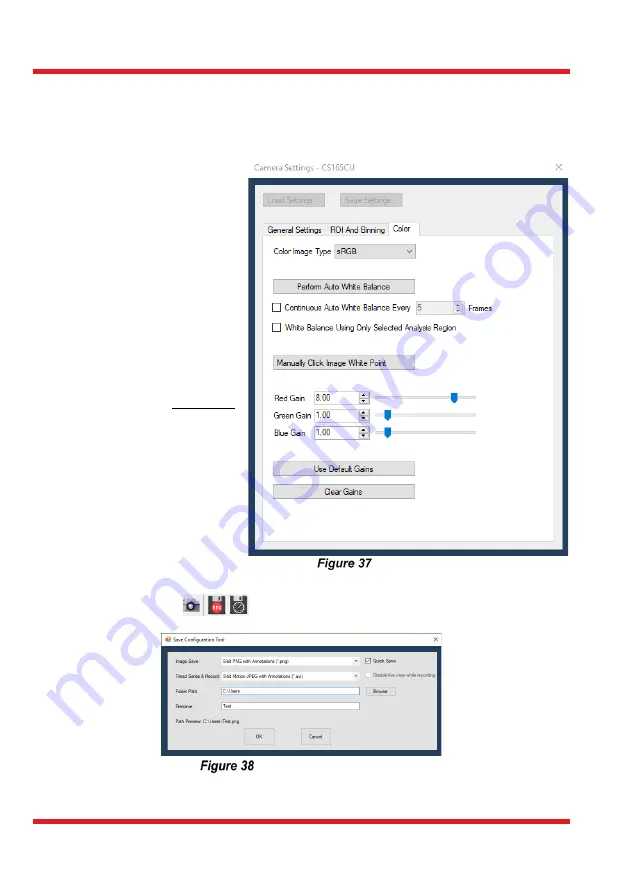
For
image improvements
adjust the settings in the
Color
tab. The recommended settings
are shown in Figure 37. The high red gain compensates for the red bandpass filter in front
of the camera (to avoid saturation by the laser).
Note: in previous versions of this kit, a cube beamsplitter was used instead of a dichroic
mirror. This resulted in less laser
light in the focus and more laser
light on the camera.
Both the laser diode’s center
wavelength and the dichroic
mirror’s cut-off wavelength can
vary slightly depending on the
manufacturing lot. This will
affect the Red Gain settings
you have to choose for your
setup. To do so, vary the Red
Gain during the adjustment
process and choose the
optimal setting that allows to
observe both the sample and
the laser spot. In very rare
cases, the image and laser
intensity might have an
unfavorable combination that
cannot be compensated for
using the gain settings. Should
that be the case, please contact
Tech Support. For an example
of the desired results, please
see Figure 44.
Camera Settings
With the ThorCam software you can also save snapshots during live imaging or record
videos and timed series,
. The recording dialog box shown in Figure 38 lets you
set file type, path and name.
Record Video Settings
For further information on the settings check the ThorCam user guide installed in the
program’s folder
.
Summary of Contents for EDU-OT3
Page 1: ...EDU OT3 EDU OT3 M Portable Optical Tweezers User Guide...
Page 93: ......
Page 94: ...www thorlabs com...


