3-29
Graphical User Interface
3. 6. Settings
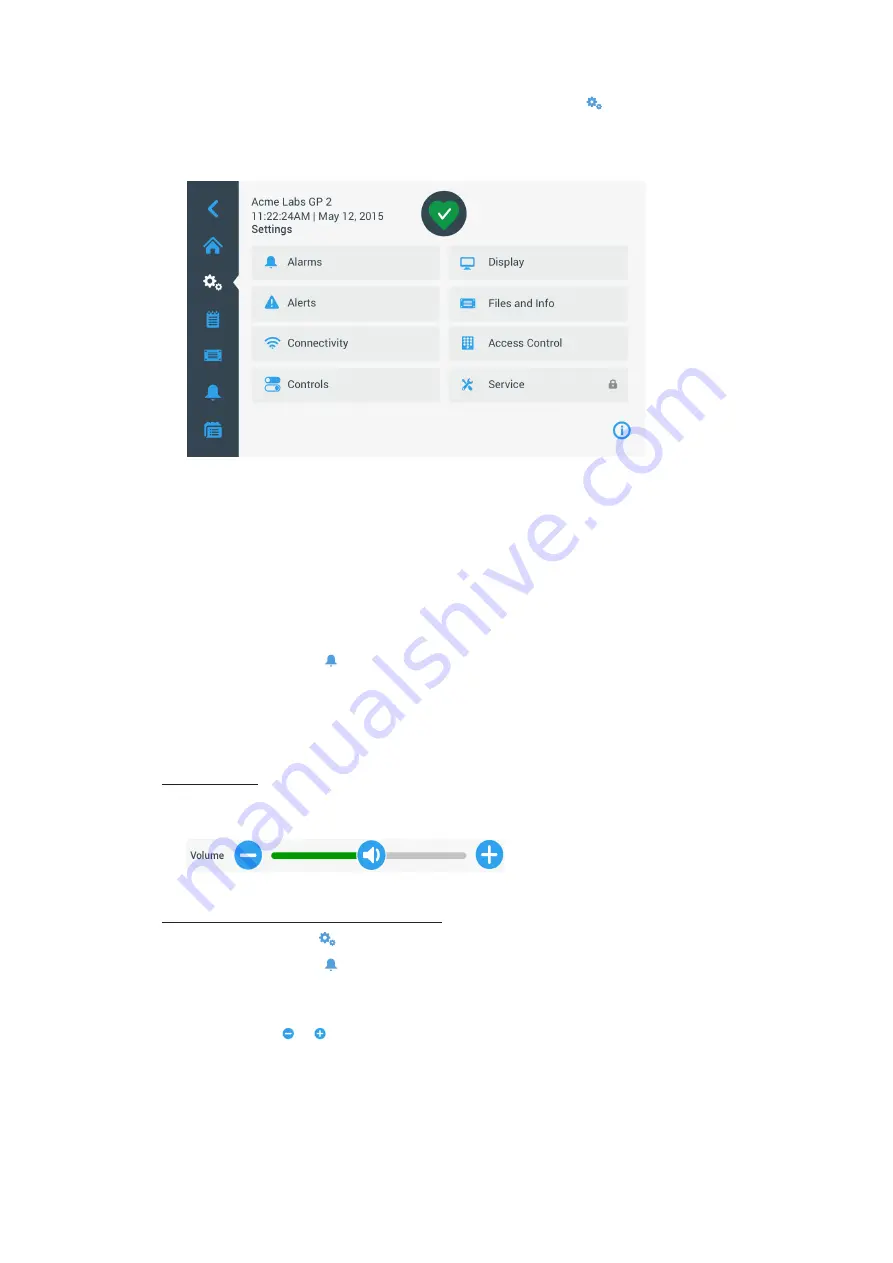
This section explains how to set up the centrifuge using the options of the Settings main screen.
The “Settings Main” screen opens up when you tap the
Settings
icon in the navigation Bar and features
eight buttons. Seven of the buttons provide instant access to sub-menus that let you activate additional features,
change the factory default settings to customize the centrifuge to your needs, and modify items entered during
the initial setup process.
Figure 3–54: Settings Main Screen
Most of the settings are open to normal users, but some require advanced user privileges. Where this is the
case, you will be prompted to enter an administrator passcode. The eighth button, labeled Service, is reserved to
Thermo Fisher Scientific service technicians and requires even more advanced user privileges. This is indicated
by the padlock icon on the button.
Instructions for using the screens opened by the buttons on the “Settings Main Screen” appear in the following
sections.
3. 6. 1. Alarms
Tapping the
Alarms
button on the “Settings” screen takes you to the “Alarms Settings” screen.
From the “Alarms Settings” screen, you may change the volume, tone, and timing of several audible alarms
emitted by the centrifuge.
Selections are made by dragging a slider or tapping drop-down lists on the screen. You may change one,
several, or all of the options before confirming your selections with the
Save
button.
Alarm Volume
You may change the volume of the alarm tone directly on the main “Alarms Settings” screen by tapping on the
speaker
icon in the slider and dragging left to decrease or right to increase.
Figure 3–55: Alarms Settings ->Alarm Volume Slider
Proceed as follows to change the Alarm Volume:
1. Tap the
Settings
icon on the navigation bar.
2. Tap the
Alarms
button on the “Settings” screen.
Alternatively, you can also tap the
Alarm
icon on the navigation bar to open the “Alarms Settings” screen.
3. Tap the
Alarm Volume
slider and drag to the left to decrease and or to the right to increase. Alternatively,
you can tap the or buttons on both sides of the slider to decrease or increase.
The alarm tone will play briefly with the newly chosen volume.
4. Save your changes or change any other desired option on the “Alarms Settings” screen.
Summary of Contents for Sorvall ST Plus Series
Page 116: ...B 9 TX 750 B 1 4 Biocontainment Certificate ...
Page 120: ...B 13 TX 1000 B 2 4 Biocontainment Certificate ...
Page 126: ...B 19 HIGHConic II B 4 4 Biocontainment Certificate ...
Page 133: ...B 26 Fiberlite F15 6 x 100y B 7 4 Biocontainment Certificate ...
Page 137: ...B 30 HIGHPlate 6000 B 9 4 Biocontainment Certificate ...
Page 140: ...B 33 M 20 Microplate B 10 4 Biocontainment Certificate ...
Page 143: ...B 36 Microliter 48 x 2 B 11 4 Biocontainment Certificate ...
Page 146: ...B 39 Microliter 30 x 2 B 12 4 Biocontainment Certificate ...
Page 149: ...B 42 MicroClick 30 x 2 B 13 4 Biocontainment Certificate ...
Page 152: ...B 45 MicroClick 18 x 5 B 14 4 Biocontainment Certificate ...
Page 155: ...B 48 Fiberlite F21 48 x 2 B 15 4 Biocontainment Certificate ...
Page 159: ...B 52 Fiberlite F10 6 x 100 LEX B 17 4 Biocontainment Certificate ...


