background image

Operating Instructions

64

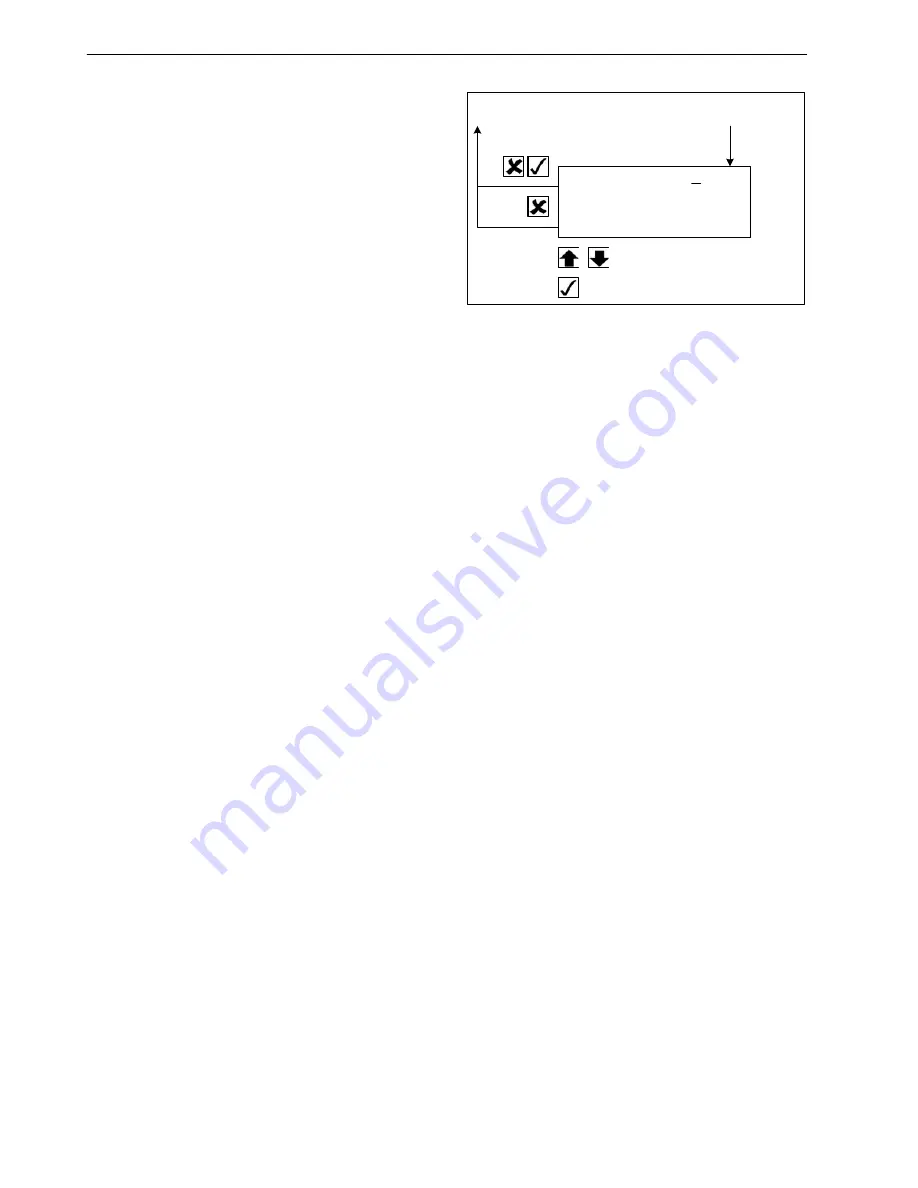
Date/Time

The Date/Time submenu is used to set the clock in 
the controller. To enter the Date/Time submenu 
and set the clock complete the following steps:

1. Place the On/Off switch in the “ON” position.

2. Press the 

E

NTER

 key or the 

E

SCAPE

 key to enter 

the Main Menu, if necessary. 

3. Press the 

U

P

 or 

D

OWN

 key to scroll up or down 

through the Main Menu to the Commands 
Menu. 

4. Press the 

E

NTER

 key to enter the Commands 

Menu. 

5. The PTI submenu will be displayed. 

6. Press the 

U

P

 or 

D

OWN

 key to scroll up or down 

through the Commands Menu to the System 
Setup submenu. 

7. Press the 

E

NTER

 key to enter the System Setup 

submenu. 

8. Press the 

U

P

 or 

D

OWN

 key to scroll up or down 

through the System Setup submenu to the 
Date/Time submenu. 

9. Press the 

E

NTER

 key to enter the Date/Time 

submenu to set the clock. 

10. Press the 

E

NTER

 key to move the cursor (to the 

right or down at the end of a row) to select the 
value you want to change.

NOTE: The 

E

NTER

 key does not move the 

cursor to the right in the Time value. You 
must use the 

U

P

 or 

D

OWN

 keys to scroll the 

total Time value up or down. 

11. Press the 

U

P

 or 

D

OWN

 key to scroll the selected 

value up or down to the new setting. 

12. Repeat steps 10 and 11 until you have changed 

all the values to the new settings. 

13. Press the 

E

SCAPE

 key and the 

E

NTER

 key at the 

same time to save the new settings and return 
to the System Setup submenu. 

NOTE: Press the 

E

SCAPE

 key to return to the 

System Setup submenu without saving the 
new settings. 

Figure 28: Date/Time

YEAR:       200

6

MONTH:      03

DATE:       22

TIME:       14.08

Save changes and return to
"DATE/TIME" prompt of
"MISC. FUNCTIONS" menu

ESC

From "DATE/TIME" prompt of
"MISC. FUNCTIONS" menu.

Scrolls values up/down

Moves cursor right

ARA736

Summary of Contents for SGCO 3000

Page 1: ...SGCO 3000 233 2011 MAEG302598 MAEG302830 TK 55076 4 MM Rev 0 04 11 Copyright 2011 Thermo King Corp Minneapolis MN USA Printed in USA...

Page 2: ...nd will not be held liable in contract or in tort including negligence for any special indirect or consequential damages including injury or damage caused to vehicles contents or persons by reason of...

Page 3: ...to the atmosphere We strictly adhere to a policy that promotes the recovery and limits the loss of refrigerant into the atmosphere In addition service personnel must be aware of Federal regulations co...

Page 4: ......

Page 5: ...ine 23 Generator 23 Electrical Control System 24 Electrical Components 24 Controller Default Settings 24 Physical Specifications 25 Metric Hardware Torque Charts 26 Unit Description Features Options 2...

Page 6: ...ommands Menu 58 PTI 59 Manual Function Test 60 System Setup 62 Date Time 64 Misc Functions Menu 65 C F Mode 66 SW HW Version 67 Timers Counters 68 Configuration Menu 69 Setting Hour Meter Thresholds a...

Page 7: ...d Units 99 Adjustment Procedure for Units with EcoPower Option 99 Integral Fuel Solenoid 100 DIagnosing the Integral Fuel Solenoid System 100 Fuel Solenoid Replacement 102 Injection Pump Service and T...

Page 8: ...utput Voltage 123 Rewiring Procedure for Changing the Output Voltage from 460 Vac to 230 Vac 123 Structural Accessory Maintenance 125 Unit Inspection 125 Mounting Bolts 125 Radiator Fan Location 125 S...

Page 9: ...Setup Submenu 63 Figure 28 Date Time 64 Figure 29 Misc Functions Menu 65 Figure 30 C F Mode 66 Figure 31 SW HW Version 67 Figure 32 Timers Counters 68 Figure 33 Configuration Menu Page 1 70 Figure 34...

Page 10: ...Alignment 107 Figure 80 Align Flat Sides of Crankshaft Gear with Flat Sides of Inner Rotor in Timing Gear Cover 107 Figure 81 Trochoid Feed Pump Location 108 Figure 82 Trochoid Feed Pump Removal 108...

Page 11: ...11 SGCO 3000 Genset Addendum Fuel Strainer option added to the following units MAEG302598 MAEG302830 Figure 1 Maersk Equipment Number Located On Vertical Frame Member Behind Alternator...

Page 12: ...SGCO 3000 Genset Addendum 12...

Page 13: ...Wire Generator S SG Control System S Battery Post Style S Battery Charging System Solid state S Clip on Unit Frame S Combination Fuel Filter Water Separator S Dry Air Cleaner S Silicone Coolant Hoses...

Page 14: ...Genset Model Features 14...

Page 15: ...tanding idle Added to this danger is the fall out of highly corrosive sulfuric acid caused by the explosion A rubber blanket or other cover can be used to reduce the risk of injury from a possible exp...

Page 16: ...ate medical assistance if available The source of shock must be immediately removed by either shutting down the power or removing the victim from the source If it is not possible to shut off the power...

Page 17: ...it 5 Avoid contacting the electronic components on the unit circuit boards 6 Leave the circuit boards in their static proof packing materials until ready for installation 7 If a defective controller i...

Page 18: ...or electrical equipment Don t remove guards or protective devices Don t wear loose clothing or jewelry in the vicinity of moving parts These can get in machinery with disastrous results Don t wear je...

Page 19: ...l number is stamped on the shell Engine The engine serial number is stamped on the back side of the engine block SGCO Units The unit serial number nameplate is attached to the unit battery box beside...

Page 20: ...erator sets These decals provide information that may be needed to service or repair the unit Service technicians should read and follow the instructions on all warning decals Figure 2 Model SGCO 3000...

Page 21: ...vibrations etc Inspect clean fuel transfer pump inlet strainer Inspect optional fuel strainer for water or dirt Remove cover and clean if necessary Check air cleaner restriction indicator change filt...

Page 22: ...Service Guide 22...

Page 23: ...ynthetic Engine Oil Pressure 120 to 320 kPa 1 2 to 3 2 bar 18 to 47psi Engine RPM No Load 1890 10 RPM High Speed 1560 5 RPM Low Speed EcoPower Option only Valve Clearance 0 15 to 0 25 mm 0 006 to 0 01...

Page 24: ...ontroller Default Settings Setting Menu Location Default Setting Tank Size Commands System Setup 125 Date Time Commands System Setup Software Date ID Number Commands System Setup 00000000 C F Mode Mis...

Page 25: ...Specifications 25 Physical Specifications Weight net SGCO 3000 818 Kg 1804 lbs including oil coolant battery and 473 liter 125 gal fuel tank excluding fuel Unit Dimensions AXA0271...

Page 26: ...6 41 47 30 35 68 81 50 60 122 149 90 110 HH SS 2 10 13 7 10 20 27 15 20 41 47 30 35 75 88 55 65 Bolt Type and Class Bolt Size M14 M16 M18 M22 N m Ft lb N m Ft lb N m Ft lb N m Ft lb HH CL 5 8 75 88 55...

Page 27: ...n radiator and poly vinyl coating on the engine and generator Fuel tanks are provided as an integral part of each unit Fuel capacities are 473 liter 125 gal on SGCO clip on models The alternator is a...

Page 28: ...maintenance recommendations see the Service Guide chapter in this manual SG Microprocessor Controller The SG Microprocessor controller controls and monitors unit operation records system faults and pe...

Page 29: ...controller monitors the load from the refrigeration unit and determines if the engine should run in high speed 1890 10 RPM or low speed 1560 5 RPM The output frequency is 60 Hz in high speed and 50 h...

Page 30: ...h side 3 Fuel Tank 9 Control Box Location 4 Alternator and Engine Compartment Access Doors 10 Fuel Tank Fill Neck and Cap each side 5 Coolant Expansion Tank Location 11 Upper Unit Mounting Clamps Corn...

Page 31: ...8 Oil Fill and Dipstick 2 Alternator 9 Oil Level Sensor 3 Starter 10 Oil Drain 4 Timing Mark Location 11 Engine Speed Adjustment Screw 5 Flywheel Sensor 12 Water Pump Pulley 6 Oil Filter 13 Water Temp...

Page 32: ...Unit Description Features Options 32...

Page 33: ...or delayed restart Variable air heater preheat time Automatic Pretrip Test capability Delayed alternator excitation for 15 seconds or until engine coolant temperature increases to 32 C 90 F Unit shut...

Page 34: ...Circuit Connection 7 Serial Port For Flash Loading Software 8 J2 Connector To SG Controller Display 9 2C Circuit Connection 10 8 Circuit Connection 11 Fuse SI3 10 Amp Protects Microprocessor Power Inp...

Page 35: ...y to the Alarm List Menu and view the alarm information in the display Language Key Press this key to change the language used on the display English and Spanish are the languages that are currently a...

Page 36: ...at can be navigated via the keypad The display menus are organized into seven Main Menus Data Menu Alarm List Menu Warning List Menu Commands Menu Misc Functions Menu Configuration Menu and Event Log...

Page 37: ...e SG Controller Menus It is recommended to fold this flow diagram out and leave it folded out until you become familiar with the controller menus Navigating Controller Menus Moving through the menus a...

Page 38: ...ALARM LIST DATA ANALOG INPUTS DIGITAL INPUTS DIGITAL OUTPUTS INTERNAL STATES PTI MANUAL FUNCTION TEST SHOW INPUTS SHOW INPUTS SHOW OUTPUTS SHOW STATES PERFORM PTI PERFORM TESTS SHOW ALARMS SHOW MESSA...

Page 39: ...nal test of the unit See PTI on page 59 for more information Manual Function Test which is used to test some components such as the display and relays See Manual Function Test on page 60 for more info...

Page 40: ...wing display appears if the engine fails to start Figure 14 Typical Pause Mode Display Network Down Display The Network Down display indicates there is no communication between the SG controller and t...

Page 41: ...securely fastened Check wires and terminals for corrosion cracks or moisture Repair or replace if necessary Structural Visually inspect the unit for leaks loose or broken parts and other damage The ra...

Page 42: ...ntroller verifies that the alternator output is off g MAIN MENU DATA AIR HEATER ON This display appears only if the controller determines that the engine coolant temperature is low enough to require t...

Page 43: ...n page 42 2 Initiate an automatic PTI NOTE Correct all existing alarm conditions and clear the alarm codes before performing a PTI a Press the ENTER key or the ESCAPE key to enter the Main Menu if nec...

Page 44: ...ends automatically and the controller display shows PTI PASSED or FAILED REBOOT Turn the On Off Switch Off and back On to reboot and return the unit to normal operation 5 If an operating problem occur...

Page 45: ...ENTER key to enter the Data Menu Press the UP or DOWN key to scroll up or down through the Main Menu Figure 16 Main Menu MAIN MENU DATA VOLTAGE 460 V MAIN MENU ALARM LIST VOLTAGE 460 V MAIN MENU MESS...

Page 46: ...the UP or DOWN key to scroll up or down through the Main Menu to the Data Menu if necessary 4 Press the ENTER key to enter the Data Menu 5 The Analog Inputs submenu will be displayed Press the ENTER k...

Page 47: ...e Main Menu to the Data Menu if necessary 4 Press the ENTER key to enter the Data Menu 5 The Analog Inputs submenu will be displayed 6 Press the ENTER key to enter the Analog Inputs Press the UP or DO...

Page 48: ...e ENTER key to enter the Data Menu 5 Press the UP or DOWN key to scroll up or down through the Data Menu to the Digital Inputs submenu 6 Press the ENTER key to enter the Digital Inputs Press the UP or...

Page 49: ...e UP or DOWN key to scroll up or down through the Data Menu to the Digital Outputs submenu 6 Press the ENTER key to enter the Digital Outputs Press the UP or DOWN key to scroll up or down through the...

Page 50: ...ion 2 Press the ENTER key or the ESCAPE key to enter the Main Menu if necessary 3 The Data Menu is typically the first menu displayed in the Main Menu NOTE Press the UP or DOWN key to scroll up or dow...

Page 51: ...Enter the Alarm List Menu through the Main Menu as follows a Press the ENTER key or the ESCAPE key to enter the Main Menu if necessary b Press the UP or DOWN key to scroll up or down through the Main...

Page 52: ...echanically 3 In cold ambient temperatures check for fuel gelling 4 Check for restricted air cleaner or air intake system 5 Check intake air heater 104 RL2 FUEL H FEEDBACK FAILURE Shutdown Alarm No fe...

Page 53: ...ED TO START LOW BATTERY Controller is reset 3 times during cranking 1 Defective battery load test battery 2 Controller not charging battery 3 Check ground connections at block 112 WATER TEMPERATURE SE...

Page 54: ...It shows the most recent message and the following information The message code 101 through 131 The position of the message in the list of recorded messages For example 1 1 means message one of one T...

Page 55: ...l Level Switch indicates low oil level for 3 minutes 1 Check oil level 2 Check Oil Level Switch 3 Check circuits to Oil Level Switch 109 HOUR METER 1 HAS EXCEEDED THRESHOLD Hour Meter 1 HM1 has exceed...

Page 56: ...ttery battery cables and starter 2 Check 8S circuit 3 Check Start Relay 4 Check for seized engine or alternator 121 ENGINE FAILED TO START No oil pressure and did not reach 800 RPM restarting 1 Check...

Page 57: ...message 1 Check for leak in fuel tank 2 Check to see if fuel has been removed from fuel tank 128 SPEED SOLENOID FAILURE During PTI if HIGH speed is same as LOW speed 1 Check throttle solenoid 1 Check...

Page 58: ...p or down through the Main Menu to the Commands Menu 4 Press the ENTER key to enter the Commands Menu 5 The PTI submenu will be displayed Press the ENTER key to start the PTI Press the UP or DOWN key...

Page 59: ...level switch is tested e The oil pressure switch is tested f The coolant temperature sensor is tested g The coolant level is tested h Test speed solenoid relay if detected i The preheat relay is teste...

Page 60: ...ESCAPE key to enter the Main Menu if necessary 3 Press the UP or DOWN key to scroll up or down through the Main Menu to the Commands Menu 4 Press the ENTER key to enter the Commands Menu 5 The PTI sub...

Page 61: ...EL HOLD RELAY TEST FUEL PULL RELAY TEST To MANUAL FUNCTION TEST prompt of COMMANDS menu From MANUAL FUNCTION TEST prompt of COMMANDS menu DISPLAY TEST PREHEAT RELAY TEST FUEL HOLD RELAY TEST FUEL PULL...

Page 62: ...e to the default setting when the battery is disconnected To enter the System Setup submenu complete the following steps 1 Place the On Off switch in the ON position 2 Press the ENTER key or the ESCAP...

Page 63: ...NGE SPEED or or and SAVE SETTING DISCARD CHANGE CURRENT RPM 1890 SPEED SOLENOID ON TANK SIZE 50 FUEL SENSOR NO ENTER FUNCTION CHANGE SETTING and SAVE SETTING DISCARD CHANGE ENTER FUNCTION CHANGE SETTI...

Page 64: ...the ENTER key to enter the Date Time submenu to set the clock 10 Press the ENTER key to move the cursor to the right or down at the end of a row to select the value you want to change NOTE The ENTER...

Page 65: ...enter the Misc Functions Menu 5 The C F Mode submenu will be displayed Press the ENTER key to enter C F Mode submenu to set the controller for Celsius or Fahrenheit units Press the UP or DOWN key to...

Page 66: ...tions Menu 4 Press the ENTER key to enter the Misc Functions Menu 5 The C F Mode submenu will be displayed 6 Press the ENTER key to enter C F Mode to change the units displayed 7 Press the UP or DOWN...

Page 67: ...necessary 3 Press the UP or DOWN key to scroll up or down through the Main Menu to the Misc Functions Menu 4 Press the ENTER key to enter the Misc Functions Menu 5 Press the UP or DOWN key to scroll u...

Page 68: ...s Run Hours 50 Hz and Run Hours 60 Hz can be adjusted See Setting Hour Meter Thresholds and Resetting Hour Meters on page 72 To enter the Timers Counters submenu complete the following steps 1 Place t...

Page 69: ...s the alarm 110 ENGINE STOPPED DUE TO USER SETUP Factory Reset The default setting is OFF When this is set to ON the controller will reset all run timers to 0 when the unit is turned Off and then back...

Page 70: ...COLDSTART ON HM1 THRESHOLD 00000 HM2 THRESHOLD 00000 ENG OFF HOURS 00000 Toggle between ON OFF Toggle between ON OFF Toggle between ON OFF Toggle between ON OFF Scrolls cursor right Scrolls cursor rig...

Page 71: ...D OFF OUTPUT VOLTAGE 460 FUEL SENSOR OFF PASS WORD PASS WORD APU CONNECTED OFF OUTPUT VOLTAGE 460 FUEL SENSOR OFF FUEL LEVEL 00000 OUTPUT VOLTAGE 460 FUEL SENSOR OFF FUEL LEVEL 00000 CRANK RESTARTS 00...

Page 72: ...he cursor on LOP Restart 6 Press the UP or DOWN key to scroll up or down through the Configuration Menu to HM1 Threshold HM2 Threshold Run Hours Run Hours 50 Hz or Run Hours 60 Hz 7 Press the ENTER ke...

Page 73: ...or DOWN key to scroll up or down through the Main Menu to the Event Log Menu 4 Press the ENTER key to enter the Event Log Menu 5 The Event Log submenu will be displayed Press the ENTER key to enter t...

Page 74: ...and time of that event 8 Press the DOWN key to scroll down to the next event 9 Press the UP or DOWN key to scroll up or down through the event log 10 Press the ESCAPE key to return to the Event Log Me...

Page 75: ...e most recent fuel event and the date and time of that event 9 Press the DOWN key to scroll down to the next fuel event 10 Press the UP or DOWN key to scroll up or down through the fuel events 11 Pres...

Page 76: ...an alarm is active and entering shutdown state Engine running The engine is running Restart engine Restart sequence started Pre trip PTI started PTI start event PTI failed PTI failed PTI OK PTI compl...

Page 77: ...ange in level 7 Ga 2008 08 10 18 39 SYSTEM Flash load completed Old 000000 00 New 080423 00 2008 08 10 18 39 POWER Power ON 2008 08 10 18 39 CONFIGURATION Clock set 2008 08 12 14 06 SPEED High to low...

Page 78: ...Operating Instructions 78...

Page 79: ...will not energize The RL1 LED on the PC board will light up when the fuel pull relay is energized Fuel Hold Relay The fuel hold relay RL2 is located on the PC board It supplies power to the fuel solen...

Page 80: ...ons for loose chaffed or broken wires This will protect against unit malfunctions due to open or short circuits 12 Vdc Charging System Battery charging current is supplied by a transformer and rectifi...

Page 81: ...of the heater The current draw should be approximately 89 amps at 12 5 volts The heater is probably defective if the current draw is less than 60 amps or more than 100 amps Engine Low Oil Pressure Swi...

Page 82: ...there are no short circuits in the wires Switch Removal and Installation 1 Disconnect the switch wires from the main wire harness before removing the switch 2 Remove the screw in style switch by caref...

Page 83: ...ram or schematic for correct connections 4 Enter the Analog Inputs submenu of the Data Menu and scroll to the engine temperature screen If the display shows a reading below 40 C 40 F or above 130 C 26...

Page 84: ...ode 108 Test the coolant level sensor if the controller records Message Code 108 and the radiator is full of coolant Figure 46 Coolant Level Detector Sensor Sensor Test 1 Ground the sensor to chassis...

Page 85: ...ocknut 3 Disconnect wires FS1 and FS2 from the sensor 4 Start and operate the unit 5 Check the ac voltage output across the sensor terminals Use a meter with a high ohms per volt internal resistance A...

Page 86: ...Electrical Maintenance 86...

Page 87: ...ine Overhaul Manual TK 50136 for a detailed description of the engine lubrication system Engine Oil Change The engine oil should be changed according to the Maintenance Inspection Schedule Drain the o...

Page 88: ...d Oil Check Oil Pressure Oil May Be Diluted Change Oil and Filter Check Oil Pressure Oil Pressure OK Oil Pressure OK Check Oil Level Oil Level Low Oil Pressure Low Install Known Good Oil Pressure Gaug...

Page 89: ...estrictive Check the air restriction indicator before checking the crankcase pressure Replace the air cleaner if the reading on the air restriction indicator exceeds 20 in 508 mm H2O of vacuum A dirty...

Page 90: ...reduces the flow of air to the engine This affects horsepower output fuel consumption and engine life Periodically inspect the restriction indicator to assure the air filter is not restricted Service...

Page 91: ...n attack accumulator tank water tubes radiator and engine block plug 4 Provides lubrication for the water pump seal ELC Extended Life Coolant ELC has been phased into all container units equipped with...

Page 92: ...recommended over tap water to insure the integrity of the cooling system is maintained AJA2076 9 10 11 12 3 4 5 2 1 6 7 8 1 Water Pump 7 Expansion Tank 2 Water Temperature Sensor 8 Vent Fitting for Bl...

Page 93: ...not exposed to freezing temperatures A 50 50 antifreeze mixture will provide the required corrosion protection and lubrication for the water pump Checking the Antifreeze Check the solution concentrat...

Page 94: ...d in the block Bleed the air out of the block using the following procedure NOTE If an engine operates with air trapped in the block engine damage could occur The high water temperature switch may not...

Page 95: ...r assembly return to the fuel tank through the return lines Maintenance The fuel system is relatively trouble free and if correctly maintained will usually not require major service repairs between en...

Page 96: ...lter system maintenance Prime pump hand replacement or repair Transfer pump replacement or repair Injection line replacement Engine speed adjustments Pump timing Nozzle spray pattern testing and adjus...

Page 97: ...cap and clamp Note that the end cap has a larger OD than the other hoses and requires the larger clamp 4 Install the fuel return lines and clamps It may be necessary to adjust the banjo fitting slight...

Page 98: ...head and bleeds off air 1 Unscrew the filter using a strap wrench Drain filter Properly dispose of fuel and filter 2 Fill the new filter with clean fuel through one of the small openings in the top of...

Page 99: ...the jam nut when the speed is correct Adjustment Procedure for Units with EcoPower Option Make the engine speed adjustments with the engine fully warmed up 1 Turn the refrigeration unit off so there i...

Page 100: ...position Once the governor linkage is in the fuel ON position the hold in coil will keep the linkage in the fuel on position until the 8D circuit is de energized The pull in coil must be de energized...

Page 101: ...between the 8DP circuit pin in the connector on the fuel solenoid and the positive battery terminal The fuel solenoid should make a definite click when the pull in coil is energized It should click ag...

Page 102: ...n Off switch in the ON position to energize the fuel solenoid NOTE The fuel solenoid must be energized when it is being installed If it is not the plunger and the linkage may not line up correctly 6 P...

Page 103: ...uel system 3 Remove the cover plate from the gear case Remove the nut and lockwasher that secure the gear to the injection pump shaft Use a shop rag to prevent the lock washer or nut from falling into...

Page 104: ...njection pump and the gear case like they were in step 1 of Injection Pump Removal NOTE If a different injection pump is being installed see Injection Pump Timing on page 105 to set the timing 3 Remov...

Page 105: ...k on the injection pump see Figure 71 2 Clean the area with brake cleaner or something similar Place an injection angle sticker on the gear case so the center line on the sticker is aligned with the i...

Page 106: ...k is located on the side of the pump facing the engine The injection angle mark on the pump does not use a decimal point Add a decimal point before the last digit of the injection angle mark to get th...

Page 107: ...helps to install the idler gear last when aligning the timing marks NOTE The oil pump is located in the timing gear cover on TK486V engines The inner rotor of the oil pump fits around the crankshaft...

Page 108: ...rochoid feed pump and the injection pump if oil is leaking Torque the bolts to prevent leaks 8 to 10 N m 6 to 7 ft lb Replace all O rings if fuel is leaking Torque the Allen head screws and Hex head b...

Page 109: ...pull the plunger out of a cold start device because that will damage it Checking Cold Start Device Operation Use the following procedure to check the operation of the cold start device The engine coo...

Page 110: ...ng is clean 5 Install the new cold start device with a new O ring in the injection pump fitting Torque the cold start device to 30 to 35 N m 22 to 26 ft lb 6 Install the coolant fitting and banjo bolt...

Page 111: ...the rocker arms are loose the engine is at top dead center of the compression stroke for the number one cylinder d If the rocker arms are tight the engine is at top dead center of the exhaust stroke f...

Page 112: ...e number four cylinder Also check the valve clearance for the intake valve for the number three cylinder and the exhaust valve for the number two cylinder The clearance for both the intake and exhaust...

Page 113: ...pulley 2 Remove the pulley sliding section and add or remove shims to adjust the belt tension 3 Reinstall the belt on the pulley and replace the sliding pulley section on the pulley 4 Tighten the moun...

Page 114: ...Engine Maintenance 114...

Page 115: ...This provides excitation to the main alternator rotating field The SG Controller energizes and controls the exciter field The output from the main winding builds up until the voltage and amperage reac...

Page 116: ...urrent and is used to charge the battery and energize the exciter field The controller monitors the alternator output voltage and adjusts the output to the exciter field as necessary to maintain the a...

Page 117: ...the tests should have a good working knowledge of their basic electrical principles The tests are intended to determine whether the source of difficulty lies in the generator itself or in the excitat...

Page 118: ...12 Vdc Check for AC voltage output on T1 T2 T1 T3 T2 T3 should be 400 VAC or higher If AC voltage is present problem is in controller Go to Test 2 If still no AC voltage problem is in alternator go to...

Page 119: ...tator the rotating rectifier the rotating exciter field and the rotating field armature 1 Main alternator stator windings a Disconnect the stator leads from the terminal board and ground stud in the c...

Page 120: ...500 Volts must be more than 1 M ohm Megohmmeter The use of a megohmmeter can be a valuable addition to the repair and maintenance of the generator set The megohmmeter is essentially a high range resi...

Page 121: ...mechanically satisfactory Look for any evidence of overheating burned or frayed insulation loose connections foreign matter etc Generator Housing Feel the alternator housing cautiously for abnormal t...

Page 122: ...5 Key 18 Stud Bell 6 Spacer Bearing 19 Cover End Bell 7 Bearing Seal Rotor 20 Screw Mounting End Bell Cover 8 Exciter Assembly Rotor 21 Gasket End Bell Cover 9 Rectifier Positive Assembly 22 O ring 10...

Page 123: ...to 230 Vac 1 Refer to the unit wiring diagram for illustrations of the proper wire connections 2 Disconnect Wires a Remove wire T7 from T4 connection wire T8 from T5 connection and wire T9 from T6 co...

Page 124: ...Alternator Operation and Diagnosis 124...

Page 125: ...dware should be inspected for tightness during every pretrip Radiator Fan Location The radiator fan and hub assembly mounts on the water pump pulley When installed the fan blade should be in the orifi...

Page 126: ...oot of generator set mounting clamp should fit into mounting hole on each side of the container CAUTION Take adequate precautions when lifting and mounting the generator set to prevent personal injury...

Page 127: ...on the head of the clamp shaft CAUTION Watch the clamp flat on threaded end of the mounting shaft when rotating the handle The clamp flat should turn as the clamp handle rotates With the mounting cla...

Page 128: ...t Installation 1 Lift the unit into mounting position on front wall of the container Both header pins of generator set mounting channel should fit into mounting holes on top of the container 2 Check t...

Page 129: ...nit during unit pre trip inspection and scheduled maintenance intervals Look for loose or broken wires or hardware and other physical damage which might affect unit performance Repair if required NOTE...

Page 130: ...Structural Accessory Maintenance 130...

Page 131: ...relay check 2A 8S SR and PSR circuits Defective starter solenoid Replace solenoid Defective starter Repair starter Water in cylinders Check for hydrostatic lock Remove injectors and turn engine slowly...

Page 132: ...ir or replace nozzles Delivery of fuel pump insufficient Repair pump Worn injection pump plungers delivery valve defective injection rate too low gum formations Repair or replace pump Compression low...

Page 133: ...gs loose oil gallery plug Repair engine High oil consumption Oil leakage Check and eliminate possible causes at cylinder head cover oil lines oil filter front timing cover or crankshaft seals Clogged...

Page 134: ...ary Black Smoke excessive fuel to air ratio Engine is sooting heavily emits thick black clouds of smoke Cold engine Allow engine to warm up Wrong fuel Drain and refill with correct fuel Clogged air in...

Page 135: ...g System Engine 91 Crankcase Breather 89 Cyclonic Dry Air Cleaner 90 D Data Menu 39 46 Date Time 64 Decals SGCO 20 Decals Units 20 Description General 27 Diagnosis Mechanical 131 Diagram Menu Flow 139...

Page 136: ...Inspection Test 43 59 Protection Devices Descriptions 29 PTI Pretrip Inspection Test 43 59 R Radiator Coil 129 Radiator Fan Location 125 Recover Refrigerant 3 Refrigerant Recovery 3 Relays 79 S Safety...

Page 137: ...cals 20 Unit Inspection 125 129 Unit Instruments Descriptions 28 V Valve Clearance Adjustment 111 Viewing SG Logs 76 W Water in the Fuel System 98 Water Separator Replacement 98 Water Temperature Sens...

Page 138: ...Index 138...

Page 139: ...139 Electrical and SG Menu Flow Diagrams Drawing Title Page Wiring Diagram Genset SG 141 Schematic Diagram Genset SG 142 SG Menu Flow Diagram 143 144...

Page 140: ...Electrical and SG Menu Flow Diagrams 140...

Page 141: ...141 SGCO 3000 Wiring Diagram Page 1 of 1...

Page 142: ...142 SGCO 3000 Schematic Diagram Page 1 of 1...

Page 143: ...1 2 Middle lines show message text Bottom line shows message status View and write down all messages before acknowledging Press key to view additional messages Press key to acknowledge the message be...

Page 144: ...menus C F Mode SW HW Version Timers Counters MISC FUNCTIONS MENU Run Hours Hour Meter 1 Hour Meter 2 Engine Off Hours Restarts Total Restarts Run Hours 50 Hz Run Hours 60 Hz SW XXXXXX XX Hardware Rev...

Reviews: