PROVIDENCE INSERT
PELLET STOVE
29
b. Be extremely careful not to damage
mica plates since they are very
fragile.
Monthly Maintenance
1. Exhaust channels- Approximately every
month
a. Unplug stove from power outlet.
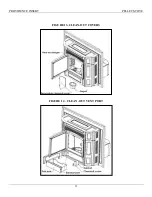
b. Remove ash pan. See Figure 14.
c. Loosen retaining nuts that hold
exhaust port covers in position. See
Figure 14.
d. Use ash or shop vacuum on one side
of U shaped exhaust channel while
inserting brush into the other side of
the channel. Brush approximately
half of the channel around 4-5 times
to loosen ash and allow the vacuum
to remove the ash from the channel.
See Figure 14.
e. Repeat process by switching the
ports for the vacuum and brush.
f. Reinstall items removed in reverse
order
g. With door open, push clean button
and allow fan to run 30-45 seconds
to blow excess ash out flue.
2. Hopper
a. Vacuum hopper to remove excess
sawdust. Excessive sawdust can
cause feeding issues.
3. Scrape pellet feed chute with putty knife if
soot build-up is present. Build-up on the
feed chute will prevent pellets from falling
freely into the firepot.
4. Remove clean-out cover on bottom of the
tee (outside, if applicable) and dump excess
ash from tee. This should be checked every
four to six weeks.
Yearly/ end of burn season
Note: The following should only be performed by
a qualified individual. If you are unsure how to
perform any maintenance tasks, please consult a
professional service technician.
1. All of preceding maintenance
2. Combustion blower fan
a. Unplug stove from power outlet.
b. Remove stove surround and engine
as needed to gain access to back of
stove. See Figure 10.
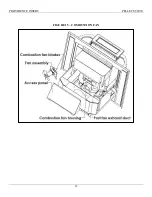
c. Remove rear access panel. See
Figure 15.
d. Unplug
fan
motor
electrical
connections.
e. Loosen 3 retaining nuts on fan
flange.
f. Loosen 4 screws on fan shroud.
g. The fan motor is installed with high
temperature silicone sealant and will
need to be gently worked loose from
fan housing.
h. Vacuum fan housing and use a soft
vacuum brush attachment to remove
ash buildup from exhaust fan blade.
Ensure all ash is removed evenly
from blade since uneven removal can
cause a blade balancing issue and
possible noise.
Summary of Contents for providence
Page 6: ...PROVIDENCE INSERT PELLET STOVE 6 LABORATORY LISTING LABEL...
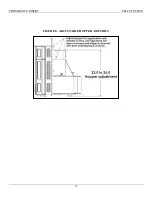
Page 8: ...PROVIDENCE INSERT PELLET STOVE 8 FIGURE 1 STOVE DIMENSIONS...
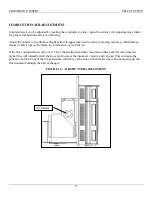
Page 19: ...PROVIDENCE INSERT PELLET STOVE 19 FIGURE 8 ADJUSTABLE HOPPER ASSEMBLY...
Page 20: ...PROVIDENCE INSERT PELLET STOVE 20 FIGURE 9 CONTROL PANEL...
Page 31: ...PROVIDENCE INSERT PELLET STOVE 31 FIGURE 13 CLEAN OUT COVERS FIGURE 14 CLEAN OUT VENT PORT...
Page 32: ...PROVIDENCE INSERT PELLET STOVE 32 FIGURE 15 COMBUSTION FAN...
Page 37: ...PROVIDENCE INSERT PELLET STOVE 37 FIGURE 18 ELECTRICAL SCHEMATIC WIRING DIAGRAM...
Page 40: ...PROVIDENCE INSERT PELLET STOVE THELIN HEARTH PRODUCTS 63 Laxalt Dr Carson City NV 89706...
Page 41: ......

