


Revision H
August 19, 1996
29
4.7
TO PLACE FREQUENCIES IN MEMORY (CONTINUED)
Rotate tune knob:
XXX.XX 2m XXX.XX
Release and tune:
XXX.XX 2
110.30
Press “STO”:
XXX.XX 2m 110.30
Continue until all frequencies that are desired are “loaded in”. After the frequencies are
loaded, you are ready to recall them at any time.
4.8
MEMORY/CHANNEL MODE
Cycle power to the TN 200D, after initialization push tune knob and rotate to “1m”. Press
transfer button and 113.20 moves to the active window. The previously displayed frequency
moves to the standby window, and 1m is cleared from the display. To gain access to any
channel, simply push the tune button in, rotate to desired channel, press the transfer button,
and you are on your desired channel.
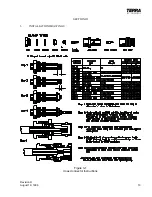
Figure 4-1
TN 200D Front Panel Controls
Below Mod 2 without Glideslope; Below Mod 3 with Glideslope
Summary of Contents for TN 200D
Page 16: ...12 Revision H August 19 1996 THIS PAGE INTENTIONALLY LEFT BLANK ...
Page 18: ...14 Revision H August 19 1996 THIS PAGE INTENTIONALLY LEFT BLANK ...
Page 19: ...Revision H August 19 1996 15 Figure 3 2 Coax Connector Instructions ...
Page 20: ...16 Revision H August 19 1996 THIS PAGE INTENTIONALLY LEFT BLANK ...
Page 21: ...Revision H August 19 1996 17 18 Figure 3 3 TN 200D Outline Dimensions ...
Page 22: ...Revision H August 19 1996 19 20 Figure 3 4 Typical Outline Drawing Dual Tray ...
Page 23: ...Revision H August 19 1996 21 22 Figure 3 5 Outline Drawing 3 Option ...
Page 24: ...Revision H August 19 1996 23 24 Figure 3 6 Interconnect Drawing TN 200D Without Glideslope ...
Page 25: ...Revision H August 19 1996 25 26 Figure 3 7 Interconnect Diagram TN 200D With Glideslope ...
Page 33: ...34 Revision H August 19 1996 THIS PAGE INTENTIONALLY LEFT BLANK ...
Page 35: ...36 Revision H August 19 1996 THIS PAGE INTENTIONALLY LEFT BLANK ...
Page 37: ...38 Revision H August 19 1996 6 2 INSTALLATION NOTES ...


