Service and Repair Manual
December 2019
Boom Components
50
SX
™
-150
Part No. 1300669GT
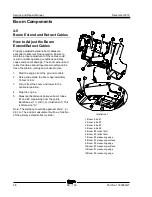
4 Remove the pin retaining fastener from the
boom lift cylinder rod-end pivot pin. Use a soft
metal drift to remove the pin. Protect the
cylinder rod from damage.
Crushing hazard. The boom lift
cylinder may fall when the
rod-end pivot pin is removed if
the boom lift cylinder is not
properly supported by the
overhead crane.
Crushing hazard. The boom
may fall when the rod-end pivot
pin is removed if the boom is
not properly supported by the
overhead crane.
5 Place support blocks under the boom lift
cylinder.
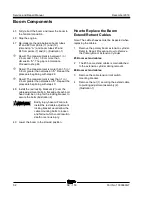
6 Remove the pin retaining fastener from the
boom lift cylinder rod-end pivot pin. Use a soft
metal drift to remove the pin. Protect the
cylinder rod from damage.
7 Using the Auxiliary Power Unit, retract the
boom lift cylinder until the rod end will clear the
boom weldment.
8 Carefully lower the rod end of the boom lift
cylinder down onto the support blocks.
9 Tag, disconnect and plug the boom lift cylinder
hydraulic hoses.
10 Remove the platform. Refer to Repair
Procedure,
How to Remove the Platform.
11 Remove the platform mounting weldment and
the platform rotator. Refer to Repair
Procedure,
How to Remove the Platform
Rotator
.
12 Remove the jib boom. Refer to Repair
Procedure,
How to Remove the Jib Boom.
Note: When the jib boom is installed, the jib boom
angle sensor will need to be calibrated. Refer to
Repair Procedure,
How to Calibrate the Jib Boom
Bellcrank Angle Sensor
.
13 Remove the primary boom cable track. Refer
to Repair Procedure,
How to Remove the
Cable Track
.
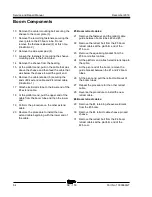
14 Remove the end cover from the pivot end of
the primary boom.
15 Remove the limit switch mounting fasteners
from the limit switch on the ground controls
side of the primary boom. Do not disconnect
the wiring. Remove the limit switch.
16 Disconnect the electrical connector from the
primary boom angle sensor.
Note: The primary boom angle sensor is located on
the pivot pin on the tank side of the boom.
17 Remove the primary boom angle sensor
bracket mounting fasteners and remove the
primary boom angle sensor from the primary
boom. Do not remove the angle sensor from
the bracket.
Note: When the primary boom is installed, the
primary boom angle sensor will need to be
calibrated. Refer to Repair Procedure,
How to
Calibrate the Primary Boom Angle Sensor
.
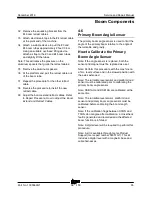
18 Attach a 10 ton / 9071 kg overhead crane to
the pivot end of the primary boom. Do not
apply any lifting pressure.
19 Remove the pin retaining fasteners from the
primary boom pivot pins.
20 Use a soft metal drift to remove the primary
boom pivot pins.
21 Carefully remove the primary boom from the
machine and place it on a structure capable of
supporting it.
Crushing hazard. The primary
boom could become unbalanced
and fall when removed from the
machine if not properly attached
to the overhead crane.
Summary of Contents for Genie SX-150
Page 105: ...December 2019 Service and Repair Manual Manifolds Part No 1300669GT SX 150 93 ...
Page 107: ...December 2019 Service and Repair Manual Manifolds Part No 1300669GT SX 150 95 ...
Page 109: ...December 2019 Service and Repair Manual Manifolds Part No 1300669GT SX 150 97 ...
Page 117: ...December 2019 Service and Repair Manual Part No 1300669GT SX 150 105 ...
Page 119: ...December 2019 Service and Repair Manual Part No 1300669GT SX 150 107 ...
Page 122: ...Service and Repair Manual December 2019 Manifolds 110 SX 150 Part No 1300669GT ...
Page 124: ...Service and Repair Manual December 2019 Manifolds 112 SX 150 Part No 1300669GT ...
Page 229: ...December 2019 Service and Repair Manual 217 Control Circuits Horn ...
Page 230: ...Service and Repair Manual December 2019 218 SX 150 Part No 1300669GT Control Circuits Horn ...
Page 231: ...December 2019 Service and Repair Manual Part No 1300669GT SX 150 219 Control Circuits Power ...
Page 232: ...Service and Repair Manual December 2019 220 Control Circuits Power ...
Page 233: ...December 2019 Service and Repair Manual 221 Control Circuits Can Bus ...
Page 234: ...Service and Repair Manual December 2019 222 SX 150 Part No 1300669GT Control Circuits Can Bus ...
Page 236: ...Service and Repair Manual December 2019 224 Control Circuits Deutz TD2011L04i Engine ...
Page 237: ...December 2019 Service and Repair Manual 225 Control Circuits Deutz TD 2 9 L4Engine ...
Page 240: ...Service and Repair Manual December 2019 228 Control Circuits Perkins 1104D 44T Engine ...
Page 241: ...December 2019 Service and Repair Manual 229 Control Circuits Perkins 854F 34T Engine ...
Page 244: ...Service and Repair Manual December 2019 232 Control Circuits Axle Extend Retract ...
Page 245: ...December 2019 Service and Repair Manual 233 Control Circuits Steering ...
Page 247: ...December 2019 Service and Repair Manual Part No 1300669GT SX 150 235 Control Circuits Propel ...
Page 248: ...Service and Repair Manual December 2019 236 Control Circuits Propel ...
Page 249: ...December 2019 Service and Repair Manual 237 Control Circuits Turntable Rotate ...
Page 252: ...Service and Repair Manual December 2019 240 Control Circuits Boom Up Down ...
Page 253: ...December 2019 Service and Repair Manual 241 Control Circuits Boom Extend Retract ...
Page 261: ...December 2019 Service and Repair Manual 249 Control Circuits Recovery PLD ...
Page 264: ...Service and Repair Manual December 2019 252 Control Circuits Telematics ...
Page 265: ...December 2019 Service and Repair Manual 253 Generator Receptacle Wiring ANSI CSA ...
Page 268: ...Service and Repair Manual December 2019 256 Generator Receptacle Wiring CE ...
Page 269: ...December 2019 Service and Repair Manual 257 Perkins 1104D 44T Engine Electrical Schematic ...
Page 272: ...Service and Repair Manual December 2019 260 Perkins 854F 34T Engine Electrical Schematic ...
Page 273: ...December 2019 Service and Repair Manual 261 Perkins 854F 34T Engine Harness ...
Page 276: ...Service and Repair Manual December 2019 264 Deutz TD 2 9 L4 Engine Electrical Schematic ...
Page 277: ...December 2019 Service and Repair Manual 265 Deutz TD 2 9 L4 Engine Harness ...
Page 279: ...December 2019 Service and Repair Manual 267 Hydraulic Schematic ...
Page 280: ...Service and Repair Manual December 2019 268 Hydraulic Schematic ...
Page 282: ......


