background image

56051701 

 Rev A 


8


© 2019 Telguard 

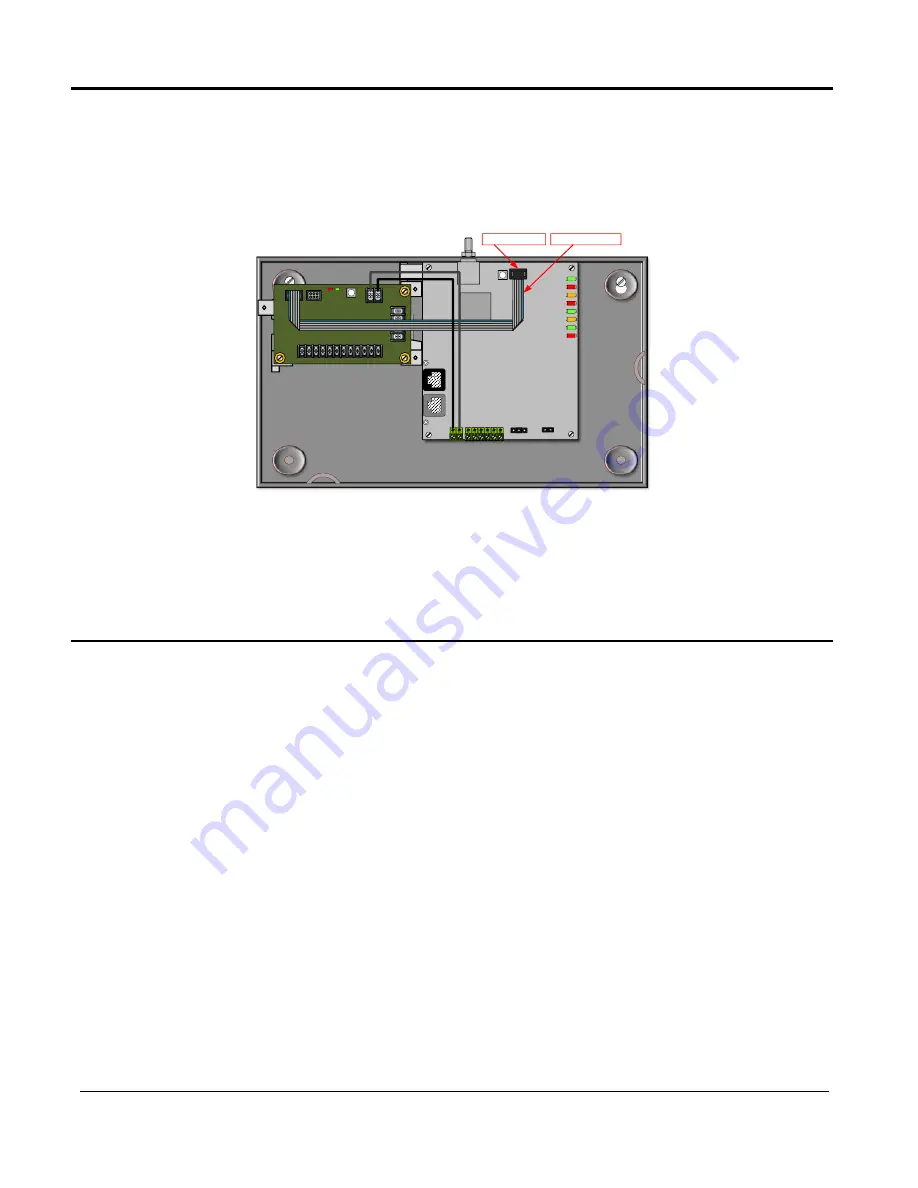
Step 5:  Connect the TG-PEM to the TG-7 or TG-7FS Host 


Make sure there are no AC or DC power sources connected to the TG-7 or TG-7FS communicator.  
Connect power and ground from the TG-

PEM terminal labeled “TELGUARD POWER” to the terminal block 

on the TG-7 or TG-7FS labeled DC and GND.  Do not overtighten. 


Connect ribbon cable (provided) from the connector on TG-

PEM labeled “TO HOST” t

o the 3x2 6-pin 

header on the TG-7 series board as shown. The dark color edge of the ribbon cable should be oriented 
away from the antenna (on the right side) of the TG-7 or TG-7FS. 


If your installation includes a second TG-PEM, install it now following the instructions in Appendix 1. 


Step 6:  Power Up and Configure  


Connect power and ground from the panel auxiliary 

output to the terminal labeled “PANEL POWER” on 

the TG-PEM to provide power to the TG-PEM and TG-7 or TG-7FS. 


Complete the activation of the TG-7 or TG-7FS as outlined in the TG-7 series Installation and Operating 
Guide.  The TG-PEM does not require a separate activation but will require an active TG-7 or TG-7FS host. 


If the TG-PEM was preconfigured, it should now be ready; otherwise, visit www.telguard.com to configure 
the TG-PEM. 


When both the TG-7 series communicator and the TG-PEM have been activated, LED D2 on the TG-PEM 
should have a solid light on.  If the TG-PEM was configured to be used as a power supply only, the light 
will be amber.  If the TG-PEM was configured to be used as both a power supply and to provide additional 
zones, LED D2 will be green. 


Alternate Activation Situations 

The TG-PEM will not communicate if the TG-7 series communicator does not have the minimum firmware 
version 2.32.00.  Generally, the firmware will be upgraded automatically when initially powering up and 
configuring.  To upgrade the firmware for a TG-7FS when there is no dial capture output on the FACP, you will 
need to call Telguard Technical Support (1-800-229-2326, option 9) for assistance when the system is powered 
up and ready to upgrade.  Firmware upgrades can take several minutes to complete. 

```

TG-7FS 

LTE

3x2 6-pin header

Dark edge on right

LED1
LED2
LED3
LED4
LED5
LED6
LED7
LED8

DC            STC2   STC1   TRIP           BATT                AC

Summary of Contents for TG-PEM

Page 1: ...COMPANY CONFIDENTIAL For use by TELGUARD customers only Distribution to other parties strictly prohibited September 20 2019 Telguard TG PEM Power Expansion Module Installation Manual ...

Page 2: ...s measuring voltages stripping wire properly connecting wires together connecting wires to terminals and checking phone lines It also assumes that you have a familiarity with the proper installation and programming tasks related to various alarm panels The material and instructions covered in this manual have been carefully checked for accuracy and are presumed to be reliable However Telguard assu...

Page 3: ...supply is off for any reason however briefly The cellular radio network needed to transmit alarm signals from protected premises to a central monitoring station may be inoperable or temporarily out of service Cellular radio networks are also subject to compromise by sophisticated methods of attack This equipment like any other electrical device is subject to component failure Although this equipme...

Page 4: ...T IN AN ENVIRONMENT NOT PROVIDED OR PERMITTED BY TELGUARD IN WRITING THE PARTIES SHALL GIVE EACH OTHER PROMPT NOTICE OF ANY SUCH COST OR CLAIMS AND COOPERATE EACH WITH THE OTHER TO EFFECTUATE THIS INDEMNIFICATION DEFENSE AND HOLD HARMLESS WARRANTY and LIMITATIONS TELGUARD WILL REPAIR OR REPLACE OUR OPTION INOPERATIVE UNITS FOR UP TO TWO YEARS FROM DATE OF MANUFACTURE EXCLUDES DAMAGE DUE TO LIGHTNI...

Page 5: ...llation Checklist 5 Installation 6 Summary 6 Step 1 Register the TG 7 or TG 7FS Communicator 6 Step 2 Pre configure the TG PEM prior to installation 6 Step 3 Mount the TG 7 or TG 7FS Communicator 6 Step 4 Mount the TG PEM 7 Step 5 Connect the TG PEM to the TG 7 or TG 7FS Host 8 Step 6 Power Up and Configure 8 Step 7 Connect Zone Inputs if using 9 Check Proper Operation of Zones 9 Optional Connect ...

Page 6: ...e TG PEM System 13 Two TG PEM System 13 Wiring Diagrams 14 Main Terminal Strip Pin Assignments 15 DC Terminal Strip Pin Assignments 16 Wire Lengths 16 End of Line Resistors 16 Appendix 3 Troubleshooting Guide 17 LED Indicator Guide 17 Appendix 4 Power Specifications 18 Power consumption 18 ...

Page 7: ...or and a second TG PEM if equipped Powering from the panel eliminates the need for the communicator s external power supply and the backup battery within the metal enclosure The TG PEM has 8 dry contact inputs that may be configured as normally open normally closed or supervised zone Each zone can be configured independently as needed for your application Note The TG PEM is an accessory for a TG 7...

Page 8: ...edicated AC outlet and backup communicator battery at the protected premises Wire the panel auxiliary power to the TG PEM for the system to operate normally UL Note For all UL Listed installations the input must to be power limited by a panel that is UL Listed for compatible listing and provides a regulated output of either 12VDC or 24VDC Refer to Appendix 4 for load calculations Note When using p...

Page 9: ...cluding wiring faults when the inputs are in Supervised Mode STC2 relay NC shall be programmed to report NSC LFC RFC DTF UL Note Each input on any PEM module should have a unique zone number programmed Zone numbers can t be duplicated between two PEM modules Swinger Swinger is the repetitive opening and closing of a detection circuit or device for no apparent reason Some central stations may refer...

Page 10: ...red from www telguard com Note The STC1 relay is limited to tripped or restored condition The STC1 relay is energized in a powered up state when no system troubles exist For more information refer to the TG 7 Series Installation and Operating Guide UL Note for Commercial Fire applications STC1 shall be configured for Trouble Condition on the TG PEM and all trouble conditions from the TG 7FS Progra...

Page 11: ...n to the FACP you will need to call Telguard Technical Support 1 800 229 2326 option 9 for assistance Pre Installation Checklist Before attempting to install the TG PEM in to the Telguard enclosure please make sure you have all the proper parts at the job site The following items are shipped with each TG PEM Telguard TG PEM Mounting bracket Three mounting screws Data cable Quick Install Guide You ...

Page 12: ...lling a Telguard TG PEM Please follow the instructions carefully and if you should need assistance or have any questions please call Telguard Technical Support at 1 800 229 2326 extension 9 Note Complete Dealer Account Establishment and Telguard Registration prior to Installation Step 1 Register the TG 7 or TG 7FS Communicator Use the dealer portal at www telguard com Do not actually mount or inst...

Page 13: ...emove top left mounting screw that holds the TG 7 series board indicated by arrow Orient bracket as shown in diagram Insert bracket at an angle so that top mounting point slides under board as depicted and angled tab threads through the enclosure bump out Replace screw to securely mount bracket and board Use the three provided mounting screws to secure the TG PEM board onto the bracket in the hole...

Page 14: ...Guide The TG PEM does not require a separate activation but will require an active TG 7 or TG 7FS host If the TG PEM was preconfigured it should now be ready otherwise visit www telguard com to configure the TG PEM When both the TG 7 series communicator and the TG PEM have been activated LED D2 on the TG PEM should have a solid light on If the TG PEM was configured to be used as a power supply onl...

Page 15: ...pact the use of zones in NFPA 72 that must be honored to remain in UL and or ULC compliance for fire systems For example initiating devices must be connected to the FACP not the TG PEM Check with your AHJ to understand how these restrictions impact your installation Prior to making connections to the zone inputs verify that LED D2 on the TG PEM is solid green If it is solid amber your TG PEM is no...

Page 16: ...C1 relay must be connected to the panel s input zone to annunciate trouble condition in TG PEM and TG 7FS For commercial burglary applications any inputs from TG PEM may be configured to trip the STC1 relay on the TG 7 to annunciate the alarm or trouble condition locally on the alarm panel using a 24 hour input on the panel Complete the Telguard Power and Expansion Module Installation Route and se...

Page 17: ...a second TG PEM use one of the screws provided to pre thread the screw holes in the metal mounting bracket While not required this will make attaching the TG PEM circuit board to the metal bracket much easier Make sure to pre thread the holes that will be on the left when the bracket is installed as shown below Remove the bottom left mounting screw that holds the TG 7 series circuit board Orient t...

Page 18: ...tructions to connect first TG PEM Connect power and ground from POWER PASS THRU terminal of the first TG PEM to the PANEL POWER terminal on the second TG PEM Data Connections Follow instructions to connect first TG PEM Connect the provided ribbon cable from the keyed connector on the second TG PEM labeled TO HOST to the keyed connector on the first TG PEM labeled TO TG PEM See Appendix 2 for wirin...

Page 19: ...6 LED7 LED8 Alarm Panel Do Not Use these power connectors when using TG PEM Power from TG PEM TG PEM Panel Power DC DC STC2 STC1 TRIP BATT AC TG PEM TG 7FS LTE LED1 LED2 LED3 LED4 LED5 LED6 LED7 LED8 Alarm Panel Burglary Systems STC1 needs to be connected to a 24 hour panel input zone to indicate alarm conditions from TG PEM STC2 could be used to indicate TG 7 trouble conditions Do Not Use these p...

Page 20: ...em The TG PEM device that is getting the panel power is referred to as the First TG PEM The second TG PEM device is optional and its connections are depicted in red T R SIM 1 2 3 4 5 Power LED LED Mode Toggle Button System Status LEDs TELGUARD TG 7 STC2 N C STC1 N O 1 2 3 5 6 1 2 1 2 1 3 2 4 Alarm Panel UL Note 1 Panel Power Te lguar d powe r Panel powe r Power pass thr u To TG PEM To Host Te lgua...

Page 21: ...ower Power pass thru To TG PEM To Host FACP UL Note 2 UL Note 2 STC1 needs to be connected to a panel input zone to indicate all trouble conditions Main Terminal Strip Pin Assignments Terminal Strip Pin Definition Connects To Function 1 Input 1 Monitoring device Input COM Common or ground Common ground Common ground 2 Input 2 Monitoring device Input 3 Input 3 Monitoring device Input COM Common or ...

Page 22: ...wer to additional TG PEM devices TELGUARD POWER Telguard TG 7FS Power out to the Telguard DC power to the TG 7FS device UL Note For all UL listed installations the panel needs to be listed for the application and the panel shall provide a regulated 12VDC or 24VDC from its output Wire Lengths Gauge Length of Wire Loop Note 22 2000ft 1000ft in distance 18 5000ft 2500ft in distance End of Line Resist...

Page 23: ...Input tripped or Event waiting to report on green At least 1 enabled input is tripped or Event s captured and waiting to be reported Event is reporting flashing green Event s reporting or waiting for response LED Test on amber Application is starting all LEDs on for 3sec followed by off for 3sec Firmware update off amber fast flash Updating TG PEM firmware Bootloader error off red flash Device fai...

Page 24: ... Specifications This section provides a power consumption summary for two 2 TG PEMs and TG 7FS combined Power consumption DC input mA standby no link supervision mA standby with link supervision mA transmit max 12V 78mA 82mA 278mA 24V 43mA 46mA 132mA ...

Reviews: