FEATURES
·
Lightweight, small size and is
self-contained.
·
2 separate antennas, one for transmit, the
other for receive.
·
Push-to-Talk with Lock-to-Talk feature
switch
for
the
TR-200
and
Push-to-Transmit with Lock-to-Transmit
feature for the TR-200P.
CONTROLS AND CONNECTIONS
EXTERNAL CONTROLS (Refer To Figure 6)
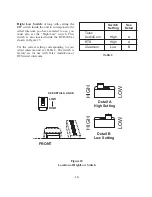
Volume OFF/ON Control:
This thumbwheel
control serves as both an off/on switch and as a
volume control.
Low Battery and Overmodulation Indicator
LED:
Low Battery Indicatorœ:
Part of the bat-
tery
check circuit. When the power switch is
placed in the “ON” position the LED will
flash one time if the battery is good. A poor
battery will cause the LED to illuminate
continuously and a bad or unusable battery
will not cause any illumination at all.
Overmodulation Indicator:
Uses the same
LED as the low battery indicator. During the
talk mode, if the microphone gain is too
high, the LED will illuminate when talking.
Push-To-Talk/Lock-To-Talk Switch:
For
Model TR-200, this switch enables the talk
function. For Model TR-200P, this switch en-
ables the transmit and audio function and oth-
erwise
operates as described for TR-200.
Talk LED Indicator:
(Labeled “talk”) Will be
illuminated whenever the talk function on the
TR-200 or transmit function on the TR-200P is
enabled.
Headset Jack:
A four pin XLR connector for
Input/Output. The headset jack will accept six
different Telex Model Headsets. See “Recom-
mended Headset” Section for more informa-
tion. Compatible with other intercom headsets
with four pin XLR connectors that are wired as
shown in Figure 5.
Figure 5
Headset XLR Connector Wiring
-10-
1
2
3
4
MICROPHONE
SHIELD (-)
MICROPHONE
AUDIO (+)
HEADPHONE
BALANCED
AUDIO
OUT
BTR-200/TR-200
MALE CONNECTORS


