background image

6

What’s in the box 

Please confirm that the following accessories are in the box
when you open it.

Remote control unit x 1
Batteries (AA, R6, SUM-3) x 2
Felt sheet x 3
Power cord x 1
Owner’s manual x 1
Warranty card x 1

Conventions about this manual

<

Instructions in this manual describe the controls on the
remote control. You can also use the buttons on the front
panel of the main unit if they have the same or similar names
as those on the remote.

<

The types of functions and operations that can be used for a
particular disc vary depending on the features of that disc. In
some cases, these functions and operations may differ from
the descriptions given in this owner’s manual. In this event,
follow the instructions given on the screen. This manual only
covers basic disc operations.

<

For some operations, the PROHIBIT icon “

A

” may appear on

the screen. This indicates that the function described in this
manual is not permitted for the type of disc being played.

<

The drawings about the TV screen and front panel display
used in this manual are purely for the purpose of visual
explanation. The actual displays may differ slightly from what
is shown here.

Before Use

Read this before operation

<

Caution: This unit weighs about 32.5 kg (71 5/8 lb). Be
careful to avoid injury when moving the unit. Get someone to
help you if necessary. It is highly recommended that 2 people
move the unit at all times.

<

As the unit may become warm during operation, always leave
sufficient space around the unit for ventilation. 

<

The voltage supplied to the unit should match the voltage as
printed on the rear panel. If you are in any doubt regarding
this matter, consult an electrician.

<

Choose the installation location of your unit carefully. Avoid
placing it in direct sunlight or close to a source of heat. Avoid
locations subject to vibrations and excessive dust, heat, cold
or moisture.

<

Do not place the unit on any other electronic components.

<

Do not open the cabinet as this might result in damage to the
circuitry or electrical shock. If a foreign object should fall into
the unit, contact your dealer or service company as soon as
possible.

<

When removing the power plug from a wall outlet, always
pull directly on the plug. Do not pull on the line cord.

<

To keep the laser pickup clean, do not touch it and always
close the disc tray after each use.

<

Do not attempt to clean the unit with chemical solvents as
this might damage the finish. Use a clean, dry, lint-free cloth.

<

Keep this manual in a safe place for future reference.

CAUTION: DO NOT MOVE THE UNIT DURING PLAYBACK

During playback, the disc rotates at high speeds. Do NOT lift
or move the unit during playback. Doing so may damage the
disc or the unit.

WHEN MOVING THIS UNIT

When changing places of installation or packing the unit for
moving, be sure to remove the disc and return the disc tray to
its fully closed position. Then, press the power switch to turn
the power off, and disconnect the power cord. Moving this
unit with the disc loaded may result in malfunction or other
damage.

Summary of Contents for Esoteric P-03

Page 1: ...P 03 Universal Universal Transport Owner s Manual...

Page 2: ...ized or grounding type plug A polarized plug has two blades with one wider than the other A grounding type plug has two blades and a third grounding prong The wide blade or the third prong are provide...

Page 3: ...ecting the playback area 24 Selecting groups and titles 24 Repeat mode 25 Fast scanning 25 Slow motion frame advance 26 Changing camera angle 26 Selecting subtitles 27 Selecting audio 27 Lip sync 28 T...

Page 4: ...while powerful electronic speed feedback circuits control this sled mechanism for quick access thereby ensuring smooth continuous movement with superior response Shutter isolates the mechanism from e...

Page 5: ...L and NTSC discs can be played back Conversion between the standards is possible allowing the same monitor and player to be used for discs produced to either standard Progressive scan playback with th...

Page 6: ...ay become warm during operation always leave sufficient space around the unit for ventilation The voltage supplied to the unit should match the voltage as printed on the rear panel If you are in any d...

Page 7: ...n the front panel display press the button The display changes to V Set PAL or V Set NTSC Select V Set PAL when a PAL TV European standard is connected Select V Set NTSC when a NTSC TV American standa...

Page 8: ...g logos Region Number of DVD Video discs DVD players and discs are designed with region numbers that determine the regions in which a disc can be played If the region number on the disc you want to pl...

Page 9: ...micals such as record LP sprays antistatic sprays or fluids benzine or thinner to clean the discs Such chemicals will do irreparable damage to the disc s plastic surface Discs should be returned to th...

Page 10: ...each component you intend to use with this unit Be sure to insert each plug securely To prevent hum and noise avoid bundling the signal interconnection cables together with the AC power cord or speake...

Page 11: ...distorted Connect the unit directly to the television In all cases use the highest quality cables for the best possible picture HDMI video audio output terminal Use a commercially available HDMI cabl...

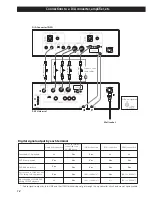
Page 12: ...e up converter circuit and are not up converted Digital signal output by each terminal Single XLR connection Both XLR terminals connected to an ES LINK device i LINK connection RCA connection HDMI con...

Page 13: ...tput cable interface When using an i LINK terminal select a proper Digital Output setting see page 37 The RCA terminal cannot output the digital audio from a Super Audio CD or the digital surround aud...

Page 14: ...the D 03 to the next D 03 unit Daisy chain the three units similarly in random order Connect the word sync terminals as shown in the figure in random order When connecting an optional clock generator...

Page 15: ...ders as well as the i LINK AUDIO A M Protocol Never connect devices that are not compatible with i LINK AUDIO to this unit If you do this unit and other components may not operate normally and may als...

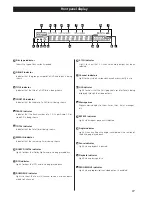
Page 16: ...o change scanning speed OPEN CLOSE Press to open or close the disc tray The indicator flashes when the disc tray is being opened or closed and also when a disc is being read The indicator lights when...

Page 17: ...ator Lights to show that DTS audio is being played back DOWN MIX indicator Lights to show that a multi channel source has been down mixed to 2 channels j i h g f e d c b a 5 1CH indicator Lights to sh...

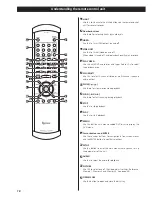
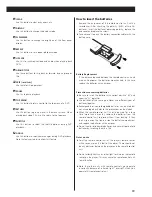
Page 18: ...low motion video playback SCAN m Use these for fast scanning during playback STOP Use this to stop playback PLAY Use this to start playback MENU Use this button with menu enabled DVD discs to display...

Page 19: ...se batteries of the same type Never use different types of batteries together Rechargeable or non rechargeable batteries can be used but not mixed together Refer to the precautions on their labels Whe...

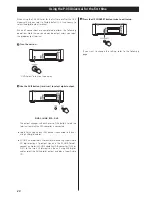
Page 20: ...T button twice to exit setup 3 OUT Select blinks on the display DUAL i LINK RCA XLR The output changes with each press of the button Select the terminal to which the D A converter is connected Select...

Page 21: ...converter D 03 or D 01 to the two XLR terminals on the unit using XLR digital cables select the DUAL digital output and play a Super Audio CD To select a digital output perform operations up to Step T...

Page 22: ...u works may differ from disc to disc DVD menus Use the cursor buttons to select the menu item from a DVD and confirm the selection using the ENTER button Returning to the menu screen Press either the...

Page 23: ...pause audio playback Any DVD or video CD image is frozen Press PLAY or PAUSE to restart playback If the still picture appears blurred or noisy reconfigure the still mode to field see page 47 Caution...

Page 24: ...r track will play from the beginning If the button is pressed once during playback playback returns to the start of the current track or chapter If it is pressed within one second from the start of th...

Page 25: ...ack normal playback starts from the start of that track Notes on video CD non PBC playback audio CD and Super Audio CD Scanning can be carried out across track boundaries If backward scanning reaches...

Page 26: ...the SLOW buttons to slow playback in either direction Pressing PLAY resumes normal speed playback Repeated presses of the SLOW buttons change the slow playback speed 1 8 q 1 4 q 1 2 q normal speed 1 2...

Page 27: ...scs have two or more audio groups In this case select the audio group that contains your selected program material DVD VCD DVD A Selecting subtitles Use the SUBTITLE button to select DVD subtitles Rep...

Page 28: ...DVD Press the LIP SYNC button to display the current lip sync value default is 0 Use the left and right cursor buttons to adjust the value Positive values mean that the sound is delayed relative to th...

Page 29: ...i LINK connection The 5 1 channel indicator lights when Multi ch is selected DVD SA CD DVD A The display on the main unit can be dimmed to suit the environment in which you listen to music or watch v...

Page 30: ...m the XLR1 L terminal and an 88 2 96kHz right channel from the XLR2 R terminal This requires two XLR cables and a DUAL AES compliant D A converter CONV DSD When an ES LINK compliant device is connecte...

Page 31: ...ctions to the WORD SYNC terminal before turning on the unit Switching word sync on and off may occasionally result in noise from the D A converter In this situation turn off the unit and lower the amp...

Page 32: ...c During playback it is possible to change the display as shown here The display on both the main unit and the on screen display when the video output is on changes When playback stops the display mod...

Page 33: ...disc Time remaining for current track Elapsed time of current group Time remaining for current group Audio format Sampling frequency Total number of audio versions recorded Audio channels Bit rate To...

Page 34: ...t 480i NTSC or 576i PAL z 480p NTSC or 576p PAL z 720p z 1080i z 1080p z Auto z OFF HDMI output ON You can also use the HDMI button on the remote control unit to turn ON the format selected by the HDM...

Page 35: ...lects a video signal output from the HDMI terminal Choose either RGB or YCbCr When units not supporting YCbCr are connected with a HDMI cable RGB is automatically output even when YCbCr is selected RG...

Page 36: ...gs to be made but it is easier to use the on screen display to select these settings remember that video output must be turned on Move Analog Out Digital Out CD Digital Direct Audio DRC Group Playback...

Page 37: ...should be set up properly for multi channel use See page 43 for details Note that if Multi Channel is selected and if the connected HDMI component cannot accept multi channel sound only the front L R...

Page 38: ...l AUDIO q Audio DRC ON Applies dynamic range control to Dolby Digital material reducing the volume of loud sounds and increasing the volume of quiet ones This is useful for spoken word material and fo...

Page 39: ...eturn to the memory selection screen or press SETUP to exit the setup menu completely You can use the PICTURE button of the remote control unit to select Reference Memory 1 Memory 2 or Memory 3 4 Shar...

Page 40: ...terial through progressive scan With film material also there are occasions when the ON setting produces better images in terms of smoothness and depth At the AUTO setting the DCDi circuit detects whe...

Page 41: ...hat language Press ENTER when done If the selected language is not available on the disc the first subtitle language of the disc is used Move Return Select Exit Audio Language Subtitle Language Subtit...

Page 42: ...kh kk 1111 Greenlandic kl 1112 Cambodian km 1113 Kannada kn 1114 Kashmiri ks 1119 Kurdish ku 1121 Kirghiz ky 1125 Latin la 1201 Lingala ln 1214 Laothian lo 1215 Lithuanian lt 1220 Latvian lv 1222 Mala...

Page 43: ...duce bass frequencies Small Select this when the connected speakers are rather small and cannot reproduce low bass frequencies When this setting is selected bass frequencies are output from the subwoo...

Page 44: ...lso possible to adjust all distances together The point of these settings is to provide the best synchronization between sound and image by delaying the sound by an appropriate amount The subwoofer is...

Page 45: ...nals are converted and output at 48kHz or 44 1kHz Use this if your amplifier does not have 96kHz 88 2kHz playback capability Note that even when down sampling is turned off some discs are automaticall...

Page 46: ...playback is stopped you cannot do this while playing back a disc 16 9 Use with a 16 9 wide screen television or monitor 4 3LB Letterbox This mode is used with 4 3 televisions 4 3 images are displayed...

Page 47: ...ITH THIS MODEL 525p AND 625p DVD PLAYER PLEASE CONTACT OUR CUSTOMER SERVICE CENTER PAL NTSC conversion GENERAL q Video Out q PL NT Conv This allows you to playback and show NTSC discs on PAL equipment...

Page 48: ...can be played back on the unit it is necessary to enter a password which temporarily changes the level to a more relaxed value These different levels of of parental control also allow you to change th...

Page 49: ...18 br CANADA 0301 ca CHILE 0312 cl CHINA 0314 cn DENMARK 0411 dk FINLAND 0609 fi FRANCE 0618 fr GERMANY 0405 de HONG KONG 0811 hk INDIA 0914 in INDONESIA 0904 id ITALY 0920 it JAPAN 1016 jp KOREA REPU...

Page 50: ...nd the number of available functions by pressing the STOP button twice see page 36 Scanning stops e Scanning does not work within menus Sound skips e Place the unit on a stable and level surface to av...

Page 51: ...wide screen format This is not a malfunction The screen will return to normal when the Setup screen is closed Beware of condensation When the unit or a disc is moved from a cold to a warm environment...

Page 52: ...utput Jack HDMI 19 pin version 1 1 Digital audio output XLR output x 2 Use 2 terminals for ES LINK or Dual AES output i LINK AUDIO output x 1 RCA coaxial output x 1 0 5 Vp p 75 Word synchronization in...

Reviews: