background image

KG-PS232Xh/232X | KG-PV131X/131S

 User’s Manual

E-11

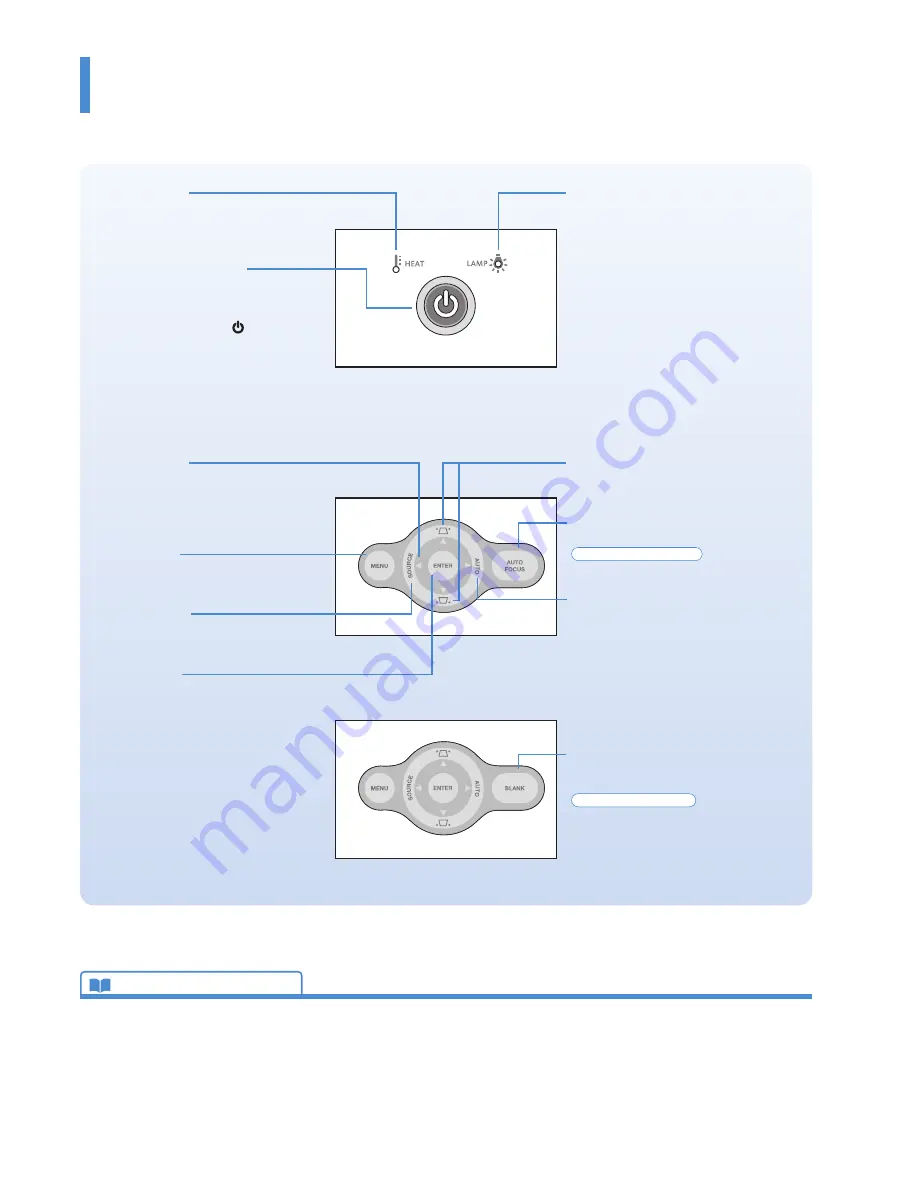
Cursor buttons 

These buttons perform the menu opera-

tions. (They are allocated to other func-

tions when the menu screen is not being 

displayed.)

MENU button 

This button selects the menu display. 

See Page E-47.

SOURCE button 

This button displays the input source 

screen. See Page E-39.

ENTER button 

This button is used to execute menu opera-

tions, etc. 

Finding Information with the Remote Control and the Projector Control Panel

Finding Information with the Projector Control Panel 

LAMP indicator 

This is an indicator that indicates faults 

related to the lamp. See Page E-83.

HEAT indicator

This is an indicator that indicates faults 

related to the temperature of the projector. 

See Page E-83.

POWER/STANDBY button 

This button is used to switch on the power 

and set the projector to the STANDBY 

mode. See Page E-34.

The power supply symbol   of the POW-

ER/STANDBY button serves as an indicator 

that indicates the on/off status of the Eco 

mode, the temperature, and lamp faults. 

Eco Mode: See Pages E-42 and E-56. 

Indications of the indicator: See Page E-83. 

KEYSTONE buttons 

These buttons operate the keystone cor-

rection manually. See Page E-43.

AUTO FOCUS button 

This button adjusts the focus automatically. 

KG-PS232Xh/232X only


See Page E-40. 

AUTO button 

This automatically adjusts the video. (Usu-

ally, the video is adjusted automatically at 

the time of signal selection.) See Page E-39.

* Only the RGB signal is adjustable. 

Technical Point

What is the menu display?

The menus of this projector include the two types of 

Simple Menu

 and 

Advanced Menu

Simple Menu

 includes a collection of frequently used functions. Included are On/Off switch-

ing of 

Auto Keystone

 and 

Auto Focus

Projection Mode

 and other items. On the contrary, 

the 

Advanced Menu

 includes infrequently used settings such as fine adjustments of the im-

age and 

Set Password

, etc. 

See “Using the Menu” for details. See Page E-46.

What is Keystone Distortion? 

Keystone distortion is distortion of the projected image that occurs when the projector is tilted 

vertically or horizontally with respect to the screen. 

There are two types of keystone distortion, in the horizontal direction when the projector is 

slanted to the left or right, and in the vertical direction when the projector is tilted up or down. 

This projector can manually or automatically correct the distortion in the vertical direction. 

See “Auto Keystone”, and “Keystone” for details. See Pages E-53 and 54.

BLANK button 

This button temporarily blanks the video 

and mutes the audio. 

KG-PV131X/131S only


See Page E-40.

Summary of Contents for KG-PS232Xh

Page 1: ...egistered trademark of Video Electronics Standards Association Microsoft Windows and PowerPoint are registered trademarks of Microsoft Corporation U S A and other countries Macintosh is a trademark of...

Page 2: ...low and the Major Specifications for details See Pages E 90 to 93 Model Resolution Full Function Auto Focus Function KG PS232Xh 1024 768 XGA KG PS232X 1024 768 XGA KG PV131X 1024 768 XGA KG PV131S 800...

Page 3: ...been tested and found to comply with the limits for a Class B digital device pursuant to Part 15 of the FCC Rules These limits are designed to provide reasonable protection against harmful interferenc...

Page 4: ...ntilation slots and speaker grills on the unit periodically using a vacuum cleaner If accumulated dust blocks the ventilation slots the unit will overheat which may cause the unit to malfunction Use a...

Page 5: ...ns of this product 3 I would like to know about operations via the remote con trol and the projector control panel Finding Information with the Remote Control and the Projector Control Panel See Page...

Page 6: ...ons with the Personal Computer E 26 Connections with Typical Video Equipment E 28 Connections with the AUDIO Jacks E 30 Connections with the MONITOR OUT Connector E 31 Connections with the RS 232C Con...

Page 7: ...d Menu View E 66 Select Aspect Ratio E 66 Horizontal Position Vertical Position E 68 Vertical Flip Horizontal Flip E 68 Advanced Menu Color E 69 Custom Mode E 69 Gamma Correction E 69 Color Temperatur...

Page 8: ...control See Page E 41 See Projection Mode for information about operation from the menu See Page E 52 I would like to stop the projection temporarily The projection can be stopped temporarily during...

Page 9: ...erns This projector is equipped with security lock functions that allow it to be used more safely including a theft prevention lock compatible with the Kensington MicroSaver security system and a pass...

Page 10: ...the focus auto matically KG PS232Xh 232X only See Page E 40 AUTO KEYSTONE button This button corrects the keystone dis tortion automatically See Page E 40 VOLUME buttons These buttons perform the volu...

Page 11: ...AUTO FOCUS button This button adjusts the focus automatically KG PS232Xh 232X only See Page E 40 AUTO button This automatically adjusts the video Usu ally the video is adjusted automatically at the t...

Page 12: ...operation method is the same for both types the Simple Menu will be used here to describe the names and functions of the menu screen Menu Name This is the title of the menu The color of the selected m...

Page 13: ...9 Gamma Correction E 69 Color Temperature E 70 White Level E 70 White Balance E 71 Color Space E 72 Chroma E 72 Hue E 73 Input Computer1 E 74 Computer2 E 74 Video E 74 S Video E 74 Admin Set Password...

Page 14: ...3 Digital Zoom E 44 58 D ZOOM E 44 ECO E 42 Eco Mode E 42 56 Flashing indicator E 83 Focus E 37 42 FOCUS E 42 FREEZE E 41 Frequency E 64 94 Gamma E 69 HEAT E 83 Hue E 73 Keyword Page Initial Setting E...

Page 15: ...of the video cable or S video cable See Attaching the Ferrite Core for details See Pages E 28 and 33 Power cable 1 8 m 5 9 feet 1 This power cable supplies power to the unit See Turning On the Power f...

Page 16: ...y and Support Service Guide 1 Security Sheet 1 Security Label 1 Soft Case 1 This case will hold the projector the accessories and the user s manual Item Insertion Close the lens shutter of the project...

Page 17: ...hutter during projection will au tomatically activate Blanking Muting of the video audio See Page E 33 Rear adjusters Adjust the projection angle See Page E 36 Focus ring Adjusts the focus of the scre...

Page 18: ...cts Group See below RS 232C connector This connector is used for projector control See Page E 32 COMPUTER IN connector See Page E 26 Remote control sensor AUDIO IN connector See Page E 30 VIDEO IN con...

Page 19: ...perform the menu opera tions 13 AUTO FOCUS button This button adjusts the focus automati cally KG PS232Xh 232X only See Page E 40 14 AUTO KEYSTONE button This button corrects the keystone distor tion...

Page 20: ...y case Precautions Use the same type of replacement batteries as the supplied AA batteries There is danger of explosion if different battery types are used Dispose of used batteries according to the l...

Page 21: ...nt The three colors R red G green and B blue are separated and transferred as an analog signal with this system The display of a personal computer is expressed by the RGB color space and synthe sizing...

Page 22: ...Power for the First Time after Purchase on Page E 34 The factory default setting is for Automatic Detection be On This will automati cally project the video when an input signal is detected When atte...

Page 23: ...e selection See Page E 41 Advanced Menu Allows more detailed video settings to be made such as Im age and Color Advanced Menu See Page E 63 Continued on next page Basic Operation The Procedure from Pr...

Page 24: ...sed check that the POWER STANDBY button indicator is lit in orange in the standby mode and then disconnect the power cable When the power cable is disconnected the indicator of the POWER STANDBY butto...

Page 25: ...projected video when placing the projector The projection distance over which focusing is adjustable is 1 20 m 3 9 feet to 11 79 m 38 65 feet from the projector lens surface The projector should be pl...

Page 26: ...ion of the image When a long cable is used we recommend the use of a noise canceller or other devices Contact an installer or other professional for details Setting the output frequency of the persona...

Page 27: ...eing output from the notebook computer take steps to output an external output signal The output method of the external output signal will differ depending on the personal computer manufacturer See th...

Page 28: ...rite core Cable Video decks DVD players docu ment cameras etc Technical Point What is a RCA Connector and a S Connector Several types of connectors are used as video connectors including composite vid...

Page 29: ...Commercially available Mini D Sub 15 pin RCA 3 pin Component cable Commercially available Mini D Sub 15 pin RCA 3 pin What is YCbCr Connector and a YPbPr Connector Several types of connectors are used...

Page 30: ...nt to be connected are RCA phono jacks The built in speaker of the projector provides monaural audio To enjoy impres sive audio connect the audio output of the projection equipment to your audio syste...

Page 31: ...connector is used to connect two projectors as illustrated in the diagram below the same im age can be viewed on two large screens This is convenient when a large number of people are viewing the sam...

Page 32: ...the projector using a commercially available serial cable of the D Sub 9 pin straight type The connection might not work depending on the control equipment Thank you for your understand ing in advanc...

Page 33: ...al Point To wall outlet Only connect to a grounded power outlet Firmly plug in all the way Attaching the Ferrite Core Ferrite core Cable Precautions Whenthepowerplugwillbeunpluggedfromthe power outlet...

Page 34: ...ENTER button will se lect English After checking the selected item press the cursor button and proceed to the next setting 2 Auto Focus setting KG PS232Xh 232X only Sets the auto focus function to On...

Page 35: ...oceed to the next setting 5 Background Color Sets the background color when the screen is blanked temporarily or when there is no signal Align the cursor with Blue or Black and press the ENTER button...

Page 36: ...ojector is facing the side with respect to the screen therefore place the projector so that it is facing the screen straight from the front KG PS232Xh 232X KG PV131X 131S Zoom ring 1 3 3 4 4 2 Technic...

Page 37: ...s turned on When the zoom lever is moved When the projector is moved When the projection angle has been changed Auto focus operating range Auto focus will work with screen sizes ranging from 31 inches...

Page 38: ...shing blue then go off about 90 seconds later and the indicator will light in the orange of the standby mode 2 Disconnect the Power Cable When the Quick off function is not being used check that the i...

Page 39: ...finalize When Auto Detect is On and there is no input signal at the selected source the source having an input signal will be selected automatically When Auto Detect is Off there will be switching to...

Page 40: ...on of the projected video When the setting of Auto Keystone is On the vertical keystone correction will be performed automatically when the projector is tilted up or down etc Temporarily Blanking Muti...

Page 41: ...will differ depending on the input source See the table below for details Input Source Setting Item Setting Content Computer 1 2 RGB signal Standard This is the standard setting Graphics A setting th...

Page 42: ...ice life of the lamp will be ex tended Off POWER STANDBY button indicator lights steadily in blue The brightness of the lamp will be 100 and there will be bright video KG PS232Xh 232X only Manual Adju...

Page 43: ...ally when there has not been an operation in about 10 seconds When Auto Keystone is Off the adjustment value of the keystone correc tion will be stored after the power is turned off See Auto Keystone...

Page 44: ...liedsothat the dots do not stand out The projected image cannot be moved while the menu screen is displayed Note Enlargement of the Video and Image Movement This function digitally enlarges projected...

Page 45: ...of the display position When enlargement has not been applied i e Zoom is 100 there will not be any movement To close the display right away press the MENU button of the remote con trol or the projec...

Page 46: ...mes and Functions of the Remote Control Buttons and Projector Buttons Menu Name This is the title of the menu The color of the selected menu will change Item Name This is the name of the adjustment or...

Page 47: ...he cursor of the item name will disappear Selecting Show Advanced will switch the display to the Advanced Menu The operation method is the same as for Simple Menu 3 Select the Item Name Press the curs...

Page 48: ...e Menu Screen Press the MENU button and close the menu screen To Select another Menu Item when an Item Name Is Selected Press the cursor buttons and select the menu name Check that the cursor of the i...

Page 49: ...COMPUTER IN VIDEO IN S VIDEO IN Page RGB Signal Component Signal Source Auto Detect E 51 Manual selection Computer1 E 51 Computer2 E 51 Video E 51 S Video E 51 Settings Projection Mode E 52 Auto Focu...

Page 50: ...htness E 63 Contrast E 63 Sharpness E 63 Frequency Compensation E 64 Phase Control E 65 Definition E 65 View Select Aspect Ratio E 66 Horizontal Position E 68 Vertical Position E 68 Vertical Flip E 68...

Page 51: ...h the Auto Detect item name and switch the function On or Off with the cursor buttons Manual selection This selects the input signal manually Select the desired input source and press the ENTER button...

Page 52: ...eproducibility Brightness will drop but color reproduc ibility will rise This is recommended for projection of photographs and animation Presentation A setting that prioritizes brightness Color reprod...

Page 53: ...cally When the setting is Off Automatic adjustment will not be performed Correct the keystone distortion manually KG PS232Xh 232X only KG PS232Xh 232X only What is Keystone Distortion Keystone distort...

Page 54: ...with the Keystone item name and correct the keystone distortion with the cursor buttons The displayed menu screen itself will not be cor rected Please note that depending on the content and projectio...

Page 55: ...f is set to an arbitrary number of minutes the opera tion will be as described below When a no signal condition continues for approximately 10 minutes No Signal Auto Power Off will be displayed as sho...

Page 56: ...age projec tion will cause deterioration of the lamp On POWER STANDBY button indicator flashes slowly in green The brightness of the lamp will be approximately 80 of normal and the service life of the...

Page 57: ...video This is a convenient function that allows a movie to be stopped or a screen to be stopped during projection to permit searching for another document Align the cursor with the Still Image item na...

Page 58: ...es and video Align the cursor with the Zoom item name and enlarge or reduce the im age with the cursor buttons Each press of will further enlarge the video Up to 200 Each press of will return the vide...

Page 59: ...0 there will not be any movement To close the display right away press the MENU button of the remote con trol or the projector The display will close automatically when there has not been an operation...

Page 60: ...e remaining time is indicated with the black gauge and the timer When the gauge disappears the set time will have passed The timer will con tinue to be displayed after the gauge has disappeared When s...

Page 61: ...to the desired position The timer display can be used only when there is signal input It cannot be used when there is no input signal The screen movement that occurs when zoom is used cannot be per fo...

Page 62: ...d in the vari ous message displays etc Align the cursor with the Select Language item name and press the EN TER button The selection screen of display languages will be displayed Select the de sired l...

Page 63: ...cursor with the various item names and adjust with the cursor buttons Item Name Brightness Darker Lighter Contrast Image becomes less dense Image becomes more dense Sharpness Image becomes softer Ima...

Page 64: ...ment is not satisfac tory please adjust as described below Align the cursor with the Frequency Compensation item name and ad just with the cursor buttons While viewing the screen set the adjustment va...

Page 65: ...ctor and an enlarged or reduced display is produced Align the cursor with the Definition item name and adjust with the cursor buttons Setting Definition to Off will result in a soft image and moire pa...

Page 66: ...and projects to fill the screen Direct Projects the image at the maximum displayable size while maintaining the as pect ratio of the input signal Real Projects the input signal without converting the...

Page 67: ...ls Auto Project to fill the screen so that no portion protrudes from the screen while main taining the aspect ratio The top and bottom of a 16 9 video will be black Wide Project all to fill the screen...

Page 68: ...l Position item name and adjust with the cursor buttons Vertical Flip Horizontal Flip Use this when the projector is installed suspended from the ceiling or is in a rear projection setup Align the cur...

Page 69: ...ot be possible Gamma Correction This corrects the proportion of the change of the dark portion from the bright portion of the input signal This is used when reproducing natural color tones and when pr...

Page 70: ...reates a cool white Bluish tone White Level This can project text or diagrams from a personal computer and emphasize the white Align the cursor with the White Level item name and select the setting co...

Page 71: ...white signal from COMPUTER IN 1 and press ENTER 5 Set the connected personal computer screen to white 6 A press of the ENTER button will display the Adjusting white message and the white level will b...

Page 72: ...RGB whichisthevideoexpression oftheprojector the correctcolorscannotbeexpressedunlessasystemis usedthat is compatible with the color difference conversion system of the input signal Color Space serves...

Page 73: ...e projected image Align the cursor with the Hue item name and adjust with the cursor but tons Reddish Greenish Hue can be used only with component signal Video S Video input This permits fine video se...

Page 74: ...Content Computer1 2 Auto Automatically detects the signal Computer Fixed to the analog RGB signal Component Fixed to the component signal Video S Video Auto Automatically detects the signal NTSC Fixe...

Page 75: ...the password setting screen will be displayed Make the setting using the cursor buttons of the remote control or the projector control panel Be sure to enter 4 digits The password that has been enter...

Page 76: ...a message will be displayed and the will disappear Repeat the procedure again from the setting entry To delete the setting at the time of password entry press the MENU button The asterisks will disap...

Page 77: ...t has been set Enter the password using the entry buttons cursor buttons Be sure to enter the 4 digits that have been set Example Enter password A press of cursor button will result in an asterisk bei...

Page 78: ...try display will not be displayed the next time the projector is started Changing a password 1 After Set Password has been set to Off with the aforementioned opera tion we will set it to On again 2 Th...

Page 79: ...000 hours When the Lamp Has Reached the End of Its Service Life Replace the lamp cartridge will be displayed on the screen for 10 seconds in 1 minute intervals Replace the lamp with a new one See Repl...

Page 80: ...s the EN TER button This message will be displayed on the screen Resetting lamp operation time Press ENTER to proceed Press MENU to cancel Pressing the ENTER button again will return the lamp timer to...

Page 81: ...Initialize press the MENU button and there will be a return to the menu screen Even when the following items are initialized the settings will remain Vertical Flip Horizontal Flip Language Setting La...

Page 82: ...re performed Align the cursor with the Background Color item name and make the set ting with the cursor buttons Blue The background color will be a blue screen Black The background color will be a bla...

Page 83: ...cooling fan ventilation holes If clogged clean the filter When the temperature protector is activated the power will turn off and it might not come back on even when the power is turned on immediatel...

Page 84: ...oidal keystone distortion perform keystone adjustment Please note that depending on the projected picture and the projection conditions it may not be possible to eliminate keystone distortion complete...

Page 85: ...mote control signal sensor Is the remote control unit outside of range Are you pointing the remote control unit s transmitter towards the projector s re mote control signal sensor Is the projector loc...

Page 86: ...rwise hit the projector body with your nails or other hard object since this will cause scratches Dirty Lens Clean using the same method you would use to clean a camera lens Use a commercial blower fo...

Page 87: ...p cartridge according to the procedure on the next page See Page E 88 When the lamp has been used for more than 100 hours after reaching its service life the projector will enter the standby mode and...

Page 88: ...ter replacement return the projector to its original condi tion 3 Remove the lamp cover 1 Press the 2 tabs of the lamp cover and lift upward 2 Pull and remove in the direction of the arrows 4 Remove t...

Page 89: ...ress the ENTER button There will be a change to the initialization verification display Now press the ENTER button See Lamp Timer Reset for details on Page E 80 When the lamp has been used for more th...

Page 90: ...Horizontal 15 to 80 kHz Vertical 50 to 85 Hz Color Reproduction Full color 16 770 000 colors Resolution VGA 640 480 expansion true S VGA 800 600 expansion true XGA 1024 768 true S XGA 1280 1024 compr...

Page 91: ...l switching RGB Horizontal 15 to 80 kHz Vertical 50 to 85 Hz Color Reproduction Full color 16 770 000 colors Resolution VGA 640 480 expansion true S VGA 800 600 expansion true XGA 1024 768 true S XGA...

Page 92: ...witching RGB Horizontal 15 to 80 kHz Vertical 50 to 85 Hz Color Reproduction Full color 16 770 000 colors Resolution VGA 640 480 expansion true S VGA 800 600 expansion true XGA 1024 768 true S XGA 128...

Page 93: ...80i 720p automatic or manual switching RGB Horizontal 15 to 80 kHz Vertical 50 to 85 Hz Color Reproduction Full color 16 770 000 colors Resolution VGA 640 480 expansion true S VGA 800 600 true XGA 102...

Page 94: ...3 800 600 37 9 60 3 800 600 46 9 75 0 800 600 48 1 72 2 800 600 53 7 85 1 1024 768 48 4 60 0 1024 768 56 5 70 1 1024 768 60 0 75 0 1024 768 68 7 85 0 1280 1024 64 0 60 0 Apple Macintosh 640 480 35 0 6...

Page 95: ...KG PS232Xh 232X KG PV131X 131S User s Manual E 95 Major Specifications Cabinet Dimensions KG PS232Xh 232X KG PV131X 131S 260 10 2 210 8 3 58 2 3 260 10 2 210 8 3 58 2 3 Unit mm inch...

Page 96: ...2008 KAGA COMPONENTS CO LTD...

Reviews: