MAINTENANCE
68
On-Demand Water Heater Installation Manual and Owner’s Guide
-Water filter cleaning-
MAINTENANCE AND SERVICE
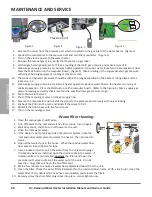
4. Remove the screw from the pressure port which is located on the gas inlet of the water heater. (Figure 2)
5. Connect the manometer to the pressure port and zero the manometer. (Figure 3)
6. Turn on the electric power to the water heater.
7. Re-open the manual gas valve. Verify that there are no gas leaks.
8. With all gas burning equipment off, take a reading of the static gas pressure and make a note of it.
9. Measure gas supply pressure at maximum heater operation: Open hot water faucets to create maximum flow.
Press the MAX button on the computer board. (Figure 4) Take a reading of the supply dynamic gas pressure
with all gas burning equipment running at maximum rate.
10. The static and dynamic pressures should be within the ranges specified on the heater's rating plate and the
table on p. 31.
11. Measure gas supply pressure at minimum heater operation: Reduce water flow so the heater is running at
minimal operation. Press the MIN button on the computer board. (Refer to the figure 4.) Take a supply gas
pressure reading and verify that it is within the specified inlet gas pressure range.
12. Shut off all water fixtures.
13. Shut off the manual gas valve on the gas supply line.
14. Remove the manometer and reinstall the screw to the pressure port securely with no gas leaking.
15. Put back the PCB into the case and reinstall the screw to fix it.
16. Reinstall the front cover with the four screws.
17. Turn on the manual gas valve.
1. Close the manual gas shutoff valve.
2. Turn off power to the unit and wait five (5) seconds. Turn on again.
3. Wait 30 seconds, and then turn off power to the unit.
4. Close the inlet water valve.
5. If the heater is part of an Easy-Link or Multi-Unit System, close the
inlet and outlet water valves to isolate the heater. Then proceed to
step 6.
6. Open all hot water taps in the house. When the residual water flow
has ceased, close all hot water taps.
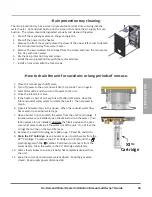
7. Have a bucket or pan to catch the water from the unit’s drain plugs.
If Isolation valves are installed, open the drains to drain the water. If
isolation valves are not installed,
unscrew
the filters and open the
pressure relief valve to drain all the water out of the unit. Do not
lose the o-rings that will be on the two filter caps.
8. Wait a few minutes to ensure all water has completely drained from the unit.
9. Clean the filter: Check the water filters located within the cold and return inlets. With a tiny brush, clean the
water filter of any debris which may have accumulated and reinsert the filters.
10. Securely screw the drain filter plugs back into place. Hand- tighten only.
Figure 2
Pressure port
Figure 4
MAX
MIN
Figure 1
Figure 3
Summary of Contents for 160X3P
Page 84: ...7J8071 1 2000570774 REV B...


