


INS
TALLA
TION
36
On-Demand Water Heater Installation Manual and Owner’s Guide
Model
Indoor
Outdoor
Maximum Pipe length*
(Hot Water supply line and Dedicated Return line)
Pipe
Diameter
3/4"
500 ft (152.4 m)
1/2"
200 ft (61 m)
*These are equivalent length that includes head loss for elbows, tees, unions, etc for smooth wall copper tube. Other water
tube materials have different head loss characteristics. When other materials are used, the installer shall consult with the
water tube manufacturer to conduct a head loss calculation to make sure the installed pump will flow at least 2 gpm. Please
refer to the manufacturer's specification sheet for pump head loss information. An additional pump may be necessary for cir-
culation systems with longer equivalent pipe lengths.
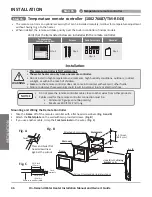
INSTALLATION
Step 12:
Water connections
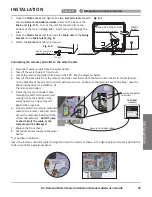
Step 12:
Water connections
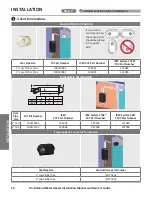
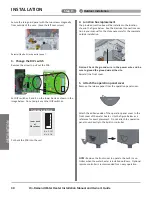
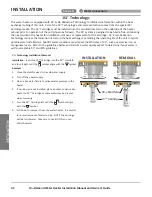
IF YOU HAVE COPPER PIPES:
If your home has copper water pipes, you can solder the water pipe connections or use compression fittings which don’t require
soldering. Compression fittings are easier to install than soldering pipe. Check with local plumbing officials to determine what
types of pipe materials are suitable for your location. Do not use lead-based solder.
Do not solder pipes while they are attached to the water heater. The water heater contains non-metallic parts
which could be damaged. The proper way to connect the water heater to copper water pipes is as follows:
• Solder a short length of pipe (about a foot or so) to a threaded adapter using only 95/5 tin antimony or
equivalent solder.
• Attach the threaded adapters to the water heater’s connections (using thread sealant tape or pipe joint
compound).
• Connect the home’s water pipes by soldering, keeping the connections at the water heater cool with wet rags.
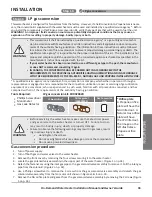
NOTICE
Do not use this appliance if any part has been under water. Immediately contact a qualified
installer or service agency to replace a flooded water heater. Do not attempt to repair the unit! It
must be replaced!
WARNING
Do not reverse the hot outlet and cold inlet connections to the water heater. If you reverse the
connections, the water heater will not activate properly.
NOTICE
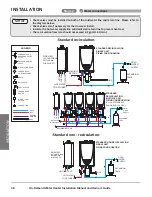
• A manual shutoff valve must be installed on the cold water inlet to the water heater between the main water supply line and
the water heater.
• A thermal expansion tank or code approved device to handle thermal expansion must be installed.
• Connect the cold water supply using 3/4 inch National Pipe Thread “NPT” to the fitting marked “C” (COLD).
• For ease of removing the water heater for service or replacement, connect the water pipes with a coupling called a union. We
recommend using a dielectric-type union (available at your local plumbing supplier). Dielectric unions can help prevent corro-
sion caused by tiny electric currents common in copper water pipes and can help extend the life of the water heater.
• Connect the hot water supply using 3/4 inch NPT to the fitting marked “H” (HOT). Follow the same connection guidelines as
for the cold water supply.
• In addition, a manual shutoff valve is also recommended on the hot water outlet and return inlet of the unit.
• Double check to make sure the hot and cold water pipes are connected to the correct hot and cold water fittings on the water heater.
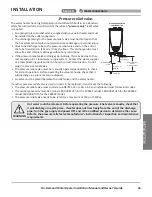
• If needed, install (or adjust) the home’s Pressure Reducing Valve and a thermal expansion tank or code approved device to
handle thermal expansion must be installed.
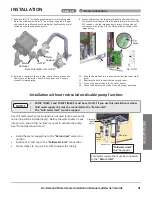
• Before installing the water heater, flush the water line to remove all debris, and after installation is complete, purge the air from
the line. Failure to do so may cause damage to the heater.
• There is a wire mesh filter within the cold inlet and return inlet to trap debris from entering your heater. This will need to be
cleaned periodically to maintain optimum flow. (Refer to p. 68.)
• Install insulation (or heat tape) on the water pipes especially if the indoor installation area is subject to freezing temperatures.
Insulating the hot water and return pipes will reduce heat loss.
• If water hammer is evident install water hammer arrestors on the inlet side.
• Water lines with temperatures exceeding 110°F (43°C) should not be connected to the cold inlet of the water heater where
water will flow through the X3™ Technology Cartridge. Damage to the cartridge will result.
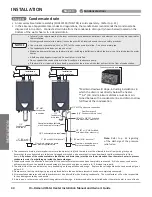
Determine the type of water pipes in your home. Most homes use copper water pipes, but some use CPVC or cross-linked poly-
ethylene (PEX). Use fittings appropriate for the type of pipe in your home. Do not use iron or PVC pipe – they are not suitable for
potable water. All pipes, pipe fittings, valves and other components, including soldering materials, must be suitable for potable
water systems. Also, an automatic air vent or air separator must be installed when the water heater operates in a closed loop
system such as a recirculation system. Trapped air bubbles in the water system can cause a pump to cavitate or damage the water
heater's heat exchanger. This equipment must be installed according to its manufacturer's instructions.
Summary of Contents for 160X3P
Page 84: ...7J8071 1 2000570774 REV B...


