


INS
TALLA
TION
16
On-Demand Water Heater Installation Manual and Owner’s Guide
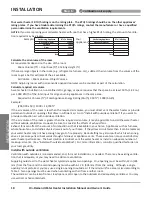
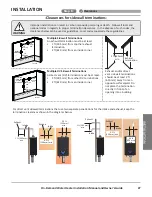
DIP switches
(Default)
Vent
style
Vent type
Vent length
Lower
bank
of DIP
switches
1
2
3
4
5
6
7
8
ON
No. 3: ON
No. 4: OFF
2" DV
Intake
10 to 60 ft (3.1 to 18.3 m)
Exhaust
2" PV
Intake
2" elbow: 5 ft (1.5 m)
Exhaust
15 to 60 ft (4.6 to 18.3 m)
3" DV
Intake
60 to 150 ft (18.3 to 45.7 m)
Exhaust
3" PV
Intake
2" elbow: 5 ft (1.5 m)
Exhaust
60 to 150 ft (18.3 to 45.7 m)
DIP switches
Vent
style
Vent type
Vent length
Lower
bank
of DIP
switches
1
2
3
4
5
6
7
8
ON
No. 3: OFF
No. 4: ON
2" DV
Intake
5 to 9.9 ft (1.5 to 3.0 m)
Exhaust
2" PV
Intake
2" elbow: 5 ft (1.5 m)
Exhaust
5 to 14.9 ft (1.5 to 4.5 m)
3" DV
Intake
5 to 59.9 ft (1.5 to 18.3 m)
Exhaust
3" PV
Intake
2" elbow: 5 ft (1.5 m)
Exhaust
5 to 59.9 ft (1.5 to 18.3 m)
Outdoor installation (Refer to p.29.)
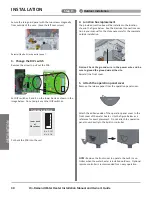
Changing DIP switch
1. Remove the front cover.
2. Pull out the PCB.
3. Locate the lower bank of the DIP switches.
4. Change the DIP switch.
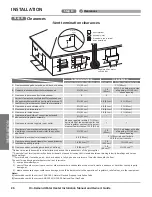
DIP switch settings for the vent style
Set the DIP switch as shown in the following for your vent style. If your vent style is out of the range of the upper
table, change the DIP switches as shown in the lower table. WARNING! Before changing the DIP switches, make
sure that there is no power supply, gas supply, and water supply.
INSTALLATION
Step 5:
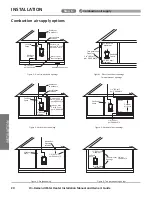
General instructions of venting
Summary of Contents for 160X3P
Page 84: ...7J8071 1 2000570774 REV B...


