


Troubleshooting the AirSPEED AP542
SYSTIMAX® AirSPEED™ AP542
User Guide
131
Download a New Image Using ScanTool
To download the AP Image, you will need an Ethernet connection to the computer on which the TFTP server resides
and to a computer that is running ScanTool (this is either two separate computers connected to the same network or a
single computer running both programs).
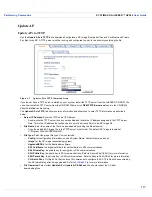
ScanTool detects if an Access Point does not have a valid software image installed. In this case, the
TFTP Server
and
Image File Name
parameters are enabled in the ScanTool’s
Change
screen so you can download a new image to the
unit. (These fields are grayed out if ScanTool does not detect a software image problem.)
Preparing to Download the AP Image
Before starting, you need to know the Access Point’s IP address, subnet mask, the TFTP Server IP Address, and the
AP Image file name. Make sure the TFTP server is running and configured to point to the folder containing the image
to be downloaded.
Download Procedure
Follow these steps to use ScanTool to download a software image to an Access Point with a missing image:
1. Download the latest software from
http://www.systimax.com.
2. Copy the latest software updates to your TFTP server.
3. Launch ScanTool.
4. Highlight the entry for the AP you want to update and click
Change
.
5. Set
IP Address Type
to
Static
.
NOTE
You need to assign static IP information temporarily to the Access Point since its DHCP client functionality is
not available when no image is installed on the device.
6. Enter an unused IP address that is valid on your network in the
IP Address
field. You may need to contact your
network administrator to get this address.
7. Enter the network’s
Subnet Mask
in the field provided.
8. Enter the network’s
Gateway IP Address
, if necessary. You may need to contact your network administrator to get
this address. You should only need to enter the default gateway address (169.254.128.133) if the Access Point
and the TFTP server are separated by a router.
9. Enter the IP address of your TFTP server in the field provided.
10. Enter the
Image File Name
(including the file extension). Enter the full directory path and file name. If the file is
located in the default TFTP directory, you need enter only the file name.
11. Click
OK
.
–
Result: The Access Point will reboot and the download will begin automatically. You should see downloading
activity begin after a few seconds within the TFTP server’s status screen.
12. Click
OK
when prompted that the device has been updated successfully to return to the
Scan List
screen.
13. Click
Cancel
to close the ScanTool.
14. When the download process is complete, configure the AP as described in
Getting Started
and
Performing
Advanced Configuration
.


