background image

AMU Powercon

Installation

A-96.250.331 / 230320

15

2.4.2

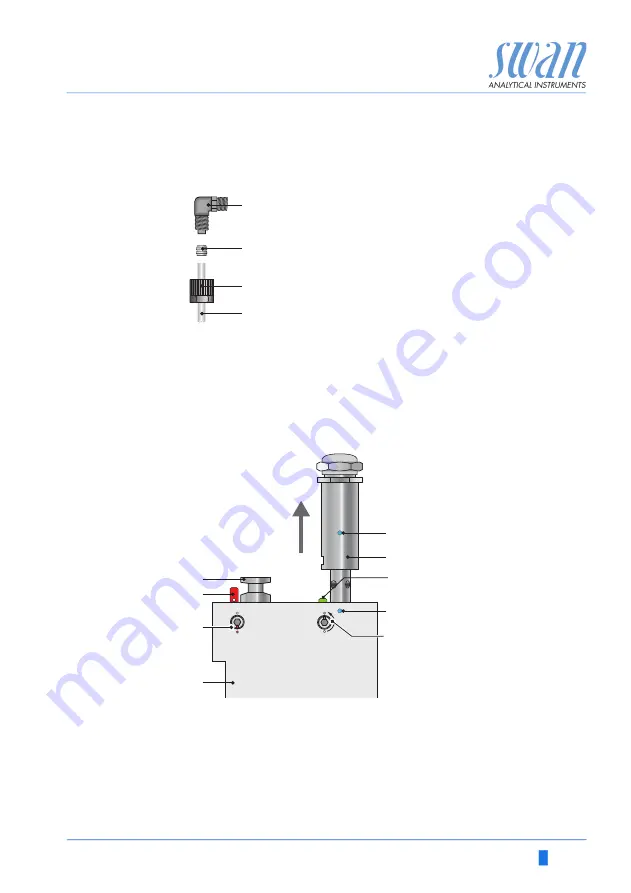
FEP Tube at Sample Outlet
FEP flexible tube 6 mm

Connect the tube to the Serto elbow union and Insert it into an at

-

mospheric drain of sufficient capacity. 

Max. tube length is 1.5 m. Do not connect longer tubes.

2.5. Install the Conductivity Sensor

1

Make sure that the locking mechanism is in unlocked position 

(locking pin in position [G] and security screw in position [H]).

2

Put the sensor into the flow cell with the alignment marks [E] in 

line.

3

Turn the locking screw with a 5 mm allen key clockwise 180°.

The locking pin moves up in lock position.

A

B

C

D

Ellbow union

Compression ferrule

Knurled nut

Flexible tube

B

C

D

A

A

B

C

D

E

F

G

H

Blind plug

Locking pin locked

Locking screw closed

Flow cell

Alignment marks

Conductivity sensor

Locking pin unlocked

Locking screw open

A

C

B

D

G

E
H

F

E

Summary of Contents for AMU Powercon

Page 1: ...AMU Powercon Version 6 20 and higher A 96 250 331 230320 Operator s Manual ...

Page 2: ...und the world For any technical question contact your nearest SWAN representative or the manufacturer SWAN ANALYTISCHE INSTRUMENTE AG Studbachstrasse 13 8340 Hinwil Switzerland Internet www swan ch E mail support swan ch Document Status Title AMU Powercon Operator s Manual ID A 96 250 331 Revision Issue 00 Sept 2006 First Edition 01 March 2013 Update to FW release 5 30 02 July 2019 Update to FW re...

Page 3: ... Sample Inlet 14 2 4 2 FEP Tube at Sample Outlet 15 2 5 Install the Conductivity Sensor 15 2 6 Installation of Cation Exchanger 16 2 7 Electrical Connections 17 2 8 Power supply 19 2 9 Sensor 19 2 10 Flow Meter 19 2 11 Input 19 2 12 Relay Contacts 20 2 12 1 Alarm Relay 20 2 12 2 Relay 1 and 2 20 2 13 Signal Output 1 and 2 current outputs 20 2 14 Interfaces 21 2 14 1 RS232 Interface 21 2 14 2 Profi...

Page 4: ...ing the inlet filter 33 5 6 Calibration 34 5 7 Longer Stop of Operation 35 6 Error List 36 7 Program Overview 39 7 1 Messages Main Menu 1 39 7 2 Diagnostics Main Menu 2 40 7 3 Maintenance Main Menu 3 41 7 4 Operation Main Menu 4 41 7 5 Installation Main Menu 5 42 8 Program List and Explanations 44 1 Messages 44 2 Diagnostics 44 3 Maintenance 45 4 Operation 46 5 Installation 47 9 Material Safety Da...

Page 5: ...instructions are given throughout this manual at the respective locations where observation is most important Strictly follow all safety instructions in this publication Target audience Operator Qualified person who uses the equipment for its intended purpose Instrument operation requires thorough knowledge of applications instrument functions and software program as well as all applicable safety ...

Page 6: ... the prevention instructions carefully WARNING Severe injuries or damage to the equipment can occur if such warnings are ignored Follow the prevention instructions carefully CAUTION Damage to the equipment minor injury malfunctions or incor rect process can be the consequence if such warnings are ig nored Follow the prevention instructions carefully Mandatory Signs The importance of the mandatory ...

Page 7: ...to ensure safe operation of the instrument Spare Parts and Disposables Use only official SWAN spare parts and disposables If other parts are used during the normal warranty period the manufacturer s warranty is voided Modifications Modifications and instrument upgrades shall only be carried out by an authorized Service Technician SWAN will not accept responsi Electrical shock hazard Corrosive Harm...

Page 8: ...e shall be performed by authorized personnel only Whenever electronic service is required disconnect in strument power and power of devices connected to relay 1 relay 2 alarm relay WARNING For safe instrument installation and operation you must read and understand the instructions in this manual WARNING Only SWAN trained and authorized personnel shall perform the tasks described in this document D...

Page 9: ...arameter for the total quantity of ions present in the solution It can be used for the controlling of the condition of waters water purification water hardness completeness of ion analysis Special Features Many temperature compensation curves for specific conductivity measurement none Coefficient Neutral salts High purity water Strong acids Strong bases Ammonia Eth am Morpholine Signal Outputs Two...

Page 10: ...le When a voltage is set between two electrodes in an electrolyte solution the result is an electric field which exerts force on the charged ions the positively charged cations move towards the neg ative electrode cathode and the negatively charged anions to wards the positive electrode anode The ions by way of capture or release of electrons at the electrodes are discharged and so a current I flo...

Page 11: ...tivity is compensated to 25 C Several temperature compensation curves designed for different water compositions can be chosen After cation exchanger cation conductivity the temperature com pensation curve strong acids has to be set For more information see Wagner Heinz Influence of Tempera ture on Electrical Conductivity of Diluted Aqueous Solutions PowerPlant Chemistry 2012 14 7 455 469 Standard ...

Page 12: ... housing Protection degree Ambient temperature Humidity Display Dimensions Weight Noryl resin IP54 front 10 to 50 C 10 90 rel non condensing backlit LCD 75 x 45 mm 96 x 96 x 120 mm DIN 43700 0 45 kg Power supply Voltage Power consumption 100 240 VAC 10 50 60 Hz 5 or 24 VDC 15 max 8 VA Conductivity sensor type 2 electrode sensor ...

Page 13: ... 1 mS cm Automatic range switching Values for a cell constant of 0 0415 cm 1 Swansensor UP Con1000 Accuracy 1 of measured value 1 digit Sensor cell constant 0 005 10 cm 1 Temperature compensation none Coefficient Neutral salts High purity water Strong acids Strong bases Ammonia Eth am Morpholine Temperature measurement Pt1000 type sensor DIN class A Measuring range Resolution 30 to 250 C 0 1 C Sam...

Page 14: ...n temperature sensor Specifications UP Con1000 Measuring range 0 055 1000 μS cm Operating conditions Continuous Temperature 100 C at 6 5 bar Max temperature 120 C at 6 5 bar Pressure max 30 bar at 25 C Accuracy at 25 C 1 or 0 001 S cm whichever is greater Temperature sensor Pt1000 Cell constant 0 04 cm 1 Sensor mounting SWAN slot lock for quick release in suitable flow cells 3 4 NPT thread Ø 30 29...

Page 15: ...n SL with integrated flow sensor and flow regulating valve Catconplus SL with a built in cation exchanger and flow regu lating valve For a 3 4 NPT thread UP Con1000 sensor B Flow UP Con Q Flow UP Con with integrated flow sensor QV Flow UP Con with integrated flow sensor and flow regu lating valve Catcon with a built in cation exchanger Catconplus with a built in cation exchanger and flow regulat i...

Page 16: ...al Connections p 17 Connect the power cord but do not switch on power until all exter nal devices are connected Power up Open sample flow and wait until flow cell is completely filled Switch on power Adjust sample flow Instrument setup Program all sensor parameters see Sensor parameters p 23 Program the required temperature compensation Program all parameters for external devices interface recorde...

Page 17: ...AMU Powercon Installation A 96 250 331 230320 11 2 2 Dimensions of the AMU Transmitter 96 mm 89 8 mm 89 8 mm 112 mm 7 mm 96 mm 92 mm 92 mm ...

Page 18: ...tented SWAN slotlock adapter for quick sensor release Operating temperature up to 130 C Operating pressure max 10 bar at 130 C Process connections at inlet and outlet 2 x 1 8 female ISO tapered thread Installation The maximal recommended cable length is 15 m select the instal lation location accordingly The flow cell must be aligned in exactly vertical position 72 161 85 35 45 46 28 ...

Page 19: ...d bore has to be closed with a blind plug Sample conditions Temperature up to 50 C Inlet pressure 0 2 to 2 bar Outlet pressure ambient pressure Sample flow 5 to 20 l h Sample connection Inlet Swagelok tube adapter SS Outlet 8 6 mm Serto tube adapter PVDF Installation The maximal recommended cable length is 15 m select the instal lation location accordingly The flow cell must be aligned in exactly ...

Page 20: ... reassembly of bigger sized unions thread compression cone Installation 1 Insert the compression ferrule C and the compression cone D into the union nut B 2 Screw on the union nut onto the body do not tighten it 3 Push the stainless steel pipe through the union nut as far as it reaches the stop of the body 4 Mark the union nut at 6 o clock position 5 While holding the fitting body steady tighten t...

Page 21: ... locking mechanism is in unlocked position locking pin in position G and security screw in position H 2 Put the sensor into the flow cell with the alignment marks E in line 3 Turn the locking screw with a 5 mm allen key clockwise 180 The locking pin moves up in lock position A B C D Ellbow union Compression ferrule Knurled nut Flexible tube B C D A A B C D E F G H Blind plug Locking pin locked Loc...
Page 22: ...Unscrew and remove the empty bottle E from the bottle holder B 2 Fill high purity water into the cation exchanger bottle C until the water level in the bottle reaches the beginning of the thread 3 Carefully without spilling water push the cation exchanger bot tle over the inlet filter holder D into the bottle holder B 4 Screw the cation exchanger bottle into the bottle holder Do not tighten the bo...

Page 23: ...0320 17 2 7 Electrical Connections CAUTION Use only the terminals shown in this diagram and only for the mentioned purpose Use of any other terminals will cause short circuits with possible corresponding consequences to material and personnel ...

Page 24: ...18 A 96 250 331 230320 AMU Powercon Installation Rear view of AMU Transmitter 1 L RS232 N 2 3 4 5 6 7 8 9 RON OFF A PB B PB 10 11 12 13 14 24 23 22 21 20 19 ...

Page 25: ...ar the instrument easily accessible to the operator marked as interrupter for AMU Powercon 2 9 Sensor Connect the sensor to the AMU transmitter according to the con nection diagram see Electrical Connections p 17 For sensor settings see Programming p 23 2 10 Flow Meter Connect the flow meter if any to the AMU transmitter according to the connection diagram see Electrical Connections p 17 2 11 Inpu...

Page 26: ...13 Signal Output 1 and 2 current outputs NOTICE Max burden 510 Ω If signals are sent to two different receivers use signal isolator loop isolator Signal output 1 Terminals 13 and 12 Signal output 2 Terminals 14 and 12 For programming see Program List and Explanations p 44 Menu Installation Terminals Description NC a Normally Closed a As defined when ordering 5 6 Active opened during normal operati...

Page 27: ...ter The RS232 interface is used for logger download and firmware up load 2 14 2 Profibus optional To connect several instruments by means of a network or to config ure a PROFIBUS DP connection consult the PROFIBUS manual Use appropriate network cable NOTICE The switch must be ON if only one instrument is installed or on the last instrument in the bus ...

Page 28: ...allation 2 14 3 Modbus optional To connect several instruments by means of a network consult the MODBUS manual Use appropriate network cable NOTICE The switch must be ON if only one instrument is installed or on the last instrument in the bus ...

Page 29: ...rade delivered by Swan Not rinsed cation exchanger resin from other suppliers may require a run in period of several hours to several days 3 2 Programming Sensor parameters Program all sensor parameters in Menu 5 1 2 1 Installation Sensors Sensor parameters The sensor characteristics are printed on the label of each sensor Enter the Cell constant cm 1 Temperature correction C Cable length Temperat...

Page 30: ...vices interface recorders etc See program list and explanations 5 2 Signal Outputs p 48 and 4 2 Relay Contacts p 46 Limits Alarms Program all parameters for instrument operation limits alarms See program list and explanations 4 2 Relay Contacts p 46 Temp Compensation Menu 5 1 3 Choose between none Coefficient Neutral salts High purity water Strong acids Strong bases Ammonia Ethanolamine Morpholine...

Page 31: ...ges to move back to the previous menu level B to move DOWN in a menu list and to decrease digits C to move UP in a menu list and to increase digits D to open a selected sub menu to accept an entry Exit Enter A B C D 25 4 C RUN 9 l h 14 10 45 R1 0 178 S R2 1 Installation Operation Diagnostics Messages Maintenance Main Menu Enter Exit ...

Page 32: ...RROR Error Fatal Error C Keys locked transmitter control via Profibus D Time E Process values F Sample temperature G Sample flow H Relay status upper lower limit not yet reached upper lower limit reached control upw downw no action control upw downw active dark bar indicates control intensity motor valve closed motor valve open dark bar indicates approx position timer timer timing active hand rota...

Page 33: ...t parameters that might need to be modified during daily routine Normally password protected and used by the process operator Subset of menu 5 Installation but process related Menu Installation 5 For initial instrument set up by SWAN authorized person to set all instrument parameters Can be protected by means of password 1 Messages Operation Maintenance Diagnostics Main Menu Installation 1 1 Pendi...

Page 34: ...set 5 1 1 Sensors Flow None Sensor parameters Quality Assurance Temp Compensation Sensor parameters Quality Assurance Temp Compensation 5 1 1 Sensors Flow None Flow None Q Flow 5 1 1 Sensors Flow Q Flow Sensor parameters Quality Assurance Temp Compensation Sensor parameters Quality Assurance Temp Compensation 5 1 1 Sensors Flow Q Flow No Save Yes 1 Select the value you want to change 2 Press Enter...

Page 35: ...lations Reagent consumption A 1 l resin bottle delivered by Swan lasts at 1 ppm alcalizing re agent pH 9 4 for 4 months at sample flow 10 l h 5 months at sample flow 5 l h 5 2 Stop of Operation for Maintenance 1 Stop sample flow 2 Shut off power of the instrument Monthly Check sample flow Check cation exchanger resin if any The resin color changes to red orange if exhausted If required Clean condu...

Page 36: ...ner If the sensor is strongly contaminated dip the tip of the sensor into 5 hydrochloric acid for a short time 5 3 2 Install the Sensor into the Flow Cell 1 Make sure that the locking mechanism is in unlocked position locking pin in position G and security screw in position H 2 Put the sensor into the flow cell with the alignment marks E in line 3 Turn the locking screw clockwise 180 using a 5 mm ...

Page 37: ...anger bottle E be fore removing Thus no water will spill out of the flow cell when loosening the bottle 3 Unscrew and carefully remove the exhausted cation exchanger bottle E 4 Fill high purity water into the new cation exchanger bottle C until the water level in the bottle reaches the beginning of the thread 5 Carefully without spilling water push the cation exchanger bot tle over the inlet filte...

Page 38: ...liter Swan resin This graphic shows the average exhaust time flow 6 l h and must be verified by the user Cation Conductivity Operational Days for 1 l of Cation Exchange Resin with an Ex change Capacity of 1 8 eq l Flow Rate 6 l h Alkalization with Ammonia Safety Margin of 15 Subtracted 0 8 8 9 0 9 2 9 4 9 6 9 8 10 0 10 2 pH Days 100 200 300 400 500 600 700 ...

Page 39: ...nscrew and carefully remove the cation exchanger bottle 4 For better access to the Allen screws C unscrew and remove the filter holder B from the bottle holder A 5 Loosen the 4 Allen screws with a 1 5 mm Allen key 6 Carefully remove the inlet filter D with a screw driver no 0 from the inlet filter holder 7 Insert a new inlet filter 8 Tighten the 4 Allen screws slightly 9 Screw the cation exchanger...

Page 40: ...t with clean water see Maintenance of the Sensor p 30 6 Use a one liter beaker and fill it with one liter of calibration solu tion 7 Put the sensor into the beaker filled with calibration solution 8 Wait at least 5 minutes to permit temperature equilibration between sensor and calibration solution 9 Start the calibration procedure 10 Press Enter to save the values if the calibration was successful...

Page 41: ...ation set in menu 5 1 3 1 During calibration control is interrupted The signal outputs are frozen if hold has been programmed menu 4 2 4 2 Otherwise the outputs track the measuring value Hold after calibration is indicated by Hold on the display 5 7 Longer Stop of Operation 1 Stop sample flow 2 Slightly squeeze the ion exchanger bottle Thus no water will spill out of the flow cell when loosening t...

Page 42: ...uch Errors are marked E0xx bold and orange Errors which indicate a hardware failure of the instrument Such Errors are marked E0xx bold and red Error or fatal Error Error not yet acknowledged Check Pending Errors 1 1 5 and take corrective action Press ENTER Navigate to menu Messages Press ENTER Navigate to menu Pending Errors Press ENTER Press ENTER to acknowledge the Pending Errors The Error is re...

Page 43: ... 53 E010 Sample Flow low check sample inlet pressure Check flow regulating valve check programmed value see 5 3 1 2 35 p 53 E011 Temp shorted Check wiring of temperature sensor Check temperature sensor E012 Temp disconnected Check wiring of temperature sensor Check temperature sensor E013 Case Temp high check case environment temperature check programmed value see 5 3 1 4 p 54 E014 Case Temp low c...

Page 44: ... Fault Yes is programmed in Menu see 5 3 4 p 57 E026 IC LM75 call service E030 EEProm Frontend call service E031 Cal Recout call service E032 Wrong Frontend call service E033 Power on none normal status E034 Power down none normal status Error Description Corrective action ...

Page 45: ...ngs can be modified Menu 3 Maintenance is for service Calibration simulation of outputs and set time date Please protect with password Menu 4 Operation is for the user allowing to set limits alarm values etc The presetting is done in the menu Installation only for the System engineer Please protect with password Menu 5 Installation Defining assignment of all inputs and outputs measuring parameters...

Page 46: ...rd Front End Operating Time Years Days Hours Minutes Seconds 2 1 4 1 2 1 4 Sensors Cond Sensor Current value 2 2 2 2 1 Raw value Cell constant Cal History Number Date Time 2 2 1 5 1 2 2 1 5 Miscellaneous Case Temp 2 2 2 1 2 2 2 Sample Sample ID 2 3 1 2 3 Temperature Pt1000 Sample Flow Raw value I O State Alarm Relay 2 4 1 2 4 Relay 1 2 2 4 2 Input Signal Output 1 2 Interface Protocol 2 5 1 2 5 Bau...

Page 47: ...5 Set Time Date Time 3 4 Sensors Filter Time Const 4 1 1 Menu numbers 4 10 Hold after Cal 4 1 2 Relay Contacts Alarm Relay Alarm Conductivity Alarm High 4 2 1 1 1 4 2 4 2 1 4 2 1 1 Alarm Low 4 2 1 1 25 Hysteresis 4 2 1 1 35 Delay 4 2 1 1 45 Relay 1 2 Setpoint 4 2 x 100 4 2 2 4 2 3 Hysteresis 4 2 x 200 Delay 4 2 x 30 Input Active 4 2 4 1 4 2 4 Signal Outputs 4 2 4 2 Output Control 4 2 4 3 Fault 4 2...

Page 48: ...el 0 Off 5 1 4 5 1 4 1 1 Trend 2 Standard 3 Crucial Signal Outputs Signal Output 1 2 Parameter 5 2 1 1 5 2 2 1 5 2 5 2 1 5 2 2 Current Loop 5 2 1 2 5 2 2 2 Function 5 2 1 3 5 2 2 3 Scaling Range Low 5 2 x 40 10 11 5 2 x 40 Range High 5 2 x 40 20 21 Relay Contacts Alarm Relay Alarm Conductivity Alarm High 5 3 1 1 1 1 5 3 5 3 1 5 3 1 1 Alarm Low 5 3 1 1 1 25 Hysteresis 5 3 1 1 1 35 Delay 5 3 1 1 1 4...

Page 49: ... 3 3 401 Delay 5 3 2 50 5 3 3 50 Input Active 5 3 4 1 5 3 4 Signal Outputs 5 3 4 2 Output Control 5 3 4 3 Fault 5 3 4 4 Delay 5 3 4 5 Miscellaneous Language 5 4 1 5 4 Set defaults 5 4 2 Load Firmware 5 4 3 Password Messages 5 4 4 1 5 4 4 Maintenance 5 4 4 2 Operation 5 4 4 3 Installation 5 4 4 4 Sample ID 5 4 5 Interface Protocol 5 5 1 5 5 Device Address 5 5 21 Baud Rate 5 5 31 Parity 5 5 41 ...

Page 50: ...values can only be viewed not modified 2 1 Identification Desig Designation of the instrument Version Firmware of the instrument e g V6 20 07 16 2 1 4 Factory Test Test date of the instrument motherboard and frontend 2 1 5 Operating Time years days hours minutes seconds 2 2 Sensors 2 2 1 Cond Sensor Current value in µS Raw value in µS Cell Constant 2 2 1 4 QA History Review the QA values Number Da...

Page 51: ...in l h and the raw value in Hz 2 4 I O State Shows current status of all in and outputs 2 4 1 2 4 2 2 5 Interface Only available if optional interface is installed Review programmed communication settings 3 Maintenance 3 1 Calibration Follow the commands on the screen Save the value with the en ter key 3 2 Simulation To simulate a value or a relay state select the alarm relay relay 1 and 2 signal ...

Page 52: ...to changes of the measured value Range 5 300 Sec 4 1 2 Hold after Cal Delay permitting the instrument to stabilize again af ter calibration During calibration plus hold time the signal outputs are frozen held on last valid value alarm values limits are not ac tive Range 0 6 000 Sec 4 2 Relay Contacts See Relay Contacts p 20 4 3 Logger The instrument is equipped with an internal logger The logger d...

Page 53: ... Installation 5 1 Sensors 5 1 1 Flow None Q Flow Select Q Flow if the sample flow should be monitored and shown on the display and when using a SWAN flow cell 5 1 2 Sensor parameters 5 1 2 1 Cell Constant Enter the cell constant printed on the sensor label Range 0 005000 cm 1 11 00 cm 1 5 1 2 2 Temp Corr Enter the temperature correction printed on the sensor label Range 2 C to 2 C 5 1 2 3 Cable le...

Page 54: ...Crucial Level 4 User Edit user specific limits in menu 5 1 4 2 5 2 Signal Outputs NOTICE The navigation in the menu Signal Output 1 and Signal Output 2 is equal For reason of simplicity only the menu numbers of Signal Output 1 are used in the following 5 2 1 Signal Output 1 Assign process value the current loop range and a function to each signal output 5 2 1 1 Parameter Assign one of the process ...

Page 55: ...nwards for controllers See As control output p 50 As process values The process value can be represented in 3 ways linear bilinear or logarithmic See graphs below 5 2 1 40 Scaling Enter beginning and end point Range low high of the linear or logarithmic scale In addition the midpoint for the bilinear scale A B linear bilinear X Measured value X Measured value logarithmic 20 0 0 0 1 0 2 0 3 0 4 0 5...

Page 56: ...nd In the steady state the setpoint will never be reached The deviation is called steady state error Parameters setpoint P Band PI controller The combination of a P controller with an I controller will minimize the steady state error If the reset time is set to zero the I controller is switched off Parameters setpoint P Band reset time PD controller The combination of a P controller with a D contr...

Page 57: ...elected parameter P Band Range below upwards control or above downwards con trol the set point within the dosing intensity is reduced from 100 to 0 to reach the setpoint without overshooting 5 2 1 43 Control Parameters if Parameters Conductivity 5 2 1 43 10 Setpoint Range 0 S 300 mS 5 2 1 43 20 P Band Range 0 S 300 mS 5 2 1 43 Control Parameters if Parameters Temperature 5 2 1 43 11 Setpoint Range...

Page 58: ...ill reach the same value as it will be suddenly reached by a D controller Range 0 9 000 sec 5 2 1 43 5 Control timeout If a controller action dosing intensity is constantly over 90 during a defined period of time and the process value does not come closer to the setpoint the dosing process will be stopped for safety reasons Range 0 720 min 5 3 Relay Contacts 5 3 1 Alarm Relay The alarm relay is us...

Page 59: ...e has risen above fallen below the programmed alarm Range 0 28 800 Sec 5 3 1 2 Sample Flow Define at which sample flow an alarm should be is sued 5 3 1 2 1 Flow Alarm Program if the alarm relay should be activated if there is a flow alarm Choose between yes or no The flow alarm will always be indicated in the display pending error list saved in the message list and the logger Available values Yes ...

Page 60: ... relay contacts 1 or 2 is defined by the user NOTICE The navigation in the menu Relay 1 and Relay 2 is equal For reason of simplicity only the menu numbers of Relay 1 are used in the following 1 First select the functions as Limit upper lower Control upwards downwards Timer Fieldbus 2 Then enter the necessary data depending on the selected func tion The same values may also be entered in menu 4 2 ...

Page 61: ...re needed relay 1 to open and relay 2 to close the valve 5 3 2 22 Parameter Choose on of the following process values Conductivity Temperature Sample Flow Cond uc 5 3 2 32 Settings Choose the respective actuator Time proportional Frequency Motor valve Examples of metering devices that are driven time proportional are solenoid valves peristaltic pumps Dosing is controlled by the operating time 5 3 ...

Page 62: ... needed to open a completely closed valve Range 5 300 Sec 5 3 2 32 32 Neutral zone Minimal response time in of the runtime If the re quested dosing output is smaller than the response time no change will take place Range 1 20 5 3 2 32 4 Control Parameters Range for each Parameter same as 5 2 1 43 p 51 The relay will be activated repetitively depending on the pro grammed time scheme 5 3 2 24 Mode O...

Page 63: ...he relay is active 5 3 4 3 Output Control relay or signal output Continuous Controller continues normally Hold Controller continues on the last valid value Off Controller is switched off 5 3 4 4 Fault 5 3 2 1 Function Fieldbus No Input is never active When closed Input is active if the input relay is closed When open Input is active if the input relay is open Continuous Signal outputs continue to ...

Page 64: ...es should be done by instructed service personnel only 5 4 4 Password Select a password different from 0000 to prevent unau thorized access to the menus Messages Maintenance Opera tion and Installation Each menu may be protected by a different password If you forgot the passwords contact the closest SWAN representa tive 5 4 5 Sample ID Identify the process value with any meaning full text such as ...

Page 65: ...rial Safety Data sheets 9 1 Cation Exchanger Resin SWAN Product name Cation Exchange Resin Catalogue number A 82 841 030 and A 82 841 031 Download MSDS The current Material Safety Data Sheets MSDS for the above list ed Reagents are available for downloading at www swan ch ...

Page 66: ... corr 0 00 C Sensor Parameters Cable length 0 0 m Sensor Parameters Meas unit µS cm Temp Compensation Comp none Quality Assurance Level 0 Off Signal Output 1 Parameter Conductivity Current loop 4 20 mA Function linear Scaling Range low 0 000 µS Scaling Range high 1 mS Signal Output 2 Parameter Temperature Current loop 4 20 mA Function linear Scaling Range low 0 C Scaling Range high 50 C Alarm Rela...

Page 67: ...ntrol Parameters P band 1 mS Settings Control Parameters Reset time 0 s Settings Control Parameters Derivative Time 0 s Settings Control Parameters Control Timeout 0 min Settings Actuator Time proportional Cycle time 60 s Response time 10 s Settings Actuator Motor valve Run time 60 s Neutral zone 5 If Function Timer Mode Interval Interval 1 min Mode daily Start time 00 00 00 Mode weekly Calendar S...

Page 68: ...62 A 96 250 331 230320 AMU Powercon Default Values Miscellaneous Language English Set default no Load firmware no Password for all modes 0000 Sample ID Interface Protocol Hyperterminal ...

Page 69: ...UP Con 9 Q Flow UP Con SL 9 QV Flow UP Con 9 QV Flow UP Con SL 9 I Input 4 19 Install cation exchanger bottle 16 Installation 10 Instrument setup 10 Interface 4 Interfaces Modbus 22 Profibus 21 RS232 21 M Measuring principle 4 Measuring unit 24 Modbus 22 P Power Supply 18 Power supply 19 Power up 10 Pre rinse setup 16 Profibus 21 Program Access 25 Q Quality Assurance 24 R Reagent consumption 29 Re...

Page 70: ... 64 A 96 250 331 230320 Specific Conductivity 4 Specifications AMI Transmitter 6 Swansensor RC U 8 Swansensor RC UT 8 Standard 5 Standard Temperature 5 System Description of 3 T Temperature compensation 5 Terminals 17 20 ...

Page 71: ...AMU Powercon Notes A 96 250 331 230320 65 12 Notes ...

Page 72: ...y companies and distributors cooperates with independent representatives all over the world SWAN Products Analytical Instruments for High Purity Water Feedwater Steam and Condensate Potable Water Pool and Sanitary Water Cooling Water Waste Water and Effluents Made in Switzerland ...

Reviews: