


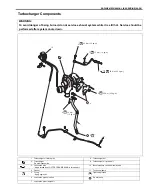


6A2-24 ENGINE MECHANICAL (K9K ENGINE)
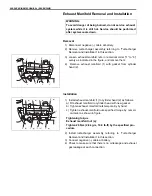
Exhaust Manifold Removal and Installation
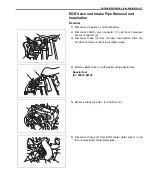
Removal
1) Disconnect negative (–) cable at battery.
2) Remove turbocharger assembly referring to “Turbocharger
Removal and Installation” in this section.
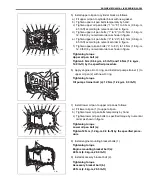
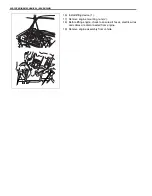
3) Loosen exhaust manifold nuts in numerical order (“1” to “8”)
evenly as indicated in the figure, and remove them.
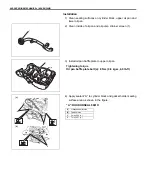
4) Remove exhaust manifold (1) with gasket from cylinder
head (2).
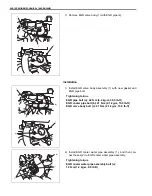
Installation
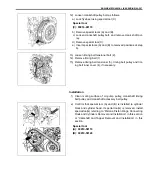
1) Install exhaust manifold (1) to cylinder head (2) as follows.
a) Fit exhaust manifold to cylinder head with new gasket.
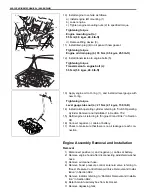
b) Tighten exhaust manifold nuts temporarily by hand.
c) Tighten exhaust manifold nuts specified torque by numeri-
cal order as shown in figure.
Tightening torque
Exhaust manifold nut (a):
Tighten 26 N·m (2.6 kg-m, 19.0 lb-ft) by the specified pro-
cedure
2) Install turbocharger assembly referring to “Turbocharger
Removal and Installation” in this section.
3) Connect negative (–) cable at battery.
4) Check to make sure that there is no oil leakage and exhaust
gas leakage at each connection.
WARNING:
To avoid danger of being burned, do not service exhaust
system while it is still hot. Service should be performed
after system cools down.
“3”
“7”
“5”
“1”
“4”
“8”
“6”
“2”
“6”, (a)
“2”, (a)
“4”, (a)
“8”, (a)
“7”, (a)
“3”, (a)
“1”, (a)
“5”, (a)
1
2