background image

System  Setup

îí

Network

TCP/IP Settings

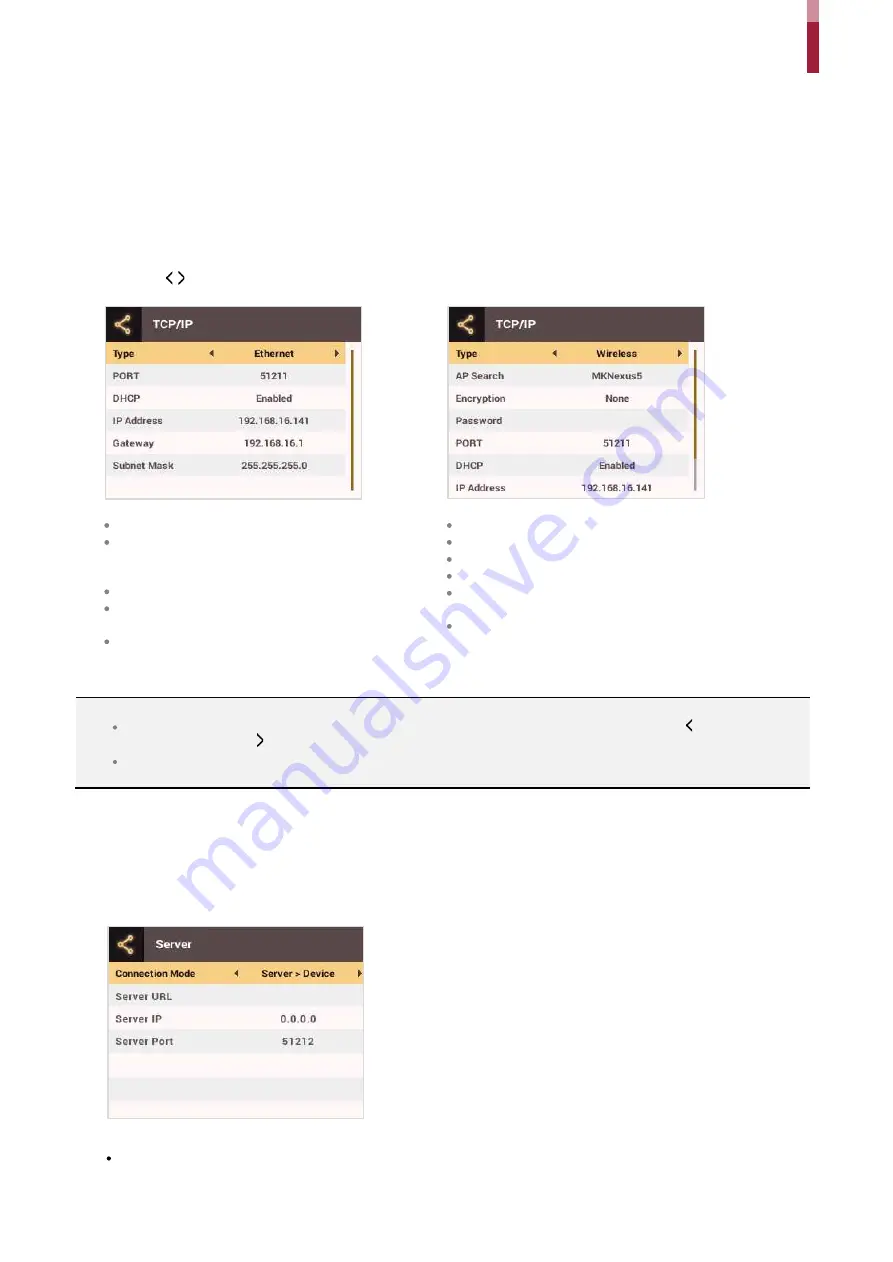
You can configure the network settings for the device.

1

Press the

ESC

button then authenticate as an administrator.

Go to 

NETWORK

 > 

TCP/IP

 then press 

OK

3

Press the  / buttons to select a

Type

then select an item. You can select 

Ethernet

or 

Wireless

.


Port

: Enter the port number of the device. 


DHCP

: Select whether or not to use DHCP. If 

Disabled

 is selected, the user can modify 

IP 

Address

Gateway

, and

 Subnet Mask


IP Address

: Enter the IP address of the device.     


Gateway

: Enter the gateway address of the 

device. 


Subnet Mask

: Enter the subnet mask address of 

the device.


AP Search

: Select the AP to connect to.


Encryption

: Shows the encryption method of the AP.   


Password

: Enter the AP login password. 

Port

: Enter the port number of the device. 


DHCP

: Select whether or not to use DHCP. If 

Disabled

 is 

selected, the user can modify the 

IP Address


IP Address

: Enter the IP address of the device.   

Press 

OK

 to save the settings. 

NOTE 


Press  the  number  buttons  to  enter  the  IP  address,  gateway  address,  and  subnet  mask  address.  Use  the    button  to  delete  the 
values entered. Use the    button to enter a separator. 

To use 

Wireless

, you need a wireless router. For more information on installing and configuring the wireless router, see the manual 

of the wireless router.

Server Settings

1

Press the

ESC

button then authenticate as an administrator.

Go to 

NETWORK

 > 

Server

 then press 

OK


Select an item and change the settings. 


Connection Mode

: Select 

Device > Server

 to send the connect signal from the device directly to the server. If 

Server > Device

 is selected, 

Server IP

 and 

Server Port

 address cannot be entered.   

Summary of Contents for BioStation 2

Page 1: ...BioStation 2 USER GUIDE EN 102 00 BS2 V1 38A Version 1 38 English...

Page 2: ...Instructions 4 Getting Started 6 Administrator Menus 12 User Management 13 Authentication Configuration 15 System Setup 18 Check Event Log 25 Troubleshooting 27 Product Specifications 28 FCC Complianc...

Page 3: ...Appendices 31...

Page 4: ...ructions Be careful not to spill any liquid such as water drinks or chemicals inside the product This can cause fire electric shock or product damage Caution Ignoring these instructions may result in...

Page 5: ...reful not to contaminate or damage the fingerprint reader with dirty hands or materials This can decrease performance or cause failures to read fingerprints Clean the product with a soft dry cloth Do...

Page 6: ...Star Shaped instead of the product fixing screw for enhanced security For more information on installation visit the Suprema website www supremainc com to see the installation guide BioStation 2 Wall...

Page 7: ...s the character type Changes the character type or selects a T A event Deletes numbers characters Inserts symbols or configures an item OK Selects an item or saves the settings Speaker Makes a sound L...

Page 8: ...pin Connects a TTL input output cable Relay 3 pin Connects a relay cable Power 2 pin Connects the power cable DIP switch Turns on the termination resistor for the RS 485 interface To use the terminat...

Page 9: ...RLY NO White 2 RLY COM Blue 3 RLY NC Orange RS 485 Pin Name Color 1 485 TRXP Blue 2 485 TRXN Yellow 3 485 GND Black 4 SH GND Gray TTL input output Pin Name Color 1 TTL IN0 OUT0 Red 2 TTL IN1 OUT1 Yell...

Page 10: ...Getting Started Intercom Pin Name Color 1 INPH VDC Red 2 INPH GND Black 3 INPH AUD Orange 4 INPH DTA Blue 5 SH GND Gray...

Page 11: ...scan again then remove your finger and place it again to scan You are required to scan the same finger twice for enrollment NOTE Precautions for enrolling fingerprints Enrolling fingerprints is the m...

Page 12: ...anyone can access the menu just by pressing the ESC button Quick Menu 1 Press and hold the ESC button for more than one second and then release the button Next authenticate yourself as an administrat...

Page 13: ...nt Card Registers cards for user authentication Scan the cards that you want to assign to users Press the ESC button if you do not want to register another card User Level Selects the privileges to as...

Page 14: ...be displayed 4 Select the user you want to edit and press F2 Edit the information by referring to Adding User Information Press F3 and then the OK button to delete a user NOTE Access Group can be regi...

Page 15: ...figured schedule For more information on configuring schedules see the BioStar 2 Administrator Guide Card A schedule can be configured for each authentication method using cards 1 Press the ESC button...

Page 16: ...on or entering a PIN is required after entering an ID In this mode both fingerprint authentication and entering a PIN are required after entering an ID 4 Press OK to save the settings NOTE You can con...

Page 17: ...to have the authentication speed configured according to the total fingerprint templates enrolled on the device Template Format Sets the fingerprint template format The default format is SUPREMA Be ca...

Page 18: ...in seconds the LCD screen light stays on Menu Timeout Configures the time in seconds for the menu screen to automatically disappear If there is no button input for the specified period the display go...

Page 19: ...th the server To synchronize the time with the server select Use Date Format Selects the date format You can select from among the YYYY MM DD MM DD YYYY or DD MM YYYY formats Time Format Selects the t...

Page 20: ...e connected USB memory stick Press the buttons to select an item and press OK FW Upgrade If there are firmware files stored on the USB memory stick select the firmware file to use and press OK to upgr...

Page 21: ...rtificate saved in the device 3 If you proceed to restore the defaults the device will restart NOTE When you reset the operator level will be reset as well After resetting make sure to set the operato...

Page 22: ...level credential 2 Select DEVICE Secure Tamper then change the settings by pressing or 3 To save settings press OK Device Info Shows the model name device ID FW version and MAC address 1 Press the ESC...

Page 23: ...P login password Port Enter the port number of the device DHCP Select whether or not to use DHCP If Disabled is selected the user can modify the IP Address IP Address Enter the IP address of the devic...

Page 24: ...BioStar 2 installed You can enter the values when Device Server is selected for Connection Mode 4 Press OK to save the settings NOTE Press the number buttons to enter the values for Server IP and Ser...

Page 25: ...OK 3 Select an item and press the buttons to change the condition If you press OK matching logs will be displayed on the screen 4 Press ESC to return to the previous screen Delete All Logs You can de...

Page 26: ...k Event Log Check Log Usage Shows the status of the log usage 1 Press the ESC button then authenticate as an administrator 2 Go to EVENT LOG Log Usage then press OK 3 Press OK after checking the log u...

Page 27: ...fingerprint recognition does not work Check whether the finger or the fingerprint sensor has sweat water or dust on it and then wipe it clear Try again after clearing the finger and the fingerprint s...

Page 28: ...per finger Max Text Log 3 000 000 Interface Wi Fi Yes TCP IP Yes RS 485 1ch Host or Slave Selectable Wiegand 1ch Input 1ch Output TTL Input 2ch Inputs 2ch Outputs Relay 1 Relay USB USB 2 0 Host Relay...

Page 29: ...Product Specifications Dimensions Unit mm...

Page 30: ...iance and its antenna must not be co located or operation in conjunction with any other antenna or transmitter A minimum separation distance of 20 cm must be maintained between the antenna and the per...

Page 31: ...uprema or a regional distributor Copyright Notice Suprema owns the copyright for this document The rights of other product names brands and trademarks belong to the individuals or organizations who ow...

Page 32: ...to a free program could make it effectively proprietary To prevent this the GPL assures that patents cannot be used to render the program non free The precise terms and conditions for copying distrib...

Page 33: ...material for which you do not control copyright Those thus making or running the covered works for you must do so exclusively on your behalf under your direction and control on terms that prohibit the...

Page 34: ...re that it is available for as long as needed to satisfy these requirements e Convey the object code using peer to peer transmission provided you inform other peers where the object code and Correspon...

Page 35: ...conveying If you add terms to a covered work in accord with this section you must place in the relevant source files a statement of the additional terms that apply to those files or a notice indicati...

Page 36: ...ur recipient s use of the covered work in a country would infringe one or more identifiable patents in that country that you have reason to believe are valid If pursuant to or in connection with a sin...

Page 37: ...HE PROGRAM TO OPERATE WITH ANY OTHER PROGRAMS EVEN IF SUCH HOLDER OR OTHER PARTY HAS BEEN ADVISED OF THE POSSIBILITY OF SUCH DAMAGES 17 Interpretation of Sections 15 and 16 If the disclaimer of warran...

Page 38: ...g Source 1 Use a suitable shared library mechanism for linking with the Library A suitable mechanism is one that a uses at run time a copy of the Library already present on the user s computer system...

Page 39: ...t com All rights reserved This package is an SSL implementation written by Eric Young eay cryptsoft com The implementation was written so as to conform with Netscapes SSL This library is free for comm...

Page 40: ...F THE POSSIBILITY OF SUCH DAMAGE The licence and distribution terms for any publically available version or derivative of this code cannot be changed i e this code cannot simply be copied and put unde...

Page 41: ......

Reviews: