background image

1-6

 PDSMi


User’s Manual

Motherboard Features 

CPU 


Latest CPU technology! 

•   Single Intel Pentium D (Dual-Core)/Pentium 4 Extreme Edition/Pentium 4/Pen-

tium Extreme Edition/Celeron D LGA (Land Grid Array) 775 Processors at system 

bus speeds of 1066 MHz/800 MHz/533 MHz.   

•   Hyper-Threading (HT), EM64T, Enhanced Intel SpeedStep (EIST) supported

Using the EM64T Feature

•  Install a 64-bit OS (Windows XP Professional x64 Ed, Server 2003x64 Ed.)

•  Install the 64-bit drivers for all MB components, devices and add-on cards

Using the Hyper-Threading (HT) Technology

•  Use a CPU that supports Hyper-Threading Technology

•  Install an OS that supports HT, including Windows XP/2003 Server and Linux 

2.4x. (Under  Linux, use the HT compiler to compile the code. For other oper-

ating systems, be sure to disable the HT feature in the BIOS.)

•  Enable the HT feature in the BIOS (under "Advanced" Setting) before install-

ing a supported OS. (*Note: visit www.Intel.com for CPU support and driver 

updates.)

• 

OS Licensing Support 

•  Intel Dual-Core CPU supports: Windows 2000 Professional,  Windows 

Advanced Server, Windows XP Home, Windows XP Professional, Windows 

Server 2003 (Standard, Enterprise)

•   Intel Dual-Core CPU and Hyper-Threading Technology supports: Windows 

2000 Advanced Server, Windows XP Home, Windows XP Professional, Windows 

Server 2003 (Standard, Enterprise) 

Memory


Latest memory technology! 

 (*

Note: See Section 2-4 for details.) 


•  Four DIMM slots support Dual/Single Channel DDRII 667/533/400 MHz up 

to 8 GB of  ECC Unbuffered two-way interleaved DDRII SDRAM.

Chipset


 Latest Intel chipset technology!

• Intel 


E7230 

(Mukilteo) 

• Intel 

ICH7R

• Intel 

PXH

Expansion Slots

•  One (1) PCI 32-Bit/33 MHz (Slot 1)

•  One (1) PCI-X 64-Bit 133 MHz slot (Slot 6) + (1) PCI-E x8 (Signal: x8 via 

Riser Card) (Slot SXB-E1)


BIOS


•  8Mb Firmware Hub Phoenix BIOS


•  APM 1.2, DMI 2.3, PCI 2.2, PCI-X 1.0,ACPI 1.0, Plug and Play (PnP), SM-

BIOS 2.3, Hardware BIOS Virus Protection

Summary of Contents for PDSMi

Page 1: ...PDSMi USER S MANUAL Revision 1 0a ...

Page 2: ...T OR DOCUMENTATION EVEN IF ADVISED OF THE POSSIBILITY OF SUCH DAMAGES IN PARTICULAR THE VENDOR SHALL NOT HAVE LIABILITY FOR ANY HARDWARE SOFTWARE OR DATA STORED OR USED WITH THE PRODUCT INCLUDING THE COSTS OF REPAIRING REPLACING INTEGRATING INSTALLING OR RECOVERING SUCH HARDWARE SOFTWARE OR DATA Any disputes arising between manufacturer and customer shall be governed by the laws of Santa Clara Cou...

Page 3: ...es the features specifications and performance of the PDSMi mainboard and provides detailed information about the chipset Chapter 2 provides hardware installation instructions Read this chapter when installing the processor memory modules and other hardware components into the system If you encounter any problems see Chapter 3 which describes trouble shooting procedures for the video the memory and...

Page 4: ...Overview 1 9 1 3 PC Health Monitoring 1 10 1 4 Power Configuration Settings 1 10 1 5 ACPI Features 1 11 1 6 Power Supply 1 11 Chapter 2 Installation 2 1 Static Sensitive Devices 2 1 2 2 Processor and Heatsink Installation 2 2 2 3 Mounting the Motherboard in the Chassis 2 5 2 4 Installing DDR II Memory 2 6 2 5 I O Port Front Control Panel Connector Locations 2 7 2 6 Connecting Cables 2 8 Power Suppl...

Page 5: ...to PCI PCI Exp Slots 2 20 Watch Dog Enable 2 21 VGA Enable 2 21 Power Force On Enable Disable 2 22 Compact Flash Master Slave Select 2 22 2 8 Onboard Indicators 2 23 GLAN LED Indicators 2 23 2 9 Floppy Connector Hard Drive IPMI and Parallel Port Connections 2 24 Floppy Connector 2 24 IDE Connector 2 25 IPMI 2 25 Parallel Port Connector 2 26 Chapter 3 Troubleshooting 3 1 Troubleshooting Procedures ...

Page 6: ... 4 1 Introduction 4 1 4 2 Running Setup 4 2 4 3 Main BIOS Setup 4 2 4 4 Advanced Setup 4 7 4 5 Security Setup 4 19 4 6 Boot Setup 4 20 4 7 Exit 4 21 Appendices Appendix A BIOS POST Messages A 1 Appendix B BIOS POST Codes B 1 Appendix C Software Installation Instructions C 1 vi ...

Page 7: ...nce Please check that the following items have all been included with your motherboard If anything listed here is damaged or missing contact your retailer All Included with Retail Box Only One 1 Supermicro Mainboard One 1 IDE cable CBL 036 One 1 floppy drive ribbon cable CBL 022 Four 4 SATA cables CBL 044 For retail only One 1 I O shield CSE PT7 One 1 Supermicro CD containing drivers and utilities ...

Page 8: ...uperMicro Computer B V Het Sterrenbeeld 28 5215 ML s Hertogenbosch The Netherlands Tel 31 0 73 6400390 Fax 31 0 73 6416525 Email sales supermicro nl General Information support supermicro nl Technical Support rma supermicro nl Customer Support Asia Pacific Address SuperMicro Taiwan 4F No 232 1 Liancheng Road Chung Ho 235 Taipei Hsien Taiwan R O C Tel 886 2 8226 3990 Fax 886 2 8226 3991 Web Site www...

Page 9: ... Important Note to the User All images and layouts shown in this manual were based upon the latest PCB Revision available at the time of publishing The motherboard you ve received may or may not look exactly the same as the graphics shown in this manual ...

Page 10: ... other devices If J4 is populated with a Compact Flash Card J3 the blue slot will be available for one device only if not J3 can be used for multiple devices Figure 1 3 Motherboard Layout not drawn to scale PCI 32 Bit 33 MHz S UPER PDSMi REV 1 0 Pentium Dual Core CPU LGA 775 KB MS COM1 GLAN1 E7230 North Bridge LAN CTRL JPL1 Fan4 Buzzer J L E D 24 Pin ATX PWR ICH7R J F 1 South Bridge J31 J28 Fan6 C...

Page 11: ... Connector Pins 3 4 Internal Buzzer Enable Pins 1 4 External Speaker Cable JL1 Chassis Intrusion Header JLED PWR LED KB MS J28 PS 2 Keyboard Mouse Connector LAN1 LAN2 JLAN1 2 Ethernet RJ45 Gigabit LAN Port1 Port2 Connectors Printer J30 Parallel Port Printer Header SATA 0 3 I SATA 0 3 4 Intel SATA Headers Slot 1 PCI 32 bit 66 MHz Slot 6 SXB E1 PCI X 133 MHz PCI Exp x8 Signal x8 via Riser Cards Spea...

Page 12: ...BIOS under Advanced Setting before install ing a supported OS Note visit www Intel com for CPU support and driver updates OS Licensing Support Intel Dual Core CPU supports Windows 2000 Professional Windows Advanced Server Windows XP Home Windows XP Professional Windows Server 2003 Standard Enterprise Intel Dual Core CPU and Hyper Threading Technology supports Windows 2000 Advanced Server Windows X...

Page 13: ...I O 1 ATA 100 EIDE Channel Intel ICH7R SATA Controller 4 connectors for 4 devices with support of RAID functions 0 1 5 and 10 1 floppy port interface up to 2 88 MB 1 Fast UART 16550 compatible serial port and 1 header Two Intel single port 82573 PCI E Gigabit Ethernet Controller PS 2 mouse and PS 2 keyboard ports Up to 6 USB Universal Serial Bus 2 0 ports for a speed VGA Connector Low Profile IPMI 2...

Page 14: ...motherboard MUKILTEO E7230 RAGE XL LGA775_PROCESSOR ICH 7R USB PORT_0 5 FWH LPC I O MS KB FDD SER 1 SER 2 PRN PRI_IDE VRM 10 1 CTRL ADDR DATA UDMA 100 PCI_32_BUS DDR2_667 533 400 VRM V10 1 DMI ATI S ATA 300 4 x SATA CK410 CLK MCH PORTS 2XGb_LAN PCIE_x1 W83627HF FSB 1066 800 533MHz USB 2 0 1 1 PCIE_x4 PCI X BUS SMBUS I F PXH_V PCIE_x8 CF_HEADER H W MONITOR PCI_32_BUS LPC CH_B1 2 DDR2 CH_A1 2 1x PCI...

Page 15: ... quired for the system to operate efficiently It also provides the bandwidth needed for the system to maintain its peak performance The Direct Media Interface DMI provides the connection between the MCH and the ICH7R The ICH7R supports up to six PCI Express slots four Serial ATA ports six USB 2 0 ports and two IDE devices In addition the ICH7R offers the Intel Matrix Storage Technology which provid...

Page 16: ... the user to define an overheat temperature When this temperature reaches the threshold the CPU thermal trip feature will be activated and it will send a signal to the Speaker LED and at the same time the CPU speed will be decreased It will also activate the alarm if a fan failure occurs 1 4 Power Configuration Settings This section describes features of your motherboard that deal with power and pow...

Page 17: ...hat has WOL capability Note that Wake On LAN can only be used with an ATX 2 01 or above compliant power supply 1 5 ACPI Features ACPI stands for Advanced Configuration and Power Interface The ACPI specifi cation defines a flexible and abstract hardware interface that provides a standard way to integrate power management features throughout a PC system including its hardware operating system and applic...

Page 18: ... you use a high quality power supply that meets ATX power supply Specification 2 02 or above You should use one that will supply at least 350W of power Also your power supply must supply 1 5A for the Ethernet ports It must also be SSI compliant info at http www ssiforum org Additionally in areas where noisy power transmis sion is present you may choose to install a line filter to shield the computer...

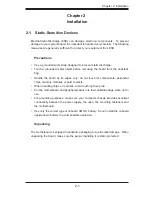
Page 19: ... its edges only do not touch its components peripheral chips memory modules or gold contacts When handling chips or modules avoid touching their pins Put the motherboard and peripherals back into their antistatic bags when not in use For grounding purposes make sure your computer chassis provides excellent conductivity between the power supply the case the mounting fasteners and the motherboard Us...

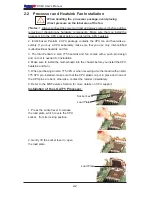
Page 20: ... the CPU heatsink 2 Intel s boxed Pentium 4 CPU package contains the CPU fan and heatsink as sembly If you buy a CPU separately make sure that you use only Intel certified multi directional heatsink and fan 3 The Intel Pentium 4 LGA 775 heatsink and fan comes with a push pin design and no tool is needed for installation 4 Make sure to install the motherboard into the chassis before you install the ...

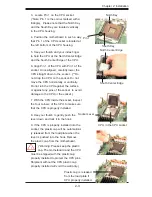
Page 21: ...ed carefully lower the CPU straight down to the socket Do not drop the CPU on the socket Do not move the CPU horizontally or vertically Do not rub the CPU against the surface or against any pins of the socket to avoid damage to the CPU or the socket 7 With the CPU inside the socket inspect the four corners of the CPU to make sure that the CPU is properly installed 8 Use your thumb to gently push t...

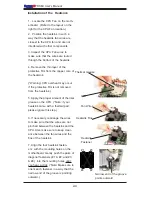
Page 22: ... if the protective film is not removed from the heatsink 5 Apply the proper amount of thermal grease on the CPU Note if your heatsink came with a thermal pad please ignore this step 6 If necessary rearrange the wires to make sure that the wires are not pinched between the heatsink and the CPU Also make sure to keep clear ance between the fan wires and the fins of the heatsink 7 Align the four heatsi...

Page 23: ...ke all necessary precautionary measures to prevent damage done to these components when installing the motherboard into the chassis 8 Repeat Step 6 to insert all four heatsink fasteners into the mounting holes 9 Once all four fasteners are securely inserted into the mounting holes and the heatsink is properly installed on the moth erboard connect the heatsink fan wires to the CPU Fan connector 1 U...

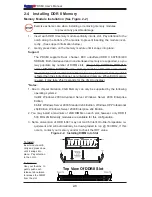
Page 24: ...on interleaved memory are supported so you may populate any number of DIMM slots Populating DIMM 1A DIMM 1B and or DIMM 2A DIMM 2B with memory modules of the same size and of the same type will result in dual channel two way interleaved memory which is faster than the single channel non interleaved memory When ECC memory is used it may take 25 40 seconds for the VGA to display Notes 1 Due to chips...

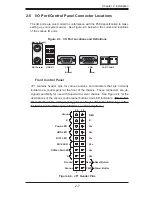
Page 25: ...indicators that are normally located on a control panel at the front of the chassis These connectors are de signed specifically for use with Supermicro server chassis See Figure 2 4 for the descriptions of the various control panel buttons and LED indicators Note For the motherboard to work properly please always refer to the following section for Front Control Panel pin definitions and descriptions...

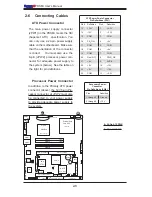
Page 26: ...PW1 Pin Definition Pin Definition 13 3 3V 1 3 3V 14 12V 2 3 3V 15 COM 3 COM 16 PS_ON 4 5V 17 COM 5 COM 18 COM 6 5V 19 COM 7 COM 20 Res NC 8 PWR_OK 21 5V 9 5VSB 22 5V 10 12V 23 5V 11 12V 24 COM 12 3 3V Secondary Power Connector Pin Definitions PW2 Pins Definition 1 through 4 Ground 5 through 8 12V PCI 32 Bit 33 MHz S UPER PDSMi REV 1 0 Pentium Dual Core CPU LGA 775 KB MS COM1 GLAN1 E7230 North Bridge L...

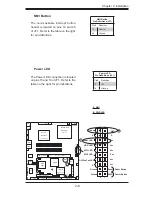
Page 27: ...I X 133 MHz BIOS PXH V IPMI Mukilteo JPW1 J30 J27 IDE J4 J3 IDE Primary JWOR LE1 JBT1 USB3 4 USB5 6 JWF1 JPG1 JPF JWD W O L Fan3 Fan2 DIMM 1B DIMM 2A DIMM 1A DIMM 1 DIMM 2 DIMM 3 DIMM 4 Fan1 JPW2 VGA CTRL Slot6 L E 3 L E 4 SATA0 SATA1 SATA2 SATA3 Compact Flash Card only JL1 J P 3 JI2 C1 JI2 C2 Fan5 Power LED The Power LED connection is located on pins 15 and 16 of JF1 Refer to the table on the rig...

Page 28: ...DIMM 2A DIMM 1A DIMM 1 DIMM 2 DIMM 3 DIMM 4 Fan1 JPW2 VGA CTRL Slot6 L E 3 L E 4 SATA0 SATA1 SATA2 SATA3 Compact Flash Card only JL1 J P 3 JI2 C1 JI2 C2 Fan5 HDD LED The HDD LED connection is located on pins 13 and 14 of JF1 Attach the hard drive LED cable here to display disk activity including Serial ATA and IDE drive activities See the table on the right for pin definitions GLAN1 2 LED Pin Defini...

Page 29: ...OM1 GLAN1 E7230 North Bridge LAN CTRL JPL1 Fan4 Buzzer J L E D 24 Pin ATX PWR ICH7R J F 1 South Bridge J31 J28 Fan6 CPU Fan 8 pinPWR Battery J9 FP CTRL USB1 2 J15 VGA JG1 GLAN2 LAN CTRL SI O COM2 JPL2 Printer Floppy Slot1 SXB E1 PCI Ex8 DIMM 2B PCI X 133 MHz BIOS PXH V IPMI Mukilteo JPW1 J30 J27 IDE J4 J3 IDE Primary JWOR LE1 JBT1 USB3 4 USB5 6 JWF1 JPG1 JPF JWD W O L Fan3 Fan2 DIMM 1B DIMM 2A DIM...

Page 30: ...R Vcc Vcc Vcc Vcc Ground Ground 19 20 Vcc X Ground NMI X Vcc X NIC2 LED Power Button The Power Button connection is located on pins 1 and 2 of JF1 Mo mentarily contacting both pins will power on off the system This button can also be configured to function as a suspend button with a setting in BIOS see Chapter 4 To turn off the power when set to suspend mode depress the button for at least 4 second...

Page 31: ...2 VGA CTRL Slot6 L E 3 L E 4 SATA0 SATA1 SATA2 SATA3 Compact Flash Card only JL1 J P 3 JI2 C1 JI2 C2 Fan5 Chassis Intrusion A Chassis Intrusion header is located on JL1 Attach the appropriate cable to inform you of a chassis intrusion Chassis Intrusion Pin Definitions JL1 Pin Definition 1 Intrusion Input 2 Ground Compact Flash Card PWR Connector A Compact Flash Card Power Connector is located at JWF...

Page 32: ...E 4 S A T A 0 S A T A 1 S A T A 2 S A T A 3 Compact Flash Card only JL1 JP3 JI2 C1 JI2 C2 Fan5 Universal Serial Bus USB There are two Universal Serial Bus ports USB 0 1 located on J15 on the I O back panel and additional four USB ports located on J45 and J46 on the motherboard These ports labeled USB2 to USB5 can be used to provide front side chassis access cables not included See the tables on th...

Page 33: ...0 SATA1 SATA2 SATA3 Compact Flash Card only JL1 J P 3 JI2 C1 JI2 C2 Fan5 ATX PS 2 Keyboard and PS 2 Mouse Ports The ATX PS 2 keyboard and PS 2 mouse are located next to the Back Panel USB ports on the motherboard See the table at right for pin defini tions Note NC No connection PS 2 Keyboard and Mouse Port Pin Definitions Pin Definition 1 Data 2 NC 3 Ground 4 VCC 5 Clock Speaker Connector The speaker...

Page 34: ...J P 3 JI2 C1 JI2 C2 Fan5 Fan Header Pin Definitions Fan1 5 Pin Definition 1 Ground Black 2 12V Red 3 Tachometer 4 PWM_Control Fan Headers The PDSMi has six fan connections Fan1 to Fan6 Fan6 is designated as the CPU Cooling Fan Note all these fans are 4 pin fans However Pins 1 3 of the fan headers are back ward compatible with the traditional 3 pin fans See the table on the right for pin definitions T...

Page 35: ...SATA3 Compact Flash Card only JL1 J P 3 JI2 C1 JI2 C2 Fan5 Wake On Ring The Wake On Ring header JWOR is located close to the ICH7 South Bridge This function allows your computer to receive an incoming call to the modem and be waken up when in the suspend state See the table on the right for pin definitions You must have a Wake On Ring card and cable to use this feature Wake On LAN The Wake On LAN W...

Page 36: ...R LE1 JBT1 USB3 4 USB5 6 JWF1 JPG1 JPF JWD W O L Fan3 Fan2 DIMM 1B DIMM 2A DIMM 1A DIMM 1 DIMM 2 DIMM 3 DIMM 4 Fan1 JPW2 VGA CTRL Slot6 L E 3 L E 4 SATA0 SATA1 SATA2 SATA3 Compact Flash Card only JL1 J P 3 JI2 C1 JI2 C2 Fan5 Power LED The Power LED connector is desig nated JLED This connection is used to provide LED Indication of power being supplied to the system See the table on the right for pi...

Page 37: ...ct Flash Card only JL1 J P 3 JI2 C1 JI2 C2 Fan5 2 7 Jumper Settings Explanation of Jumpers To modify the operation of the motherboard jumpers can be used to choose between optional settings Jumpers create shorts between two pins to change the function of the connector Pin 1 is identified with a square solder pad on the printed circuit board See the motherboard layout pages for jumper locations Not...

Page 38: ...OS Clear JBT1 is used to clear CMOS Instead of pins this jumper consists of contact pads to prevent the accidental clearing of CMOS To clear CMOS use a metal object such as a small screwdriver to touch both pads at the same time to short the connection Always remove the AC power cord from the system before clearing CMOS Note For an ATX power supply you must completely shut down the system remove t...

Page 39: ...ATA2 SATA3 Compact Flash Card only JL1 J P 3 JI2 C1 JI2 C2 Fan5 Watch Dog Enable JWD controls Watch Dog a system monitor that takes action when a soft ware application freezes the system Pins 1 2 will have WD reset the system if a program freezes Pins 2 3 will generate a non maskable interrupt for the program that hangs This function requires software support Watch Dog must also be enabled in BIOS...

Page 40: ... Disable Jumper JPF allows you to enable force on or disable the Power Force On function If enabled the power will always stay on automatically If this function is disabled the normal set ting the user needs to press the power button to power on the system Power Force On Enable Disable Jumper Settings JPF Jumper Setting Definition Open Normal Closed Force On Compact Flash Master Slave Select A Comp...

Page 41: ...n1 JPW2 VGA CTRL Slot6 L E 3 L E 4 SATA0 SATA1 SATA2 SATA3 Compact Flash Card only JL1 J P 3 JI2 C1 JI2 C2 Fan5 GLAN LEDs There are two GLAN ports on the mother board Each Gigabit Ethernet LAN port has two LEDs The yellow LED indicates activity while the other LED may be green orange or off to indicate the speed of the connec tion See the table at right for the functions associated with the second...

Page 42: ...k drive cables The floppy disk drive cable has seven twisted wires A red mark on a wire typically designates the location of pin 1 A single floppy disk drive ribbon cable has 34 wires and two connectors to provide for two floppy disk drives The connector with twisted wires always connects to drive A and the connector that does not have twisted wires always connects to drive B Floppy Connector The flop...

Page 43: ...as the IDE Slave drive reserved for Compact Flash Card use only See the table on the right pin definitions Note J4 the white slot is reserved for Compact Flash Card only Do not use it for other devices If J4 is popu lated with a Compact Flash Card J3 the blue slot will be available for one device only IPMI There is an IPMI Socket JIPMI0 on the motherboard Refer to the layout below for the location ...

Page 44: ...r pin definitions PCI 32 Bit 33 MHz S UPER PDSMi REV 1 0 Pentium Dual Core CPU LGA 775 KB MS COM1 GLAN1 E7230 North Bridge LAN CTRL JPL1 Fan4 Buzzer J L E D 24 Pin ATX PWR ICH7R J F 1 South Bridge J31 J28 Fan6 CPU Fan 8 pinPWR Battery J9 FP CTRL USB1 2 J15 VGA JG1 GLAN2 LAN CTRL SI O COM2 JPL2 Printer Floppy Slot1 SXB E1 PCI Ex8 DIMM 2B PCI X 133 MHz BIOS PXH V IPMI Mukilteo JPW1 J30 J27 IDE J4 J3 ...

Page 45: ...stall a CPU and heatsink Be sure that it is fully seated and then connect the chassis speaker and the power LED to the motherboard Check all jumper settings as well 7 Make sure to use the correct type of CMOS battery as specified by the Manu facturer Do not install the CMOS battery upside down to avoid possible explosion No Power 1 Make sure that no short circuits exist between the motherboard and ...

Page 46: ...6 for details on recommended power supplies 2 The battery on your motherboard may be old Check to verify that it still sup plies 3VDC If it does not replace it with a new one 3 If the above steps do not fix the Setup Configuration problem contact your vendor for repairs 3 2 Technical Support Procedures Before contacting Technical Support please make sure that you have followed all the steps listed b...

Page 47: ...board support Answer The PDSMi supports up to 8 GB of unbuffered ECC DDR2 677 533 400 two way interleaved or non interleaved SDRAM See Section 2 4 for details on installing memory Question How do I update my BIOS Answer It is not recommended that you upgrade your BIOS if you are not experi encing problems with your system Updated BIOS files are located on our web site at http www supermicro com tec...

Page 48: ...rvice A receipt or copy of your invoice marked with the date of purchase is required be fore any warranty service will be rendered You can obtain service by calling your vendor for a Returned Merchandise Authorization RMA number When returning to the manufacturer the RMA number should be prominently displayed on the outside of the shipping carton and mailed prepaid or hand carried Shipping and han...

Page 49: ...ys etc in the CMOS The CMOS memory requires very little electrical power When the computer is turned off a backup battery provides power to the BIOS flash chip enabling it to retain system parameters Each time the computer is powered on the computer is configured with the values stored in the BIOS ROM by the system BIOS which gains control at boot up How To Change the Configuration Data The CMOS info...

Page 50: ...e shown below appears briefly at the bottom of the screen during the POST Power On Self Test press the Delete key to activate the main Setup menu Press the Delete key to enter Setup Note Please load System Setup Default when using the system the first time 4 3 Main BIOS Setup All main Setup options are described in this section The main BIOS Setup screen is displayed below Press the Esc key to exit ...

Page 51: ...e arrow keys highlight the month day and year fields and enter the correct data Press the Enter key to save the data BIOS Date This feature allows the BIOS to display the date when the this version of BIOS was built Legacy Diskette A This setting allows the user to set the type of floppy disk drive installed as diskette A The options are Disabled 360Kb 5 25 in 1 2MB 5 25 in 720Kb 3 5 in 1 44 1 25MB ...

Page 52: ...rsion When the SATA Controller Mode is set to Enhanced the following items will display Serial ATA SATA RAID Select Enable to enable the function of Serial ATA RAID The options are Enabled and Disabled Default For the Windows OS environment if this feature is set to Enabled be sure to use the RAID driver If set to Disabled use the Non RAID driver Note If this item SATA RAID is set to Enabled the n...

Page 53: ... menu are Type Selects the type of IDE hard drive The options are Auto which allows the BIOS to automatically determine the hard drive s capacity number of heads etc a number from 1 39 to select a predetermined type of hard drive CDROM and ATAPI Removable The option User will allow the user to enter the parameters of the HDD installed at this connection The option Auto will allow the BIOS to autom...

Page 54: ...block to be used in multi sector transfer The options are Disabled 4 Sectors 8 Sectors and 16 Sectors LBA Mode Control This item determines if the BIOS will access the Primary IDE Master Device via the LBA mode The options are Enabled and Disabled 32 Bit I O This feature allows the user to enable or disable the function of 32 bit data transfer The options are Enabled and Disabled Transfer Mode Thi...

Page 55: ... are described in this section Boot Features Access the submenu to make changes to the following settings Quick Boot Mode If enabled this feature will speed up the POST Power On Self Test routine by skipping certain tests after the computer is turned on The settings are Enabled and Disabled If Disabled the POST routine will run at normal speed Quiet Boot Set to Enabled to display the Diagnostic Sc...

Page 56: ...Power On Watch Dog If enabled this option will automatically reset the system if the system is not active for more than 5 minutes The options are Enabled and Disabled Summary Screen This setting allows you to Enable or Disable the summary screen which displays the system configuration during bootup Memory Cache Cache Memory Set to enabled to set the state of Cache Memory The options are Enabled and...

Page 57: ...re will allow the data stored in the base memory area block 512K 640K to be cached written into a buffer a storage area in the Static DRM SDROM or to be written into L1 L2 cache inside the CPU to speed up CPU operations Select Uncached to disable this function Select Write Through to allow data to be cached into the buffer and written into the system memory at the same time Select Write Protect to...

Page 58: ...figuration Data ESCD area The options are Yes and No Slot 1 PCI 32 32 bit Slot 6 PCI X 133 MHz Access the submenu for each of the settings above to make changes to the following Option ROM Scan When enabled this setting will initialize the device expansion ROM The options are Enabled and Disabled Enable Master This setting allows you to enable the selected device as the PCI bus master The options a...

Page 59: ...rupt to be activated as a result of an ECC error The options are None NMI Non Maskable Interrupt SMI System Management Interrupt and SCI System Control Interrupt Note This item is available when it is supported by the memory Onboard G LANs Enable This setting allows you to enable or disable Onboard G LAN ports The settings are Enabled and Disabled Route Port 80h Cycles to This feature allows the u...

Page 60: ...ssor to operate in the single core mode Set to Enabled to allow the processor to operate in the multi core dual core mode Machine Checking Available when supported by the CPU Set to Enabled to activate the function of Machine Checking and allow the CPU to detect and report hardware machine errors via a set of model specific registers MSRs The options are Disabled or Enabled L3 Cache Available when ...

Page 61: ...er CPU voltage frequency to prevent overheat The options are Enabled and Disabled Note please refer to Intel s web site for detailed information No Execute Mode Memory Protection Set to Enabled to enable Execute Disable Bit and allow the processor to classify areas in memory where an application code can execute and where it cannot and thus preventing a worm or a virus from inserting and creating ...

Page 62: ...t A The options are IRQ3 and IRQ4 Serial Port B This setting allows you to decide how Serial Port B is controlled The options are Enabled user defined Disabled and Auto BIOS or OS controlled Mode This feature allows the user to set the mode for Serial Port B The options are Normal and IR Base I O Address This setting allows you to select the base I O address for Serial Port B The options are 3F8 2F...

Page 63: ...ddress for the parallel port The options are Primary and Secondary DMI Event Logging Access the submenu to make changes to the following settings Event Log Validity This is a display to inform you of the event log validity It is not a setting Event Log Capacity This is a display to inform you of the event log capacity It is not a setting View DMI Event Log Highlight this item and press Enter to vi...

Page 64: ...ing is 60 seconds OS Boot Timeout This item sets the amount time allowed for the OS to boot the system before a system reset Key in a number between 0 seconds to 255 seconds The default setting is 60 seconds Power On Wait Time This item sets the maximum amount of time allowed for an Alert Sending Device ASD to establish a connection with its transport media to send out warning signals Key in a num...

Page 65: ... Type This item allows you to choose from the available options to select the console type for console redirection The options are VT100 VT100 8bit PC ANSI 7bit PC ANSI VT100 and VT UTF8 Flow Control This item allows you to choose from the available options to select the flow control for console redirection The options are None XON XOFF and CTS RTS Console Connection This item allows you to decide ...

Page 66: ...en the CPU on die temperature increases the fan speed will also increase and vise versa If the option is set to 3 pin fan the fan speed is controlled by voltage If the option is set to 4 pin the fan speed will be controlled by Pulse Width Modulation PWM Select 3 pin if your chassis came with 3 pin fan headers Select 4 pin if your chassis came with 4 pin fan headers Select Worksta tion if your syst...

Page 67: ...sword has been entered for the system User Password Is This displays whether a user password has been entered for the system Clear means such a password has not been used and Set means a user password has been entered for the system Set Supervisor Password When the item Set Supervisor Password is highlighted hit the Enter key When prompted type the Supervisor s password in the dialogue box to set ...

Page 68: ...should see the following display Highlighting a setting with a or will expand or collapse that entry See details on how to change the order and specs of boot devices in the Item Specific Help window All Boot BIOS settings are described in this section Boot Priority Order Excluded from Boot Order Use the Up and Down Arrow Keys to select a device Use and keys to move the device up or down Use the f k...

Page 69: ... Discarding Changes Highlight this item and hit Enter to exit the BIOS Setup utility without saving any changes you may have made Load Setup Defaults Highlight this item and hit Enter to load the default settings for all items in the BIOS Setup These are the safest settings to use Discard Changes Highlight this item and hit Enter to discard cancel any changes you made You will remain in the Setup ...

Page 70: ...4 22 PDSMi User s Manual Notes ...

Page 71: ... JL1 J P 3 JI2 C1 JI2 C2 Fan5 Appendix A BIOS POST Messages and LED Indicators During the Power On Self Test POST the BIOS will check for problems If a problem is found the BIOS will activate an alarm turn on LED indicators or display a message A 1 BIOS POST Beep Codes Beeps Error Messages 1 long beep pause 1 long beep Memory Module Errors 1 long beep 2 short beeps VGA Errors A 2 LE1 Standby PWR L...

Page 72: ...witch Unlock the system to proceed Monitor type does not match CMOS Run SETUP Monitor type not correctly identified in Setup Shadow Ram Failed at offset nnnn Shadow RAM failed at offset nnnn of the 64k block at which the error was detected System RAM Failed at offset nnnn System RAM failed at offset nnnn of in the 64k block at which the error was detected Extended RAM Failed at offset nnnn Extended...

Page 73: ...ious POST did not complete successfully POST loads default values and offers to run Setup If the failure was caused by incorrect values and they are not corrected the next boot will likely fail On systems with control of wait states improper Setup settings can also terminate POST and cause this error on the next boot Run Setup and verify that the waitstate configuration is correct This error is cle...

Page 74: ...tware NMI Failed ServerBIOS2 test error Cannot generate software NMI Non Maskable Interrupt Fail Safe Timer NMI Failed ServerBIOS2 test error Fail Safe Timer takes too long device Address Conflict Address conflict for specified device Allocation Error for device Run ISA or EISA Configuration Utility to resolve resource conflict for the specified device CD ROM Drive CD ROM Drive identified Entering SETUP ...

Page 75: ...lly tested nnnn kB System RAM Passed Where nnnn is the amount of system RAM in kilobytes successfully tested One or more I2O Block Storage Devices were excluded from the Setup Boot Menu There was not enough room in the IPL table to display all installed I2O block stor age devices Operating system not found Operating system cannot be located on either drive A or drive C Enter Setup and see if fixed ...

Page 76: ...ite down and follow the information shown on the screen Press F2 to enter Setup Optional message displayed during POST Can be turned off in Setup PS 2 Mouse PS 2 mouse identified Run the I2O Configuration Utility One or more unclaimed block storage devices have the Configuration Request bit set in the LCT Run an I2O Configuration Utility e g the SAC utility System BIOS shadowed System BIOS copied to s...

Page 77: ...attempt to initialize video and write the error in the top left corner of the screen The following is a list of codes that may be written to port 80h Appendix B BIOS POST Codes POST Code Description 02h Verify Real Mode 03h Disable Non Maskable Interrupt NMI 04h Get CPU type 06h Initialize system hardware 07h Disable shadow and execute code from the ROM 08h Initialize chipset with initial POST val...

Page 78: ...ow system BIOS ROM 3Ah Auto size cache 3Ch Advanced configuration of chipset registers 3Dh Load alternate registers with CMOS values 41h Initialize extended memory for RomPilot 42h Initialize interrupt vectors 45h POST device initialization 46h 2 1 2 3 Check ROM copyright notice 47h Initialize I20 support 48h Check video configuration against CMOS 49h Initialize PCI bus and devices 4Ah Initialize al...

Page 79: ...nt 80h Disable onboard Super I O ports and IRQs 81h Late POST device initialization 82h Detect and install external RS232 ports 83h Configure non MCD IDE controllers 84h Detect and install external parallel ports 85h Initialize PC compatible PnP ISA devices 86h Re initialize onboard I O ports 87h Configure Motherboard Configurable Devices optional 88h Initialize BIOS Data Area 89h Enable Non Maskable...

Page 80: ...tBoot optional B6h Check password optional B7h Initialize ACPI BIOS B9h Prepare Boot BAh Initialize SMBIOS BBh Initialize PnP Option ROMs BCh Clear parity checkers BDh Display MultiBoot menu BEh Clear screen optional BFh Check virus and backup reminders C0h Try to boot with INT 19 C1h Initialize POST Error Manager PEM C2h Initialize error logging C3h Initialize error display function C4h Initializ...

Page 81: ...size EEh Shadow Boot Block EFh System memory test F0h Initialize interrupt vectors F1h Initialize Run Time Clock F2h Initialize video F3h Initialize System Management Manager F4h Output one beep F5h Clear Huge Segment F6h Boot to Mini DOS F7h Boot to Full DOS If the BIOS detects error 2C 2E or 30 base 512K RAM error it displays an addi tional word bitmap xxxx indicating the address line or bits th...

Page 82: ...B 6 PDSMi User s Manual Notes ...

Page 83: ... software drivers The necessary drivers are all included on the Supermicro CD that came packaged with your motherboard Note that the current version of the ICH7R SATA RAID Utility can only support Windows XP 2000 2003 Operating Systems Serial ATA SATA Serial ATA SATA is a physical storage interface that uses a single cable with a minimum of four wires to create a point to point connection between ...

Page 84: ...ition size without any data Configuring BIOS settings for SATA RAID Functions Native Mode 1 Press the Del key during system bootup to enter the BIOS Setup Utility Note If it is the first time powering on the system we recommend you load the Optimized Default Settings If you have already done so please skip to Step 3 2 Use the arrow keys to select the Exit Settings Once in the Exit settings Scroll do...

Page 85: ...ars after Power On Self Test b When you see the above screen press the Ctrl and the I keys simultane ously to have the main menu of the SATA RAID Utility appear Note All graphics and screen shots shown in the manual are for refer ence only The screen shots shown in the manual do not imply Supernicro s endorsement or non endorsement on any 3rd party s product Your screens may or many not look exact...

Page 86: ...ress Space to select it A triangle appears to confirm the selection of the drive f Use the Up Arrow Down Arrow keys to selet the stripe size ranged from 4 KB to 128 KB for the RAID 0 array and hit Enter Note For a server please use a lower stripe size and for a multimedia system use a higher stripe size The default stripe size is 128 KB g Press Enter when the Create Volume item is highlighted A war...

Page 87: ...ect the previous menu c When RAID Level item is highlighted press the Up Arrow Down Arrow keys to select RAID 1 Mirror and hit Enter d When the Capacity item is highlighted enter your RAID volume capacity and hit Enter The default setting is the maximum capacity allowed e Press Enter when the Create Volume item is highlighted A warning message displays f When asked Are you sure you want to create ...

Page 88: ...row keys to select the stripe size from 4 KB to 128 KB for your RAID 10 and hit Enter The default setting is 6 4KB Note For a server please use a lower stripe size and for a multimedia system use a higher stripe size e When the RAID Volume Capacity item is highlighted enter your RAID volume capacity and hit Enter The default setting is the maximum capacity allowed f Press Enter when the Create Vol...

Page 89: ... drive and press Space to select it A triangle appears to confirm the selection of the drive f Use the Up Arrow Down Arrow keys to select the stripe size ranged from 4 KB to 128 KB for the RAID 5 array and hit Enter Note For a server please use a lower stripe size and for a multimedia system use a higher stripe size The default stripe size is 128 KB g Enter your desired RAID volume capacity and pre...

Page 90: ...when deleting a RAID set a From the main menu select item2 Delete RAID Volume and press Enter b Use the Up Arrow Down Arrow keys to select the RAID set you want to delete and press Del A Warning message displays c When asked Are you sure you want to delete this volume Y N press Y to delete the RAID volume or type N to go back to the Delete Volume menu ...

Page 91: ...AID set drive A Warning message displays d Press Y to reset the drive or type N to go back to the main menu Exiting the Intel Matrix Storage Manager Utility a From the main menu select item4 Exit and press Enter A warning message will appear b Press Y to reset the drive or type N to go back to the main menu Warning Be cautious when you reset a RAID volume HDD to non RAID or Resetting a RAID HDD Re...

Page 92: ...ler from the list indicated in the XP 2000 2003 Setup Screen and press the Enter key f Press the Enter key to continue the installation process If you need to specify any additional devices to be installed do it at this time Once all devices are specified press the Enter key to continue with the installation g From the Windows XP 2000 2003 Setup screen press the Enter key The XP 2000 2003 Setup wil...

Page 93: ...must re boot the system before moving on to the next item on the list You should install everything here except for the SUPER Doctor utility and the LAN SCSI driver diskettes which are optional The bottom icon with a CD on it allows you to view the entire contents of the CD C 3 Installing Intel Application Accelerator Utility a When the above screen appears click on the icon marked Applica tion Ac...

Page 94: ...installation in the welcoming window 15 Intel ICH5R Serial ATA RAID Introduction The InstallShield Wizard will begin automatically for installation showed as following Click on the Next button to proceed the installation in the welcoming window Intel ICH5R Serial ATA RAID Introduction 16 After reading the license agreement in the following window click Y es button to continue Select the folder in ...

Page 95: ...n marked Yes on the screen and the following screen will appear Intel ICH5R Serial ATA RAID Introduction 16 After reading the license agreement in the following window click Y es button to continue Select the folder in which you want the program to be installed in the following window and click Next button to start installation 17 Intel ICH5R Serial ATA RAID Introduction Select a program folder in...

Page 96: ...2003 Operating System is installed please read the Readme text files for the instructions to use the SATA RAID Utility in the Windows XP 2000 2003 OS environment 17 Intel ICH5R Serial ATA RAID Introduction Select a program folder in the following window where you want Setup to add the program icon The following window appears to show the Intel Application Accelerator RAID Edition Setup installation...

Page 97: ...r to Page C 14 Driver Tool Installation Display Screen Note Click the icons showing a hand writing on paper to view the readme files for each item Click the computer icons to the right of these items to install each item from top to the bottom one at a time After installing each item you must re boot the system before moving on to the next item on the list You should install everything here except ...

Page 98: ... called SD III Client The Supero Doctor III program included on the CDROM that came with your motherboard allows you to moni tor the environment and operations of your system Supero Doctor III displays crucial system information such as CPU temperature system voltages and fan status See the Figure below for a display of the Supero Doctor III interface Supero Doctor III Interface Display Screen I H...

Page 99: ...ded from our Website at ftp ftp supermicro com utility Supero_Doctor_III You can also download SDIII User s Guide at http www supermicro com PRODUCT Manuals SDIII UserGuide pdf For Linux we will still recommend Supero Doctor II Supero Doctor III Interface Display Screen II Remote Control ...

Page 100: ...C 18 PDSMi User s Manual Notes ...

Reviews: