background image


Synway Information Engineering Co., Ltd


SMG Series Analog Gateway User Manual (Version 1.5.3)       

                                     Page 50 

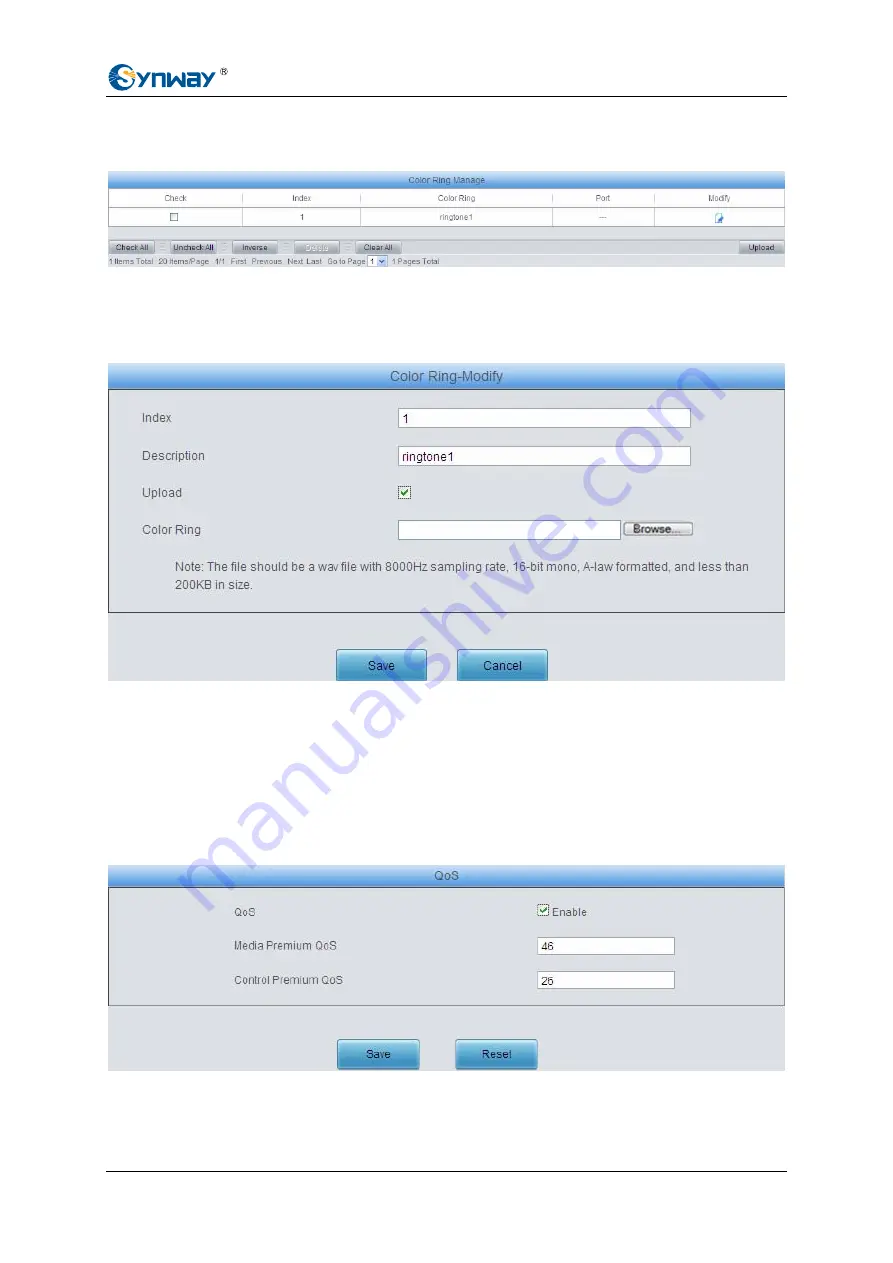
After configuration, click 

Upload

 to upload the color ring file to the gateway or click 

Return

 to 

cancel the upload. After upload, the color ring will appear on the color ring manage interface, see 
Figure 3-53. 


Figure 3-53 Color Ring Manage Interface 

Click 

Modify

 in Figure 3-53 to modify the configuration of the color ring or tick the 

Upload


checkbox to change the old color ring file. See below for the color ring modification interface. The 
configuration items on this interface are the same as those on the 

Color Ring Upload 

interface. 


Figure 3-54 Color Ring Modification Interface 

To delete a color ring, check the checkbox before the corresponding index in Figure 3-53 and click 
the 

Delete

 button. 

Check All

 means to select all available items on the current page; 

Uncheck 

All

 means to cancel all selections on the current page; 

Inverse

 means to uncheck the selected 

items and check the unselected. To clear all color rings at a time, click the 

Clear All

 button in 

Figure 3-54.


3.5.13 QoS 


Figure 3-55 Differentiated Services Setting Interface 

See  Figure 3-55 for the Differentiated Services setting interface. Using this technology, the 
gateway can meet various application requirements under a limited bandwidth and ensure neither 

Summary of Contents for SMG Series

Page 1: ...Synway SMG Series Analog Gateway SMG1008 SMG1016 SMG1032 SMG1032A2 SMG1032A4 Analog Gateway Version 1 5 3 Synway Information Engineering Co Ltd www synway net ...

Page 2: ...stem Info 14 3 2 2 Channel State 15 3 2 3 Call Count 16 3 2 4 SIP Message Count 17 3 3 Quick Config 17 3 4 VoIP Settings 19 3 4 1 SIP 20 3 4 2 SIP Compatibility 22 3 4 3 SIP Station 24 3 4 4 SIP Server 25 3 4 5 NAT Setting 27 3 4 6 Media 29 3 5 Advanced Settings 31 3 5 1 FXS 32 3 5 2 FXO 34 3 5 3 Tone Detector 35 3 5 4 Tone Generator 38 3 5 5 DTMF Detector 38 3 5 6 Ringing Scheme 39 3 5 7 Fax 41 3...

Page 3: ...Tel to IP CallerID 75 3 8 4 Tel to IP CalleeID 78 3 9 System Tools 79 3 9 1 Management 80 3 9 2 Network 81 3 9 3 Upgrade 82 3 9 4 Signaling Capture 85 3 9 5 Call Log 85 3 9 6 Operation Log 86 3 9 7 Backup Upload 87 3 9 8 Factory Reset 88 3 9 9 System Monitor 88 3 9 10 SNMP Config 89 3 9 11 PING Test 90 3 9 12 TRACERT Test 91 3 9 13 Change Password 92 3 9 14 Restart 92 Appendix A Technical Specific...

Page 4: ...on Engineering Co Ltd hereinafter referred to as Synway Synway reserves all rights to modify this document without prior notice Please contact Synway for the latest version of this document before placing an order Synway has made every effort to ensure the accuracy of this document but does not guarantee the absence of errors Moreover Synway assumes no responsibility in obtaining permission and au...

Page 5: ...1 2014 06 Add description on the new series SMG1032A2 Version 1 3 2 2014 07 New revision Version 1 3 3 2014 09 New revision Version 1 3 5 2014 10 New revision Version 1 5 0 2014 12 Add description on the new series SMG1032A4 Version 1 5 1 2015 01 New revision Version 1 5 2 2015 04 New revision Version 1 5 3 2015 11 New revision Note Please visit our website http www synway net to obtain the latest...

Page 6: ...a powerful reliable and cost effective VoIP solution for such occasions as IP call centers and multi branch agencies SMG series analog gateway has five modules z SMG1008 8 FXS FXO z SMG1016 16 FXS FXO z SMG1032 SMG1032A2 SMG1032A4 32 FXS FXO 1 1 Typical Application Headquarter SMG Gateway Subscriber Terminal IP Phone Tel Tel Fax FXS IP Phone LAN LAN Router SMG Gateway FXO FXO Branch 1 SMG Gateway ...

Page 7: ...x parameters fax mode maximum fax rate fax train mode error correction mode etc Communication without Power Provides composite modules to enable a direct connection of the station which is linked with the FXS port and the trunk which is linked with the FXO port to keep the calls between the FXS port and PSTN uninterrupted during power outage Communication without Network Automatically routes a cal...

Page 8: ...running status of the system and the server Maintain Upgrade Description WEB Configuration Support of configurations through the WEB user interface Language Chinese English Software Upgrade Support of user interface gateway service kernel and firmware upgrades based on WEB Tracking Test Support of Ping and Tracert tests based on WEB SysLog Type Three options available ERROR WARNING INFO 1 3 Hardwa...

Page 9: ...iew Figure 1 8 Left View Power Key 220V AC Grounding Stud RJ45 Interface LAN Console Port Channel Indicator Alarm Indicator Reset Button Power Indicator Run Indicator LAN2 Indicator LAN1 Indicator Power Key 220V AC Grounding Stud Console Port Channel Indicator Alarm Indicator Reset Button Power Indicator Run Indicator LAN2 Indicator LAN1 Indicator Ventilation Holes Screw Holes for Foot Bracket Pow...

Page 10: ... It lights up when the gateway starts up with the power cord well connected Run Indicator Indicates the running status For more details refer to 1 4 Alarm Info Alarm Indicator Alarms the device malfunction For more details refer to 1 4 Alarm Info Link Indicator The green LED on the left of LAN indicating the network connection status ACT Indicator The orange LED on the right of LAN whose flashing ...

Page 11: ...onsists of two stages System Booting and Gateway Service Startup The system booting costs about 1 minute and once it succeeds both the run indicator and the alarm indicator light up Then after the gateway service is successfully started and the device begins to work normally the run indicator flashes and the alarm indicator goes out z During runtime if the alarm indicator lights up or flashes it i...

Page 12: ...ground wire If it doesn t use the grounding stud on the rear panel of the device See Figure 1 3 for earthing Step 4 Connect the network cable Step 5 Connect the telephone line The line from PSTN should be connected to FXO port port with red LED flashing the line from station should be connected to FXS port port with green LED flashing The connection for SMG1008 SMG1016 SMG1032 series products Thes...

Page 13: ...the pins of the RJ45 jack and the 4 way hub is shown in the table below Interface Channel Number Pins of the RJ45 Jack 4 way Hub 1 1st and 2nd pins 1st jack 2 3rd and 4th pins 2nd jack 3 5th and 6th pins 3rd jack First RJ45 Jack 4 7th and 8th pins 4th jack Table 2 1 Matching Relationship among Channel Number Pins of RJ45 Jack and 4 way Hub Step 6 Power on and start the gateway Step 7 Log in the ga...

Page 14: ...cription with test and configure Dial Rule to 123 2 Go to Port Settings Æ Port Group on the WEB interface and click the Add New button to create a new port group and add FXS ports which are connected with stations to it Refer to 3 6 3 Port Group for detailed instructions You may use the default values of other configuration items and are required not to leave Description empty Example Provided the...

Page 15: ...uto dial feature and set the parameters Auto Dial Number and Wait Time before Auto Dial If there is no dialing operation in a time period i e Wait Time before Auto Dial after pickup the port will automatically call the preset number i e Auto Dial Number Refer to 3 6 1 FXS for detailed instructions Step 11 Enable the DND do not disturb feature Skip this step if not necessary Go to the Port Settings...

Page 16: ...rd feature and fill in a forward number According to what you set the SMG analog gateway can automatically forward the incoming calls on three conditions unconditional busy no reply Note that this feature is applicable only to a single port but not to a port group consisting of more than one port Refer to 3 6 1 FXS for detailed instructions Special Instructions z The chassis of the SMG analog gate...

Page 17: ... 3 1 Login Interface The gateway only serves one user whose original username and password are both admin You can change the username and the password via System Tools Æ Change Password on the WEB interface For detailed instructions refer to 3 9 13 Change Password The prompt New UI language is being set Please do not leave this page will display on the interface upon your first login after changin...

Page 18: ...mation Engineering Co Ltd SMG Series Analog Gateway User Manual Version 1 5 3 Page 13 Figure 3 2 Login Interface after Language Modified After login you can see the main interface as below Figure 3 3 Main Interface ...

Page 19: ...Info 3 2 1 System Info Figure 3 5 System Info Interface See Figure 3 5 for the system info interface You can click Refresh to obtain the latest system information The table below explains the items shown in Figure 3 5 Item Description MAC Address MAC address of LAN 1 or LAN 2 disabled by default IP Address The three parameters from left to right are IP address subnet mask and default gateway of LA...

Page 20: ...n of the WEB interface Gateway Current version of the gateway service Serial No Unique serial number of an SMG analog gateway U boot Current version of Uboot Kernel Current version of the system kernel on the gateway Note The kernel version for the gateways with RJ45 RJ21 interface is different from that for the gateways with RJ11 interface Product Type The type of the analog gateway 3 2 2 Channel...

Page 21: ... CalleeID Displays the CalleeID of the call on channel Reg Status Displays the registration status of the port 3 2 3 Call Count Figure 3 7 Call Count Interface See Figure 3 7 for the call count Interface The above list shows the detailed information about all the calls counted from the startup of the gateway service to the latest open or refresh of this interface You can click Refresh to obtain th...

Page 22: ... sent received or repeatedly sent received during the period from the startup of the gateway service to the latest open or refresh of the interface Click Refresh to refresh the count of SIP messages or click Clear to clear the current count of SIP messages 3 3 Quick Config Figure 3 9 Quick Config Interface See Figure 3 9 for the Quick Config interface Follow the gateway Quick Configuration wizard ...

Page 23: ...red to fill with the information about the registrar if the gateway must be registered After configuration click Back to go back to the Network Settings interface click Next to enter the FXS Settings interface Figure 3 11 Quick Config SIP Settings Interface See Figure 3 12 for the FXS Settings interface The configuration items on this interface are the same as those on the FXS interface Refer to9 ...

Page 24: ...letion Interface Click Back to go back to the FXO Settings interface click Finish to finish the Quick Config wizard and now the gateway can work normally with basic configuration 3 4 VoIP Settings VoIP Settings includes six parts SIP SIP Compatibility SIP Station SIP Server NAT Setting and Media See Figure 3 15 SIP is used to configure the general SIP parameters SIP Compatibility is used to set wh...

Page 25: ...e Figure 3 16 for the SIP settings interface where you can configure the general SIP parameters After configuration click Save to save your settings into the gateway or click Reset to restore the configurations If a dialog box pops up after you save your settings asking you to restart the service do it immediately to apply the changes Refer to 3 9 14 Restart for detailed ...

Page 26: ...e Registrar Server Check the enable checkbox to enable the spare registrar server By default it is disabled Spare Registrar IP Address Address of the spare registry server for the gateway to register The gateway will enable the spare registrar server if the master registrar server has no reply or the master server is detected with no response in case the item Detection Server Cycle is enabled Spar...

Page 27: ...erface where you can configure the SIP parameters to determine which SIP servers and SIP messages will the gateway be compatible with After configuration click Save to save your settings into the gateway or click Reset to restore the configurations Figure 3 17 SIP Compatibility Setting Interface The table below explains the items shown in Figure 3 17 Item Description ...

Page 28: ...nfo Two Stage Dialing for SIP Incoming Call Once this feature is enabled the incoming call from SIP should perform the two stage dialing operation By default this feature is disabled Maximum Wait Answer Time Sets the maximum time for the SIP channel to wait for the answer from the called party of the outgoing call it initiates If the call is not answered within the specified time period it will be...

Page 29: ...P Station on the VoIP Settings menu Click SIP Station to go into the SIP Station interface By default there is no available SIP station See Figure 3 18 below Figure 3 18 SIP Station Setting Interface Click Add New to add SIP stations manually See Figure 3 19 You can configure basic SIP station information on this interface The bound port to a SIP station must be an FXO port and unique The username...

Page 30: ...ion See Figure 3 21 The configuration items on this interface are the same as those on the Add New SIP Station interface Figure 3 21 SIP Station Modification Interface To delete a SIP station check the checkbox before the corresponding index in Figure 3 20 and click the Delete button Check All means to select all available items on the current page Uncheck All means to cancel all selections on the...

Page 31: ...IP Item Description Index The index of each SIP server The gateway supports up to 8 SIP servers Description More information about each SIP server with the default value of default After configuration click Save to save the above settings into the gateway or click Cancel to cancel the settings See Figure 3 24 for the SIP server management interface Figure 3 24 SIP Server Management Click Modify in...

Page 32: ...select all available items on the current page Uncheck All means to cancel all selections on the current page Inverse means to uncheck the selected items and check the unselected To clear all SIP servers at a time click the Clear All button in Figure 3 24 3 4 5 NAT Setting See Figure 3 26 for the NAT setting interface where you can configure the parameters for NAT After configuration click Save to...

Page 33: ...the failure of direct communication between the gateway and the destination address so as to ask the remote end to send signaling messages or voice data to it during the signaling or voice communication between the gateway and the destination Note Once this item is filled out it will be used as the first choice even if Rport and NAT IP are enabled RTP Self adaption When this feature is enabled the...

Page 34: ...tore the configurations If a dialog box pops up after you save your settings asking you to restart the service do it immediately to apply the changes Refer to 3 9 14 Restart for detailed instructions The table below explains the items shown in Figure 3 27 Item Description DTMF Transmit Mode Sets the transmit mode for the IP channel to send DTMF signals The optional values are RFC2833 In band and S...

Page 35: ...lculated by ms with the default value of 100 JitterUnderrunLead Sets the initial delay of packets if they are received later than JitterBuffer Range of value 0 280 calculated by ms with the default value of 200 Note Only when JitterMode is set to Static Mode will this item be shown JitterOverrunLead Sets the initial lead inserted if packets are received earlier than 300 JitterBuffer Range of value...

Page 36: ...70 7 40 7 95 10 20 12 20 20 40 15 2 30 13 3 iLBC 60 13 3 15 2 3 5 Advanced Settings Advanced Settings includes thirteen parts FXS FXO Tone Detector Tone Generator DTMF Detector Ringing Scheme Fax Function Key Dialing Rule Dialing Timeout Cue Tone Color Ring and QoS See Figure 3 28 FXS is used to configure the general properties of the FXS port FXO is used to configure the general properties of the...

Page 37: ...O configuration interface The table below explains the items shown in the above figure Item Description Tone Energy Energy of the tone signal sent by the gateway Range of value 35 15 calculated by dB with the default value of 16 Voice Gain Output from FXS Adjusts the gain of the voice output from the FXS port The value must be multiples of 3 Range of value 24 24 calculated by dB with the default v...

Page 38: ...dopted by the FXS port to send the CallerID The optional values are FSK and DTMF with the default value of FSK Occasion to Send FSK CallerID Sets when to send the CallerID before rings or after the 1 st Ring The default value is after 1st Ring Send Polarity Reversal Signal Once this feature is enabled the gateway will send the polarity reversal signal to a corresponding FXS channel when it detects...

Page 39: ...sfied The default setting is being disabled Energy Threshold of Silence The energy threshold to judge whether the line is silent or not Range of value 86 5 calculated by s with the default value of 45 Note This item will be valid only when Silence Detection is enabled Time Threshold of Silence The time threshold to judge whether the line is silent or not calculated by s with the default value of 6...

Page 40: ...nswer of the remote side for an outgoing call from FXO port This item is valid only when Polarity Reversal is enabled It is calculated by s with the default value of 25 Communication without Network Automatically routes a call to the FXO port in case of network failure or call timeout After configuration click Save to save your settings into the gateway or click Reset to restore the configurations...

Page 41: ...The default value is 450 The 2 nd Mid frequency The 2 nd center frequency Range of value 0 or 300 3400 calculated by Hz The default value is 0 Duration at ON State The duration of tones at on state The default setting Dial Tone is 1500ms Busy Tone is 350ms Ringback Tone is 1000ms Duration at OFF State The duration of tones at off state The default setting Dial Tone is 0ms Busy Tone is 350ms Ringba...

Page 42: ... 3 9 14 Restart for detailed instructions Click Modify in Figure 3 31 to modify the tone parameter See Figure 3 33 for the tone parameter modification interface The configuration items on this interface are the same as those on the Add New Tone Parameter interface Figure 3 33 Modify Tone Parameter To delete a piece of tone check the checkbox before the corresponding index in Figure 3 31 and click ...

Page 43: ...ne a single tone with 450HZ frequency repeatedly playing in the method of 1s play and 4s pause Busy Tone a single tone with 450HZ frequency repeatedly playing in the method of 350ms play and 350ms pause You can configure the tone generator manually The exact explanation about the format and the meaning is described on the right of the interface 3 5 5 DTMF Detector Figure 3 35 DTMF Detector Configu...

Page 44: ...0 20 calculated by ms The default value is 5 Center Frequency Error The error threshold of the center frequency at ON state in the DTMF tone with the default value of 1 Lowest Energy Threshold The energy threshold to trigger the DTMF detection Range of value 40 9 calculated by dB The default value is 30 Minimum Signal to noise Ratio Threshold The signal to noise ratio threshold to trigger the DTMF...

Page 45: ...th the default value of 4000ms CallerID After this setting different ringing schemes will be executed on the FXS port according to the set CallerID After configuration click Save to save the above settings into the gateway or click Close to cancel the settings See Figure 3 38 for the saved ringing scheme Figure 3 38 Ringing Scheme List Click Modify in Figure 3 38 to modify the ringing scheme See F...

Page 46: ... to uncheck the selected items and check the unselected To clear all ringing scheme at a time click the Clear All button in Figure 3 38 3 5 7 Fax Figure 3 40 Fax Configuration Interface Disable by default See Figure 3 40 for the default fax mode configuration The table below explains the items shown in the above figure Item Description Fax Mode The real time IP fax mode The optional values are T 3...

Page 47: ...eceiving and transmitting Range of value 14400 9600 and 4800 calculated by bps with the default value of 14400 Fax Train Mode Sets the train mode for T 38 fax The optional values are transferredTCF and localTCF with the default value of transferredTCF Error Correction Mode Sets the error correction mode for T 38 fax The optional values are t38UDPRedundancy Redundancy Error Correction and t38UDPFEC...

Page 48: ...unction Key Configuration Interface Click Enable to enable the corresponding function key The gateway will use the default function keys when the mode is set to default and it will allow you to set new function keys when the mode is set to user defined Click Save to save your settings into the gateway Note Phone Test is used just to see if the phone can work normally It requires you to hang up the...

Page 49: ...very time it receives a number Instead we hope that the gateway can automatically judge the received number to see if it meets the set rule if it is complete and if it is qualified to make outgoing calls Therefore a whole dialing plan which consists of multiple dialing rules specifying the auto judging conditions is required Each dialing rule has a priority which is used to restrict the sequence a...

Page 50: ...atching for your dialing number based on the dialing rule and regard your dialing as finished upon receiving or dialing timeout Character Description 0 9 Digits 0 9 A D Letters A D x A random number A string of x s represents several random numbers For example xxx denotes 3 random numbers indicates a random amount including zero of characters after it is used to define the range for a number Value...

Page 51: ... digit number starting with 13 14 15 17 or 18 87 2 3 5 7 xxxxxxx Any 8 digit number starting with 2 3 5 6 or 7 86 8 1 9 xxxxxx Any 8 digit number starting with 81 82 83 84 85 86 87 88 or 89 85 80 1 9 xxxxx Any 8 digit number starting with 801 802 803 804 805 806 807 808 or 809 84 800xxxxxxx Any 10 digit number starting with 800 83 4 1 9 xxxxxx Any 8 digit number starting with 41 42 43 44 45 46 47 ...

Page 52: ... uncheck the selected items and check the unselected To clear all dialing rules at a time click the Clear All button in Figure 3 44 See Figure 3 47 for the Dialing Rule Configuration interface under the Character mode You can edit the dialing rule list to add a new one or modify an old one The exact meaning of each rule element is described on the page Figure 3 47 Dialing Rule Configuration Interf...

Page 53: ...is interval Description More information about the configuration item Inter Digit Timeout such as the reason for adopting the current value Click Modify in Figure 3 48 to modify the dialing timeout info See Figure 3 49 for the dialing timeout info modification interface The configuration items on this interface are the same as those on the Dialing Timeout Info Interface Figure 3 49 Modify Dialing ...

Page 54: ... Color Ring Figure 3 51 Color Ring Interface By default there is no available color ring on the gateway See Figure 3 51 Click Upload to upload a new color ring manually See Figure 3 52 You can upload the required color ring file to the gateway following this interface Figure 3 52 Color Ring Upload Interface The table below explains the items shown above Item Description Index The unique index of e...

Page 55: ...this interface are the same as those on the Color Ring Upload interface Figure 3 54 Color Ring Modification Interface To delete a color ring check the checkbox before the corresponding index in Figure 3 53 and click the Delete button Check All means to select all available items on the current page Uncheck All means to cancel all selections on the current page Inverse means to uncheck the selected...

Page 56: ...iority The value range is 0 63 with the default value of 46 Control Premium QoS Sets the priority of the control premium for QoS A control premium QoS with a bigger value has a higher priority The value range is 0 63 with the default value of 26 3 6 Port Settings Port Settings includes three parts FXS FXO and Port Group See Figure 3 56 Figure 3 56 Port Settings 3 6 1 FXS Figure 3 57 FXS Settings I...

Page 57: ...on interface Item Description Port Serial number of the FXS port on the device Type Type of the port on the device FXS This item is not configurable Register Port Sets whether to register the port to the SIP server When this item is set to No the item Reg Status on the FXS settings interface Figure 3 57 shows Unregistered when this item is set to Yes the item Reg Status shows Failed or Registered ...

Page 58: ...re for a call conversation over the FXS channel By default this feature is enabled and the effect can reach 128ms Forbid Outgoing Call If this feature is enabled the FXS port will be forbidden to call out The default setting is disabled CID CallerID If this feature is enabled the FXS port will send the CallerID of the incoming IP call together with the ringing tone to the corresponding station The...

Page 59: ... will be quoted by the current FXS port Talkback With this feature enabled and a number bound the port can talkback to its bound number That is they can start a call with each other as soon as picking up the phone The default setting is disabled Note This feature is only used in the case of channel registration Bound Number Sets the bound number for talkback Ringing Parameter Sets the ringing para...

Page 60: ...me configuration items on this interface are the same as those on the FXS Modification Interface The others are described in the table below Item Description Starting Port The starting serial number of the FXS port on the device in the batch setting Ending Port The ending serial number of the FXS port on the device in the batch setting ...

Page 61: ...d including Increase and Decrease two options Authentication Password Batch Step Size Sets the increase or decrease step size of the authentication password in the batch setting Authentication Username Batch Rule The rule for batch setting the authentication username including Increase and Decrease two options Authentication Username Batch Step Size Sets the increase or decrease step size of the a...

Page 62: ...en this item is set to Yes the item Reg Status shows Failed or Registered SIP Account Registration account of an FXO port The default SIP account is 80XX among which XX represents the corresponding port number For example the default SIP account corresponding to Port 1 is 8001 and that corresponding to Port 32 is 8032 Password Registration password of the port To register a port to the SIP server ...

Page 63: ...ler The echo cancellation feature for a call conversation over the FXO channel By default this feature is enabled and the effect can reach 128ms Forbid Outgoing Call If this feature is enabled the FXO port will be forbidden to call out The default setting is disabled Caller ID Detection If this feature is enabled the FXO port will detect the caller IDs from the incoming calls The default setting i...

Page 64: ...t on the device in the batch setting Starting SIP Account The starting SIP account in the batch setting Starting Authentication Password The starting authentication password in the batch setting Starting Authentication Username The starting authentication username in the batch setting SIP Account Batch Rule The rule for batch setting the SIP account including Increase and Decrease two options SIP ...

Page 65: ...batch setting After configuration click Save to save the settings into the gateway or click Cancel to cancel the settings 3 6 3 Port Group Figure 3 63 Port Group Setting Interface See Figure 3 63 for the Port Group Settings interface By default there is no available port group on the gateway A port group is a set containing one or more than one port having such properties as Port Selection and Aut...

Page 66: ...e port group to the SIP server Only when this configuration item is set to Yes can you see the configuration items SIP Account and Password SIP Account When the port group initiates a call to SIP this item corresponds to the username of SIP Password Registration password of the port group To register the port group to the SIP server both configuration items SIP Account and Password should be fille...

Page 67: ...e registered SIP account and password of the whole gateway Refer to 3 4 1 SIP for gateway registration Register Port Group SIP initiates a call with the registered SIP account and password of the port group Register Port SIP initiates a call with the registered SIP account and password of the port Register Status Registration status of the port group When Register Port Group is set to No the value...

Page 68: ...e idle FXS ports in this port group Ringing by Turns Ring the ports in this port group according to the Rule for Ringing by Turns which can be user defined Refer to the format of the rule in Figure 3 64 By default the ringing will be carried out in the ascending order of the port number Timeout for Ringing by Turns is used to set the overtime for ringing Range of value 15 60 calculated by s with t...

Page 69: ...ose on the Add New Port Group interface Figure 3 66 Modify Port Group To delete a port group check the checkbox before the corresponding index in Figure 3 65 and click the Delete button Check All means to select all available items on the current page Uncheck All means to cancel all selections on the current page Inverse means to uncheck the selected items and check the unselected To clear all por...

Page 70: ...g before or after number manipulation The default value is Route before Number Manipulate After configuration click Save to save the above settings into the gateway 3 7 2 IP to Tel Figure 3 69 IPÆTel Routing Rule Configuration Interface Standard See Figure 3 69 for the IPÆTel routing rule configuration interface By default there is no available routing rule on the gateway The IPÆTel routing rule c...

Page 71: ...nsisting of digits 0 9 or character ranges defined by represents a character within the range it defines Values in only can be characters 0 9 punctuations and is used between two characters to indicates any character between these two characters is used to separate characters or character ranges representing alternatives For example 057 1 3 6 represents the string 0571 0572 0573 or 0576 Also these...

Page 72: ...tion Interface Click Modify in Figure 3 71 to modify a routing rule The configuration items on the IPÆTel routing rule modification interface are the same as those on the Add New Routing Rule IPÆTel interface Note that the item Index cannot be modified To delete a routing rule check the checkbox before the corresponding index in Figure 3 71 and click the Delete button Check All means to select all...

Page 73: ...ck Add New to add them manually See Figure 3 74 You may use the default values of all the configuration items herein except for Destination IP and Destination Port Figure 3 74 Add New Routing Rule TelÆIP The table below explains the items shown in the above figure Item Description Index The unique index of each routing rule which denotes its priority A routing rule with a smaller index value has a...

Page 74: ...r click Close to cancel the settings See Figure 3 75 for the TelÆIP routing rule configuration interface after your configuration There is a rule displayed with Index 63 Destination IP 192 168 1 101 and Destination Port 5060 i e default IP address and port of the gateway having no restriction on Call Initiator CallerID Prefix and CalleeID Prefix which indicates all the outgoing calls from Tel whic...

Page 75: ...eeID See Figure 3 77 Figure 3 77 Number Manipulation 3 8 1 IP to Tel CallerID Figure 3 78 IPÆTel CallerID Manipulation Interface Standard See Figure 3 78 for the IPÆTel CallerID manipulation interface under the Standard mode A new number manipulation rule can be added by the Add New button on the bottom right corner of the list in the above figure See Figure 3 79 for the IPÆTel CallerID manipulati...

Page 76: ...lation rule which denotes its priority A number manipulation rule with a smaller index value has a higher priority If a call matches several number manipulation rules it will be processed according to the one with the highest priority Description More information about each number manipulation rule with the default value of default Call Initiator IP address from where the call is initiated This it...

Page 77: ...ts from Right The amount of digits to be deleted from the right end of the number If the value of this item exceeds the length of the current number the whole number will be deleted Reserved Digits from Right The amount of digits to be reserved from the right end of the number Only when the value of this item is less than the length of the current number will some digits be deleted from left other...

Page 78: ... all available items on the current page Uncheck All means to cancel all selections on the current page Inverse means to uncheck the selected items and check the unselected To clear all number manipulation rules at a time click the Clear All button in Figure 3 78 See Figure 3 81 for the IPÆTel CallerID Manipulation Interface under the Character mode You can edit the number manipulation rule list t...

Page 79: ...r manipulation process for IPÆTel CalleeID is almost the same as that for IPÆTel CallerID only the number to be manipulated changes from CallerID to CalleeID See Figure 3 83 for IPÆTel CalleeID manipulation interface The configuration items on this interface are the same as those on IPÆTel CallerID Manipulation Interface Figure 3 78 Figure 3 82 IPÆTel CalleeID Manipulation Interface Standard ...

Page 80: ...lation rule can be added by the Add New button on the bottom right corner of the list in the above figure See Figure 3 85 for the TelÆIP CallerID manipulation rule adding interface You may use the default values of all the other configuration items herein Figure 3 85 Add TelÆIP CallerID Manipulation Rule The table below explains the items shown in the above figure Item Description Index The unique...

Page 81: ...ft The amount of digits to be deleted from the left end of the number If the value of this item exceeds the length of the current number the whole number will be deleted Stripped Digits from Right The amount of digits to be deleted from the right end of the number If the value of this item exceeds the length of the current number the whole number will be deleted Reserved Digits from Right The amou...

Page 82: ... all available items on the current page Uncheck All means to cancel all selections on the current page Inverse means to uncheck the selected items and check the unselected To clear all number manipulation rules at a time click the Clear All button in Figure 3 84 See Figure 3 87 for the TelÆIP CallerID Manipulation Interface under the Character mode You can edit the number manipulation rule list t...

Page 83: ...lation process for TelÆIP CalleeID is almost the same as that for TelÆIP CallerID only the number to be manipulated changes from CallerID to CalleeID See Figure 3 88 Figure 3 89 for the TelÆIP CalleeID manipulation interface The configuration items on this interface are the same as those on TelÆIP CallerID Manipulation Interface Figure 3 84 Figure 3 88 TelÆIP CalleeID Manipulation Interface Standa...

Page 84: ...ersion 1 5 3 Page 79 Figure 3 89 TelÆIP CalleeID Manipulation Interface Character 3 9 System Tools System Tools is mainly for gateway maintenance It provides such features as IP modification data backup and connectivity check See Figure 3 90 for details Figure 3 90 System Tools ...

Page 85: ... IPs are allowed You can set an IP whitelist to allow all IPs within it to access the gateway freely Also can set an IP blacklist to forbid all IPs within it to access the gateway SYSLOG Sets whether to enable SYSLOG It is required to fill in SYSLOG Server Address and SYSLOG Level in case SYSLOG is enabled By default SYSLOG is disabled Server Address Sets the SYSLOG server address for log receptio...

Page 86: ...ateway regularly every day at the preset Restart Time By default this feature is disabled Restart Time Sets the time to restart the gateway regularly System Time The system time Check the checkbox before Modify and change the time in the edit box Time Zone The time zone of the gateway 3 9 2 Network Figure 3 92 Network Settings Interface See Figure 3 92 for the network settings interface A gateway ...

Page 87: ...figuration click Save to save the above settings into the gateway or click Reset to restore the configurations After changing the IP address you shall log in the gateway again using your new IP address 3 9 3 Upgrade Figure 3 93 Upgrade Interface See Figure 3 93 for the upgrade interface where you can upgrade the WEB gateway service kernel and firmware to new versions Select the upgrade package tar...

Page 88: ...r Manual Version 1 5 3 Page 83 Figure 3 94 File Uploading Interface After a successful uploading of the file the gateway will start to upgrade the system See Figure 3 95 and you can learn the detailed upgrading information from the upgrade information box at the bottom ...

Page 89: ...age 84 Figure 3 95 System Upgrading Interface Note that clicking Reset can only delete the selected update file but not cancel the operation of Update Note Please contact our technicians if you need to downgrade the gateway to an old version An improper operation may cause unexpected problems ...

Page 90: ... according to your requirement Click Start to start capturing packets Click Stop to stop the capture and download the captured packets Data Recording will execute the recording task on the set port with the set recording time length Click Start to start recording data consecutively recording 300 seconds at most on the corresponding port with the corresponding time length Click Stop to stop the rec...

Page 91: ... 98 for the Call Log interface Click the checkbox before Enable Call Log to enable the call log feature including Call Log and SIP Log Call from IP Channel displays the call log information generated on all IP channels and Call from Port displays the call log information generated on the port you select All the SIP related information will be displayed in SIP Log 3 9 6 Operation Log ...

Page 92: ...ation item is unconfigured 3 9 7 Backup Upload Figure 3 100 Backup Upload Interface See Figure 3 100 for the backup and upload interface To back up the configuration file to your PC just click Backup To upload a configuration file select it via Browse and click Upload Figure 3 101 Backup Upload Prompt Interface Click OK on the prompt box Figure 3 101 to upload the configuration file to the gateway...

Page 93: ... Monitor Figure 3 104 System Monitor Configuration Interface See Figure 3 104 for the System Monitor Configuration interface Watchdog is a timing reset system used to avoid application crash You can set the dog feeding interval when this feature is enabled The feeding interval is calculated by s with the value range of 1 15s By default this feature is enabled with the default value of 5s As the fe...

Page 94: ...tion and reply them to the SNMP management software By default the SNMP feature is disabled The available information includes kernel version CPU usage processes memory usage startup information LAN status and etc Currently the gateway only provides the community string for information acquisition The table below explains the configuration items shown in Figure 3 105 Item Description SNMP Server A...

Page 95: ...em Description Source IP Address Source IP address where the Ping test is initiated Destination Address Destination IP address on which the Ping test is executed Ping Count The number of times that the Ping test should be executed Range of value 1 100 Package Length Length of the data package used in the Ping test Range of value 56 1024 bytes Info The information returned during the Ping test help...

Page 96: ...e figure Item Description Source IP Address Source IP address where the Tracert test is initiated Destination Address Destination IP address on which the Tracert test is executed Maximum Jumps Maximum number of jumps between the gateway and the destination address which are returned by the Tracert test Range of value 1 255 Info The information returned during the Tracert test helping you to learn ...

Page 97: ...uration click Save to apply your new username and password or click Reset to restore the configurations After changing the username and password you are required to log in again 3 9 14 Restart Figure 3 109 Service System Restart Interface See Figure 3 109 for the Restart interface Click Restart on the service restart interface to restart the gateway service or click Restart on the system restart i...

Page 98: ...nsulation resistance of telephone line from PC 2MΩ 500V DC Telephone line impedance Compliant with the national standard impedance for three component network Console Port Amount 1 RS 232 Baud rate 115200bps Connector RJ45 to DB 9 Connector Data bits 8 bits Stop bit 1 bit Parity unsupported Flow control unsupported Note Follow the above settings to configure the serial port or it may work abnormal...

Page 99: ...Group 1 will be routed to the gateway b Add a new routing rule on the IPÆTel routing rule configuration interface Fill in Source IP with the gateway s IP address e g LAN1 192 168 1 101 and select a port group e g Port Group 2 as Destination Port Group to be called Then if the IP end of the gateway calls itself the station corresponding to Port Group 2 will ring c Finishing the above configurations...

Page 100: ...eature Communication without Power is implemented with the help of composite modules equipped in the gateway Once the power to the device is cut off the station which is linked with the FXS port on the composite module and the trunk which is linked with the FXO port on the same module will connect to each other directly and keep the good communications between phones and networks What you need to ...

Page 101: ...n Engineering Co Ltd SMG Series Analog Gateway User Manual Version 1 5 3 Page 96 Q10 Which RTP codecs are supported by the SMG gateway At present the supported RTP codecs are G 711A G 711u G 729 G 723 G 722 AMR and iLBC ...

Page 102: ... help you Headquarters Synway Information Engineering Co Ltd http www synway net 9F Synway D R Center No 3756 Nanhuan Road Binjiang District Hangzhou P R China 310053 Tel 86 571 88860561 Fax 86 571 88850923 Technical Support Tel 86 571 88864579 Mobile 86 18905817070 Email techsupport sanhuid com Email techsupport synway net MSN synway support hotmail com Sales Department Tel 86 571 88860561 Tel 86...

Reviews: