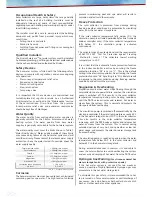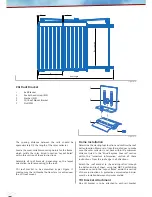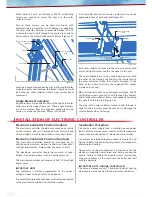
Rafter
Tile Batten
Fixing strap -
Secured with
two Hex head
self-drilling
screws
Fixing strap - Secured
with two Hex head
self-drilling screws
Collector - Secured to strap
with two screws
Collector - Secured to strap with
retaining plates, screws and nuts
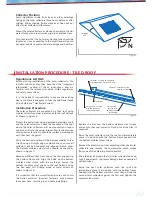
Figure 6
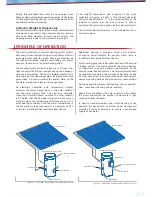
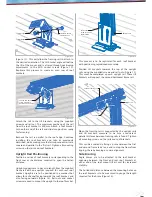
N
45
°
45
°
Latitude
±20
°
Figure 5
Regulations & OH&S
Before starting installation of the solar collector/s, the
installer should ensure they have read the “Important
Information” section of these instructions and are
familiar with the relevant standards, OH&S regulations
and safety precautions.
It is the builder’s responsibility to ensure the existing
house structure is adequate to take the additional loads
of the SolarCore
TM
Hot Water System.
Installation Procedure
The solar collectors are mounted on a tiled roof using
stainless steel straps that are fastened to the roof battens
as shown in Figure 6.
Protect the gutter from being damaged by ladders, tools
and the solar collectors. Check the condition of the roof
where the solar collectors will be mounted and report
any broken tiles to the owner. Broken tiles in the planned
solar collector location/s should be replaced or swapped
with tiles near the gutter.
Mark the desired position of the bottom stainless steel
straps using a straight edge or plumb line to ensure all
collectors will be horizontal and aligned to each other.
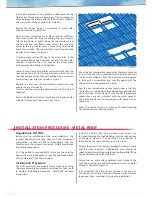
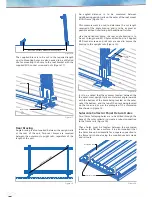
The bottom stainless steel straps should be spaced as
shown in Figure 7.
Remove sufficient tiles from above the tiles supporting
the bottom frame and align the hook on the bottom
stainless steel straps with the markings. Fasten the
bottom stainless steel straps to the roof battens using
two hex head self- drilling wood or metal screws as
shown in Figure 6.
It is important that the correct fasteners are used to suit
the batten material. Incorrect fasteners may become
loose over time, resulting in an unsafe installation.
INSTALLATION PROCEDURE - TILED ROOF
Collector Position
Avoid significant shade from trees or other buildings
falling on the solar collectors three hours before or after
midday. Minor shading from antennas or flues will not
affect solar collector performance.
Mount the solar collectors as close as possible to the hot
water storage tank to minimise pipe runs and heat loss.
Also consider that the hot water storage tank should be
located as close as possible to the most frequently used
hot water outlets to minimise water wastage and heat loss.
Replace the tiles over the bottom stainless steel straps
and ensure they seat correctly. Flash or seal the tiles (if
required).
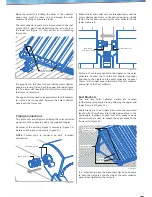
Raise the solar collector onto the roof and immediately
place it in position with the bottom frame hooked into
the bottom stainless steel straps.
Remove the plastic cover from adjoining sides of all solar
collectors and remove the compression union nipple
from one of the adjoining solar collectors.
Wrap the plastic around the first solar collector tube and
tuck it underneath, to prevent damage from exposure of
unfilled tubes.
Raise the next solar collector onto the roof and
immediately place it in position with the bottom frame
hooked into the bottom stainless steel straps. Slide the
second solar collector against the first and tighten the
compression union.


