background image

Chapter 6 – Replacing a QIP or Bus Expansion Module

56

Replacing a QIP

Note:

If you are replacing the exporting QIP, use your backup software 
to stop any backups running to drives that are associated with QIP.

Prepare the Library

1.

Log into the library with superuser or administrator privileges.

2.

From the toolbar menu, select 

Configuration > Controllers

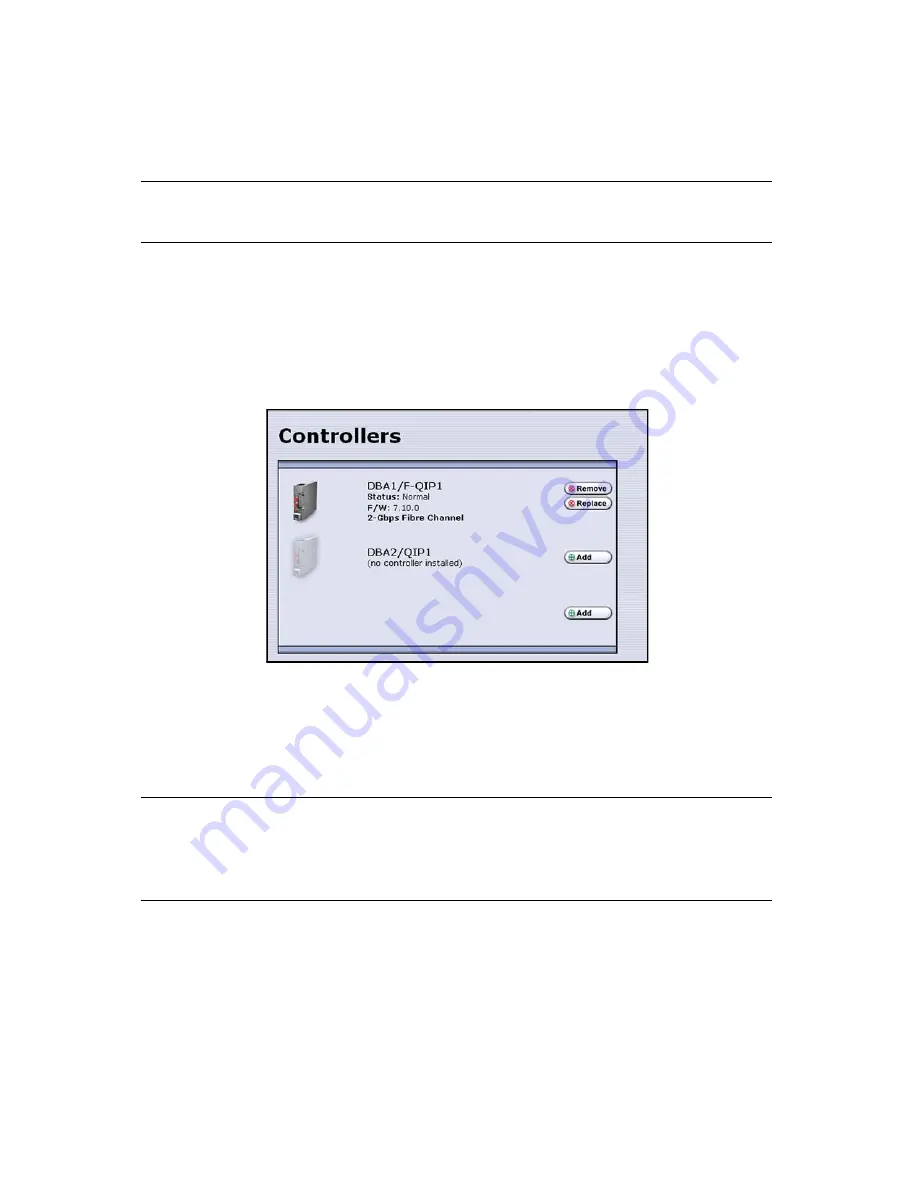
. The Controllers screen 

displays (Figure 6-5).

3.

Select 

Replace

 for the QIP that needs replacing.

A Feedback Required screen prompts you to confirm that you want to replace the 
QIP.

Caution:

Do not select


Remove

. This option removes the QIP from the 

partition. When the replacement QIP is installed, it will not be 
assigned to the partition from which the malfunctioning QIP 
was removed.

Figure 6-5

The Controllers screen.

Summary of Contents for T-Series Spectra T200

Page 1: ...Spectra T200 T380 Libraries Assisted Self Maintenance Guide PN 91010002 Revision A ...

Page 2: ...satisfactory quality performance accuracy and effort including lack of negligence is with you Also there is no warranty against interference with your enjoyment of the Software or against infringement If you have received any warranties regarding the SOFTWARE those warranties do not originate from and are not binding on Software suppliers Note on Java Support The Software may contain support for p...

Page 3: ...not place the rack on a carpeted floor or anywhere else that poses risk for static discharge that could damage your library and its drives Caution If the library is loaded with media packs RXT media packs or media in TeraPacks Spectra recommends that the library not be moved If you must move the library contact SpectraGuard Support for recommendations before proceeding Warning The T200 library wei...

Page 4: ...upport Web Site www spectralogic com support index cfm Knowledge Base www spectralogic com support kbase index cfm United States and Canada Phone 800 227 4637 Email support spectralogic com Europe Middle East Africa Phone Phone 44 0 870 112 2185 UK only 49 0 6028 9796 507 Email spectralogic stortrec de Mexico Central and South America Asia Australia and New Zealand Phone 303 449 0160 Email support...

Page 5: ...ance 15 Replaceable Front Panel Components 15 Replaceable Rear Panel Components 16 Replaceable Interior Components 17 Preparing for Maintenance 18 ESD Protection 18 Maintenance Tools 18 Accessing Rear Panel Components 19 Remove the Cover 19 Install the Cover 20 Turning the Power On and Off 21 Power On the Library 21 Power Off the Library 21 Resetting the Library or LCM 22 Resetting the Library 22 ...

Page 6: ...g Data From the Library to a USB Storage Device 25 Chapter 3 Replacing the Air Filter 27 Before You Begin 27 Required Tools and Materials 27 Continuing Library Operations While Replacing the Filter 27 Replacing the Filter 28 Chapter 4 Replacing a Drive 31 Before You Begin 31 Required Tools and Materials 32 Continuing Backups 32 Identifying the Malfunctioning Drive 33 Preparing the Library 34 Repla...

Page 7: ... Cleaning 48 Exporting the Cleaning Cartridge 48 Tracking Cleaning Cartridge Use 50 Purchasing Cleaning Cartridges 50 Chapter 6 Replacing a QIP or Bus Expansion Module 51 Before You Begin 51 Required Tools and Materials 52 Continuing Backups 52 Identifying a Malfunctioning QIP 53 Identifying a Malfunctioning Bus Expansion Module 55 Resetting a QIP 55 Replacing a QIP 56 Prepare the Library 56 Remov...

Page 8: ...ring for Replacement 68 Replacing the LCM 68 Restarting the Library 69 Restoring the Library Configuration 69 Restoring a Saved Configuration 70 Replacing the Compact Flash Card in the LCM 71 Restarting Backups 72 Chapter 9 Replacing the Transporter 73 Before You Begin 73 Required Tools and Materials 74 Continuing Backups 74 Test the Transporter 74 Take the Transporter Offline 76 Power Off the Lib...

Page 9: ...e Side Access Panels 96 Power On the Library 97 Bring the New Transporter Online 97 Test the New Transporter 99 Reimport Media Packs and Update Inventory 99 Restart Backups 99 Chapter 10 Returning Components 101 Packaging a Component for Shipment 101 Shipping RMA Returns 103 Domestic Returns 103 International Returns 104 Index 105 ...

Page 10: ...Contents 10 Notes ...

Page 11: ... version of this guide visit the Spectra Logic web site at www spectralogic com index cfm fuseaction support document catID 241 p 240 About ASM Assisted Self Maintenance ASM is a technical support option that lets you maintain a stock of replacement components known as Customer Replaceable Units or CRUs for your library at your site Having parts on site lets you make immediate repairs to your libr...

Page 12: ...de is intended for data center personnel who perform on site maintenance of data storage equipment The information in this guide assumes a familiarity operating the library as described in the Spectra T200 T380 Library User Guide It also assumes a familiarity with SCSI and Fibre Channel communication protocols as well as with network connectivity protocols such as Fibre Channel Ethernet and iSCSI ...

Page 13: ...etailed information about the SCSI and Fibre Channel commands used in the library Drives LTO Ultrium Tape Drives Check the IBM web site at www storage ibm com tape lto oem index html to locate documentation for LTO Ultrium tape drives RXT Drives The following documents related to the RXT drives are available as PDF files on the Spectra Logic web site at www spectralogic com index cfm fuseaction su...

Page 14: ...ons to highlight important information Note Provides additional information or suggestions about the current topic Caution Provides information you must know to avoid damage to the library or tape drives or avoid losing data Warning Provides information you must know to avoid personal injury ...

Page 15: ...s chapter also provides information on the following topics Preparing for Maintenance on page 18 Accessing Rear Panel Components on page 19 Turning the Power On and Off on page 21 Resetting the Library or LCM on page 22 Resetting the LCM on page 22 Replaceable Front Panel Components The library s air filter is the only front panel component covered in this guide Figure 1 1 shows the location of th...

Page 16: ...rive page 31 Quad Interface Processor QIP or bus expansion module Chapter 6 Replacing a QIP or Bus Expansion Module page 51 Power supply module Chapter 7 Replacing a Power Supply Module page 63 Library Control Module LCM Chapter 8 Replacing the LCM Note Depending on ASM your service contract the LCM may not be included with the components stored at your site page 67 Figure 1 2 Location of rear pan...

Page 17: ...r Components The transporter is the only interior component covered by this guide Figure 1 3 shows the location of the transporter To replace the transporter see Chapter 9 Replacing the Transporter beginning on page 73 Note Depending on the ASM service contract you purchased the transporter may not be included with the components stored at your site Note The transporter is replaced from the front ...

Page 18: ...ection wrist band whenever you handle library components that have been removed from their antistatic bags Connect this wrist band to the static protection mat or to other suitable ESD grounding Keep all components in antistatic bags when not in use Ensure that the host computer communicating with the library is properly grounded Make sure the AC power source is properly grounded when the library ...

Page 19: ...e the two knurled screws securing the bottom of the cover to either side of the chassis Figure 1 4 2 Using your fingers or a 2 Phillips screwdriver loosen but do not remove the captive screws that secure the bottom of the cover to the chassis 3 Lift the cover outward and away from the chassis to disengage the two nuts extending from the back of the cover from the holes on either side of the chassi...

Page 20: ...hey fit into the cutout in the top of the cover If the cables to the drives and QIPs installed in the library are routed from the bottom of the library make sure that they fit into the cutout in the bottom of the cover Caution Make sure that cables are not pinched between the cover and the chassis 2 Using your fingers or a 2 Phillips screwdriver tighten the two screws to secure the bottom of the c...

Page 21: ...old the front panel power button Figure 1 6 for two to three seconds until the button s LED illuminates Wait while the library completes its power on sequence which takes about five minutes depending on the library configuration During the power on sequence the library initializes all of its installed components The library is ready to begin operation when the login screen displays on the front pa...

Page 22: ...Wait at least 10 seconds 3 Power on the library see Power On the Library on page 21 When the library completes its power on sequence it is ready to resume operation Resetting the LCM Some troubleshooting procedures require you to reset the LCM You also may need to reset the LCM if it stops responding because of an incompatible USB storage device Note Resetting the LCM resets the motion control for...

Page 23: ...or safekeeping Importing a previously exported BlueScale encryption key Required Equipment You need a USB storage device to complete the procedures described in this chapter One Spectra Logic 256MB USB storage device is shipped with the library but most types of USB storage device work Note If you are unable to access a USB storage device connected to the library remove it and use a different one ...

Page 24: ... a firmware package to the library from the USB storage device It is not safe to continue library operations such as data backup while the library is performing a firmware update using a firmware package previously copied to the library Caution Do not run backups while the library is performing updates from downloaded firmware Updated components automatically reboot when updates are complete which...

Page 25: ... Saving Data From the Library to a USB Storage Device You can save upload the following types of data from the library to a USB storage device Library configurations Whenever you modify the configuration of the library or a partition you have the option of saving the configuration to USB The library user interface also includes a utility for saving the configuration to USB Refer to the Spectra T20...

Page 26: ...Chapter 2 Using a USB Storage Device 26 Notes ...

Page 27: ...s for preventive maintenance If the air filter is clogged replace it immediately Note Some environments may require more frequent filter inspection and replacement If an air filter gets clogged quickly consider moving the library to a more dust free location or improve the environment where it is located To order replacement filters contact your sales representative see Contacting Spectra Logic on...

Page 28: ...top right edge of the filter cover panel to rotate the top of the cover out from the front panel Figure 3 1 2 Reach in and remove the old air filter from the inside of the filter cover Figure 3 2 Discard the filter Figure 3 1 Open the fan cover panel Figure 3 2 Replace the air filter Pull outward Tab Air filter ...

Page 29: ...sh the top edge of the cover toward the front panel until the magnets secure it to the front panel Figure 3 3 Note Clean the tape drives After replacing the filter Spectra Logic recommends cleaning all of the tape drives in the library See Chapter 5 Cleaning Tape Drives beginning on page 39 for instructions Figure 3 3 Install the filter cover Push inward ...

Page 30: ...Chapter 3 Replacing the Air Filter 30 Notes ...

Page 31: ...sed serial number remains constant even if the physical drive is replaced The new drive simply retains the designated serial number so drive replacement is completely transparent to the backup software In addition to the electrical connections for the drive the drive sled includes a fan to provide additional cooling to the tape drive and a handle to simplify sliding the drive in or out of a drive ...

Page 32: ...g the replacement of the malfunctioning drive as long as that drive is not the one exporting the library that is providing the robotic control path for the partition If the malfunctioning drive is providing the control path for the robotics stop backup operations to the partition Note Selecting a drive to provide the robotic control path is part of configuring a partition Refer to the Spectra T200...

Page 33: ...s are currently available with the T380 library Figure 4 2 shows the relationship between the drive bay assembly DBA number and the drive locations used in the identifier Examples If an LTO drive is installed in drive bay 1 of DBA1 its identifier is DBA1 LTO DRV1 If an RXT drive is installed in drive bay 2 of DBA2 its identifier is DBA2 RXT DRV2 Figure 4 2 The relationship between drive locations ...

Page 34: ...e before performing the steps in this section See Moving Media Within the Library in the Spectra T200 T380 Library User Guide for instructions If you are unable to remove the cartridge continue with the replacement without removing the cartridge After you determine which drive is malfunctioning and needs replacing use the following steps to shut down the drive so that you can remove it from the li...

Page 35: ...nstalled it will not be assigned to the partition from which the malfunctioning drive was removed If you select Remove and the selected drive is the only drive in the partition the partition will be deleted 5 Select OK Another Feedback Required screen indicates that the requested drive has been successfully shut down Note Do not respond to the prompt in the Feedback Required screen or perform any ...

Page 36: ...lfunctioning Drive on page 33 locate the malfunctioning drive 3 Make sure that the Status LED see Figure 4 1 on page 31 is off indicating that the drive is powered off 4 If you are replacing a direct attach drive carefully disconnect any cables from the drive Note Label the cables before you disconnect them so you can reconnect them to the same locations on the new drive 5 Unlock the drive by push...

Page 37: ...disconnected from the drive in Step 2 on page 36 10 Return to the Feedback Required screen displayed on the user interface see Step 5 on page 35 and select OK The library powers on the new drive and begins the process of configuring it A window displays showing the progress When the configuration is complete the Drives screen refreshes to show the new drive functioning in the old drive s location ...

Page 38: ...al megabytes of data to the drive Perform a comparison check on the backup data to confirm that it was written correctly 3 Reinstall the protective cover on the back of the library as described in Install the Cover on page 20 Restarting Backups Use your backup software to restart any backup processes that had been running to the replaced drive This restart ensures that the software recognizes the ...

Page 39: ...e drives in the library and you suspect that it may require cleaning Check the Cleaning Status on the Drive Details screen as described in Check the Drive Cleaning Status on page 40 Note In order for the library to monitor drive status the drive must be configured in a partition Determine Whether Cleaning is Required Clean the library s tape drives when one or more of the following occurs The driv...

Page 40: ...Configuration Drives The Drives screen displays Figure 5 1 2 Select Detail next to the drive you want to check The Drive Details screen displays Figure 5 2 If the Cleaning Status indicates Drive Cleaning Required continue with the cleaning procedure described in this chapter Figure 5 1 The Drives screen Figure 5 2 The Drive Details screen ...

Page 41: ...rials You must have a certified cleaning cartridge for the type of drive s to be cleaned Cleaning cartridges can be purchased from Spectra Logic If the cartridge has a bar code be sure to note the code including any leading zeros This information will help you locate the cleaning cartridge after it is loaded into the library If you do not permanently store a cleaning cartridge in the storage pool ...

Page 42: ... slots or if you want to keep the cleaning cartridge in its own magazine proceed to Prepare to Import a Magazine on page 43 Export a Magazine with an Empty Slot Use the following steps to identify a TeraPack magazine with an empty slot and export the magazine See Importing Exporting and Moving Media in the Spectra T200 T380 Library User Guide for detailed instructions The numbers in Figure 5 3 cor...

Page 43: ...ind any empty slots import a magazine containing the cartridge into an empty chamber in the library Follow the instructions in Prepare to Import a Magazine on page 43 5 Select Add Move The specified move is added to the Move Queue list 6 Select Start Moves 7 When the TeraPack magazine containing the empty slot is delivered to the TAP the TAP door opens Remove the magazine from the TAP 8 Proceed to...

Page 44: ... cleaning cartridge for the one that you exported Start the Import Process Use the following steps to prepare for importing the magazine containing the cleaning cartridge See Importing Exporting and Moving Media in the Spectra T200 T380 Library User Guide for detailed instructions The numbers in Figure 5 4 correspond to steps in the procedure 1 From the toolbar menu select General Import Export Th...

Page 45: ...guides on each side of the magazine slide easily into the grooves on either side of the TAP opening If the magazine does not slide into place easily remove it and reinsert it 3 Manually raise the TAP door until it latches closed moving the magazine into the TAP Caution Do not use force to close the TAP door 4 Select Continue in the Feedback Required screen The transporter retrieves the magazine fr...

Page 46: ...aning material has been used discard the cartridge and use a new cleaning cartridge After importing the cleaning cartridge into the library you are ready to clean the tape drive Depending on your situation proceed to either Use Your Backup Software below or Use the Library User Interface on page 47 Use Your Backup Software Usually tape drive cleaning can be automated through your backup software p...

Page 47: ... code in the Find Source by Barcode box and select Find If the cartridge has no bar code the TeraPack slot containing the cartridge simply shows Full 5 Select Drives from the Destination menu then select Go Select the drive that requires cleaning 6 Select Add Move The specified move appears in the Move Queue list 7 Select Start Moves The transporter moves the cleaning cartridge to the tape drive a...

Page 48: ... Import a new cleaning cartridge see Import the Cleaning Cartridge on page 45 3 Repeat the cleaning operation see Cleaning a Tape Drive on page 46 4 If do not want to store the cleaning cartridge in the library proceed to Exporting the Cleaning Cartridge Exporting the Cleaning Cartridge If you do not want to leave the cleaning cartridge in the library use the following steps to export it The numbe...

Page 49: ...the cleaning cartridge If it does not repeat Step 4 until you locate the correct magazine 5 Select Add Move The specified move appears in the Move Queue list 6 Select Start Moves When the TeraPack magazine containing the cleaning cartridge is delivered to the TAP the TAP door opens 7 Remove the cleaning cartridge from the magazine or remove the magazine from the TAP 8 If you exported a TeraPack ma...

Page 50: ...c recommends marking the cleaning cartridge label after each use so that you know when it has reached the end of its life cycle Purchasing Cleaning Cartridges To purchase cleaning cartridges contact your sales representative or visit the Spectra Logic web site at www spectralogic com index cfm fuseaction shop viewHome CatID 261 ...

Page 51: ... expansion module must be installed in the controller bay to the right of the drives in the drive bay assembly DBA The bus expansion module provides the second SCSI connection required connect each drive to a SCSI bus Direct attach Fibre Channel drives connect directly to the network and do not use a QIP or a bus expansion module Note A QIPs or bus expansion module mounts vertically with the capti...

Page 52: ... Continuing Backups QIPs Backups running to drives associated with other QIPs in the library or partition can safely continue during the replacement of the malfunctioning QIP The only exception is if the QIP being replaced is an exporting QIP that is the QIP provides the robotic control path for the partition Removing an exporting QIP removes the control path to the transporter If there is only on...

Page 53: ...olution for each Symptom Solution The QIP shows offline in the front panel library interface and the host can no longer communicate with the QIP or the drives attached to it Reset the QIP as described on page 55 It will most often resume functioning which indicates that it experienced a communications problem with the host If this problem occurs frequently locating the source of the communications...

Page 54: ... one controller bay so x is always 1 Figure 6 3 shows the relationship between the DBA number and the QIP locations used in the identifier Examples If an F QIP is installed in the controller bay of DBA1 its identifier is DBA1 F QIP1 If an E QIP is installed in the controller bay of DBA2 its identifier is DBA2 E QIP1 Figure 6 3 The relationship between QIP DBA locations and their identifiers QIP Dr...

Page 55: ...ioning properly the Controllers screen indicates that no controller is installed A malfunctioning bus expansion is indicated by SCSI bus problems for the drives connected to the bus expansion module The bus expansion module seldom malfunctions and should only be replaced after eliminating all other potential sources of the SCSI bus problems Resetting a QIP To reset a QIP insert the tip of a toothp...

Page 56: ...r privileges 2 From the toolbar menu select Configuration Controllers The Controllers screen displays Figure 6 5 3 Select Replace for the QIP that needs replacing A Feedback Required screen prompts you to confirm that you want to replace the QIP Caution Do not select Remove This option removes the QIP from the partition When the replacement QIP is installed it will not be assigned to the partition...

Page 57: ...llowing steps to remove a QIP 1 After shutting down the QIP go to the rear of the library and remove the protective cover as described in Remove the Cover on page 19 2 Based on the QIP identifier you determined in Identifying a Malfunctioning QIP on page 53 locate the malfunctioning QIP 3 Carefully disconnect any cables connected to the QIP Note Label the cables to indicate where each was connecte...

Page 58: ...til the mounting plate is against the chassis 4 Install the SFPs you removed from the malfunctioning QIP into the ports on the new QIP see Figure 6 6 on page 57 The SFPs are keyed and only fit into the ports one way 5 Reconnect any cabling you disconnected in Step 3 on page 57 Make sure you connect the cables to the same connector locations as they were before 6 Reinstall the protective cover on t...

Page 59: ...nd ship it to Spectra Logic as described in Chapter 10 Returning Components Replacing a Bus Expansion Module Note The bus expansion module does not appear on the Controllers screen There is no shut down process to perform on the library s user interface before removing the module Backups cannot be continued to the drives associated with the malfunctioning bus expansion module Removing the bus expa...

Page 60: ...55 3 Disconnect any cables and SCSI terminators from the connectors on the module Note Label the cables and terminators to indicate where each was connected You will connect the cables and terminators to the same locations on the new bus expansion module 4 Use a 2 Phillips screwdriver to loosen the two captive screws on the right side of the bus expansion module Figure 6 8 5 Pull firmly outward on...

Page 61: ...nected in Step 3 on page 60 Make sure you connect the cables and terminators to the same locations as they were before 4 Reinstall the protective cover on the back of the library as described in Install the Cover on page 20 5 Package the malfunctioning bus expansion module and ship it to Spectra Logic as described in Chapter 10 Returning Components Restarting Backups 1 Power on and restart the hos...

Page 62: ...Chapter 6 Replacing a QIP or Bus Expansion Module 62 Notes ...

Page 63: ...e for each module is at the top The power supply module in Figure 7 1 is shown in a horizontal position for reference only Required Tools and Materials You must have the following to complete this procedure A 2 Phillips screwdriver A new power supply module Note After removing the new power supply from its packaging keep the packaging for returning the old power supply to Spectra Logic Figure 7 1 ...

Page 64: ...supply module as soon as possible Depending on the number of drives installed in each DBA relying on the remaining power supply modules to compensate for the failed module may cause the remaining power supply modules to fail If your library is configured with two power supply modules per DBA for 2N redundancy and one power supply fails or is removed backups can continue while you replace the malfu...

Page 65: ...crew in the upper right corner of the power supply module Figure 7 3 As you loosen the screw the module disengages from the connector inside the power supply bay and moves outward 2 Pull outward on the handle to slide the power supply module out of the power supply bay Figure 7 3 LED State Meaning DC power status Solid green The DC power is operating normally Off unlit The power supply is off or m...

Page 66: ...module see Figure 7 3 on page 65 As you tighten the screw the module is pulled it into the library until it engages the connector inside the library Tighten the screw until the module fits flush against the chassis 6 Package the power supply module and ship it to Spectra Logic as described in Chapter 10 Returning Components on page 101 Restarting Backups If necessary use your backup software to re...

Page 67: ...dard web browser Figure 8 1 shows the available connections on the LCM Note Depending on the ASM service level you purchased the LCM may not be included in your on site ASM kit Required Tools and Materials You must have the following to complete this procedure A 1 Phillips screwdriver A 2 Phillips screwdriver A new LCM module Note After removing the new LCM from its packaging keep the packaging to...

Page 68: ...he saved configuration can be used to restore a lost configuration If you previously saved the library configuration on a USB storage device or uploaded it to a file on your computer locate the most current configuration file before beginning the replacement procedure You can use this saved configuration to restore the library configuration after you replace the LCM Caution Do not attempt to save ...

Page 69: ...ote It may be necessary to upgrade firmware on the LCM See the Spectra T200 T380 Library User Guide for detailed information about performing firmware upgrades The LCM must reboot after a firmware upgrade which will interrupt backups Restoring the Library Configuration After the library restarts restore the partition definitions and library configuration settings using one of the following methods...

Page 70: ...e following as applicable for your situation Upload Backup Configuration Use the button at the top of the screen to upload a configuration file that you previously saved on a computer to a temporary location in the library memory Note The Upload Backup Configuration option is only available when you access the library from a web browser using the remote library controller RLC Restore Library Confi...

Page 71: ...all the compact flash card from the LCM you replaced unless directed to do so by SpectraGuard Support Installing a corrupted compact flash card can cause the new LCM to fail 1 Power off the library as described in Power Off the Library on page 21 2 Using a 1 Phillips screwdriver remove the two screws securing the protective cover plate to the LCM Figure 8 4 3 Remove the cover and set it aside 4 Pu...

Page 72: ...o not force it 7 Position the protective cover against the LCM aligning the screw holes in the cover with those on the LCM see Figure 8 4 on page 71 8 Using a 1 Phillips screwdriver install the two screws to secure the protective cover plate to the LCM 9 Restart the library see Restarting the Library on page 69 Restarting Backups After you restore the library configuration use your backup software...

Page 73: ...ine or RXT media pack as the transporter moves it from one location to another The picker selects an individual cartridge from the magazine and inserts it in a tape drive or removes the cartridge from a tape drive and inserts it in a magazine slot It can also move a cartridge from one magazine slot to another Figure 9 1 The transporter components side view Transporter horizontal axis Transporter v...

Page 74: ...interrupted if the transporter is malfunctioning because media cannot be moved to or from drives Also backups cannot run during the replacement of the transporter since the library must be powered down Use your backup software to stop any backups running to the library Restart any backup processes after you complete the replacement procedure and run diagnostics to ensure that the new transporter i...

Page 75: ...showing the result of each test 6 Scroll through the list of tests to determine if any of them failed Select Details next to any failed test to learn more information about the failed test If one or more tests failed contact SpectraGuard Support for advice see Contacting Spectra Logic on page 4 7 If SpectraGuard Support instructs you to replace the transporter continue with the steps in the follow...

Page 76: ...s 3 Select Show Advanced The Advanced Utilities Confirmation screen displays 4 Select Next The Utilities screen refreshes to show the advanced utilities Figure 9 4 5 Scroll down and select Send Controller Command The screen refreshes to show the details for the Send Controller Command utility Figure 9 5 Figure 9 4 The advanced Utilities screen Figure 9 5 The Send Controller Command Utilities scree...

Page 77: ...Power off the library as described in Power Off the Library on page 21 2 Set the main power switches Figure 9 6 on the library back panel to the off position Note If you have redundant power supplies installed make sure you turn off both power switches 3 Disconnect the AC power cords from the library Note With cable locks installed on the power cords it may be easier to disconnect the cords from t...

Page 78: ...e library s side panels are inaccessible you must perform the replacement procedure through the front of the library See Access the Transporter from the Front beginning on this page for instructions Do not remove the library from the rack If the library is installed in a rack that allows access to the library s side panels you can perform the replacement procedure by removing the access panels on ...

Page 79: ...he cover upward to disengage the tabs on each side of the cover from the slots in the front of the library 3 Remove the cover and set it aside 4 Using your fingers or a 2 Phillips screwdriver loosen but do not remove the two knurled screws securing the bottom of the library front panel to the chassis Figure 9 8 Figure 9 7 Removing the filter cover panel Figure 9 8 Removing the front panel screws P...

Page 80: ...ry you must remove any TeraPack magazines or RXT media packs that are stored in the chambers at the front of the library then remove the chamber shelves 1 Using your fingers or a 2 Phillips screwdriver loosen but do not remove the knurled screw securing the fan assembly to the chassis Figure 9 10 2 Rotate the fan assembly toward the right and outward to remove it from the chassis Figure 9 9 Removi...

Page 81: ...the shelf retaining bar to the chassis Figure 9 11 Note The screw on the right side of the retaining bar is accessed through the circular cutout in the chassis Note The shelves behind the fan assembly do not have retaining bars b Lift retaining bar up off the screws and set it aside c Grasp the front edge of the shelf with both hands and pull it toward you to disengage the shelf from the slots in ...

Page 82: ...use the following steps to remove the access panels on the right side of the chassis as viewed from the front 1 While holding the panel against the chassis use a 2 Phillips screwdriver to remove the screws securing the lower access panel to the right side of the library Figure 9 13 Lift the bottom access panel off the chassis and set it aside Figure 9 12 The transporter with chamber shelves remove...

Page 83: ...of the carriage Figure 9 12 to position the transporter toward the left side of the library Grasp the front edge of the picker and gently move it toward the front of the library Leave the picker in the horizontal position If you are accessing the transporter from the right side of the library grasp the base of the carriage Figure 9 12 and pull the transporter toward you Grasp the front edge of the...

Page 84: ...d on the ribbon cable release tab to disconnect the cable from the PC card Figure 9 15 Note If you are working from the front of the library it is easiest to reach over the top of the picker 4 Gently push the picker assembly toward the rear of the library and rotate it to a vertical position if it is not already in that position see Step 1 on page 83 Figure 9 15 Disconnecting the ribbon cable Conn...

Page 85: ...o its mounting bracket circled in Figure 9 16 Note If you are using the T handle hex key insert the hex key through the right side of the carriage to reach the bottom two screws as shown in Figure 9 16 Caution Be careful not to drop the screws into the transporter or onto any of the internal components Figure 9 16 Removing the transporter screws ...

Page 86: ...from the front of the library it is easiest to use your left hand to support the transporter Caution Do not lift the transporter using the picker It is not designed to support the weight of the transporter 7 Lift the transporter out of the library Caution Be careful not to bump the vertical axis VAX column VAX motor or the components on the PC card mounted in the bottom front of the chassis 8 Set ...

Page 87: ... hand supporting the weight of the transporter from underneath and your other hand grasping the right side of the transporter carriage for stability orient the transporter with the bracket hooks toward the mounting bracket on the vertical axis Note If you are working from the front of the library it is easiest to use your left hand to support the transporter Caution Do not lift the transporter usi...

Page 88: ...VAX motor or the components on the PC card mounted in the bottom front of the chassis 5 Gently lift outward on the right side on the carriage base to confirm that the transporter mounting hooks are securely in the slots on the mounting bracket Note Make sure that the transporter is secured to the mounting bracket and not simply resting on the vertical axis motor Figure 9 20 Figure 9 20 Lifting the...

Page 89: ...s that secure the transporter to its mounting bracket circled in Figure 9 21 Note To reach the bottom two screws insert the hex key through the right side of the carriage Caution Be careful not to drop the screws into the transporter or onto any of the internal components Figure 9 21 Installing the transporter screws ...

Page 90: ...able connector has a release tab you will hear an audible click as the connector snaps into place Note If you are working from the front of the library it is easiest to reach over the top of the picker 8 Proceed to Completing the Replacement on page 91 Figure 9 22 Connecting the ribbon cable Connector release tab viewed from back Back edge of transporter carriage ...

Page 91: ... the same for both access methods Reinstall the Chamber Shelves and Front Panel If you accessed the transporter from the front use the steps in the following sections to reinstall the chamber shelves fan assembly and front panel If you accessed the transporter from the side skip to Install the Side Access Panels on page 96 Install the Chamber Shelves and Fan Assembly 1 Reinstall each shelf that yo...

Page 92: ...chassis Caution Make sure that the rear top edge of the shelf fits into the slots in both of the mounting tabs Figure 9 24 Incorrectly installing a shelf may cause the transporter to malfunction c If you removed the guides on each side of the shelf reinstall them Tabs on the bottom edge of each guide fit into cutouts in the shelf Make sure that the guides are oriented correctly Figure 9 24 Figure ...

Page 93: ...ibrary and tested the new transporter 3 Reinstall the fan assembly a Orient the fan assembly with the gasket material toward the outside and the knurled nut to the left b Angle the right edge of the assembly behind the front right edge of the chassis so that the notches in the edge of the assembly fit over the PEM nuts on the chassis Figure 9 26 Figure 9 25 Reinstalling the chamber shelf retaining...

Page 94: ... the front of the library b Insert the alignment pin on the bottom edge of the front panel into the corresponding hole in the bottom edge of the chassis c Fit alignment pin on the top edge of the panel and the two nuts extending from the back of the front panel Figure 9 27 into the corresponding holes on the edges of the chassis Note Make sure that the power button fits into the cutout in the fron...

Page 95: ...ots in the front cover Figure 9 28 4 Engage the tabs with the slots in the front of the library then slide the cover downward Figure 9 29 Push the upper edge of the cover toward the front panel until the magnets secure it to the front panel 5 Proceed to Power On the Library on page 97 Figure 9 28 Install the front panel screws Figure 9 29 Install the filter cover Knurled Slot for filter cover Slot...

Page 96: ...anel circled in Figure 9 30 with the screw holes in the chassis Use a 2 Phillips screwdriver to install the screws securing the cover to the chassis Note The upper access panel can be identified by the lip on its lower edge This lip fits under the top edge of the lower access panel 3 Position the lower access panel with the notched edge down aligning the holes on the top edge of the panel circled ...

Page 97: ...brary initializes all of its installed components The library is ready to begin operation when the login screen displays on the front panel Bring the New Transporter Online 1 Log into the library with superuser or administrator privileges 2 Select Maintenance Tools Utilities The Utilities screen displays 3 Select Show Advanced The Advanced Utilities Confirmation screen displays 4 Select Next The U...

Page 98: ...Control 8 Select Run Utility A progress screen displays When the operation is complete a Utility Results screen displays Note It may be necessary to upgrade firmware on the transporter if the transporter s firmware level is down revision The LCM needs to be reset to complete the firmware upgrade Any backups in progress will be interrupted during the reset 9 Package the malfunctioning transporter a...

Page 99: ...When all of the tests are complete the Diagnostic Results screen displays showing the result of each test Figure 9 33 5 Scroll through the list of tests to confirm that all of the tests were successful Reimport Media Packs and Update Inventory If you removed media packs from the front of the library during the replacement procedure reimport them using the library user interface and TAP Refer to th...

Page 100: ...Chapter 9 Replacing the Transporter 100 Notes ...

Page 101: ...onent to pack the component you are returning The packaging for the component may look different from the packaging shown in this chapter 1 Place the component inside the anti static bag 2 Fold the bag snugly around the component and tape it closed Figure 10 1 3 Place the bottom air cushion plastic side up in the shipping box Figure 10 1 Wrap the component in an anti static bag Small component Lar...

Page 102: ...unction the same way 5 Place the top air cushion plastic side down over the component Figure 10 3 When properly installed the two air cushions suspend the component securely in the center of the box 6 Tape the box securely closed 7 Proceed to Shipping RMA Returns for shipping instructions Figure 10 2 Place the component on the bottom air cushion Figure 10 3 Place the top air cushion over the compo...

Page 103: ...SpectraGuard Technical Support representative see Contacting Spectra Logic on page 4 Spectra Logic needs this number to identify the part on its arrival 2 Write the RMA number on the shipping label If you fail to include the RMA number on the label the package will be returned to you If you do not know your RMA number contact Spectra Logic Technical Support Domestic Returns 1 Ship the package to S...

Page 104: ...the International Shipping Instructions form available on the Spectra Logic Web site 2 Return the form to Spectra Logic in one of the following ways Email intlreturns spectralogic com Fax 303 939 8844 Post Spectra Logic International Returns 1700 N 55th Street Boulder CO 80301 USA 3 When you receive confirmation from Spectra Logic follow the instructions given to prepare the component for pickup b...

Page 105: ... C cautions closing TAP door 45 correct insertion of LCM compact flash card 72 do not rewind cleaning cartridges 46 drive sled weight 37 executing firmware updates during backups 24 25 installing back cover 20 installing chamber shelves 92 lifting transporter 86 media 3 moving the library 3 packaging components for shipping 103 cautions continued removing drives 35 removing transporter 86 removing...

Page 106: ...nctioning 33 to 33 location 16 lock location 31 moving a cleaning cartridge to 47 preparing for replacement 34 to 35 privileges required to replace 34 replacing 36 to 37 required tools and materials 32 sled status LED 31 supported types 33 testing 38 E email International Shipping 104 Spectra Logic media sales 4 Spectra Logic sales 4 E QIP See QIPs ESD protecting against 18 Ethernet connector loca...

Page 107: ...moving cautions 3 power off sequence 21 power on sequence 21 rear panel CRUs 16 resetting 22 restoring a saved configuration 70 to 71 returning components 103 software license 2 weight warning 3 license library software 2 location air filter 15 bus expansion modules 16 drive lock 31 drive sled status LED 31 drives 16 LCM compact flash card 71 LCM compact flash card eject button 71 LCM connectors 6...

Page 108: ...P 58 rear panel cover 19 side access panels 82 to 83 transporter 83 to 86 repair RMA policy 103 replacing bus expansion module 59 to 61 drives 36 to 37 LCM 68 to 69 power supply module 65 QIPs 56 to 59 transporter 73 to 99 resetting LCM 22 library 22 QIPs 55 resetting the library 22 returns international 104 RMA requirements 103 Spectra Logic shipping address 103 US 103 ribbon cable transporter di...

Page 109: ...location 73 completing the replacement 91 to 99 confirming malfunction 74 to 75 continuing backups while replacing 74 installing 87 to 90 location 17 mounting on vertical axis 87 positioning for removal 83 preparing for replacement 76 to 77 privileges required to remove 74 76 removing 83 to 86 required tools and materials 74 ribbon cable location 73 ribbon cable disconnect connect 84 take off line...

Page 110: ...Index W 110 Notes ...

Reviews: