background image


19 

disconnect  the  cable  from  the  mini-USB  connector  of  the 
electronic indicator unit. 


7. MAINTENANCE SERVICE 


7.1. Maintenance of the stress indicator is performed by 

technical  personnel  from  the  departments  of  the  control  and 
measuring devices service (KIP) or similar. 

7.2.  Maintenance  of  the  stress  indicator  consists  of  a 

preventive  inspection,  scheduled  maintenance,  and  routine 
maintenance. 

7.3.  The  frequency  of  planned  inspections  is  set 

depending  on  the  production  conditions,  but  at  least  once  a 
month.  During  a  routine  inspection,  the  fastening  of  all 
components, the condition of controls and paint coatings, and 
the integrity of the measuring transducer are checked. 

7.4.  Scheduled  maintenance  is  performed  after  the 

warranty period expires and then at least once a year.  

Repairs include visual inspection of the stress indicator, 

inspection  of  the  internal  state of  the  installation,  verification 
of  the  reliability  of  the  contact  connections,  and  removal  of 
dust  and  dirt.  At  the  same  time,  all  types  of  work  are 
performed,  the  need  for  which  was  identified  during  the 
preventive  inspection  of  the  stress  indicator.  In  the  event  of 
failure  of  the  electronic  components  of  the  stress  indicator, 
they must be replaced. 

7.5.  Current  repairs  are  made  during  the  operation  of 

the  stress  indicator.  At  the  same  time,  faults  detected  during 
routine  inspection  are  eliminated  by  replacing  or  restoring 
individual  parts  of  the  stress  indicator  (replacing  radio 
elements, restoring broken electrical connections, etc.). 


20 

8. TROUBLESHOOTING 


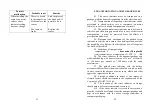
8.1.  Possible  malfunctions  and  ways  to  fix  them  are 

shown in table 8.1. 

Table 8.1. 

Possible 

malfunction 

Probable cause 

Remedy 

When the power is 
turned on, there is 
no information on 
the stress indicator 
screen 

1. The battery is 
low. 


2. Poor contact in 
the power supply 
circuit. 

Charge the 
battery. 
Replace the 
battery. 
 
Clean the contacts 
in the battery 
compartment. 

When metal stress 
indicator is powered 
on, the message 
"FAT32!" 

The file system 
of the memory 
card is different 

Remove the 
memory card and 
format its file 
system on the 
computer. 

When the power is 
turned on, the 
message "SD error" 

Appears on the 
screen if memory 
card is Faulty 

Replace the 
memory card. 

When the power is 
turned on, "No card" 

Appears on the 
screen if no card 
presented inside 
of the slot 10 

Insert a memory 
card into slot 10. 

When you click the 
record measurement 
button, the message 
"Error!" appears 

Faulty memory 
card  

Replace the 
memory card. 

Summary of Contents for IN-01m

Page 1: ...Spector Sci Tech LLC IN 01m METAL STRESS INDICATOR USER MANUAL Russia Ufa 2020 2...

Page 2: ...1 PURPOSE 1 1 The IN 01m metal mechanical stress indicator is intended for indirect estimation of the value of the metal mechanical stress of a local section of a steel product or a metal structure ma...

Page 3: ...rent consumed from a freshly charged PP3 element mA when working without the display backlight 7 0 5 when working with the display backlight 16 0 5 2 6 Operating time of stress indicator when powered...

Page 4: ...effect sensor 2 via a scale amplifier combined with a 4 6 7 5 3 2 1 8 8 low pass filter 4 to the input of the signal level exceeding light indication unit 5 and the input of the analog to digital conv...

Page 5: ...receiving service information from the computer 3 3 4 4 Connector 12 is used to connect the charger s network adapter to the electronic unit for recharging the battery battery 3 4 The purpose of the...

Page 6: ...lays the current date and time of stress indicator on the screen 12 3 5 Magnetizing unit 3 5 1 The magnetizing unit of the stress indicator is used for magnetizing the local metal section of a steel p...

Page 7: ...rmation first appears then the value of the measured signal of the Sensor is set see section 3 4 2 of current document 14 5 1 5 In low light conditions to improve the visibility of the stress indicato...

Page 8: ...ation according to step 6 2 1 6 2 2 Install the stress indicator sensor in the middle area of the magnetized end surface of the steel stud or bolt 6 2 3 To measure the field strength of the residual m...

Page 9: ...me N Measurement N End of file 18 The data file represents sequentially recorded measurement results see table 6 1 6 4 3 Transfer of data recorded in the stress indicator s electronic memory to a pers...

Page 10: ...In the event of failure of the electronic components of the stress indicator they must be replaced 7 5 Current repairs are made during the operation of the stress indicator At the same time faults de...

Page 11: ...must ensure their stable position exclude the possibility of collision with other objects as well as against the walls of the vehicle 9 5 Conditions of transportation temperature C from minus 30 to p...

Page 12: ...11 0 11 5 12 14 5 650 400 5 6 8 0 8 5 10 11 Table A 2 r mT Steel grade B MPa Y MPa 0 Y B 3 350 210 0 62 1 69 2 0 09 2 470 325 1 06 1 38 2 43 2 79 2 98 17 1 520 350 1 38 3 12 4 12 Steel 20 420 230 1 3...

Reviews: