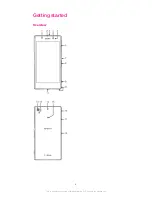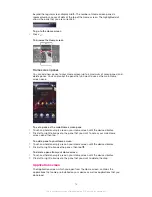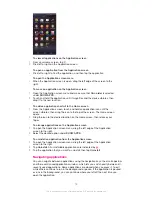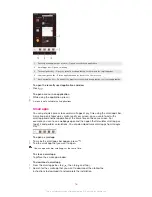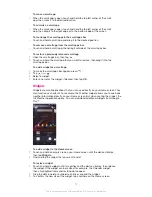
1. Front camera lens
2. Ear receiver
3. Headset jack
4. Proximity sensor/Light sensor
5 Charging light/Notification light
6. Micro SIM card slot cover
7. Power key
8. Volume/Zoom key
9. Camera key
10. Strap hole
11. Main speaker and microphone
12. Main camera lens
13. Camera light
14. Second microphone
15. NFC™ detection area
16. Charger/USB cable port cover
17. Memory card slot cover
18. Charging dock connector
Do not insert fingers or other objects into the opening for the second microphone (illustrated in
item 14 above) to avoid damaging your device.
Use the accessories provided with your device, or other compatible accessories for optimal
performance.
Assembly
If you are new to T-Mobile, please use the SIM card included in the box. If you are an
existing T-Mobile customer, please ask a retail store representative to help you
transfer your information to the new SIM card included in the box. This new card will
allow you to upgrade your device so you can use the Wi-Fi calling feature and ISIS
Mobile Wallet features.
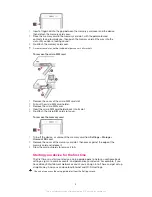
To insert the micro SIM card
Do not insert a memory card into the micro SIM card slot.
1
Insert a fingernail into the gap between the micro SIM card slot cover and the
device, then detach the cover.
2
Using a fingernail, pull out the micro SIM card holder.
3
Place the micro SIM card on the holder, with the gold-coloured contacts on the
micro SIM card facing up.
4
Insert the micro SIM card holder back into the device.
5
Re-attach the micro SIM card slot cover.
Inserting the micro SIM card into the device without the SIM card holder could damage your
micro SIM card or your device, and Sony Mobile does not warrant and will not be responsible
for any damage caused by such action.
To insert the memory card
Do not insert the memory card into the micro SIM card slot.
7
This is an Internet version of this publication. © Print only for private use.


