background image

Chapter 

5

. The Configuration Screens in More Detail 

Solwise SAR715PVW ADSL Ethernet Router User’s Guide 

46 

2.  Type in the network location of the new firmware image 

that you want to upload, or use the 

Browse 

button to browse 

through the network and select the file. Click on 

Upgrade

3.  Once the file has been uploaded to the RAM of your ADSL 

router, it is written to Flash. A status page is displayed 
confirming that the upload is complete and telling you how 
much of the file (in bytes and as a percentage) has been 
written to Flash. 

4. 

Once the file has been written to Flash, the 

Firmware 

Upgrade 

page is refreshed. The page confirms completion 

of the update and asks you to restart your ADSL router in 
order to use the new firmware. Click on 

Restart.  

Note 

– Upgrading your firmware could take up to 15 minutes to 

complete. 

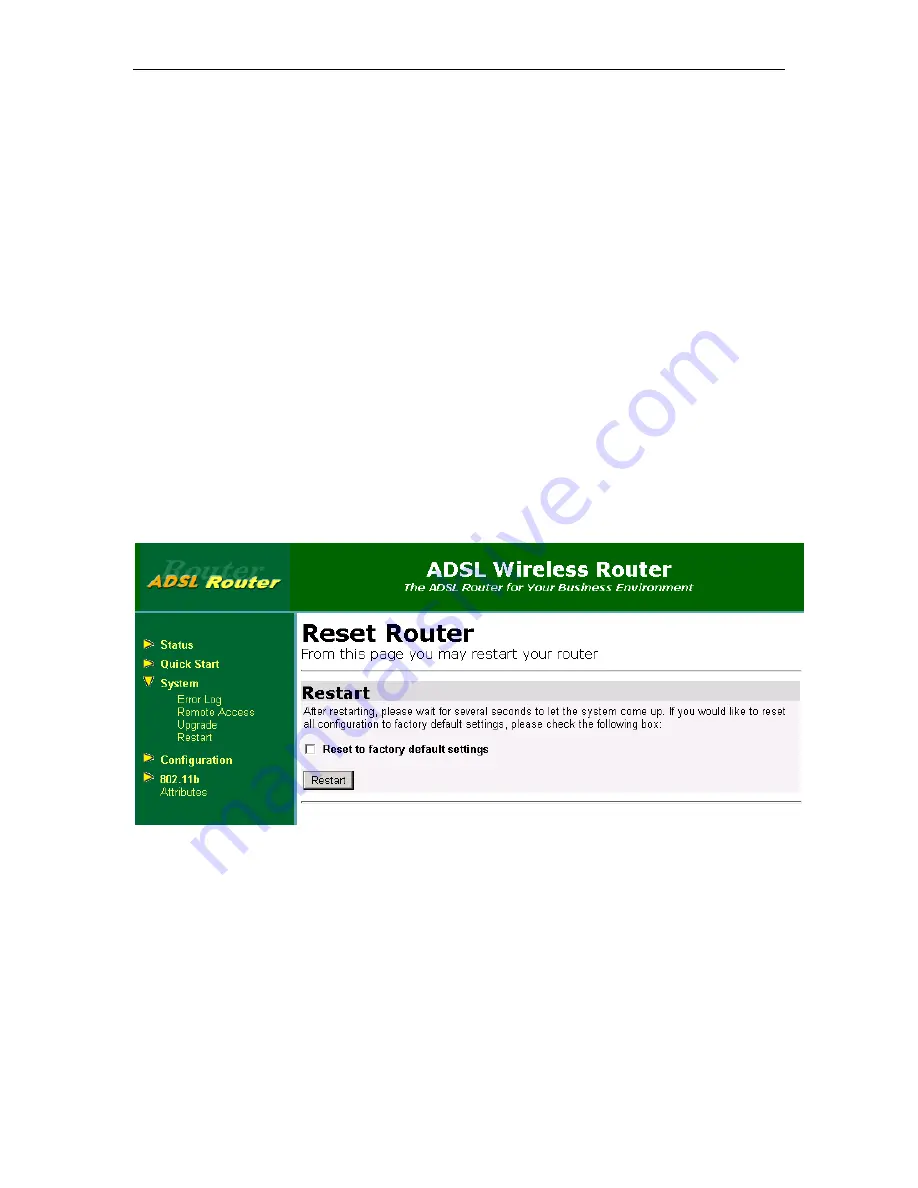
5.1.4 Restart 

This page allows you to restart your ADSL router. It has the same 
effect as resetting your ADSL router by pressing the appropriate 
reset button on the hardware. 

To restart your system: 

1. From 

the 

System 

menu, click on 

Restart

. The following page is 

displayed: 


2.  Click on the 

Restart 

button to reset the ADSL router. The 

Restart 

page also provides you with the option of restarting 

and 

restoring the factory default settings. Click in the 

Reset 

to factory default settings 

box to check it, then click on the 

Restart 

button. Read the console status output to check how 

the reset is progressing. 

3.  Once the login and password prompt is displayed at the 

console, you can login as usual (with login = 

admin

password = 

admin

), then refresh the browser that is 

running. The 

Status 

page is displayed and your ADSL router 

has been reset. 

Summary of Contents for SAR715PVW

Page 1: ...Forum is designed to be the first port of call for technical support and sales advice for the whole Solwise product range Please check the forum for coverage on any technical problems you have Many p...

Page 2: ...nce This equipment complies with Part 68 of the FCC Rules On this equipment is a label that contains among other information the FCC registration number and Ringer Equivalence Number REN for this equi...

Page 3: ...at the electrical ground connections of the power utility telephone lines and internal metallic water pipe system if present are connected together This precaution may be particularly important in rur...

Page 4: ......

Page 5: ...ee on the Start up page 23 4 1 1 About the Status Page 24 4 2 Setting up a basic NAT router configuration 27 4 2 1 Clearing to factory defaults 27 4 2 2 Creating the WAN connection 29 4 2 3 Disabling...

Page 6: ...P Access Concentrator PAC and L2TP Access Concentrator LAC Configuration 97 6 4 Configuring PPTP or L2TP Client Initiated Tunneling with VPN Concentrator 99 6 4 1 Create two dial up networking DUN con...

Page 7: ...8 2 Using xmodem to upload the firmware files 131 8 2 1 Loading a new bootcode bin firmware file 131 8 2 2 Loading a new main bin firmware file 139 9 DNS Addresses 149 10 About Universal Plug n Play a...

Page 8: ...1 ping 182 13 5 2 nslookup 183 13 6 MTU value What is it and why does having the correct value matter 184 13 6 1 What are the symptoms of having a wrong MTU value 184 13 6 2 So what is it 184 13 6 3 W...

Page 9: ...the ICSA firewall standard The general function of SAR715PVW is defined as a Wireless AP ADSL Router with connectivity to either or connection as in the following diagram In this mode you may connect...

Page 10: ...tool allows easy to configure which can via Ethernet or Wireless connection option Support SNMP for remote management Support 8 simultaneous PPP or Bridge Routing sessions allowing multiple concurrent...

Page 11: ...Light when ADSL in data ode ADSL ACT Green Blinking when ADSL transmitted or received Lan1 Lan2 Lan3 Lan4 Green Local Area Network status of port 1 2 3 4 A steady LED indicates a successful connectio...

Page 12: ...e Port connector Ethernet connections and ADSL phone socket as below Function Definition 1 0 Power on off switch POWER The power jack connects to 12VDC Adapter from wall outlet RS232 This is RS232C in...

Page 13: ...er jack from the power supply to the power socket on the router and then plug the power supply into a suitable UK power socket The green POWER LED on the front of the router should light up If you wan...

Page 14: ...R715PVW ADSL Ethernet Router User s Guide 14 Alternatively a more user friendly configuration method is to use the built in http interface To do this all you need to do to be able to do is access the...

Page 15: ...rotocol and you don t use IP settings in the required range then you will have to either permanently alter the settings of your computers to suite or change the default address of the router If you wi...

Page 16: ...network set up Then on Properties If you already see a line showing TCP IP protocol such as the example shown above then you can skip this section Otherwise click on Install then select Protocol and...

Page 17: ...of the routers address e g in the range 192 168 0 2 to 192 168 0 254 assuming default IP address for the router Next for each PC you must enter a Gateway address This is the address of the router and...

Page 18: ...the address for DNS entered in it s TCP setting If your PC doesn t have a DNS setting then it will not be able to find any internet sites so it s important that you have this set correctly On the mai...

Page 19: ...the revised network settings please note that your original Windows installation CD might be required You should then reboot your PC That s all there is to the basic set up 3 3 Setting up TCP IP proto...

Page 20: ...715PVW ADSL Ethernet Router User s Guide 20 Enter a suitable IP address e g 192 168 0 2 and the netmask as shown above and click on Apply Now Now enter the IP address of the router in Router box You a...

Page 21: ...deally you should get the DNS address to use from your ISP However if you don t know the ISPs DNS address then you can temporarily use the address 212 50 160 100 Add the DSN address to the Domain Name...

Page 22: ...igure the router Please note the following The default IP address for the 8 2 firmware is 192 168 0 1 The default configuration username and password are admin Any browser can be used on any operating...

Page 23: ...by your ISP System 1 Error Log This page shows recent configuration errors from your router 2 Remote Access This page allows you to setup remote configuration options 3 Upgrade From this page you may...

Page 24: ...TP Allows you configure the PPTP IP pool and user authentication 12 L2TP Allows you configure the L2TP IP pool and user authentication 13 Syslog Allows you to set the Syslog message level and specify...

Page 25: ...ration The current Local IP Address configuration It also provides a LAN Settings hyperlink that allows you to create modify or delete your LAN configuration Advanced Diagnostics The Advanced Diagnost...

Page 26: ...ly from DHCP WAN Subnet Mask Default Gateway whether DHCP server has been configured to give out the WAN IP address as the default Gateway address Primary DNS whether a Primary DNS IP address has been...

Page 27: ...hyperlink associated with it Click on this for detailed information about some all of the following depending on the interface type and configuration the interface connection details port configuratio...

Page 28: ...First of all you are advised to ensure the router is reset to factory default settings To do this goto System Restart and to enter configuration enter admin for username and password if you are asked...

Page 29: ...about 30 seconds whilst the router resets and then click on Status to re display the front page 4 2 2 Creating the WAN connection The quick way to setup a your router for internet access is to create...

Page 30: ...using your browser Solwise SAR715PVW ADSL Ethernet Router User s Guide 30 Now delete the current WAN connections Click on the Delete link on the end of each line to remove the connection For example...

Page 31: ...SL Ethernet Router User s Guide Chapter 4 Quick Router configuration using your browser 31 Click on Create a new service Select PPPoA routed and click on Configure 4 2 2 1 For BT Phone lines Enter you...

Page 32: ...I 38 Select CHAP and enter the login username and password as given to you by your ISP Please note even if your ISP doesn t provide you with a password you MUST enter one Make one up DO NOT ENABLE NAT...

Page 33: ...er mode to on Select CHAP and enter the login username and password as given to you by your ISP DO NOT ENABLE NAT yet Then click on Configure You have now entered all your ISP login details 4 2 3 Disa...

Page 34: ...Chapter 4 Quick Router configuration using your browser Solwise SAR715PVW ADSL Ethernet Router User s Guide 34 Select Disabled and then click Configure Now click on Apply...

Page 35: ...SL Ethernet Router User s Guide Chapter 4 Quick Router configuration using your browser 35 4 2 4 Setting up the Security Interfaces Goto Configuration Security Click on Add Interface under the heading...

Page 36: ...Chapter 4 Quick Router configuration using your browser Solwise SAR715PVW ADSL Ethernet Router User s Guide 36 Select ppp 0 as type external and then click on Apply Now click on Add Interface again...

Page 37: ...W ADSL Ethernet Router User s Guide Chapter 4 Quick Router configuration using your browser 37 Select iplan as type internal and then click on Apply Now enable NAT by clicking on the Enable NAT to int...

Page 38: ...using your browser Solwise SAR715PVW ADSL Ethernet Router User s Guide 38 That completes your basic NAT setup 4 2 5 Saving the configuration and restarting To store you new configuration click on Con...

Page 39: ...on Restart Wait about 30 seconds for the router to reboot and then click on Status 4 2 6 Testing the connection Goto the Status page Now if you are correctly connected to the line the ADSL Status the...

Page 40: ...r IP Now your connection should be up and working check your TCP set up is set for the new address of the router 192 168 0 1 and your other TCP settings are correct If you re router is not connection...

Page 41: ...are happy about the wireless connection then if needed you can enable WEP Most parameters can be left as default The only parameters to check are the ESSID string default is act1 and the Default Chann...

Page 42: ...ription wireless then you will need to create this To create the service click on Create a new service Select Ethernet bridged for those interested selecting routed would allow you to run the wireless...

Page 43: ...u should save the configuration see above for details on how to save the configuration Assuming you ve correctly configured your LAN settings on the router and your wireless network clients you should...

Page 44: ...able remote administration of your ADSL router using NAT Upgrade allows you to update the image on your ADSL router Restart allows you to restart your ADSL router and optionally restore factory defaul...

Page 45: ...the length of time that you want to allow remote access for Click on Enable 4 The Remote Access page is displayed confirming the number of seconds remaining for remote access There is also a Disable...

Page 46: ...irmware Click on Restart Note Upgrading your firmware could take up to 15 minutes to complete 5 1 4 Restart This page allows you to restart your ADSL router It has the same effect as resetting your AD...

Page 47: ...r accounts LAN connections allows you to edit your LAN port IP address create and edit a secondary IP address and create new LAN services WAN connections allows you to create edit and delete WAN servi...

Page 48: ...After a short time the configuration is saved and the following confirmation message is displayed Saved information model to file flashfs im conf 5 2 2 Authentication This option allows you to admini...

Page 49: ...is displayed Type details for the new user into the username password and comment text boxes and select a May login option true means that the user can login but not dialin false means that the user c...

Page 50: ...epend on the image that you are booting and the ADSL router that you are using 1 From the Configuration menu click on LAN connections The following page is displayed 2 This page displays a table that...

Page 51: ...ection To update your primary or secondary IP address 1 At the LAN connections page click on the change default LAN port IP address button The following page is displayed This page contains the Defaul...

Page 52: ...ning a list of WAN service options The options available on this page are determined by the image which is running on the ADSL router b Select an option then click on Configure You need to add detaile...

Page 53: ...page is displayed This page lists the following information about existing routes Destination IP address Gateway address Netmask address This page also allows you to Edit the destination gateway and...

Page 54: ...onfigure the route 3 When you have entered all the details click on OK The Edit Routes page is displayed The table now contains details of the route that you have just created 5 2 6 DHCP Server This o...

Page 55: ...displays the current status of the DHCP server The values listed above are the default settings for DHCP server Once the DHCP server or Relay is enabled information about any subnets which have been d...

Page 56: ...uter to give out its own IP address as the DNS Server address Set the Primary and Secondary DNS Server addresses Set your ADSL router to give out its own IP address as the default Gateway address Once...

Page 57: ...DHCP Server page 5 2 7 DNS Client This option allows you to create a list of server addresses This enables you to retrieve a domain name for a given IP address create a domain search list DNS client...

Page 58: ...associated with it Click on Delete to remove an IP address from this list To configure DNS search domains 1 Type a search string in the Domain search order text box 2 Click on Add The search string i...

Page 59: ...s Guide Chapter 5 The Configuration Screens in More Detail 59 The default setting for DNS relay is disabled To enable and configure DNS relay 1 Click on the Enabled radio button 2 Click on the Config...

Page 60: ...e a new DNS relay address 5 2 9 Security This option allows you to configure Security NAT and Firewall Security allows you to enable Security configure Security interfaces configure triggers NAT allow...

Page 61: ...on the Security Enabled radio button 2 Click on Change State to update the Security State section Enabling Firewall and or Intrusion Detection You must create a security interface before you can enab...

Page 62: ...drop down list and select the LAN service that you want to base your security interface on 3 Click on the Interface Type drop down list and specify what kind of interface it is depending on how it co...

Page 63: ...e and an internal interface your table will look like this 4 The NAT column for the external interface tells you that you can enable NAT to internal interfaces If you also had a DMZ interface configur...

Page 64: ...ur network Before you can configure global addresses you need to configure NAT If you want to set up a global address pool on your existing NAT enabled interfaces 1 From the NAT Security Interfaces ta...

Page 65: ...Click on the drop down list and select a method type in the IP Address that is visible outside the network Subnet Mask IP Address 2 the value you specify here depends on the subnet configuration that...

Page 66: ...le click on the Advanced NAT Configuration hyperlink for the interface that you want to add reserved mapping to The Advanced NAT Configuration page is displayed 2 Click on the Add Reserved Mapping hyp...

Page 67: ...To create and configure a Firewall policy 1 Go to the Policies Triggers and Intrusion Detection section of the Security Interface Configuration Click on Firewall Policy Configuration The Firewall Pol...

Page 68: ...ter is an individual rule that determines what kind of traffic can pass between two interfaces specified in an existing policy To configure a portfilter 1 From the Current Firewall Policies table clic...

Page 69: ...n lists to specify whether you want to allow block inbound traffic and allow block outbound traffic Click on Apply The Firewall Port Filters page is displayed containing details of the TCP portfilter...

Page 70: ...ded Each portfilter displayed in the Firewall Port Filters page has a Delete hyperlink assigned to it To delete a portfilter click on this link then at the confirmation page click on the Delete button...

Page 71: ...the host validator that you have just added 6 Each portfilter displayed in the Configure Validators page has a Delete Host Validator hyperlink assigned to it To delete a validator click on this link...

Page 72: ...econdary session to be initiated only to from the same remote host e Max Activity Interval type the maximum interval time in milliseconds between the use of secondary port sessions f Enable Session Ch...

Page 73: ...rigger b To display the Security Interface Configuration page click on Return to Interface List Configuring Intrusion Detection Settings Intrusion Detection settings allow you to protect your network...

Page 74: ...Open Handshaking Count type in the maximum number of unfinished TCP handshaking sessions per second that are allowed by Firewall before a SYN Flood is detected e Maximum Ping Count type in the maximu...

Page 75: ...de Chapter 5 The Configuration Screens in More Detail 75 2 Next enter the email contact details for those recipients that should be contacted if there is an intrusion For example to enter the setting...

Page 76: ...hapter later on for details about how to configure PPTP 5 2 12 L2TP See separate Chapter later on for details about how to configure L2TP 5 2 13 Ports This option allows you to configure the ports ava...

Page 77: ...n page such as the version number and connection status cannot be changed but some attributes can be configured Update your port attributes then click on Apply to update the configuration or Reset to...

Page 78: ...he advanced configuration or Reset to revert back to the default advanced configuration settings Click on the Return to basic attribute list to return to the ADSL Port Configuration page Please note D...

Page 79: ...page such as the version number and connection status cannot be changed but some attributes can be configured Update your port attributes then click on Apply to update the configuration or Reset to re...

Page 80: ...ion or Reset to revert back to the default advanced configuration settings Click on the Return to basic attribute list to return to the Ethernet Port Configuration page Please note DON T ALTER ANY OF...

Page 81: ...tes can be configured Update your 802 11b Attributes then click on Configure to update the configuration Normally the only parameters you will need to alter will be the ESSID string and the DefaultCha...

Page 82: ...tions available to you depending on the image that you are using is displayed Select the service that you want to create Select Ethernet bridged b Click on the Configure button to display the service...

Page 83: ...r 5 The Configuration Screens in More Detail 83 c Click on Apply The LAN connections page is displayed The table now contains details of the service that you have just created 802 11b From the 802 11b...

Page 84: ...Laptop PC or notebook with wireless card connects SAR715PVW Configuration mode Infrastructure ESSID The same as ESSID value on SAR715PVW 802 11b Attributes page 5 3 3 WEP setup In order to enable WEP...

Page 85: ...the key Mode64Key0 entry then enter 0 3 Finally enter the key in the key field Please note the numbers must be entered as 5 two digit hex numbers for 64 bit wep and 13 two digit hex numbers for 128 b...

Page 86: ...he P series router works in association with the firewall before enabling VPN configuration you must first of all enable the firewall on the Configuration Security page Next you must ensure that you h...

Page 87: ...o add the required port filters Please note TCP is Transport Type 6 UDP is Transport Type 17 The important filter entries are as shown above EXCEPT TCP Transport Type 6 for ports 8481 8000 and 443 the...

Page 88: ...tion Method Pre shared Key Tunnel shared key test Tunnel type Public IKE life duration 3600 IKE hash SHA IKE encryption DES IPSEC operation ESP ESP transform DES ESP AUTH Null or HMAC_MD5 Office LAN W...

Page 89: ...t enter the Intranet address The Intranet address will tell the remote gateway the IP address of the network the local gateway is protecting 3Now enter the Intranet subnet mask The Intranet subnet mas...

Page 90: ...ed Key Both gateways must use the same value Tunnel Type Public uses the ESP protocol only and Private provides UDP encapsulation for NAT traversal We are using ports 2787 ESP 2788 AH and 2845 IPCOMP...

Page 91: ...for the endpoint must different than the subnet used on your local LAN If you don t specify a different subnet for the destination then your computer wont know to send the IP data to the router for fo...

Page 92: ...ng the IP address of a computer on the remote network If you merely ping the main network it will only trigger phase 1 and 2 negotiations You will only receive a reply if you ping an actual IP address...

Page 93: ...for Main Office Negotiation ID main Pheenet com Intranet address 192 168 2 0 Intranet subnet mask 255 255 255 0 Termination address 66 122 62 184 Authentication Method Digital Signature Tunnel shared...

Page 94: ...your router s WAN port IP address example Ip 66 122 47 30 email remote Pheenet NOTE Entering both an IP address and an email address into the Subject Alternative Name field will give you the flexibili...

Page 95: ...nph real cert cert pem as we do in the example In a new browser window enter the URL of your desired server or the one listed above Paste the user certificate text that you copied in step 5 into the...

Page 96: ...top of the window and then click Add Paste the Root CA that you copied in step 8 into the window Enter Test CA1 as the common name and click OK Then from the bottom of the page click the Add Policy b...

Page 97: ...You will only receive a reply if you ping an actual IP address on the network such as the router WAN IP address You can use Microsoft HyperTerminal connected to the console port of the router to view...

Page 98: ...he Create a new user link 4The Authentication Create User page will appear Enter a new user name and password Select true for the may dial in field and then select your access level The access level d...

Page 99: ...TP or L2TP Client Initiated Tunneling with VPN Concentrator Configuration shown is the Windows 2000 Client for PPTP or L2TP It is assumed that you have already created suitable IP PPTP or L2TP IP pool...

Page 100: ...IP address automatically 6 4 2 Disabling IPSec on the Windows 2000 PC Warning Take adequate precautions such as backing up the registry prior to modifying the registry You should also refer to the Mic...

Page 101: ...to live TTL field indicates the maximum amount of time this IP packet is allowed to remain in the network Each router is required to decrement this value as it routes the packet The packet is dropped...

Page 102: ...n the third round all the exchanged information is authenticated through one of the three authentication mechanisms shared secret digital signature or public key encryption When shared secret mechanis...

Page 103: ...col over the Internet L2TP has been designed so that it can be used directly over various wide area network WAN media such as Frame Relay without an IP transport layer which can extend its usefulness...

Page 104: ...1 Select Start Programs MS DOS Prompt Find the IP address of the Router s Ethernet port Then use TELNET to login the Router For example TELNET 192 168 0 1 in the example below the IP of the router in...

Page 105: ...to the Router s console port Please configure your serial port as BPS 9600 Data bits 8 Parity None Stop Bits 1 Flow Control None Then do the following steps to log on to the Router via Microsoft Hyper...

Page 106: ...106 Enter the following parameters Bits per second 9600 Data bits 8 Parity None Stop bits 1 Flow Control None Then click OK When the HyperTerminal window appears you must press the enter key several t...

Page 107: ...this is admin Then you need the password which by default is also admin Then the prompt should be shown with a successful login Now you are ready to configure the Router by using the command line int...

Page 108: ...to Solwise SAR715PVW ADSL Ethernet Router User s Guide 108 This should explain the basic syntax used for command entry So if you press the current commands are listed This shows the complete list of...

Page 109: ...ds please refer to the CLI Reference Manual Remember after doing any changes in CLI mode you must enter the system config save command to store your settings If you don t do this then they may be lost...

Page 110: ...5PVW Router with fixed IP address Most users will use their router with NAT enabled This allows them to share their internet connectivity across their whole network without needing a block of static I...

Page 111: ...ork To do this you will first of all need to get a block of IP addresses from your ISP so that you can allocate an IP address to each of your clients First of all setup a normal NAT configuration as d...

Page 112: ...SL Ethernet Router User s Guide 112 Now note down the IP interface IP address you ll need this in the non NAT setup detailed below Next you need to turn NAT off Goto Configuration Security Now click o...

Page 113: ...LAN your PC s sides of the router The next step is to assign the correct IP address to the LAN side of the router the IP address for the WAN side of the router should be automatically assigned to the...

Page 114: ...should now change the IP address s and subnet masks of your clients with the rest of the IP addresses you received from your ISP With your PC setup with the new address you should now be able to login...

Page 115: ...Solwise SAR715PVW ADSL Ethernet Router User s Guide Chapter 7 How to 115 Under Security Interfaces click on Advanced NAT Configuration Then click on Add Reserved Mapping...

Page 116: ...ser s Guide 116 Now add the port mapping rule you require e g to forward port the telnet ports to point to the LAN port of the router so you can do remote configuration using telnet you should add 23...

Page 117: ...ould now save the new settings Configuration Save config Please note If you have the firewall enabled then you MUST add port filter rules for each reserved mapping to allow the traffic through 7 5 Con...

Page 118: ...VW ADSL Ethernet Router User s Guide 118 Now click on Firewall Trigger Configuration at the bottom of the screen Now click on New Trigger The following settings are required for Netmeeting Add the abo...

Page 119: ...23 calls then you need to set up a port forwarding rule on port 1720 TCP to point to your computer see below for details about how to set reserved port rules If you are using the firewall then you mus...

Page 120: ...f common attacks and will block access from hosts attempting these attacks To configure intrusion detection you must first click on the Configuration Security Make sure that Intrusion Detection is tic...

Page 121: ...cribe the default policies enabled in the firewall for each of the high medium and low security levels The tables tell you whether a certain service can be received in or allowed out by a specific pol...

Page 122: ...p N A 3 3 3 3 3 3 H 323 720 3 3 3 3 3 3 T 120 1503 3 3 3 3 3 3 SSH 22 3 3 3 3 3 3 These presets block and allow common applications They will suit most needs if you have a specific application you may...

Page 123: ...lecting allow will allow traffic from all hosts which have validators but block traffic from other all other hosts Selecting block will block traffic from all hosts which have validators but allow tra...

Page 124: ...policy So first to create a port filter Click on Port Filters Now decide if you need a filter on TCP UDP or a filter to act upon any IP packet Raw IP For our example of blocking web access for our ho...

Page 125: ...7 How to 125 Now go back to the Policy List click on link and from the Firewall Policy Configuration click on Host Validators under Policy Configuration Now click on Add Host Validator Now enter the...

Page 126: ...Chapter 7 How to Solwise SAR715PVW ADSL Ethernet Router User s Guide 126 You should now save the configuration and reset the router...

Page 127: ...n DHCP server Make sure DHCP server is selected at the bottom and click Configure The DHCP Server Setup screen will be presented here you can change the IP assignment range to be anything you would li...

Page 128: ...o change lease times and control functions like allowing unknown clients these should be left at defaults unless you have specific reasons for changing them Click Apply to keep the settings When you v...

Page 129: ...tarting your browser up and going to the router set up screen again Then try to enter and configuration screen You should be prompted to enter a username and password try the new one you ve created It...

Page 130: ...g this period do not touch the router or browser leave them alone until the upgrade file is loaded After the flash update is complete the following screen should display You should now restart 8 1 1 W...

Page 131: ...8 2 1 Loading a new bootcode bin firmware file First of all you need to connect using a console serial programme to the router Details are given in the set up guide but in simple terms it s 9600 bps 8...

Page 132: ...lwise SAR715PVW ADSL Ethernet Router User s Guide 132 The router has now changed it s port speed to 38400 bps so you now need to change your terminal set up To do this on Hyperterminal select Call Dis...

Page 133: ...Solwise SAR715PVW ADSL Ethernet Router User s Guide Chapter 8 Firmware Upgrade 133 The click on Configure...

Page 134: ...thernet Router User s Guide 134 Change the port speed to 38400 and then click on OK Now you are ready to start sending the bootcode file Select Transfer Send file Click on browse so you can select the...

Page 135: ...Solwise SAR715PVW ADSL Ethernet Router User s Guide Chapter 8 Firmware Upgrade 135 Now you are ready to send the file Click on Send...

Page 136: ...SAR715PVW ADSL Ethernet Router User s Guide 136 The file should now start to send Notice the Packet count goes up and the indicator bar starts to increase When the file send is finished then a screen...

Page 137: ...Upgrade 137 You should now type quit Now the port speed of the router has changed back to the normal setting of 9600 so you need to change the set up of your terminal back to 9600 You should now see t...

Page 138: ...Chapter 8 Firmware Upgrade Solwise SAR715PVW ADSL Ethernet Router User s Guide 138 Now you need to enter the command flashfs rewrite boot bin You can now reboot your router power off on...

Page 139: ...o the router Details are given in the set up guide but in simple terms it s 9600 bps 8 data 1 stop no parity no flowcontrol Please note these instructions assume you are using Windows Hyperterminal If...

Page 140: ...r s Guide 140 The router should now boot to the prompt It s now ready to accept the firmware file Type xmodem fast The router has now changed it s port speed to 38400 bps so you now need to change you...

Page 141: ...Solwise SAR715PVW ADSL Ethernet Router User s Guide Chapter 8 Firmware Upgrade 141 Then File Properties The click on Configure...

Page 142: ...8 Firmware Upgrade Solwise SAR715PVW ADSL Ethernet Router User s Guide 142 Change the port speed to 38400 and then click on OK Now you are ready to start sending the bootcode file Select Transfer Sen...

Page 143: ...wise SAR715PVW ADSL Ethernet Router User s Guide Chapter 8 Firmware Upgrade 143 Click on browse so you can select the bootcode bin file called flash bin in this example Now you are ready to send the f...

Page 144: ...rnet Router User s Guide 144 Click on Send The file should now start to send Notice the Packet count goes up and the indicator bar starts to increase When the file send is finished then a screen simil...

Page 145: ...Chapter 8 Firmware Upgrade 145 Now the port speed of the router has changed back to the normal setting of 9600 so you need to change the set up of your terminal back to 9600 You should now see the Lo...

Page 146: ...Chapter 8 Firmware Upgrade Solwise SAR715PVW ADSL Ethernet Router User s Guide 146 Login using the username and password normally admin and admin Now you need to enter the command console enable...

Page 147: ...Solwise SAR715PVW ADSL Ethernet Router User s Guide Chapter 8 Firmware Upgrade 147 You should now see the IP address prompt Enter the command flashfs update to write the new firmware to flash...

Page 148: ...Chapter 8 Firmware Upgrade Solwise SAR715PVW ADSL Ethernet Router User s Guide 148 When it s done you are now ready to reboot power off on...

Page 149: ...43 240 3 BT_test as used by bt_test startup_domain 194 72 7 57 194 73 82 242 PlusNet 212 159 11 150 212 159 13 150 Nildram 195 112 4 4 195 112 4 7 Demon 158 152 1 58 158 152 1 43 BT Openworld 213 120...

Page 150: ...Chapter 9 DNS Addresses Solwise SAR715PVW ADSL Ethernet Router User s Guide 150 194 168 8 100 BT Broadband 193 113 212 38 194 72 6 57...

Page 151: ...ual control is preferred this can still be conveniently done from a single location Let s take a look at a few examples If a UPnP printer were to be attached to the network not only would it be instal...

Page 152: ...points listen for these advertisement packets to detect new devices and their capabilities as they become present on the network UPnP devices leaving the network also send notifications that their se...

Page 153: ...roblem in the mean time the idea of NAT was introduced NAT1 stands for Network Address Translation and is a mechanism that will multiplex a multitude of private IP addresses onto a single public IP ad...

Page 154: ...5PVW the IGD and embed it in the SIP messages to set up a video session The second benefit of UPnP NAT Traversal is about configuring services on your LAN For example if you would want to deploy a sma...

Page 155: ...ndow will announce its presence on the network More specifically for an IGD an icon will appear in My Network Places Double clicking it will show the presentation page In the case of the 715PVW this i...

Page 156: ...de 156 After the software is installed you can then goto My Network Places and you should have the Virata IGD shown If you right click properties on the IGD icon then a screen similar to that shown be...

Page 157: ...that the IP port used by the 715PVW is higher than 1024 The default port used for UPnP on the 715PVW is 280 BUT XP will only work on ports greater than 1024 To set the UPnP port on your router go int...

Page 158: ...niversal Plug n Play and the SAR715PVW RouterSolwise SAR715PVW ADSL Ethernet Router User s Guide 158 To install UPnP support for Windows XP goto Add Remove Programs in Control panel Select Add Remove...

Page 159: ...he SAR715PVW Router 159 Select Networking Services Make sure that Internet Gateway Device Discovery and Universal Plug and Play are both ticked Then click on OK to install these services After the sof...

Page 160: ...Chapter 10 About Universal Plug n Play and the SAR715PVW RouterSolwise SAR715PVW ADSL Ethernet Router User s Guide 160 Now if you go into Network Connections the Internet Gateway is shown...

Page 161: ...Solwise SAR715PVW ADSL Ethernet Router User s GuideChapter 10 About Universal Plug n Play and the SAR715PVW Router 161 Clicking on Settings allows you to view predefined services...

Page 162: ...VW ADSL Ethernet Router User s Guide 162 Click on Add to install your own service 10 4 2 2 Discovery Windows XP support is much more elaborate As with Windows ME discovery of a UPnP device will trigge...

Page 163: ...niversal Plug n Play and the SAR715PVW Router 163 an icon in My Network Places will allow access to the presentation page right clicking will show a properties summary If you right click properties on...

Page 164: ...10 About Universal Plug n Play and the SAR715PVW RouterSolwise SAR715PVW ADSL Ethernet Router User s Guide 164 If you double click on the IGD icon then the web configuration page for the router is di...

Page 165: ...ing Additionally an Internet Gateway icon will appear in the Network Connections window When disconnected double clicking this icon will set up a connection to the Internet starting from the Internet...

Page 166: ...ved 10 4 2 5 Control and Eventing NAT Traversal By now pressing the Properties button or alternatively by choosing Properties from the icon s right mouse button menu another very interesting feature o...

Page 167: ...now click Add you can configure a mapping for a web server all packets coming in on port 80 will be forwarded to the host with IP address 10 0 0 15 on port 8080 Additionally UPnP enabled applications...

Page 168: ...niversal Plug n Play and the SAR715PVW RouterSolwise SAR715PVW ADSL Ethernet Router User s Guide 168 This is truly NAT Traversal no user intervention is needed to make applications work transparently...

Page 169: ...lient MTU 1516 over SVC only ATM supports AAL5 AAL3 4 and AAL0 ATM Traffic shaping supports CBR and UBR OAM F4 and F5 segment end to end loopback are supported F4 on all VPIs F5 on VIP 0 only Transpar...

Page 170: ...Routed PDU for LLC SNAP VC Mux encapsulation RFC 1577 Classic IP over ATM MTU 1500 RFC 2364 PPP over ATM LLC SNAP VC Mux encapsulation RFC 2516 PPP over Ethernet Bridging Bridge features conformance t...

Page 171: ...Netmeeting H 323 HTTP HTTPS ICQ IPsec passthrough Napster Net2Phone Ping Quicktime 4 Telnet Traceroute Windows Media Player Shoutcast L2TP VPN pass through PPTP VPN pass through Delta Force Game Half...

Page 172: ...ith 64 128 bit WEP Web browser configuration and management tool allows easy configuration via Ethernet connection Support SNMP for remote management Support 8 simultaneous PPP or Bridge Routing sessi...

Page 173: ...334 RFC 1994 VPN via IPSec PPTP and L2TP L2TP support is limited to dial in to the L2TP Access Concentrator LAC Several standard protocols and customizable individual filtering profile filtering 2 lev...

Page 174: ...monitoring Bridging Transparent Bridging IEEE 802 1D Multi protocol Encapsulation over AAL5 RFC 1483 Spanning Tree Protocol IEEE 802 1D Support IEEE802 3 IEEE802 3u IEEE802 1D Support up to 4096 MAC...

Page 175: ...ment and monitoring DSL Forum TR 037 CPE auto configuration OpenDSL CPE auto configuration UPNP Universal Plug and play SNTP client DHCP RFC 2131 RFC 2132 server relay and client DHCP server and clien...

Page 176: ...Guide 176 PPTP VPN pass through Delta Force Game Half Life Game Network News Transfer Protocol TFTP VPN PPTP VPN tunneling PPP PAP RFC 1334 and CHAP authentication protocol Firewall Intrusion Detectio...

Page 177: ...ADSL keeps on flashing after phone cable is attached and ADSL is enabled If the DSL LED keeps on flashing after you have connected the phone cable then this indicates that the router is unable to find...

Page 178: ...178 Now if you are correctly connected to the line the ADSL Status there should be a WAN IP Address shown at the top under PPPoA Connections To get the full connection statistics goto the bottom of t...

Page 179: ...s indicates that there is a valid login with your ISP If you haven t got an IP address shown then the reason is the router is failing to login into your ISP This might be for the simple reason that yo...

Page 180: ...Check that the Dialout Username and Passwords are correct If they look okay then the next thing to try is the BT test account sorry you cannot do this in the Hull KC area because KC don t have a test...

Page 181: ...are logged into the ISP but you still haven t got internet access 13 3 1 Pinging the WAN side of the router First of all let s do some basic ping tests Ping is a basic IP programme that allows you to...

Page 182: ...but this is not guaranteed Anyway assuming that you have a valid DNS address try pinging it Do you get a reply If not then I would check the DNS address you are using 13 4 Connecting to a web site So...

Page 183: ...mmand as explained in the following section From most other IP enabled operating systems you can execute the same command at a command prompt or through a system administration utility 13 5 2 nslookup...

Page 184: ...or frame based network such as the Internet The Internet s Transmission Control Protocol uses the MTU to determine the maximum size of each packet in any transmission Too large an MTU size may mean re...

Page 185: ...Segments Retransmitted the better If you have a retransmit rate in Windows check Microsoft there are some patches can fix this type of problem In this example using netstat s the rate is about 1 5 Not...

Page 186: ...eshooting Solwise SAR715PVW ADSL Ethernet Router User s Guide 186 To alter the MTU value make sure you have selected the correct LAN adapter under Adapter Settings Then enter the MTU value you want to...

Page 187: ...hone network PSTN However due to differences between the individual PSTNs provided in different countries the approval does not of itself give an unconditional assurance of successful operation on eve...

Page 188: ......

Page 189: ...ecimal notation The IP address 20 56 0 211 is read twenty dot fifty six dot zero dot two eleven 15 1 1 Structure of an IP address IP addresses have a hierarchical design similar to that of telephone n...

Page 190: ...254 hosts at most but the total possible number of class C networks exceeds 2 million 2 097 152 to be exact LANs connected to the Internet are usually class C networks Some important notes regarding I...

Page 191: ...e usual 0 to 255 for a class C address Similarly to split a class C network into four subnets the mask is 255 255 255 192 or 11111111 11111111 11111111 11000000 The two extra bits in field4 can have f...

Page 192: ......

Page 193: ...1 2 4 8 16 etc For example Decimal Binary 1 000 s 100 s 10 s 1 s 8 s 4 s 2 s 1 s 1 3 1 1 0 1 Also since binary uses only two digits to represent all numbers a binary number has more digits than the sa...

Page 194: ...Chapter 16 Appendix E Binary Numbers SAR715PVW ADSL Ethernet Router User s Guide 194 The decimal value of this byte is 173 128 32 8 4 1 173...

Page 195: ...ers with ADSL routers that would like easy access to various information about then current internet connection www ukbonkers karoo net url This program to allow you to modify port forwarding and fire...

Page 196: ...enticate To verify a user s identity such as by prompting for a password binary The base two system of numbers that uses only two digits 0 and 1 to represent all numbers In binary the number 1 is writ...

Page 197: ...friendly name used in place of its associated IP address For example www globespan net is the domain name associated with IP address 209 191 4 240 Domain names must be unique their assignment is cont...

Page 198: ...ol An Internet protocol used to report errors and other network related information The ping command makes use of ICMP IGMP Internet Group Management Protocol An Internet protocol that enables a compu...

Page 199: ...ublicly known IP address into a private IP address for each computer on your LAN Only your router and your LAN know these addresses the outside world sees only the public IP address when talking to a...

Page 200: ...pes of PPP interfaces you can define for a Virtual Circuit VC the other type being PPPoA You can define one or more PPPoE interfaces per VC protocol A set of rules governing the transmission of data I...

Page 201: ...mask subnet mask A mask that defines a subnet See also network mask TCP See TCP IP TCP IP Transmission Control Protocol Internet Protocol The basic protocols used on the Internet TCP is responsible f...

Page 202: ...oftware program that uses Hyper Text Transfer Protocol HTTP to download information from and upload to web sites and displays the information which may consist of text graphic images audio or video to...

Reviews: