background image

36 • UK

Return to contents

AVN9010/20 V105.15


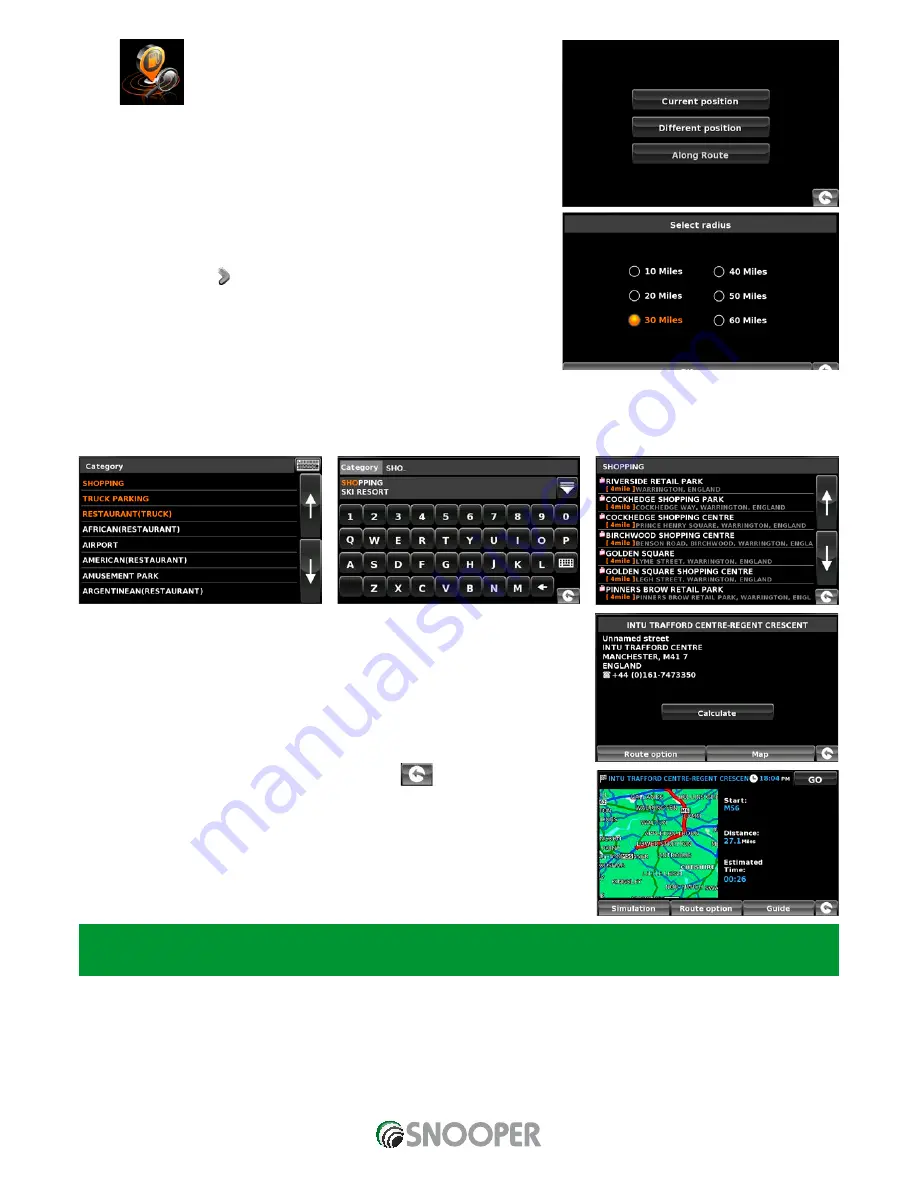
3.10   Find by nearest POI 

This function will help you to find the nearest POI from either your ‘Current 
Position’ 
or a ‘Different Position’ within a certain radius which can be specified 
up to a maximum of 60 miles.

3.10.1  To navigate using the ‘Current Position’

Press the centre of the screen to enter the ‘Navigate to’ menu.

Press the black arrow   once.

Press the ‘Find by nearest POI’ icon.

Select ‘Current Position’

Select the maximum radius you wish the unit to search for (the default setting is 
30 miles) and then press ‘OK’

Press ‘Category’ and enter the category type using the keyboard displayed.

If you do not know which category to type, you can press the down arrow to the right of the lower window and all the category types 
will be displayed in alphabetical order. Use the arrows to the right of the display to scroll up and down through the category options. 
Once you find the category you are looking for select it with your finger. 


A list of POI’s within the specified radius and category will be displayed. Use the arrows 
on the right hand side of the screen to scroll up and down through the options. When 
you find the POI that you are looking for, select it with your finger

To start the journey press ‘Calculate’

To view the location of the POI, press ‘Map’.

To change the route parameters press ‘Route Option’ (see Section 6.0: Route Options 
on page 72 for specific instructions).

To return to the previous page press the return arrow 

 located on the bottom 

right hand corner of the display.

Once the calculation is complete you can either press ‘Go’ to start navigation, 
‘Simulation’ to see the actual route that will be taken, ‘Route Option’ to change the 
parameters of the route or ‘Guide’ which will list the turn by turn instructions of the 
journey. The ‘Summary Screen’ will tell you the distance to your destination, estimated 
time of arrival and the estimated time it will take to complete your journey.

Please note: The summary screen is only displayed for approximately 10 seconds before the unit automatically begins to 
provide you with turn-by-turn instructions.


AVN S9010/9020 V1 06/15 UK

Summary of Contents for AVN S9010/20

Page 1: ...AVN9010 20 V105 15 AVN S9010 20 User manual AVN9010 20 V105 15...

Page 2: ...Bus Coach 61 Brightness Control 62 Change Language Setup 2D 3D North 63 Speed Time MPH KMH Arrival Time Remaining Time Page 64 Map Text Size Vehicle Icon 65 Lane Guidance Junction Number Display Came...

Page 3: ...lease read this user manual carefully to ensure correct usage and to ensure maximum enjoyment Due to continuing improvement the specifications of this unit may change without further notice Copyright...

Page 4: ...nctions simultaneously Traffic Message Channel TMC AVN S9020 ONLY The Traffic Message Channel TMC is a FM data channel provided by the traffic news service that supplies continuously updated real time...

Page 5: ...ng Before making connections turn the car ignition off to avoid short circuits Connect the power supply connection cables to the unit and speakers before connecting it to the auxiliary power connector...

Page 6: ...equipment is required Optional or AV input B wires is required USB ipod video input or Port for iPod input iPod data line is required Optional Reversing sensors Not used Navi GPS antenna TV NOT USED C...

Page 7: ...7 UK Return to contents AVN9010 20 V105 15 Rear Camera input Not used AVN S9010 9020 V1 06 15 UK...

Page 8: ...8 UK Return to contents AVN9010 20 V105 15 AVN S9010 9020 V1 06 15 UK...

Page 9: ...n cars such as electronic fuel injection systems electronic antiskid antilock braking systems electronic speed control systems or air bag systems For installation or service of this device please cons...

Page 10: ...e on the touchscreen To select a function or Mode press the corresponding icon Note If when an Icon is precessed and the message Device Not Connected is displayed this indicates that there are no conn...

Page 11: ...12 Automatic Search Touch icon to enter automatic search status and save the station automatically during automatic search Touch the icon again to stop automatic search 18 radio stations can he stored...

Page 12: ...itched ON then by pressing the PTY button the radio will search for a particular type of programme The radio will then scan the frequency range to look for the programme type selected If one is found...

Page 13: ...ment TA The radio display can show if the station broadcasts travel information The Traffic Announcement TA feature allows interruption of a CD or cassette tape when there is a travel report from the...

Page 14: ...ns to access any other function such as the radio tuner or CD please press Navi to exit navigation navigation will still be active in the background To listen to radio CD or Ipod whilst using navigati...

Page 15: ...00 or Apple Macintosh operating systems Windows XP systems are also not supported Software Installation Instructions Place the Software CD into a CD ROM or DVD drive Your PC should automatically open...

Page 16: ...ll start to progress across the screen The software will then connect to our database server and then download the speed camera database The software card will then save the data on to the micro SD ca...

Page 17: ...shown for just a few seconds and then the screen will show a section of a map AVN S9010 20 needs to acquire a minimum of four satellites in order to work Once this has been achieved AVN S9010 20 will...

Page 18: ...ed and the current speed 3 Indicator will change from Black to RED text Refer to page 65 for full details and settings 3 or Current speed or time Press to change the displayed information 4 Indicates...

Page 19: ...played in the top left hand corner of the screen Junction view Full screen images of main motorway junctions are displayed in advance to help you navigate more safely These junction view images will b...

Page 20: ...preference Press OK at the bottom of the screen to save your preferences Your chosen settings will now be saved and will appear on the screen each time you use Snooper If you want to switch between y...

Page 21: ...eight Enter the weight of the vehicle here Width Enter the width of the vehicle here NOTE Caravan the maximum height width and length must include the dimensions of the vehicle towing the caravan whic...

Page 22: ...hicle All LEZs affect heavy duty goods vehicles usually over 3 5 tonnes Gross Vehicle Weight GVW and most buses and coaches usually defined as over 5 tonnes GVW Some LEZs also affect vans cars and mot...

Page 23: ...ith 1 trailer Truck with 2 trailers Truck with 3 or more trailers or semi or tractor with 1 or more trailers Load type None Normal Hazardous Hazardous goods that are not explosive or harmful for water...

Page 24: ...s 2919 and 3331 see also ADR 8 6 3 1 For mixed loads choose the MOST restrictive category Disclaimer This content gives general guidance only and should not be regarded as a complete or authoritative...

Page 25: ...hicle All LEZs affect heavy duty goods vehicles usually over 3 5 tonnes Gross Vehicle Weight GVW and most buses and coaches usually defined as over 5 tonnes GVW Some LEZs also affect vans cars and mot...

Page 26: ...he keyboard Please Note The button on the keyboard with no character on it is the Space key UK post codes can be entered with and without a space If the following message is displayed Please input cor...

Page 27: ...g for in the lower window you can select it easily by pressing that name with your finger If you wish to view the list of possible destinations in full press the down arrow to the top right hand corne...

Page 28: ...y city or Find address by post code Please refer to 3 1 and 3 2 above on how to use these functions Once you have entered the Home destination a new field is available for you to Name the destination...

Page 29: ...ou to Name the destination Press Name and a keyboard will be displayed with the road name you selected Press the Arrow key to erase this data then input the new name using the keyboard Please note You...

Page 30: ...e order of the routes before pressing Go 3 6 1 Create a Multi route Press the centre of the display to enter the Navigate to menu Press the Multi route icon You will then see the Multi route screen th...

Page 31: ...ination stages press Save 3 6 2 Editing a Multi route If you wish to change the order or delete any of the stages in the multi route Press the centre of the display to enter the Navigate to menu Press...

Page 32: ...ed time of arrival and the estimated time it will take to complete that stage of the journey Once you have pressed Go Snooper will now display your current map position along with a small summary scre...

Page 33: ...ased on route options and vehicle parameters 4 OK greyed out if no changes have been made 5 Return to previous screen Once the route has been arranged press the icon then OK Press Snooper will now cal...

Page 34: ...n 3 8 Recent destination Snooper is capable of storing the last 40 routes that have been calculated so that if you wish to return to an address you do not have to re input the details again To calcula...

Page 35: ...o type you can press the down arrow to the right of the lower window and all the category types will be displayed in alphabetical order Use the arrows to the right of the display to scroll up and down...

Page 36: ...your finger A list of POI s within the specified radius and category will be displayed Use the arrows on the right hand side of the screen to scroll up and down through the options When you find the...

Page 37: ...ooper will automatically prompt you with a list of possible matches similar to when searching for City described above When you see the road you require select it Once all fields have been completed y...

Page 38: ...pre programmed route The instructions to use this facility are the same as above see Section 3 10 2 but select Along Route to open the search 3 11 User POI The Snooper comes pre loaded with a number o...

Page 39: ...screen to scroll up and down through the options When you find the POI that you are looking for select it To start the journey press OK followed by Calculate To view the location of the POI press Map...

Page 40: ...Use the arrow keys on the right hand side of the display to scroll through the list Press Street and use the keyboard displayed to type in the street name As you begin to input the road or street nam...

Page 41: ...e button does not function Firstly plot a route by any of the methods previously described in this user guide Press the centre of the screen to enter the Navigate to menu Press the black arrow once Pr...

Page 42: ...uld like to navigate to and the road name selected will be displayed at the bottom of the screen Press Quick Menu and then press Continue To start the journey press Calculate To view the location of t...

Page 43: ...M SS s Latitude N 53 20 55 6 N Longitude W 2 40 55 71 W Please note when inputting the Longitude and Latitude you ignore the letters N and W You MUST use the degrees minutes and seconds symbols when u...

Page 44: ...ation screen will be displayed The original route is shown in Red and the new route is shown inYellow To choose either route press the corresponding text at the bottom of the screen alternatively pres...

Page 45: ...e calculation of the original route is complete the summary screen is displayed Once the calculation is complete you can either press Go to start navigation Simulation to see the actual route that wil...

Page 46: ...ou wish to use this as your start position press the or to change the start position press the button You can now search by Country City Street 3 Press Map to continue or the button to return to the p...

Page 47: ...t press Done A summary of the journey is displayed and you now have the option to Save by pressing the Save button or start navigating by pressing GO 8 If you choose to save your route you can now cha...

Page 48: ...f arrival and the estimated time it will take to complete your journey The summary screen is only displayed for approximately 10 seconds before the unit automatically returns to providing you with tur...

Page 49: ...screen press If you want to return to the original route not avoiding the incident then press the TMC Icon select the TMC alert you originally wanted to avoid and then press Snooper will recalculate...

Page 50: ...expand the list press the select the campsite camperstop by pressing on the name A summary screen is now displayed listing the campsite camperstop contact details and general information including any...

Page 51: ...now have the option to View a photograph where available Save this will save the campsite camper stop to your favourites see section 4 0 Favourites for details Route this will commence the navigation...

Page 52: ...e following options displayed Find address by city Find address by post code Find by POI Find by recently used Save using current point To find out how to use these options please refer to the applica...

Page 53: ...en to access the Navigate to menu Press My Favourite at the top of the display Press the Recent Destination icon Select the recent destination you wish to delete You can scroll through the list of rec...

Page 54: ...o find out how to use these options please refer to the applicable sections in this user manual Once you have entered your Home location details you also have the facility to name your destination Pre...

Page 55: ...data then input the new name using the keyboard Press Save once you have entered the name Please note You can enter a new name for the favourite using up to a maximum of sixteen characters 4 5 2 To de...

Page 56: ...ffice destination 5 Configure The Configure menu is used to customise the operation and appearance of your unit To access the Configure menu Press the centre of the screen to enter the Navigate to men...

Page 57: ...ter the length of the vehicle here Weight Enter the weight of the vehicle here Width Enter the width of the vehicle here NOTE Caravan the maximum height width and length must include the dimensions of...

Page 58: ...hicle All LEZs affect heavy duty goods vehicles usually over 3 5 tonnes Gross Vehicle Weight GVW and most buses and coaches usually defined as over 5 tonnes GVW Some LEZs also affect vans cars and mot...

Page 59: ...ads that are forbidden for vehicles with trailers These will be avoided Choose between Truck with No trailer Truck with 1 trailer Truck with 2 trailers Truck with 3 or more trailers or semi or tractor...

Page 60: ...least restrictive Passage forbidden through tunnels of category E NORMAL Passage allowed through all tunnels For UN Nos 2919 and 3331 see also ADR 8 6 3 1 For mixed loads choose the MOST restrictive...

Page 61: ...Day If you select Day you can adjust the day time brightness of the LCD screen The brightnesses setting is controlled by the AVN S9010 20 hardware and not by the navigation software see page for deta...

Page 62: ...f the screen to enter the Navigate to menu Press the Configure button Press the Setup icon where you will see the list of options below Select the option you wish to change on the left There are numbe...

Page 63: ...al and metric measurement To make your selection touch the relevant radio button 5 5 4 Arrival Remaining This option allows you to display either the estimated time of arrival ETA or the estimated rem...

Page 64: ...ize of the road and place name text which appears on the map screen Select the text size then press OK to save and exit 5 5 6 Car Icon This option allows you to choose the icon which appears on the na...

Page 65: ...Registering Snooper Page 3 and System Requirements Downloading page 15 for further details 5 5 9 Display Cameras You can choose between the following options Yes A safety camera visual warning will be...

Page 66: ...are near a primary school No The unit will not provide alerts of Primary schools Schools are indicated on Snooper display by the icon Please note Snooper will only provide alerts to Primary Schools at...

Page 67: ...and corner of the display 5 5 15 1 My Speed The speed limit of nearly every road across Europe can now be clearly displayed on your Snooper at all times To select the correct speed limits for your veh...

Page 68: ...These are advisory speed limits and are subject to change It is the responsibility of the driver to check the road side speed limit signs and abide by local driving regulations 5 5 17 Sharp curve ale...

Page 69: ...bottom right hand corner of the display 5 7 Change Map Colour This function allows you to choose between the alternative colour schemes that are available for the maps used in the Snooper system sever...

Page 70: ...ress the arrow once Press the Qwerty keyboard icon Select Yes or No depending on the keyboard preferred Note When a keyboard is displayed it can be changed from QWERTY ABC to Cyrillic script Press the...

Page 71: ...t is important that you do not lose or forget this code If you forget this code you will need to return your Snooper so that the unit can be reset 5 10 Configuration Security Code on Truckmate or Vent...

Page 72: ...shown in the map display Note If Yes is not selected then you cannot amend the Set time limit and Alert time options Set the duration of the time limit in hours and minutes use the arrows to increase...

Page 73: ...urites You can also choose which of the POI s you would like to have indicated on your map As standard ALL POI s are shown however this list can be edited within the POI Menu Press the centre of the s...

Page 74: ...ation of Motorways A Roads and B Roads as necessary The route is calculated by Snooper to navigate you to your destination in the shortest time possible whilst adhering to the national speed limits 6...

Page 75: ...e The summary screen is only displayed for approximately 10 seconds before the unit automatically begins to provide you with turn by turn instructions 6 2 2 Avoid by Range If you wish to avoid several...

Page 76: ...unit automatically begins to provide you with turn by turn instructions If the Avoid by Road and Avoid by Range have not been used this feature is unavailable and the button will be greyed out 6 3 Nav...

Page 77: ...your intended route such as distance to destination and estimated time of arrival for example and gives you the option of making any changes or viewing the route prior to commencing your journey 6 5 1...

Page 78: ...ff and then back on the audio level returns to either the factory default or your personalised setting If you press the speaker icon you can turn off the audio on the unit completely A symbol is displ...

Page 79: ...display to indicate that the alert has been switched off To restore the camera alerts press the top of Snooper s display to show the drop down menu and then press the camera icon Please note that if t...

Page 80: ...line on the map indicates the route you will be taking clearly and precisely Next turning or instruction As you approach the next turning or instruction a window will indicate the exact action that yo...

Page 81: ...device see page 72 for details of how to view the version screen IMPORTANT BEFORE STARTING THIS PROCESS PLEASE ENSURE YOUR DEVICE IS NOT CONNECTED TO THE PC 2 Download and SAVE the Snooper Map Downloa...

Page 82: ...PC Note the version shown here will be different than the downloaded one and the download duration is dependent on the internet connection speed 10 Once the download has completed the Map Downloader w...

Page 83: ...on Windows 95 98 98SE Millennium Windows 2000 and Windows XP Apple Macintosh operating systems are not supported To determine which operating system you have on your computer Right click on the My Com...

Page 84: ...by your Firewall software carefully before choosing your option If you do not allow the program access to the internet through the Firewall the download process will fail If no message was prompted b...

Page 85: ...automatically switch to DVD mode Insert the disc with the label facing upwards When the system detects the disc it will automatically begin to play 3 Numeric Keyboard Touch the icon on the screen to p...

Page 86: ...ack Touch the screen anywhere to show hide the menu Touch icon to exit from touch menu Touch icon to enter home page menu 5 DVD Disc Playing If the DVD has no menu the system will automatically read t...

Page 87: ...g a disc the system will automatically switch to Spectrum State if there is no operation within 10s 8 MPEG4 Disc Playing MPEG is the abbreviation of Moving Pictures Experts Group and the MPEG4 is the...

Page 88: ...itted a USB portable memory drive can be attached NOTE Before removing a portable USB drive from the AVN please exit USB mode Enter USB Mode In the main menu press or if you connect the portable USB m...

Page 89: ...F Output signal is analog signal SPDIF RAW Output original code stream source of the disc through digital port when DVD coaxial output and digital amplifier are connected through coaxial port this set...

Page 90: ...ended Audio English Chinese French Swedish Italian Russian German Spanish Portuguese others Select language for playing Disc support is needed Subtitle English Chinese French Swedish Italian Russian G...

Page 91: ...bluetooth device search function and Matching will be displayed on the screen After the connection has succeeded the mobile phones will display the AVN name Ample I While connecting the mobile phone i...

Page 92: ...one keypad mobile phone or enter telephone number on the number button on the AVN screen Press number button to enter desired number the entered number is displayed on the top line To correct a wrongl...

Page 93: ...campatible with this feature To access the phonebook on the mobile phone press To refresh the phonebook content press 7 Call Logs Click on to enter the phone log interface This interface displays the...

Page 94: ...ck Repeat the current played song Previous Track Page Up Play songs at random Page Down 3 Main Menu Touch to return to the previous menu The system classifies files according to the above mentioned 6...

Page 95: ...l audio video AV sources such a games consoles video or DVD player Press the MAIN icon to enter home page interface and touch to enter AV main interface Press the MAIN icon to enter home page interfac...

Page 96: ...20 unit Camera Function Operation On this mode if a rear camera connected you can view the picture from the rear camera On the main menu touch the icon to enter the rear camera interface Touch the ico...

Page 97: ...splay Touch SPECTRUM icon to turn on off spectrum display function 5 Rear Camera Function optional Touch BACK icon to turn on off reverse function If a rear camera is fitted this will switch the rear...

Page 98: ...Video Navigation If On this allows the navigation prompts to interrupt the original video source 9 Interface colours Touch or to change the colour scheme of the user interface Video Setup Touch icon...

Page 99: ...nnel is on Only with playback of a disc with 5 1ch encoding can you turn on and setup this feature When playing a CD MP3 disc please turn off 5 1ch Time Setup Touch the icon to enter the time setup in...

Page 100: ...fully programmed press End NOTE the steering wheel control cable must be connected for this function to operate see page 6 Touch Screen Calibration Occasionally the AVN screen may need calibrating To...

Page 101: ...DVD CD 5 0 9 In DVD USB mode press the corresponding number to select the track on the DVD USB In radio mode press buttons 1 6 to select memorised radio stations 6 10 For track selection greater than...

Page 102: ...AVI Press and hold to calibrate LCD touch screen Press for 1 second to enter or exit navigation 24 DVD USB Press to change the source to DVD USB 25 IPOD Press to change the source to iPod 26 AV TV Pre...

Page 103: ...e mechanism is blocked do NOT use force Please calI a dedicated maintenance engineer to repair 2 Precautions for Installation of external AMP Check if the resistance of the speaker matchs with that of...

Page 104: ...Reconnect properly Wrong use of AV input port Please refer to AV function operation for selecting ports Wrong iPod play video file setting Please refer to instructions of iPod function operation Occa...

Page 105: ...stance Disabled tyre pressure detection Not accurate Tyre pressure detection setting error Reset Insufficient or no tyre pressure Replace the battery Product Specifications System Parameters Working v...

Page 106: ...on the battery or on the packaging indicates that the battery provided with this product shall not be treated as household waste On certain batteries this symbol might be used in combination with a ch...

Page 107: ...W 6 THIS LIMITED WARRANTY GIVESYOU SPECIFIC LEGAL RIGHTS ANDYOU MAY ALSO HAVE OTHER RIGHTS WHICH VARY FROM EU COUNTRY TO EU COUNTRY 7 ALL IMPLIED WARRANTIES EXCEPT TO THE EXTENT PROHIBITED BY APPLICAB...

Reviews: