31
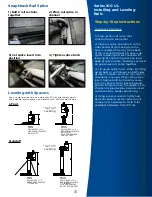
3) Set splice insert into
position
2) Place rail splice in
channel
4) Tighten splice bolts
1) Butt 2 rail sections
together
Series 100 UL
Installing and Leveling
Rails
Step-by-Step instructions
SnapNrack Rail Splice
1) Align sections of rail so that
ends butt up to each other.
2) Place rail splice assembly in to the
side channel of rail making sure the
base is seated all the way to the back
of the channel and front of splice is up
against upper lip of side channel with
lower lip of channel in groove on lower
edge of splice. Splice should be centered
on gap where rails come together.
3) Lift up on splice insert, either by lifting
up on bolts or with fingers on both sides
of insert to make sure insert is as high in
channel as it can go. While lifting up on
insert, tighten bolts by hand to secure
insert in channel. Note: loosening bolts
prior to lifting up insert to engage it into
channel will provide play between insert
and channel for proper positioning.
4) Using a socket wrench, tighten up
bolts on splice to secure splice to rails.
Torque silver hardware to 10–16 ft-lbs
and black hardware to 8–10 ft-lbs.
Use a single level spacer on no more than 30% of attachment points.
Use a double level spacer on no more than 10% of attachment points.
RAIL HEIGHT =6.4"
ABOVE ROOF SURFACE
ONE L FOOT
PLUS TWO SPACERS
UNDER L FOOT
RAIL HEIGHT =10.5"
ABOVE ROOF SURFACE
7" STANDOFF
PLUS TWO SPACERS
ON TOP OF STANDOFF
MAX
RAIL HEIGHT =7.5"
ABOVE ROOF SURFACE
7" STANDOFF
MIN
MAX
RAIL HEIGHT =3.4"
ABOVE ROOF SURFACE
ONE L FOOT
MIN
*Up To 3"
Leveling
SnapNrack Rail Splice
Leveling with Spacers
L-Foot
Standoff
*Up To 3"
Leveling
Summary of Contents for Series 100 UL
Page 48: ...48 Notes...


