background image

10

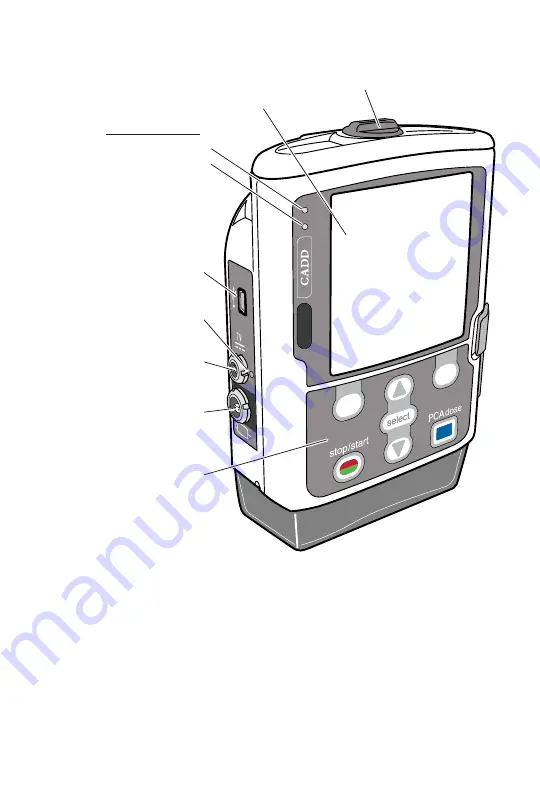
CADD®-Solis VIP Pump Diagrams

Green Light: 

Flashes when the pump is running and delivering 

medication.

Amber Light: 

Flashes when the pump is stopped, an alarm exists, 

or the battery or the reservoir volume is low. 

If the amber light is 

continuously lit, the pump is inoperable and you must contact 

your health care provider.

Note: 

At times, both indicator lights may flash. This means the 

pump is running, but will require your attention soon (for 

example, for a low battery or low reservoir volume).

Battery compartment

Display

Indicator lights

Amber

Green

AC power jack

Keypad

Blue AC 

power light

Remote dose cord jack 

(not used for 

Intermittent therapy)

USB port  

(used by 

clinician only)

Summary of Contents for cadd-solis VIP 2120

Page 1: ...CADD Solis VIP Ambulatory Infusion Pump Model 2120 Patient Information Guide Intermittent Delivery Mode ...

Page 2: ...2 Your Clinician s Name Phone Number Instructions Pump placement during bathing showering Pump placement during sleep Storage of medication fluid Notes ...

Page 3: ...p Screens 17 Removing a Cassette 20 Attaching a New Cassette 21 Priming the Tubing and Connecting to Your Catheter 25 Priming the Tubing without Changing the Cassette 27 Resetting the Reservoir Volume 29 Starting the Pump 31 Stopping the Pump During an Infusion 33 Next Dose Start Time 34 Setting the Time and Date 35 What if I Drop or Hit the Pump 38 Alarms and Messages 39 Alarm Help Screens 41 Not...

Page 4: ...n be reprogrammed by your health care provider as your medication needs change Your pump is programmed for Intermittent delivery and is used for therapies that require an infusion of a specific volume of drug fluid at a regular programmed interval Your health care provider will instruct you on the proper use of this pump This guide is intended to supplement those instructions Perform only those pr...

Page 5: ... and as a result the amount of underdelivery increases which could on occasion be significant Therefore the type of medication and delivery accuracy required must be considered when using a syringe with the CADD Solis VIP pump You must regularly compare the volume remaining in the syringe to the displayed values on the pump for example Reservoir Vol and Total Given in order to determine whether un...

Page 6: ...e or electrical shock When the pump is powered off medication is not delivered alarms are not sensed or indicated the display is blank the keypad does not respond to presses and the amber and green lights are not lit A rechargeable battery pack that has reached the end of its useful life must be replaced with either another CADD Solis rechargeable battery pack or with 4 AA batteries Do not use rec...

Page 7: ...y A detached or improperly attached cassette could result in unregulated gravity infusion of medication from the reservoir or a reflux of blood If you are using a CADD administration set or CADD medication cassette reservoir that does not have the Flow Stop feature you must use a CADD extension set with anti siphon valve or a CADD administration set with either an integral or add on anti siphon va...

Page 8: ...rror message indicating that the protocol library was lost do not proceed with using the pump Contact your health care provider If delivery of an infusion is affected by a time or date change an alarm message appears and must be confirmed Do not immerse the pump in cleaning fluid or water Do not allow solution to soak into the pump accumulate on the keypad or enter the battery compartment USB port...

Page 9: ...nce of other equipment such as ECG monitors can occur The user should check the correct function of the equipment prior to use Do not use the pump in hyperbaric chambers as they affect how the pump works and may also cause damage to the pump Use only Smiths Medical accessories that are specified for use with the CADD Solis VIP ambulatory infusion pump as other brands may adversely affect pump oper...

Page 10: ...tinuously lit the pump is inoperable and you must contact your health care provider Note At times both indicator lights may flash This means the pump is running but will require your attention soon for example for a low battery or low reservoir volume Battery compartment Display Indicator lights Amber Green AC power jack Keypad Blue AC power light Remote dose cord jack not used for Intermittent th...

Page 11: ... the pump is powered off medication is not delivered alarms are not sensed or indicated the display is blank the keypad does not respond to presses and the amber and green lights are not lit Power switch Cassette Keypad lock unlock lock Cassette latch Cassette The part of the CADD medication cassette reservoir or CADD administration set that attaches to the pump ...

Page 12: ... case pressing this key gives the question a Yes answer Soft keys also let you move through some of the pump screens Lets you scroll down menus or decrease values Lets you scroll up menus or increase values Selects a menu item This key is not used for your therapy Note The keys beep when pressed if this feature has been turned on by your health care provider ...

Page 13: ... from other manufacturers could result in fire or explosion Do not use rechargeable NiCd or nickel metal hydride NiMH batteries Do not use carbon zinc heavy duty batteries They do not provide sufficient power for the pump to operate properly which could result in death or serious injury Always have new batteries available for replacement If power is lost nondelivery of drug occurs and depending on...

Page 14: ...ise to open the battery door 3 Hold the pump at an angle to remove the old batteries and insert 4 new AA batteries Match the and markings on the batteries with the markings on the pump OR If using a rechargeable battery pack insert it as shown 4 Close the battery door and turn the knob on the battery door clockwise to lock Note If the batteries are installed backwards the pump will not power on If...

Page 15: ...and cautions read the Instructions for Use that come with the rechargeable battery pack or AC adapter To connect the AC Adapter 1 Plug the AC power cord the cord that plugs into your wall outlet into the AC power input connector on the AC Adapter 2 Plug the output power cord from the AC Adapter into the pump s AC power jack labeled 7V Push the connector firmly into the jack until it stops When the...

Page 16: ...use there may be a problem with the audible alarms If any issues are detected during power on alarms will sound and or be displayed If the alarms continue after you follow any on screen help contact your health care provider To turn off the pump press the power switch When the Power down message appears press Yes The pump then powers off When the pump is powered off The display is blank Keypad pre...

Page 17: ...Stopped or Running The battery type in use approximate amount of battery life remaining and AC adapter in use indicator Keypad lock status locked or unlocked Screen name and help text if any Work area contents for the displayed screen Menu screen AA batteries with AC adapter Rechargeable battery pack Rechargeable battery with AC adapter AA batteries ...

Page 18: ...ic uses the colors green red and gray The colors indicate that the pump is running green or stopped red The graphic is entirely gray before the pump starts Information about upcoming events that are important to the pump delivery When the pump is running messages may indicate When the next dose will begin When the dose will be complete Options for navigating the pump Press the soft key below the d...

Page 19: ...y Red There is a warning condition that requires immediate attention and infusion has stopped All high priority and system fault alarms display in red Blue Low priority alarms and informational messages display in blue On screen text and help in the pump display provide more information when there are conditions or alarms that need your attention If you cannot correct a condition or alarm by follo...

Page 20: ...ut closing the clamp could potentially cause unregulated gravity infusion which could result in serious injury or death To remove a cassette 1 Make sure the pump is stopped before removing the cassette For instructions see Stopping the Pump During an Infusion on page 33 2 Close the tubing clamp 3 If the cassette is locked insert the pump key into the cassette keypad lock and turn it counter clockw...

Page 21: ...ension set with anti siphon valve or a CADD administration set with either an integral or add on anti siphon valve to protect against unregulated gravity infusion that can result from an improperly attached cassette Unregulated gravity infusion can result in death or serious injury CAUTION If you are using a CADD medication cassette reservoir in which the medication is frozen thaw at room temperat...

Page 22: ...te hooks into the hinge pins on the bottom of the pump 5 Push down on the cassette latch and push up firmly on the cassette until it clicks into place OR Place the pump upright on a firm flat surface and then press down on the latch side of the pump so the cassette fits tightly against the pump ...

Page 23: ...tempt do not use the pump Contact your care provider for further assistance 7 Verify the cassette is attached correctly Looking from left to right the top of the cassette should line up evenly with the bottom of the pump and be securely attached If the cassette is attached incorrectly there will be an uneven gap between the cassette and the pump with the gap appearing on the latch side of the pump...

Page 24: ...ting the pump key into the cassette keypad lock and turning it clockwise to the locked position Cassette Locked appears briefly in the pump display 10 Once the cassette is attached the pump automatically displays screens that allow you to prime the fluid path reset the reservoir volume and start the pump see the sections that follow in this guide ...

Page 25: ...luid path with the tubing connected to your catheter as this could result in overdelivery of medication or air embolism which could result in serious injury or death To prime the tubing 1 After the cassette is attached a Prime tubing screen appears If a screen like the one to the right appears a security code is required to proceed If you do not have permission to prime the tubing or if the tubing...

Page 26: ...d result in serious injury or death 3 Stop priming at any time by selecting Stop Priming Priming automatically stops after 10 mL are primed or after 20 mL if using a high volume administration set 4 Continue priming as needed by selecting Yes or select No to finish priming WARNING To prevent air embolism ensure that the entire fluid path is free of all air bubbles before connecting to your cathete...

Page 27: ...he tubing without changing the cassette 1 Stop the pump if it is running 2 In the Tasks menu press U or D to highlight Prime Tubing and press S If you do not have permission to prime the tubing a security code is required Contact your health care provider for further assistance 3 Confirm that the tubing is disconnected from your catheter open the clamps and select Prime WARNING Do not prime the fl...

Page 28: ...ically stops after 10 mL are primed or after 20 mL if using a high volume administration set WARNING To prevent air embolism ensure that the entire fluid path is free of all air bubbles before connecting to your catheter Air embolism could result in serious injury or death ...

Page 29: ...ed on you may be prompted to reset the reservoir volume However you may also reset the reservoir volume without changing the cassette for example if you are using an administration set and are only changing your IV bag To reset the reservoir volume after attaching a new cassette or administration set 1 The pump displays a question asking if you wish to reset the reservoir volume to the default amo...

Page 30: ...ach the new IV bag to the administration set as instructed by your health care provider 3 In the Tasks menu press U or D to highlight Reset Reservoir Volume and press S 4 The pump displays a question asking if you wish to reset the reservoir volume to the default amount for your therapy in this example 265 mL Select Yes to reset the volume 5 If you selected to reset the reservoir volume the pump s...

Page 31: ...ter as instructed by your health care provider To start the pump 1 If the pump is programmed the Ready to Begin message is displayed on the home screen OR If the pump has been started and then stopped the home screen uses the red color in the graphic In this example a previous dose was interrupted 2 Press the stop start 9 key on the pump 3 When Start Pump appears select Yes Note If you want to set...

Page 32: ...nning message and Infusion is starting now appears briefly If a next dose start time was set the display turns green and a message that the infusion is delayed appears briefly on the screen and then the Delayed Start home screen appears along with the time remaining until your infusion starts ...

Page 33: ... pump in between doses and set a Next Dose Start Time To stop the pump 1 Press the stop start 9 key on the pump 2 When Stop Pump appears select Yes 3 The pump stops The green Running message in the status bar changes to a red Stopped message and Pump is stopping appears briefly 4 If a dose is stopped in progress Interrupted appears on the screen To resume the dose start the pump If you want to can...

Page 34: ...o begin To set the next dose start time 1 Stop the pump if it is running If a dose was delivering when the pump was stopped the Interrupted screen appears 2 In the Tasks menu press U or D to highlight Next Dose Start Time and press S If you do not have permission to set the next dose start time a security code must be entered to unlock the keypad 3 Press U or D until the desired next dose start ti...

Page 35: ...e time and date even when the AA batteries or rechargeable battery pack are removed If the pump is off for a long period of time the correct time and date may not be shown until the pump is powered on and the internal battery recharges set the time and date if necessary To set the time 1 In the Tasks menu press U or D to highlight Change Time and Date and press S 2 In the Change Time and Date menu...

Page 36: ...ess U or D to scroll to the correct minutes and press S to navigate to the AM or PM field to change it if necessary If your pump was set up to use a 24 hour clock the AM and PM fields do not appear Select Save ...

Page 37: ...rrect month and press S to navigate to the day field Note This example shows the Month Day Year date format The date format is shown below the date so that you know which field you are changing 3 Press U or D to scroll to the correct day and press S to navigate to the year field 4 Press U or D to scroll to the correct year and select Save ...

Page 38: ...y snap the door onto the bar that is located on the pump If the pump is powered on and there are audible or visual alarms and on screen help appears on the pump display follow the on screen help see Alarms and Messages on page 39 If the cassette or battery door are loose or damaged or you cannot resolve any alarms by following the on screen help do not use the pump Immediately stop the pump close ...

Page 39: ...em fault alarm occurs contact your health care provider High Priority Alarm This alarm always pauses or stops the pump This alarm is accompanied by a red screen and persists until acknowledged by a key press or until the condition that triggered the alarm goes away If silenced the alarm sounds again after 2 minutes if the alarm condition still exists Medium Priority Alarm This alarm does not stop ...

Page 40: ... some alarms unless it is acknowledged by a key press or until the condition that triggered the alarm goes away Informational priority message These messages do not stop the pump They appear in the status bar for 5 seconds are almost always silent and require no acknowledgement Examples include Cassette Locked and Cassette Unlocked Low priority alarm blue ...

Page 41: ...creens are available for the alarm Help appears above the right soft key To view the help screens select Help 3 Follow the instructions provided on the help screen To page through all available help screens select Next to advance to the next page if available 4 Select Acknowledge at any time to exit Help Retry Help appears at the end of the available help screens to let you view them again If you ...

Page 42: ...__________________________________________________ ______________________________________________________ ______________________________________________________ ______________________________________________________ ______________________________________________________ ______________________________________________________ ______________________________________________________ ___________________...

Page 43: ...43 ...

Page 44: ... Medical design marks are trademarks of Smiths Medical The symbol indicates the trademark is registered in the U S Patent and Trademark Office and certain other countries All other names and marks men tioned are trade names trademarks or service marks of their respective owners 2010 2011 Smiths Medical All rights reserved 2011 08 40 5906 51C 2 ...

Reviews: