PD900 Series
Page 52
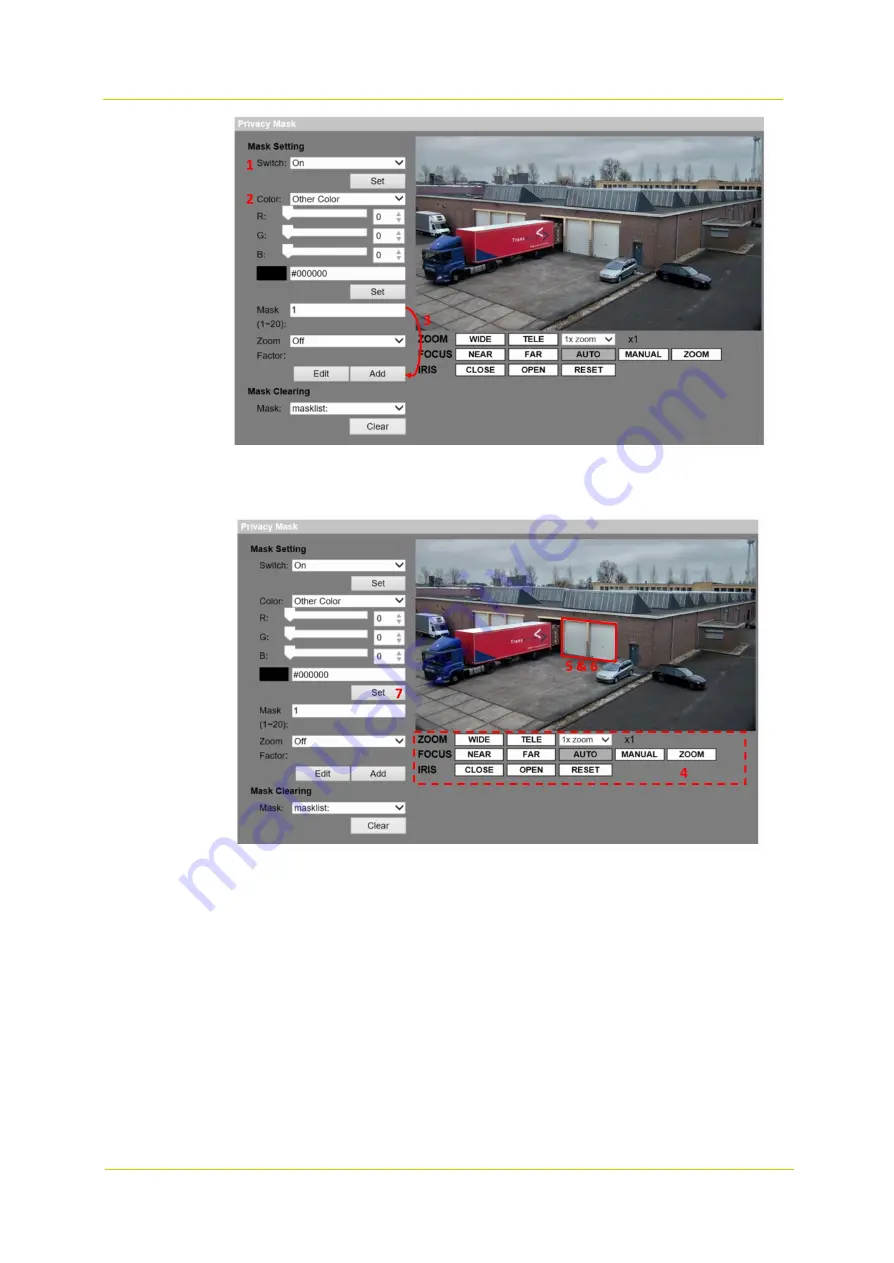
1
Set Switch to
On
and click the
Set
button to activate the Privacy Mask function.
2
Select a color for the mask from the Color drop-down list and click the
Set
button to apply the color setting.
3
Enter the mask number, e.g. 1. If a Zoom Factor is needed, select
On
to enable it. Then, click the
Add
button
and a privacy mask will be displayed on the live video pane on the right.
4
To shift the mask to the desired location, move the mouse cursor to the center of the mask and click and drag.
5
To change the shape and the size of the mask, click any edge of the mask and draw it outward/inward.
6
If needed, set Zoom, Focus and Iris.
7
Click the
Set
button to confirm the setting. The Privacy Mask will be displayed in the color set above.
If you wish to edit the previously set mask, enter the Mask number in the Mask (1~20) entry field and click the
Edit
button. The camera will go to the set location and display the mask. Then, follow steps 4 to 6 to edit the mask. To
cancel mask editing, just click the
Return
button.
Mask Clearing
In this section, you can delete an existing Privacy Mask.
Select the Privacy Mask to be removed from the drop-down list, and click the
Clear
button. The selected Privacy Mask
will be removed without warning.
Summary of Contents for PD900 Series
Page 1: ...User Manual PD900 Series PTZ Dome Camera...
Page 6: ...PD900 Series Page 6...
Page 8: ...PD900 Series Page 8...
Page 54: ...PD900 Series Page 54...
Page 56: ...PD900 Series Page 56...
Page 58: ...PD900 Series Page 58...
Page 60: ...PD900 Series Page 60...
Page 62: ...PD900 Series Page 62...


