background image

Presentation

1

GB 

AUTOSUN SYSTEM

 - 

2008546 - 2008547 - 2008548

5055194B

Read carefully these instruc-

tions before any use.

1/4

 The 

Autosun system

 is a complete solar powered motor system for 

roller shutters in walls and roofs. It comprises:

1- 

12V T3.5 DC EHz Motor, 3, 6 or 10 Nm.

2- 

12V solar panel

3- 

NiMh 12V 2.2Ah battery pack.

As options :
4-  

Emergency power supply ref: 9014738. Allows rapid recharging of the battery for 
the Autosun system.

1 : COLOR+ Wall Hz transmitter

2 : COLOR+ 1/5 channels Hz transmitter

3 : Color Multi 16 / Timer Easy / Timer Multi 

transmitters

Transmitters range :

- 1, 2 and 3 :

 20 m through 2 concrete walls .

-  Do not position the transmitter near metal in order to avoid range losses.

Location of the “PROG” key on Hz 

transmitters:

Compatible transmitters

2

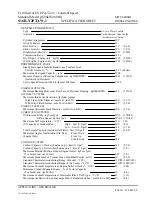
Consign concerning the autonomy of the system

3

•  The weight of roller shutter must comply with the charts determined for the motors. 

Maximum shutter heights are: 1600 mm for 3Nm motors, 2400 mm for 6Nm motors 
and 2700   mm for 10Nm motors.

•  These consign are based on average annual data and for a roller shutter used for 2 

cycles/day (1 cycle = 1 up and 1 down movement). Attention 1 cycle maximum for the 
10 Nm motor in case of north orientation (or South orientation for Australia only).

   In exceptional years, use the backup power supply to recharge the Autosun’s battery.
• The solar panel should always be placed on the shutter housing so as to be as exposed
as possible to the sun’s rays.

Reminder : Solar panel installation

4

ORIENTATION EAST / WEST / SOUTH

ORIENTATION NORTH

3 Nm 

6 Nm 

10 Nm 

2 cycles/day 

1 cycle/day max.

+ Australia (orientation E/W/N) 

+ Australia (orientation S) 

4.1 - Fastening the solar Panel by riveting


Drilling measurements (mm) for panels placed to the left of the box: 

Drilling measurements (mm) for panel placed to the right of the 

box:

28

10,5

30

Ø16

449

28

10,5

30

Ø16

449

-  Ensure that the cables are not damaged during installation. Smooth the edges of all 

the drilled holes.

-  Do not put anything on the solar panel that would filter the sun’s ray (e.g.: paint…).

-  Keep the photovoltaic cells clean by cleaning them with clean water, using a soft cloth 

to avoid scratching them (once a month).

- In winter, do not allow snow to build up on the panels.

- Caution! The cables and connectors must be protected from the roller shutter

 movement.

1

2

3

This system was developped to run into the following countries:  France, Germany, England, Belgium, Netherlands, Czech Republic, Poland, Ireland, Spain, Portugal, 
Italy, Greece, Luxembourg, Denmark, Austria, Switzerland, Hungary, USA (excluding Alaska), Turkey, Lebanon and Australia. For others countries, please contact us.

S.A.S. au capital de 5 000 000  - Z.I. Les Giranaux - BP71 - 70103 Arc-Les-Gray CEDEX - FRANCE - RCS VESOUL B 425 650 090 - SIRET 425 650 090 00011 - n° T.V.A CEE FR 87 425 650 090

Summary of Contents for AUTOSUN 2008546

Page 1: ...re tre expos le plus possible au rayonnement du soleil Rappel Installation du panneau solaire 4 4 1 Fixation du panneau par rivetage Per age pour panneau situ gauche du coffre Per age pour panneau sit...

Page 2: ...fonction du type de coffre consulter le Cahier Technique r f 5057753 Pour plus d information pour l installation du moteur se r f rer la notice r f 5055191 Pour plus d information pour l installation...

Page 3: ...se met automatiquement en rotation en mont e 3 Appuyer sur la touche stop pour immobiliser le moteur 4 Appuyer 2 secondes sur la touche stop pour valider le r glage le moteur effectue une rotation de...

Page 4: ...etteurs programm s 14 Annulation compl te de la programmation 15 Appuyer plus de 12 secondes sur la touche PROG du pack batterie Le moteur effectue trois reprises une courte rotation dans un sens puis...

Page 5: ...power supply to recharge the Autosun s battery The solar panel should always be placed on the shutter housing so as to be as exposed as possible to the sun s rays Reminder Solar panel installation 4 O...

Page 6: ...bout installation of the battery depending on the type of case see Technical booklet ref 5059076 For more information about installation of the motor see technical leaflet ref 5055191 For more informa...

Page 7: ...the keys STOP and UP The motor will run automatically in the UP direction 3 Press the STOP key to immobilize the motor 4 Press 2 seconds the STOP key to validate the setting The motor will run for 0 5...

Page 8: ...rammed transmitters 14 Cancelling programming 15 Press the PROG key of the battery pack more than 12 seconds The motor will run 3 times in one direction and then in the other The operation is complete...

Page 9: ...utzung 2 Zyklen Tag aus 1 Zyklus 1 x Hochfahren und 1 x Herunterfahren Achtung Bei einer Ausrichtung nach Norden oder nach S den in Australien ist f r den Motor mit 10Nm maximal 1 Zyklus pro Tag vorge...

Page 10: ...5055192 F r weitere Informationen ber den Einbau der Batterie nach Kastenart siehe Technisches Handbuch Nr 5059076 F r weitere Informationen ber den Einbau der Motor siehe Anleitung Nr 5055191 F r we...

Page 11: ...hzeitig Der Motor f hrt jetzt in AUF Richtung 3 Dr cken Sie jetzt die STOP Taste um den Motor anzuhalten 4 Zur Speicherung der Endbegrenzung OBEN dr cken Sie 2 Sekunden lang die STOP Taste Der Motor l...

Page 12: ...Endbegrenzung 13 L schen aller programmierten Sender 14 L schen der Programmierung 15 Etwa 12 Sekunde lang auf Taste PROG des Batteriepakets dr cken Der Motor f hrt drei Mal eine kurze Drehung in ein...

Page 13: ...luik met 2 cycli dag 1 cyclus 1 beweging omhoog en omlaag Let op 1 cyclus maximum 10Nm in Noord ori ntatie of Zuid ori ntatie voor Australi Voor de uitzonderlijke jaren moet men zich bedienen van de n...

Page 14: ...van de accupack volgens het kasttype naar het Technisch Schrift ref 5059076 Zie voor verdere informatie over de montage van de motor de handleiding nr 5055191 Zie voor verdere informatie over de mont...

Page 15: ...op STOP om de instellingen vast te leggen De motor zal bevestigen door in beide richtingen kort te bewegen Ga naar stap 8 2s 1 D 2 3 6 5 4 1 Positioneer de motor in de bovenste eindpositie met de kno...

Page 16: ...van de eindeloopposities 13 Het wissen van alle geprogrammeerde zenders 14 Het wissen van de programmering 15 Druk meer dan 12 sec op de PROG toets van het batterijpack De motor geeft drie keer een ko...

Page 17: ...n de la persiana enrollable a raz n de dos ciclos d a 1 ciclo 1 subida y 1 bajada Atenci n 1 ciclo m ximo para 10Nm en orientaci n Norte u orientaci n sur en Australia Para los a os excepcionales uti...

Page 18: ...bater a en funci n del tipo de caja refe rirse al Pliego T cnico Ref 5059076 Para mayores informaciones para la instalaci n del motor referirse al folleto referencia 5055191 Para mais informa es sobr...

Page 19: ...y subida para memorizar el punto de parada de bajada El motor se pone automaticamente en rotaci n de subida 3 Presionar sobre la tecla stop para parar el motor 4 Presionar 2 segundos sobre la tecla st...

Page 20: ...te 12 segundos en la tecla PROG del pack de bater a El motor efect a en tres ocasiones una corta rotaci n en un sentido y luego en el otro El motor se encuentra en su configuraci n de origen ning n em...

Page 21: ...yklach dziennie 1 cykl 1 podnoszenie i 1 opuszczanie Uwaga maksymalnie 1 cykl dla 10 Nm w kierunku p nocnym lub w kierunku po udniowym dla Australii W przypadku lat wyj tkowych nale y korzysta z zasil...

Page 22: ...192 Wi cej informacji na temat instalacji zestawu bateryjnego w zale no ci od rodzaju skrzynki patrz specyfikacja techniczna nr 5059076 Wi cej informacji na temat monta u nap du patrz ulotka nr 505519...

Page 23: ...ra 3 Nacisn przycisk Stop aby zatrzyma nap d 4 Naciska przez 2 sekundy na przycisk Stop aby zatwierdzi ustawienia Nap d wykona obr t przez 0 5 sekundy w jednym kierunku a nast pnie w drugim Nale y prz...

Page 24: ...ne wykasowanie zaprogramowania 15 Naciska ponad 12 sekund na przycisk PROG zestawu bateryjnego Nap d 3 razy wykonuje kr tki obr t w jednym kierunku a nast pnie w drugim Nap d powraca do swojej orygina...

Page 25: ...e doporu en orientace syst mu na v cho dn ji n nebo z padn stranu P i orientaci na severn stranu doporu ujeme denn etnost pou it 1 cyklus Co se t e let s v jime n mi klimatick mi podm nkami k dobit ba...

Page 26: ...2 V ce informac ohledn integrace baterie v z vislosti na typu krytu z sk te v technick slo ce s 5059076 V ce informac t kaj c ch se instalace motoru z sk te v n vodu s 5055191 V ce informac t kaj c ch...

Page 27: ...se s m rozjede nahoru 3 Zastavte motor tla tkem stop 4 Podr te stop na 3s motor cukne na ob strany P ejd te na bod 8 2s 1 D 2 3 6 5 4 1 Pomoc tla tek nahoru a dol nastavte horn koncovou polohu 2 Stis...

Page 28: ...abyste provedli rychl dobit baterie Fungov n motoru se vr t do norm lu pouze v p pad e nap t baterie dos hne nap t vy ho ne 12V 4 4 Zm na nebo prava horn ho nebo doln ho koncov ho dorazu 13 Vymaz n ve...

Reviews: