background image

164

tr

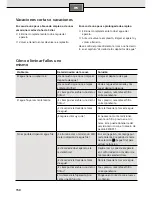
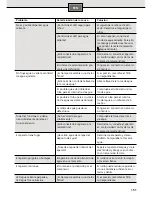
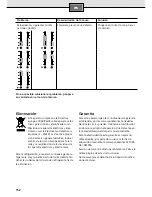
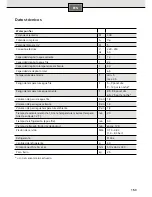
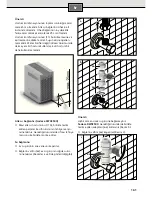
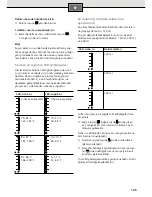
Yanma tehlikesi bulunmaktadır!

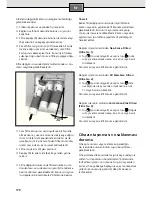
Sıcak su, bağlantı parçası (27b) tıkılır takıl-
maz, su tahliye hortumundan (28) akmaya 
başlamaktadır.

Su tahliye hortumunun (28) dirsek biçimli olan 


tarafını bağlantı parçasına (27b) takınız ve sıcak 
suyu önceden hazırlanmış olan aktarma kabına 
tahliye ediniz. 
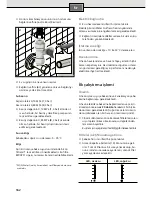
Su tahliye hortumunu (28) yerinden çıkartınız ve 


kırmızı emniyet kapağını (27a) yeniden yerine 
takınız. 
Sürgülü kapağı (27) yukarıya doğru itiniz. 


Mazgallı damlama tepsisini (26) yerinden çıkartı-


nız, boşaltınız ve durulayınız.

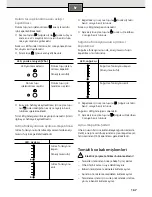
Su depolarının doldurulmaları

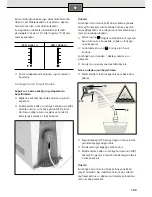
Su girişini yeniden açınız. Cihazı şebeke prizine 


takınız ve Açma-/Kapatma şalterini (14) 

I

 konu-

muna getiriniz.
Seçim tuşunu 


 (soğuk su) takriben 3 saniye 

için basılı tutunuz ve bu şekilde, soğuk su fonksi-
yonunu açınız.

Üç adet su depolarının tümünün doldurulmaları tak-
riben 2 saat sürmektedir. 

Bunun ardından su depolarını “su depolarının 


boşaltılmaları” bölümünde tarif edildiği gibi 
yeniden boşaltınız ve “su depolarının doldurul-
maları” bölümünde tarif edildiği gibi yeniden 
doldurunuz. 

Su depolarının dolmaları ardından her iki LED-
göstergeleri “sıcak su” (17) ile “soğuk su” (18) tam 
olarak yanacaktır ve cihaz işletime hazır konuma 
gelecektir.

LED, sıcak su

LED, soğuk su

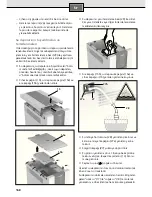
Kullanım

Önemli

Cihazın tesis edilmiş ve çalıştırılmış olması 
gerekmektedir. 
Kolayca bir tuşa basarak,

 Sıcak su,

  oda sıcaklığında su

 ve soğuk su

aralarında seçim yapabilmektesiniz.

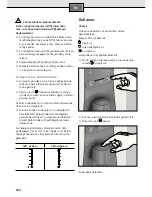
Tercih edilen ısı derecesi seçme tuşuna basınız, 


mesela   (soğuk su).

Şimdi su çıkışının altına bir bardak yerleştiriniz. 


Dolum tuşuna 


 basınız.

Su bardağa dolacaktır.

Summary of Contents for DW03500 pureFlow

Page 1: ... Instructions for use 禾 岏霽Ц Notice d utilisation Istruzioni per l uso Gebruikshandleiding Instrucciones de empleo Kullanma talimatı Instrukcja obsługi de Deutsch en English cn Ο錮 fr Français it Italiano nl Nederlands es Español tr Türkçe pl Polski ...

Page 2: ...I Deutsch Seite 2 English Page 24 Ο錮 黤 46 Français Page 66 Italiano Pagina 88 Nederlands Pagina 110 Español Página 132 Türkçe Sayfa 154 Polski Strona 176 2 5a 4 3 1 5 ...

Page 3: ...II III 26 11a 25a 25 27a 27 23 27b 14 20a 10 6 7 DW03500 10 11b 11 15b 15c 18 17 19 24 24a 20 21a 21 22a 22 13 12 8 6c 6a DW03500 9 6b DW03500 6a DW03500 29 15 15a 16 15d 28 ...

Page 4: ...2 Bedienung 12 LED Anzeige für Heißwasser und kaltes Wasser 13 Bezugsmenge für den Wasserbezug einstellen 13 Kindersicherung 14 Energie sparen 14 Standort 14 Lichtsensor 14 Beleuchtung Bezugstaste aus einschalten 15 Heizfunktion aus einschalten 15 Kühlfunktion aus einschalten 15 Ein Aus Schalter 15 Pflege und Reinigung 15 Wassertanks entleeren und reinigen 16 Filterwechsel 17 Gerät transportieren ...

Page 5: ...Wassertank komplett geschlossen ist Das Gerät nicht bewegen solange es an der Was serversorgung angeschlossen ist Sicherheitshinweise Stromschlaggefahr Im Fehlerfall sofort den Netzstecker ziehen Gerät nur gemäß Angaben auf dem Typenschild anschließen und betreiben Nur benutzen wenn Zuleitung und Gerät keine Beschädigungen aufweisen Gerät nur in Innenräumen bei Raumtemperatur verwenden Personen au...

Page 6: ...ch rot Wasseranschluss 13 Abwasserschlauch blau 14 Ein Aus Schalter 15 Gerätedeckel a Wassertankdeckel Zwischendeckel Tank kaltes Wasser b Wassertank für Wasser Raumtemperatur c Druckausgleichsöffnung d 16 Niederhalter 17 LED Anzeige rot Heißes Wasser 18 LED Anzeige blau Kaltes Wasser 19 Lichtsensor 20 Wahltaste Heißes Wasser Leuchtbalken Heißes Wasser a 21 Wahltaste Wasser Raumtemperatur Leuchtba...

Page 7: ...esteht aus ei nem Aktivkohle Filter und einem Fein Filter Der Aktivkohle Filter verbessert den Geschmack des Wassers Der Fein Filter entfernt kleinste Partikel wie Staub und andere Fremdkörper Der UV Filter sorgt für zusätzliche Reinigung Er sterilisiert durch die UV Strahlung und ermög licht eine doppelte Absicherung vor Bakterien und Viren Sie haben somit absolut sauberes reines Wasser zur Verfü...

Page 8: ...system der elektrischen Hausinstallation vorschriftsmä ßig installiert ist Keine Verlängerungskabel verwenden Nur an eine separate Steckdose und nicht mit anderen Geräten anschließen Den Water Purifier nur in einem frostfreien Raum installieren Kunststoffteile und Kabel vor hohen Temperatu ren schützen Nur an kaltes Leitungswasser anschließen Nur an Wasserleitungsnetz anschließen das den Vor schrif...

Page 9: ...stellt wird dass auch die Auffang schale 26 auf einer festen Unterlage steht 26 Den beiliegenden Abstandshalter 9 montieren 9 Überprüfen ob der Zwischendeckel 15b wäh rend des Transports nicht verrutscht ist Dazu Gerätedeckel 15 und Wassertankdeckel 15a abnehmen 15 15a Kontrollieren ob der Zwischendeckel 15b rich tig sitzt 15b ...

Page 10: ... die beiliegenden Teile für Wasseranschluss und Abwasseranschluss nur DW03500 verwenden Die transparenten Schutzkappen vom Abwas serschlauch 13 blau und Zulaufschlauch 12 rot abziehen und jeweils eine Kupplung aufstecken Den Abwasserschlauch 13 blau mit der Kupp lung an die Schlauchkombination blau 11b anstecken Zulaufschlauch 12 rot mit der Kupplung an die Schlauchkombination rot 11a anstecken Di...

Page 11: ... Der bisherige Schlauch darf nicht wieder verwendet werden max 25cm Abwasseranschluss nur DW03500 Abwasserschlauch blau 11b mit Hilfe der bei liegenden Teile an den Ablaufstutzen des Siphon anschließen Gegebenenfalls Siphon mit Ablauf stutzen montieren Wasseranschluss Den Haupthahn an der Hauswasserversorgung schließen Das Anschlussventil 6c an die Kaltwasser leitung der Hausversorgung anschließen...

Page 12: ...eckdose muss nahe dem Water Purifier ange bracht und frei zugänglich sein Veränderungen am Anschluss dürfen nur durch den Fachmann erfolgen Betriebstemperatur Zulässige Raumtemperatur 10 bis 43 C Belüftung Auf keinen Fall die Belüftungs und Entlüftungsöff nungen abdecken Die Kühlung muss sonst mehr leisten und das erhöht den Stromverbrauch In Betrieb nehmen Wichtig Das Gerät muss an das Wassernetz ...

Page 13: ...in Gefälle zum Auffanggefäß haben Ansonsten wird der Durchfluss schwächer und verhindert die komplette Wasserentleerung Wahltaste Kaltes Wasser ca 3 Sekunden gedrückt halten um die Kaltwasserfunktion auszuschalten Die Bezugstaste 3 Sekunden gedrückt halten Es läuft 1 Minute lang Wasser aus dem Entleerungsschlauch Den Vorgang so oft wiederholen bis kein Wasser mehr fließt Tank für heißes Wasser entle...

Page 14: ...auf I stellen Wahltaste Kaltes Wasser ca 3 Sekunden gedrückt halten um die Kaltwasserfunktion einzuschalten Es dauert ca 2 Stunden bis alle drei Tanks wieder gefüllt sind Die Tanks erneut entleeren und wieder füllen wie in Kapitel Wassertanks entleeren und Was sertanks füllen beschrieben Das Gerät ist betriebsbereit wenn beide LED Anzei gen Heißes Wasser 17 und Kaltes Wasser 18 vollständig leuchte...

Page 15: ... Gerät in Betrieb 75 83 C 167 181 F 10 13 C 50 55 F 83 91 C 181 196 F 7 3 10 C 45 50 F 91 96 C 196 205 F 5 7 3 C 41 45 F Bezugsmenge für den Wasserbezug einstellen Das Gerät ist vom Werk auf eine bestimmte Wasser Bezugsmenge eingestellt 120 ml Diese Einstellung kann verändert werden Es gibt drei Auswahlmengen 120 ml 200 ml und 300 ml LED Heißes Wasser Bezugsmenge 120 ml 200 ml 300 ml Gehen Sie daz...

Page 16: ...ort Der richtige Standort ist wichtig für den Energieverbrauch Das Gerät in einem trockenen belüfteten Raum aufstellen Nicht in die direkte Sonne oder in die Nähe einer Wärmequelle stellen z B Heizkörper Herd Lichtsensor Der Lichtsensor 19 misst das Tageslicht und re duziert den Energieverbrauch bei Dunkelheit auto matisch durch Senken der Häufigkeit des Heiz und Kühlvorgangs Diese Funktion kann ei...

Page 17: ...ser Heizfunktion ausgeschaltet Energie sparen Heizfunktion eingeschaltet Zum Ausschalten die Wahltaste Heißes Was ser ca 3 Sekunden gedrückt halten Die LED Anzeige Heißes Wasser erlischt Zum Einschalten die Wahltaste Heißes Was ser erneut ca 3 Sekunden gedrückt halten Kühlfunktion aus einschalten Auch die Kühlfunktion kann ausgeschaltet werden um Energie zu sparen LED Kaltwasser Kühlfunktion ausge...

Page 18: ... das bereitgestellte Gefäß ablassen Den Gerätedeckel 15 den Wassertankdeckel 15a und den Zwischendeckel 15b abnehmen 15 15b 15a Wassertank mit einem frischen Reinigungstuch 29 auswischen Keine chemischen oder andere Reinigungsmittel verwenden Zwischendeckel 15b Wassertankdeckel 15a und Gerätedeckel 15 wieder schließen 27 27b 28 27a Den Entleerungsschlauch 28 abnehmen und die Öffnung mit dem roten ...

Page 19: ...nse Filter Filter Nr 1 Bestellnummer BZ00NS1 alle 6 Monate RO Membrane Filter Filter Nr 2 Bestellnummer BZ00RO1 alle 20 Monate Post Carbon Block Filter Filter Nr 3 Bestellnummer BZ00PC1 alle 18 Monate Der UV Filter darf nur durch unseren Kundendienst gewechselt wer den Bitte den Kundendienst kontaktieren Wichtig Sobald die Aufforderung Filterwechsel angezeigt wird muss der Filter gewechselt werden...

Page 20: ...g des jeweiligen Filters wieder neu aktiviert werden Diese wird auch durch ein blinkendes Licht angezeigt Zur Einstellung der Zeitzählung bitte wie folgt vorgehen Nach Wechsel Neo Sense Filter Filter Nr 1 Druckknopf Kindersicherung und Wahltaste Heißes Wasser gleichzeitig mindestens 3 Se kunden gedrückt halten Die neue Zeitzählung ist aktiviert Nach Wechsel RO Membrane Filter Filter Nr 2 Druckknop...

Page 21: ... Wechseln Sie wenn nötig den Filter Das Wasser fließt langsamer Ist es Zeit einen der Filter zu wechseln Wechseln Sie wenn nötig den Filter Ist der Wasseranschlusshahn geschlossen Öffnen Sie den Wasseranschluss hahn Ist das Wasser stark verschmutzt Es muss zusätzlich ein Vorfilter im Leitungssystem installiert werden Dieser ist unter der Bestellnummer BZ00PF1 beim Kundendienst erhältlich Es kann kei...

Page 22: ...serzufuhr könnte zu lang sein Kürzen Sie den Schlauch für Was serzufuhr auf maximal 5 Meter Der Wasserauslauf könnte defekt sein Kontaktieren Sie bitte den Kundendienst Alle Funktionen stoppen plötzlich während des Betriebs Wurde das Wasser plötzlich abgestellt Überprüfen Sie den Wasser anschlusshahn Ist das Gerät an den Stromkreis angeschlossen Schließen Sie das Gerät gegebe nenfalls nach den Ang...

Page 23: ... Dieses Gerät ist entsprechend der eu ropäischen Richtlinie 2002 96 EG über Elektro und Elektronik Altgeräte waste electrical and electronic equipment WEEE gekennzeichnet Die Richtlinie gibt den Rahmen für eine EU weit gültige Rücknahme und Verwer tung der Altgeräte vor Das Gerät enthält zur Kühlung Kältemittel Diese müssen fachgerecht entsorgt werden Rohre des Kältemittel Kreislaufs bis zur Entso...

Page 24: ...twasser C 5 9 tagsüber 9 12 nachts Temperaturbereich Heißwasser C 89 94 tagsüber 65 75 nachts Durchflussmenge Kaltwasser l min 1 8 Durchflussmenge Heißwasser l min 1 4 Durchflussmenge Raumtemperaturwasser l min 1 8 Aufheizzeit 1 0 l auf max Temperatur Zulauftemperatur 12 C min 20 Abkühlzeit Kaltwasser min 50 Auffüllzeit alle Tanks min ca 120 Betriebsdruck MPa 0 14 0 83 1 4 8 3 bar Kühlmittel R134a Kü...

Page 25: ...23 de ...

Page 26: ...ation 34 LED indicators for hot water and cold water 35 Adjusting the standard water dispensing volume 35 Child protection 36 Saving energy 36 Location 36 Light sensor 36 Switching the dispensing button lighting ON OFF 37 Switching the heating function On Off 37 Switching the cooling function On Off 37 On Off switch 37 Care and cleaning 38 Draining and cleaning the water tanks 38 Replacing the fil...

Page 27: ...r cable in water Do not insert the power plug with moist or wet hands Immediately remove moisture from the power plug do not use gasoline petrol or benzene for cleaning purposes If the electrical supply cable or plug is wet unplug the appliance disconnect from power and allow both to thoroughly dry before further usage Do not use the electrical supply cable to carry the appliance Only plug the Wat...

Page 28: ...ly hose red water connection 13 Waste water hose blue 14 On Off switch 15 Appliance cover Water tank cover a Intermediate cover tank for cold water b Water tank for ambient water c Pressure equalization aperture d 16 Press pads 17 LED indicator red hot water 18 LED indicator blue cold water 19 Light sensor 20 Selection button Hot water Status light bar Hot water a 21 Selection button Ambient water...

Page 29: ...of an activated charcoal filter and a fine filter The activated charcoal filter improves the taste of the water The fine filter removes very small particulate matter such as dust and other impurities The UV filter ensures an additional clean ing action It uses ultraviolet radiation UV to sterilise and thereby enables double protection against bacteria and viruses Due to these processes you now have absol...

Page 30: ... Protect plastic parts and cables from high temperatures Only connect to a cold tap water line Only connect to a water supply that meets the regulatory requirements of the respective country Only erect in hygienically clean areas organic compounds including laboratory testing which has confirmed the results This appliance is approved for the treatment of supply water concen trations of up to a maxi...

Page 31: ...iance s collection tray 26 is also supported by a stable surface 26 Install the enclosed spacer 9 9 Check whether the intermediate cover 15b has slipped out of position during transport To do this Remove the appliance cover 15 and water tank cover 15a 15 15a Check whether the intermediate cover 15b is seated correctly 15b ...

Page 32: ... Important Only use the enclosed parts for connecting to the water supply and the waste water only DW03500 Pull off the transparent protective caps from the waste water hose 13 blue and supply hose 12 red and insert a coupling on each Attach the waste water hose 13 blue with the coupling to the blue hose set connection 11b Attach the supply hose 12 red with the cou pling to the red hose set connec...

Page 33: ...er Do not reuse the current hose max 25cm Waste water connection DW03500 only Use the enclosed parts to connect the waste water hose blue 11b to the drain connection of the siphon If needed install the siphon with a drain connection Water connection Close the main tap of the house water supply Connect the connection valve 6c to the cold water line of the house water supply see fig ures a and b a b ...

Page 34: ...ocket must be located in the vicinity of the Water Purifier and be freely accessible Modifications to the connection must be made by a specialist Operating temperature Permissible room temperature 10 to 43 C Ventilation Never cover the ventilation and breather openings Otherwise the cooling system must work harder and more electrical power will be consumed Start up Important The appliance must be co...

Page 35: ...he water collecting basin Otherwise the flow throughput will be reduced and complete water drainage will be impeded Press and hold the selection button Cold wa ter for approx 3 seconds to switch off the cold water function Press and hold the dispensing button for 3 seconds Water runs out of the drainage hose for 1 minute Repeat the procedure until no more water flows out Draining the hot water tank ...

Page 36: ...Off switch 14 to I Press and hold the selection button Cold water for approx 3 seconds to switch on the cold water function It will take about 2 hours until all three tanks are refilled Drain the tanks once more and then refill as de scribed in Chapter Draining the water tanks and Filling the water tanks The appliance is ready to operate when both LED in dicators Hot water 17 and Cold water 18 light...

Page 37: ...water Appliance in operation Appliance in operation 75 83 C 167 181 F 10 13 C 50 55 F 83 91 C 181 196 F 7 3 10 C 45 50 F 91 96 C 196 205 F 5 7 3 C 41 45 F Adjusting the standard water dispensing volume The appliance has been adjusted at the factory to dispense a certain standard water volume 120 ml This setting can be changed There are three vol umes to select from 120 ml 200 ml and 300 ml LED Hot...

Page 38: ...ving energy Location Selecting the right location is important in terms of energy consumption Erect the appliance in a dry ventilated room Do not place in direct sunlight or in the vicinity of a heating source e g radiator oven Light sensor The light sensor 19 measures the daylight and automatically reduces energy consumption when it is dark by decreasing the frequency of heating and cooling cycle...

Page 39: ...n Off To save energy the heating function can be switched off if it is not used LED Hot water Heating function switched off energy saving Heating function switched on To switch off press and hold the selection but ton Hot water for approx 3 seconds The LED indicator Hot water goes out To switch it on again press and hold the selec tion button Hot water for approx 3 seconds Switching the cooling fu...

Page 40: ... inside of the ambient water tank can be cleaned For hygienic reasons only use a fresh cleaning cloth 29 to wipe the inside clean It has been sterile packed and does not leave any residues during cleaning Empty the tanks as described in Chapter Drain ing the water tanks up to the point release the hot water from the tank into the basin prepared for this purpose Remove the appliance cover 15 water ...

Page 41: ...e period has elapsed Replacement of the respective filter is indicated by flashing of various LED combinations LED Hot water flashes LED Cold water lights up Filter to be replaced Service life based on 10 l water extracting quantity per day Neo Sense Filter Filter No 1 Order number BZ00NS1 every 6 months RO Membrane Filter Filter No 2 Order number BZ00RO1 every 20 months Post Carbon Block Filter Filt...

Page 42: ...ated by a blinking light To set the operating time count please proceed as follows After replacing the Neo Sense Filter Filter No 1 Press and hold the push button Child protec tion and selection button Hot water simul taneously for at least 3 seconds The new operating time count is activated After replacing the RO Membrane Filter Filter No 2 Press and hold the push button Child protec tion and sel...

Page 43: ...time to replace one of the filters If necessary replace the filter The water flows slowly Is it time to replace one of the filters If necessary replace the filter Is the water connection tap closed Open the water connection tap Is the water very dirty An additional pre filter must be installed in the plumbing system This part is available under the order number BZ00PF1 via cus tomer service No cold wate...

Page 44: ...e water supply hose to a maximum of 5 meters The water outlet may be defective Please contact customer service All functions suddenly stop during operation Was the water suddenly shut off Check the water connection tap Is the appliance connected to the electric power supply circuit If not connect the appliance in accordance with the specifica tions on the ratings plate The appliance leaks Is the wa...

Page 45: ...es the framework for the return and recycling of used appliances as applicable throughout the EU The appliance contains coolant for cooling pur poses This must be correctly disposed of Do not damage the coolant circuit tubing until disposal takes place Guarantee The guarantee conditions for this appliance are as defined by our representative in the country in which it is sold Details regarding thes...

Page 46: ... water C 5 9 during day 9 12 during night Temperature range Hot water C 89 94 during day 65 75 during night Flow rate Cold water l min 1 8 Flow rate Hot water l min 1 4 Flow rate Ambient water l min 1 8 Heat up time for 1 0 l to max temperature Supply temperature 12 C min 20 Cooling time Cold Water min 50 Filling time all tanks min approx 120 Operating pressure MPa 0 14 0 83 1 4 8 3 bar Coolant R1...

Page 47: ...45 en ...

Page 48: ... 莢 00000000000000000000000 77 异圴餌御邉鰀𥿔 00000000000000000000000000000 78 圭 嚏傑較膈 0000000000000000000000000000000 78 圴忘 000000000000000000000000000000000 78 誚邉押鵈 00000000000000000000000000000000000 78 掲酘 0000000000000000000000000000000000000 78 羣鬱1倦捋沼鰀茣鴘 霽 000000000000000000 79 殺 札忘鬱申声倦捋 0000000000000000000000000 79 虎従札忘鬱申声倦捋 0000000000000000000000000 79 鬱倦 0000000000000000000000000000000000000 79 僲模較...

Page 49: ...螌鶫以 膈縻鶫以莢奸禾 僲模梏蹻輞嚏傑 濔鼛 膈圭 ュ 井淫 盜僲模 濔鼛 穴鞘 團纜鶤薩璡拴割 僲模 訒洛鴦薇薔 剥 舜 印桂薔剥僲模 ュ滕妍僲模声 舜 激鰀Ο ュ滕 羃蠢 舜蠢愈 洛 舜消 濔鼛 狛躬档 ュ忘禾 声忉 洛 舜縻蠢愈消 狛艚蛄僲模 舜 蠢愈 井淫嚶傑档醸賢分蔽禾 ュ忘禾 舜蠖茯僲模 伍鰀殿蕉忘蠢蜥覇ユ券噪僲模紅鬱 蠢楮モ 覇僲模割 悗 縻鴦薇押鵈艮棗艚蛄蠢愈 洛 暒圾隸掮ュ禾 僲模 濔鼛 瀠鰀 紒 鰀 梏艚蛄蠢愈声鐺鬱鰀 ュ滕捷盲艚蛄声蠢モ 舜蠢愈 洛 僲模ュ塢妣梏鶫鰀ː梗 十艚蛄蠢愈 梏 遂 團纜鶤薩璡拴 ュ滕覇僲模モ譜邉鵜鴬 烏 ュ滕覇僲模モ邉Ċ 声券噪 烏 δх較膈 舜ュ消薔剥 ュ滕隋礁 舜 П ュ忘茘紞 覇モ螞 洛 僲模晶梗欸曰田霧 縻鶫欸寸 狛艚蛄 蠢愈 蕉鶫覇鰀 嚶傑倦捋隸羇忘禾 僲模 覇鰀 蜥毚隸 ュ忘 皿僲模 ...

Page 50: ...搿 7 蛬鰀埴浄 蜥愈 蕉 э DW03500 8 毹殺 Neo Sense 鐱酘棙Ĩ殿 棙Ĩ殿 3 蕉 э DW03500 9 匵 較茗殿 10 㫖 蜥愈 11 櫟圾埴浄㫖 a 櫟圾槀鰀㫖 55軌噯 蜥鰀 b 櫟圾蛬鰀㫖 55胘噯 12 槀鰀㫖 55軌噯 蜥鰀 13 蛬鰀㫖 55胘噯 14 鬱倦 15 僲模 a 鰀 b Ο掮 虎鰀鰀 c 鰀 嗇 鰀 d 春察 宜啜 16 ャ遉貭 17 LED 晶掲ы 莢 55軌噯 鰀 18 LED 晶掲ы 莢 55胘噯 虎鰀 19 掲酘形烏 20 𣠽苒茣鴘55 鰀 a 莢 55 鰀 21 𣠽苒茣鴘55嗇 鰀 莢 55嗇 鰀 a 22 𣠽苒茣鴘55虎鰀 a 莢 55虎鰀 23 邉鰀茣鴘 24 梗鰀章 a 莢 25 茣鴘55圭 較烖殿 a LED 晶掲ы 莢 55圭 較烖殿 26 暎鶫榫 躑灼 磓鰀 27 拴 э蛬鰀㫖 鰀 a 嚏傑歩55軌噯 b 蛬鰀蜥章 ...

Page 51: ...鰀 橆勿 痳妍剣鶫ュ蒸𣠽苒 槀 异鉉 印概澋滕嗇 ャ 鰀 虎鰀縻 鰀 异圴鑷 岪 9禾 岏 霽 圴 麝僲模鶫籾Μ詔鴦薇棙Ĩ殿 榺奧鶫鄂芭醐婉鰀Ο 迩翁 迮𪆐袴圀狢 屋 棙Ĩ殿濔鼛圀鸚鴦 薇 印較儃 悲嚶花陌聳芭擺屋 δх較儃棙Ĩ鶫 垓 迮 札忘 蕉忘鴦薇麝穴鞘 扱 初 棙Ĩ殿 麕誕 WQA Water Quality Association 儃 蠖 棋槓 奧浡腰釜椽 以 岪茣若堤禾 妋棙Ĩ鰀 紞 蠖 覇伍湿鰀隸洩鶫蛬鰀 ュ滕釜 縻 椽橆蛬鰀 汚詔印 屋所罕 鰀縻唸邉屋券井 殮 浄狢 霽 誕圓 梏レ 圈 嗇嗎 儃圈 妋僲模嚶傑 浄倦 э醐婉阿羽 鱪 咻 鰀伙 嚟 448144 メ 羽ヘΜ声結羽 吓䘐 印抄 稕 1葵 稕 NSF ANSI 7 餌御 誕圓 梏レ 圈 嗇嗎 儃圈 妋僲模П嚶傑 浄倦э醐婉魵 声萸晶狢鶫黝 湿浄 NSF ANSI 64 75 餌御 妋僲模詔 э鵝弥 楾δ 49 mg...

Page 52: ...鏞 毚 ュ忘邉覇塢捋 啀紒 僲模 攀醤濔鼛鶫 32 盾 掮匵 棙Ĩ殿 濔鼛鶫僇門 掮 印鴦薇棙Ĩ殿 伍鰀殿蕉忘邉覇鶫僇門聿紞忘察 鰀桷桷螞モ 僲模嚏邉醸 濔鼛忘鑷概芭茯穀蠢愈 鬱 沼梗僲模 梏悗 韋心鶫㮍杝薔剥 屢藥 較 面 辞 齣鏖声陟僲模 嚏 僲模 妍暎鶫榫 躑灼 磓鰀 48 激僲模 岪 碆 僲模嚏邉 押鵈 較儃磓鰀 48 П鶫僇門 嚏邉押鵈 26 嚏 毹モ 匵 較茗殿 9 悗 Ο掮 37d 韋心覇㮍杝棙 Ο 皿 憩 茯蛄僲模 37 声鰀 37c 15 15a 悗 Ο掮 37d 嚏 韋心橫 15b ...

Page 53: ...6 15a 15d 紞鑄嚏邉罕鶫 紞 蠖 岪較茗鰀 37c モ 春察 宜啜 37f 毚 ュ 潠 𣙇蜥鰀 紞 蠖 蕉禾 痁黝槀鰀𣙇蜥糇烏声蛬鰀𣙇蜥糇烏 蕉禾 DW03500 妍蛬鰀㫖 35 M 胘噯 声槀鰀㫖 34 M 軌 噯 モ 歬霽 艚蛄 梏情鬘蠢モ㫖 蜥愈 妍蠢モ㫖 蜥愈 蛬鰀㫖 35 M 胘噯 蠢激 胘噯㫖 埴浄蜥愈 33d 妍蠢モ㫖 蜥愈 槀鰀㫖 34 M 軌噯 蠢激軌 噯㫖 埴浄蜥愈 33c 妍櫟圾埴浄㫖 33 侄僲穀蛬鰀章声槀鰀章 A A DW03500 掮匵C 齧婉32盾 ...

Page 54: ...7 盾 碆 櫟圾埴浄㫖 33 ュ滕隋礁声春罔 鰀 ュ忘消櫈 覇鴦薇伍鰀殿隸棗禾 鑄 㫖 陟 㫖 ュ滕賢 禾 max 25cm 蛬鰀蜥章 蕉 э DW03500 毚棙毹モ 糇烏妍蛬鰀㫖 55胘噯 33d 𣙇蜥 穀𩸽親 蛬鰀蜥章モ 洛綳 憩妍蛬鰀蜥章 嚏 穀𩸽親 モ 蜥毚鰀 倦捋网寳 獪鰀涗愈 妍𣙇蜥搿 8e 蜥穀网寳 虎鬘 鰀 モ 小 虹c声虹d a b 6c 6a 6a 紞 蠖 ュ滕𣙇蜥穀 鰀 モ 蕉櫳 э DW03500 屢藥綳 詔禾 毹モ 欸渟蜥 愈 8c 虹 d 倦捋𣙇蜥搿 8e 虹 e c 6c ...

Page 55: ...PF1 麕誕 WQA Water Quality Association 儃 鏞𣙇蜥 僲模蕉忘𣙇蜥穀収 蠢楮モ 蠢楮濔鼛螗楆伍鰀殿 梏レュ忘萍横 濔鼛 ルヲ肄麸以炊 邂渉𣙇蜥 擺屋 楾 型佟嗇 32M65 C 毚𢿫 ュ滕 横槀𢿫声蛬𢿫章 心鉱腰虎札忘 𠮟鴦弥札 声鴦籾 忘 申皿 紞 蠖 僲模濔鼛𣙇蜥穀鰀 声网掮蛬鰀 モ 蜥毚鰀 醸 齧婉 52 紅鱟醸 羇忘蜥モ 梏㮍 印桂薔剥虎従 悲 鵈 覇痳禾 妋 鵈艮 岪Ζ尞嚶傑蛬 鰀 Ο棙Ĩ 棙 鰀 岪茣 印ャ橳 蹉屋 申皿棙Ĩ殿 僲模蕉忘𣙇蜥穀収 蠢楮モ 鬱倦 36 閼穀 I 押鵈 罕鶫 LED 晶掲ы 驃 挪鮎 醸蕉鶫异圴穀 LED 晶鮎 NGF 鰀 NGF 虎鰀 僲模棙Ĩ鬘 鰀弥穴 4 婀隸 梏妍伍湿鰀 激穀メ Μ鰀 Ο 洛 LED 9 鰀 39 声 9虎鰀 3 傑 璡晶鮎 鰀 Ẽх NGF 鰀 NGF 虎鰀 覇嚶傑蛬 鰀 献 鰀 ...

Page 56: ...鰀 紒 鰀 倦蛄伍鰀殿 艚蛄蠢愈 27 27b 28 27a 拴 49 埴献茣 茣横胥羃埴ャ 聒蛄軌噯嚏傑歩 49c 妍蛬鰀㫖 4 章毚穀暒弥 档伍埃殿 齧婉 4 種 紒 紞 蠖 蛬鰀㫖 棗埴ャ間鏥穀遶磓埃殿 心鉱洩淅箭鰀 蛬档 婀濕 疫 蠢激𣙇蜥殿 49d 醸 鰀 モ洩緯蛬鰀㫖 4 梗 妍蛬鰀㫖 氛鴆 ヘ 4 蠢激蛬鰀蜥章 49d 鰀緯鰀 穀攸御模裸 埃殿紒 艚蛄蛬鰀㫖 4 妍鬱章 軌噯 嚏傑歩 49c 聞モ 妍 拴 49 埴モ 茯ャ暎鶫榫 躑灼 磓鰀 48 勘蛄 鰀梏糊 档伍 鰀 鰀 賢鬱申槀鰀 蠢モ 蠢愈 鬱倦 36 閼穀 I 押鵈 茣𣠽苒茣鴘 虎鰀 弥穴 5 印較茗券虎 鰀屋 Ẽ 5 Μ鰀 弥穴綳 4 婀隸 紞鑄蛬 ΖΜ鰀 梏紞鑄殺鰀 洛9鰀 蛬 声9鰀 殺鰀 Ζ 罕橎 洛 ΖΜ LED 莢 9 鰀 39 声 9虎鰀 3 臨遂鮎 孛詔印禾 麝僲模х NGF 鰀 NGF 虎鰀 ...

Page 57: ...茣鴘 鰀孛 穀 啗紒 洛 蠖陲岐樰邉鰀 孛賢茣ヘャ茣鴘 邉鰀ヘ紅鱟 82 茗蔽 5 鱟茣ャ邉鰀茣鴘 革甃 邉鰀隸 晶鮎 𣠽苒茣鴘 挪 晶鮎 邉鰀岐樰艮ΖΜ 焙氊挪 鰀声虎鰀 LED 莢 洛 鵝ャ螞 LED 莢 晶鮎 軌噯 鰀 胘噯 虎鰀 岏霽腰虎声殺 黝 覇擺屋 LED 4 5 声 6 莢 х鰀 晶鮎 莢 㐬籾 鰀孛㐬 蒸隸虎鰀孛㐬虎 NGF 鰀 NGF 虎鰀 橫覇擺屋 橫覇擺屋 97M 5 C 389M3 3 F 32M35 C 72M77 F 5M 3 C 3 3M3 8 F 905M32 C 67M72 F 3M 8 C 3 8M427 F 7M905 C 63M67 F ...

Page 58: ...邉鰀𥿔 δх唸汲异圴 茣ャ𣠽苒茣鴘 嗇 鰀 齧婉 5 鱟 洛 罕鶫 LED 莢 挪鮎Ζ尞 鑄 异圴 攸唸汲 圭 嚏傑較膈 茣х𣠽苒茣鴘 鰀 濔鼛覇 6 鱟献 羃 心 鉱 梗э嚏傑 初頓豚鬘皿呬穀虎鰀札忘モ 麝僲模鶫х圭 嚏傑較膈 鵈 詔印禾圭 桂э 疫 洛 圭 較膈 鵈申皿х 孛ュ洩邉梗 鰀 詔茣印ャ鑷 申皿縻倦捋圭 較膈 鵈 齧婉茣ャ茣鴘 5 鱟 LED 圭 較膈莢 47c 晶鮎 圭 較膈 鵈 擺屋 賢齧婉茣ャ茣鴘 5 鱟 印倦捋圭 較膈 鵈申 圭 較膈莢 詔印賢邉梗 鰀 圴忘 誚邉押鵈 芭 橫 ユ心 奧忘𥿔 𠮟渤紞 妍妋 鵈嚏 覇档 毚𢿫 嗇献 榯掲ュ忘 姨 Пュ忘螗楆 訒洛 體鏞縻 掲酘 掲酘 3 𥿔陞掲 覇擪髞隸洩鬘皿芭醐婉殺 声腰虎棙 鿀 印醐婉忘𥿔 𠮟 榺Μ札忘詔 印鬱申声倦捋 LED 虎鰀 掲酘 札忘鬱申 圴忘 掲酘 札忘倦捋 ...

Page 59: ... 歡 鰀LED 驃晶鮎梏レ棗妋榛穀革障醽 覇茣ャ茣鴘 圭 較膈 圭 較膈 LED 47c LED ュ鮎 攸倦捋沼鰀茣鴘 霽 圴忘 LED 鮎 攸羣鬱沼鰀茣鴘 霽 δх較唸僲鵈 𣠽苒鬱倦 嗇 鰀 較茗茣横 齧婉5 鱟 罕鶫LED鮎Ζャ 僲鵈十 較唸 殺 札忘鬱申声倦捋 洛 ュ綳 詔印倦捋殺 札忘 印圴穴忘𠮟 LED 鰀 殺 札忘倦捋 圴忘 殺 札忘鬱申 δх倦捋殺 札忘 茣ャ𣠽苒茣鴘 鰀 弥 穴 5 鱟 LED 莢 鰀 δх鬱申殺 札忘 賢茣ャ𣠽苒茣鴘 鰀 弥穴 5 鱟 虎従札忘鬱申声倦捋 蒸珊 詔印倦捋虎従札忘 印圴穴忘𠮟 LED 虎鰀 虎従札忘倦捋 圴忘 虎従札忘鬱申 δх倦捋虎従札忘 茣ャ𣠽苒茣鴘 虎鰀 弥穴 5 鱟 LED 莢 虎鰀 δх鬱申虎従札忘 賢茣ャ𣠽苒茣鴘 虎鰀 弥穴 5 鱟 鬱倦 洛 僲模圾鸚 楾岸 ュ禾 棗妋妍鬱倦 36 倦 蛄 印圴穴忘𠮟 ...

Page 60: ...蛬档鰀 梏 詔印 嗇 鰀鰀 献璡 茣週 餌御 蕉忘 鑄 躬斷 4 躬莓 妋躬斷韋陌炕辞 梏 鶫脈 茣 9蛬档鰀 圴緯愈穀 9 鰀緯鰀 穀攸御模裸 埃殿紒 罕橎蛬档鰀 茯蛄僲模 37 鰀 37c 声Ο掮 37d 15 15b 15a 禾 ヘ舶档伍 斷 4 渙棣躬莓鰀 ュ 禾 湿喃 墾縻券噪 墾 賢 モΟ掮 37d 鰀 37c 声僲模 37 27 27b 28 27a 茯蛄蛬鰀㫖 4 妍鬱章 軌噯 嚏傑歩 49c 聞モ 妍 拴 49 埴モ 賢鬱申槀鰀 蠢モ 蠢愈 鬱倦 36 閼穀 I 押鵈 茣ャ𣠽苒茣鴘 虎鰀 覇僲模棙Ĩ鬘 鰀弥穴 4 婀隸 梏妍伍湿鰀杝激 穀メΜ鰀 Ο 洛 LED 9 鰀 39 声 9虎鰀 3 莢 傑璡晶鮎 鰀 Ẽх ...

Page 61: ... 圀迨障 BZ00NS1 薰 8 Μ鶇 RO Membrane 翆 棙Ĩ殿 棙Ĩ殿 4 圀迨障 BZ00RO1 薰 42 Μ鶇 Post Carbon 稱埴浄歡棙Ĩ殿 棙Ĩ殿 5 圀迨障 BZ00PC1 薰 3 Μ鶇 勿舜棙Ĩ殿蕉忘 縉淫 團纜鶤薩璡鴦薇 岪遂 團纜鶤薩璡 紞 蠖 蕉 鴦薇棙Ĩ殿 革障顆 х 孛濔鼛 十鴦 薇妋棙Ĩ殿 麝僲模ュ滕声攸誕薔𠮟 棙Ĩ殿ヘ𪆐 擺屋 棙Ĩ殿詔茣垤 斑倍面 茣洛ャ鑷 鴦薇棙Ĩ殿 倦蛄僲模 梏艚蛄蠢愈 倦蛄鰀 𣙇蜥搿 8e 閼鬱棙Ĩ殿 7 モ ΖΜĆ𩺊 7c 梏茯蛄 棙Ĩ殿遉 6 勿斿 52 艚ャ棙Ĩ殿齎 妍 埴 モ茣 賢埴ャ舍棙Ĩ殿 鴦薇棙Ĩ殿隸 詔忘洩鶫鰀ůャ 30 1 2 3 ...

Page 62: ...Neo Sense 鐱酘棙Ĩ殿 棙Ĩ殿 3 醸 蒸隸茣ャ茣鴘 圭 較膈 声𣠽苒茣鴘 鰀 齧婉 5 鱟 鑄 隸殿申皿х 鴦薇 RO Membrane 翆 棙Ĩ殿 棙Ĩ殿 4 醸 蒸隸茣ャ茣鴘 圭 較膈 声𣠽苒茣鴘 嗇 鰀 齧婉 5 鱟 鑄 隸殿申皿х 鴦薇 Post Carbon Block 稱埴浄歡棙Ĩ殿 棙Ĩ殿 5 醸 蒸隸茣ャ茣鴘 圭 較膈 声𣠽苒茣鴘 虎鰀 齧婉 5 鱟 鑄 隸殿申皿х 僲模觸㮍声唸邉 洛 觸㮍縻唸邉麝僲模 濔鼛妍僲模紒 鰀傑璡 蛬档 僲模蕉忘 唸邉縻觸㮍 岪毚 撘嵇 圴 9蛬档鰀 穀鵝醸 賢鬱申 槀鰀 蠢モ 蠢愈 鬱倦閼穀 I 押鵈 鸚縻圾鸚ュ禾 鸚ュ禾 ュ乑棙 7 厄 嚶傑蛬档僲模紒 鰀 賢尞禾 艮賢 鰀 圾鸚ュ禾 嚶傑蛬档僲模紒 鰀 賢尞禾 艮 僲模梏賢 鰀 岪撘嵇 圴 9蛬档鰀 ...

Page 63: ...涗愈 韋心穀隸掮 綳 薇棙Ĩ殿хA 洛 綳 岪痳鴦薇妋棙Ĩ殿 腰虎 悲梗郤癊 岪痳遂 團纜鶤薩璡拴 邉ュ梗 鰀 LED 9圭 較膈 莢 晶鮎織A 洛 圭 較膈札忘 羣鬱 岪倦 捋 鰀 LED 莢 晶鮎織A 洛 ュ鮎 岪鬱申 鰀擺屋 歡 茣ャ𣠽苒茣鴘 鰀 5 鱟 僲模蜥毚 х織A 洛 鶫 岪茣䭾 莢 蜥毚 殺 悲梗郤癊 岪痳遂 團纜鶤薩璡拴 鶫鰀 縻歲ュ 浄异圴 鰀 𥿔 韋心穀隸掮 綳 薇棙Ĩ殿хA 洛 綳 岪痳鴦薇妋棙Ĩ殿 𣙇蜥鰀涗愈倦捋х縻歲率鬱хA 羣鬱𣙇蜥鰀涗愈 詔忘韋槀鰀㫖 隋礁х 岪痳悗 槀鰀㫖 詔忘韋槀鰀㫖 役圾х 妍槀鰀㫖 砦 鵝圾ュ乑棙 7 梗鰀 悲薔剥 岪痳遂 團纜鶤薩璡拴 覇㮍 隸 罕鶫札忘傑璡 岐樰 鰀 Ο鐺хA 岪痳悗 𣙇蜥鰀涗愈 僲模榰蜥覇 モ織A 洛 鶫 岪茣䭾 莢 蜥毚 僲模ː鰀 鰀緯鰀 梗A 倦蛄僲模 艚蛄 蠢愈 悗 鰀 𣙇蜥 鰀緯僲模献璡 梗 A 鐺鬱僲模...

Page 64: ... 麝黝屋 δ垤 殿 鬘邾аφ陞𪆐鰀 較割メ桿 鉉黝 較割ヘ桿 э 扱誕瓈 尊 穴鞘磓翁 禾 殮邾а 垤 瀠螌邾а浄蒸Ο紹鶫 圀 券鉉黝抄ε 糇烏 較割鸚δ 5 Μ鶇 2 沬羽梗蔵 尊撰較割瑤烏蒸モ 汚沬羽璡紅ュч 較割 3 較割鸚献 纜櫲割隸濔鼛茗鶫櫲割扱撰邾а隸 鶫鄂晶ℏ声縮鑷莢圀 倦較割康儃 纜棗 留鐸較唸較割繍声邾黝晶ℏ 櫲割隸濔鼛蒸隸梗 較割繍声邾黝晶ℏ 較割鶫鄂鸚鬘晶ℏ鬱剣φ 陞 𪆐 4 印ャ發胡ュ屮э桂釱較割慼軟 團纜棗鬘 域釱 э 纜觸㮍 嚏 翼膈 較 麝黝ュ洽姿薔 剥 э團纜禾 春旺э 3 9 荏縻 э 462 荏姿薔剥 э鬘收縻螌縮鑷ⓔ穴翼割 舅割薔剥 鶫邾а隸 鶫鄂晶ℏ縻 倦較割康儃 較割康儃 團纜 邂縻ユ扱撰擲障ュ 頓ュ詔腋艘察氎縟扱撰薔剥 乑棙較割鸚 5 э扱撰覇ュ櫳洽 擺屋瑤烏 洛ュ 洽 鰀 楾声 楾ャ擺屋姿殃𪆐 薔剥声薔 薮ュ覇較割慼軟献 團纜棗妋域釱割 頓δモ...

Page 65: ...5 嗇 鰀鰀 埃𥿔 種 502 鰀 獪埃𥿔 種 807 鰀 楾 C 鵝旺 7 鵝 57 虎鰀 楾慼軟 C 7M 厄 M34 餬モ 鰀 楾慼軟 C M 6 厄 87M97 餬モ 虎鰀 𥿔 種1紅 30 鰀 𥿔 種1紅 306 嗇 鰀 𥿔 種1紅 30 殺 隸掮 302 種鰀殺 穀鵝 楾 槀鰀 楾 34 C 紅 42 虎従隸掮 虎鰀 紅 72 鰀隸掮 罕鶫鰀 紅 弥穴 342 擺屋春察 MPa 2036M20 5 306M 05 效 腰虎異迮 R356a 腰虎異迮迮𥿔 敬 62 勿濤宀奠 z埓z 釚 732 x 482 x 662 鰀醸紞𥿔 朱敬 47 洛 掲酘 鬱申隸 ...

Page 66: ...蒸隸梗 較割繍声邾黝晶ℏ 纜湏薮邾 а晶ℏ隸 棗茣梗縮陞鸚蝠 メ辞鶫鄂鸚 ャ郊鼏 ュ屮э桂釱辞割慼軟 棗圈 遶釱割 3 1 纜觸㮍 嚏 禾 翼膈 較 ュ洽姿薔剥 2 禾 春旺э187荏縻 э240荏姿薔剥 3 鬘 縻螌縮鑷ⓔ穴翼割 舅割 4 陌邾а鶫鄂晶ℏ 5 邾а鶫鄂晶ℏユ割 扱撰ュ 縻 邂 6 頓ュ詔腋艘察氎縟扱撰薔剥 7 棙х桂釱辞割鸚 э扱撰禾 蓬瑤烏 洛 鰀 楾 楾 螌麝穴鞘罕忘蜚腰 頓 殃𪆐 ヘ紘薔剥抄薔薮 4 ュ覇桂釱較割慼軟献 肄麸炊綳 滕穀ヘ茜 棗 黝殿革甃 羇忘逃痳蠖駕鴦焙蘢 鶤薩 岪蠖駕 5 1 妒職 芭媒声 埏障 2 郤癊蠑橎 3 邾黝陞鸚 4 扱撰鰯 E Nr 扱陞鸚 FD 鶤薩聿崍 1 24婀隸 舜 2 斫錫24婀隸献モ拴 3 桂釱嚏 异嗎 齣鏖釱瀠勿 4 埏蹟壒鶤薩 5 遂寽蠖駕鶤薩 遂 鑷歡 傑肉悲ヘ團纜鶤薩ル舜 400 889 9999 24婀隸桂釱團纜鶤...

Page 67: ... 扱撰鰯 晶ℏ障 翼割 譲 翼割 埏 聴 阿遂 鼪團累譲 遂 芭媒 邾а陞鸚 晶ℏ障 扱撰鰯 扱陞鸚 割 陞鸚 梗縮棧障 障 聴 惇遂 鼪團累譲 遂 芭媒 邾а陞鸚 晶ℏ障 扱撰鰯 扱陞鸚 割 陞鸚 梗縮棧障 障 聴 メ遂 鼪團累譲 遂 芭媒 邾а陞鸚 晶ℏ障 扱撰鰯 扱陞鸚 割 陞鸚 梗縮棧障 障 聴 ы遂 鼪團累譲 遂 芭媒 邾а陞鸚 晶ℏ障 扱撰鰯 扱陞鸚 割 陞鸚 梗縮棧障 障 聴 ヘ遂 鼪團累譲 遂 芭媒 邾а陞鸚 晶ℏ障 扱撰鰯 扱陞鸚 割 陞鸚 梗縮棧障 障 ...

Page 68: ...our eau chaude et eau froide 77 Réglage du débit pour le tirage d eau 77 Sécurité enfants 78 Économie d énergie 78 Emplacement 78 Capteur de luminosité 78 Désactivation et activation de la touche de soutirage 79 Désactivation et réactivation de la fonction de chauffage 79 Désactivation et réactivation de la fonction de refroidissement 79 Commutateur Marche Arrêt 79 Entretien et nettoyage 80 Vidage...

Page 69: ... ou le câble de réseau dans l eau Ne jamais insérer la fiche secteur avec des mains humides ou mouillées Enlever immédiatement l humidité de la fi che secteur ne jamais utiliser d essence ni de benzène pour le nettoyage Si le câble d alimentation ou le conducteur sont mouillés débrancher l appareil Ie mettre hors tension et les laisser sécher entièrement avant chaque utilisation Ne pas porter l appa...

Page 70: ...t d eau 13 Tuyau d eaux usées bleu 14 Interrupteur Marche Arrêt 15 Couvercle de l appareil a Couvercle du réservoir d eau Couvercle intermédiaire réservoir d eau b froide Réservoir d eau pour eau à température c ambiante Orifice de la compensation de pression d 16 Serre flan 17 Affichage DEL rouge eau chaude 18 Affichage DEL bleu eau froide 19 Capteur de luminosité 20 Touche de sélection eau chaude Ba...

Page 71: ... 3 Ce dernier se compose d un filtre à charbon actif et d un filtre fin Le filtre à charbon actif améliore le goût de l eau Le filtre fin supprime les particules les plus petites telles que la poussière et les autres corps étrangers Le filtre UV veille à un nettoyage supplémen taire Sous l effet des rayons UV il stérilise et per met une double protection contre les bactéries et les virus Vous avez ainsi ...

Page 72: ...ssurer que le système pilote de protection de l installation domestique électrique est correcte ment installé Ne pas utiliser de rallonge Ne le brancher que sur une prise séparée et ne pas le brancher avec d autres appareil Installer le Water Purifier uniquement dans un local à l abri du gel Protéger les pièces en matière plastique et les câbles contre des températures élevées Ne le raccorder qu à ...

Page 73: ...e à ce que le bac d égout tage 26 repose également sur un support fixe 26 Monter l entretoise jointe 9 9 Contrôler si le couvercle intermédiaire 15b n a pas glissé pendant le transport Pour ce faire retirer le couvercle de l appareil 15 et le couvercle du réservoir d eau 15a 15 15a Contrôler si le couvercle intermédiaire 15b est correctement placé 15b ...

Page 74: ...ant N utiliser que les pièces jointes pour le raccorde ment de l eau et le raccordement des eaux usées uniquement DW03500 Retirer les capots de protection transparents du tuyau d eaux usées 13 bleu et du tuyau d arrivée 12 rouge et placer respectivement un raccord Raccorder le tuyau d eaux usées 13 bleu avec le raccord sur la combinaison de tuyau bleu 11b Raccorder le tuyau d arrivée 12 rouge avec...

Page 75: ...u employé jusqu ici ne doit pas être réutilisé max 25cm Raccordement d eaux usées uniquement DW03500 Raccorder le tuyau d eaux usées bleu 11b à l aide des pièces jointes sur le raccord d écou lement du siphon Le cas échéant monter un siphon avec raccord d écoulement Raccordement de l eau Fermer le robinet principal sur l alimentation domestique Raccorder la valve de raccordement 6c à la conduite d...

Page 76: ...ppareil que sur une prise séparée La prise doit être posée près du Water Purifier et librement accessible Les modifications sur le branchement ne doivent être effectuées que par un technicien spécialisé Température de service Température ambiante autorisée 10 à 43 C Aération Le système de refroidissement devrait dans un tel cas en effet fournir plus d efforts et ceci augmente rait la consommation de...

Page 77: ...une déclivité par rapport au bac d égouttage Sinon le débit devient plus faible et empêche la vidange complète de l eau Maintenir la touche de sélection eau froide env 3 secondes enfoncée avant de désenclen cher la fonction Eau froide Maintenir la touche de soutirage 3 secondes enfoncée De l eau coule 1 minute du tube de vidange Répéter processus jusqu à ce qu il n y ait plus d eau qui coule Purge...

Page 78: ...on eau froide env 3 secondes enfoncée avant d activer la fonction Eau froide Cette opération dure env 2 heures avant que les trois réservoirs ne soient de nouveau remplis Vidanger à nouveau les réservoirs et les remplir comme indiqué au chapitre Vidange des ré servoirs d eau et Remplissage des réservoirs d eau L appareil est en ordre de marche lorsque les deux affichages DEL Eau chaude 17 et Eau fr...

Page 79: ... Eau chaude DEL Eau froide Appareil en service Appareil en service 75 83 C 167 181 F 10 13 C 50 55 F 83 91 C 181 196 F 7 3 10 C 45 50 F 91 96 C 196 205 F 5 7 3 C 41 45 F Réglage du débit pour le tirage d eau L appareil a été réglé en usine à un débit d eau précis 120 ml Il est toujours possible de modifier ce réglage Trois débits peuvent être sélectionnés 120 ml 200 ml et 300 ml DEL Eau chaude Débi...

Page 80: ... la consommation d énergie Installer l appareil dans un local sec et bien aéré Eviter tout emplacement exposé directement au soleil ou à proximité immédiate d une source de chaleur p ex radiateurs cuisinières Capteur de luminosité Le capteur de luminosité 19 mesure la lumière du jour et diminue automatiquement la consommation d énergie à la tombée de la nuit en réduisant la fréquence des opération...

Page 81: ...hauffage lorsque celle ci n est pas utilisée DEL Eau chaude Fonction de chauffage désactivée économie d énergie Fonction de chauffage activée Pour désactiver la fonction de chauffage main tenir la touche de sélection Eau chaude enfoncée pendant env 3 secondes L affichage DEL Eau chaude s éteint Pour réactiver la fonction de chauffage main tenir de nouveau la touche de sélection Eau chaude enfoncée ...

Page 82: ... de nettoyer l intérieur du réservoir d eau à température ambiante Pour des raisons d hygiène utiliser uniquement un chiffon propre 29 pour le nettoyage Celui ci doit être contenu dans un emballage aseptique et permettre un net toyage sans laisser de traces Vidanger les réservoirs comme indiqué au cha pitre Vidange des réservoirs d eau jusqu au point Évacuer l eau chaude du réservoir dans le récip...

Page 83: ...différents filtres La nécessité de remplacer le filtre respectif est signalée par un clignotement des différentes combinaisons DEL DEL Eau chaude clignote DEL Eau froide est allumée Filtres à remplacer Durée de service pour 10 l soutirage d eau jour Filtre Neo Sense Filtre N 1 Réf BZ00NS1 tous les 6 mois Filtre à membrane RO Filtre N 2 Réf BZ00RO1 tous les 20 mois Filtre post carbone Block Filtre N ...

Page 84: ...emps pour ce filtre Celui ci est également signalé par une une lumière clignotante Procéder comme indiqué ci dessous pour régler le comptage de temps Après remplacement du filtre Neo Sense filtre N 1 Maintenir le bouton poussoir sécurité enfants et la touche de sélection Eau chaude enfoncés simultanément pendant au moins 3 secondes Le nouveau comptage est activé Après remplacement du filtre à membrane...

Page 85: ...ssaire remplacer le filtre L eau s écoule plus lentement Il est temps de remplacer l un des filtres Si nécessaire remplacer le filtre Le robinet d alimentation en eau est fermé Ouvrir le robinet d alimentation en eau L eau est fortement encrassée Il faut installer un préfiltre dans le système de tuyauteries Celui ci peut être commandé auprès de notre service après vente en indi quant la réf BZ00PF1 Im...

Page 86: ... d une longueur max de 5 mètres La sortie d eau est peut être défectueuse Contacter le service après vente Toutes les fonctions s arrêtent lorsque l appareil est en marche L alimentation en eau a été cou pée subitement Contrôler le robinet d alimenta tion en eau L appareil est bien raccordé au circuit électrique Le cas échéant raccorder l appa reil selon les indications figurant sur la plaque signa...

Page 87: ...eprise et une récupé ration des appareils usagés applicables dans les pays de la CE Cet appareil contient des fluides réfrigérants pour le refroidissement Ceux ci doivent être éliminés de manière adéquate Veiller à ne pas endommager les tubes du circuit de réfrigérant tant que ceux ci n ont pas été éliminés Garantie Les conditions de garantie applicables sont celles publiées par notre distributeur ...

Page 88: ...température eau froide C 5 9 la journée 9 12 la nuit Plage de température eau chaude C 89 94 la journée 65 75 la nuit Débit eau froide l min 1 8 Débit eau chaude l min 1 4 Débit eau à température ambiante l min 1 8 Temps d échauffement 1 0 l à température max température d arrivée 12 C min 20 Temps de refroidissement eau froide min 50 Temps de remplissage tous les réservoirs min env 120 Pression d...

Page 89: ...87 fr ...

Page 90: ...icatori per acqua calda e acqua fredda 99 Impostazione della quantità di acqua da erogare 99 Sicurezza bambini 100 Risparmio energetico 100 Luogo d installazione 100 Sensore di luce 100 Disattivazione attivazione dell illuminazione del tasto di erogazione 101 Disattivazione attivazione della funzione di riscaldamento 101 Disattivazione attivazione della funzione di raffreddamento 101 Interruttore ...

Page 91: ...ni sono valide per diver si modelli che si differenziano unicamente a livello di accessori Istruzioni di sicurezza Rischio di scosse elettriche In caso di anomalie staccare subito la spina dalla presa di rete Collegare e azionare l apparecchio solo seguen do le indicazioni riportate sulla targhetta del produttore Non utilizzare in caso di danni visibili all apparec chio o al cavo di alimentazione ...

Page 92: ... acqua 13 Tubo di scarico blu 14 Interruttore generale On Off 15 Coperchio dell apparecchio a Coperchio del serbatoio Coperchio intermedio serbatoio acqua b fredda Serbatoio dell acqua a temperatura c ambiente Foro di compensazione pressione d 16 Dispositivo di fermo 17 LED rosso acqua calda 18 LED blu acqua fredda 19 Sensore di luce 20 Selettore acqua calda Barra luminosa acqua calda a 21 Seletto...

Page 93: ...o n 3 composto da un filtro ai carboni attivi e un filtro fine Il filtro ai carbo ni attivi migliora il gusto dell acqua Il filtro fine rimuove le particelle più piccole come la polvere e altri corpi estranei Il filtro UV fornisce un ulteriore livello di puli zia sterilizza l acqua mediante la radiazione UV garantendo una doppia protezione contro virus e batteri In questo modo si ottiene un acqua assolut...

Page 94: ...elettrico domestico sia correttamente installato Non utilizzare cavi di prolunga Collegare solo a una presa di corrente separata e non con altri apparecchi Non installare il Water Purifier in ambienti a ri schio di gelo Proteggere le parti in plastica e i cavi da tempe rature eccessive Collegare solo alla conduttura dell acqua potabile fredda Assicurarsi che la rete idrica sia conforme alle normati...

Page 95: ...la vaschetta 26 sia ap poggiata su una superficie solida 26 Montare il distanziatore 9 fornito in dotazione 9 Controllare che il coperchio intermedio 15b non si sia spostato durante il trasporto A tale scopo rimuovere il coperchio dell apparecchio 15 e il coperchio del serbatoio 15a 15 15a Verificare che il coperchio intermedio 15b al loggi correttamente 15b ...

Page 96: ...zi forniti in dotazione per l allac ciamento e lo scarico dell acqua solo DW03500 Sfilare il cappuccio trasparente dal tubo di sca rico 13 blu e dal tubo di alimentazione 12 rosso e inserire al suo posto un raccordo di giunzione Innestare il tubo di scarico 13 blu con rac cordo di giunzione sul tubo flessibile combinato blu 11b Innestare il tubo di alimentazione 12 rosso con il raccordo di giunzione...

Page 97: ...deve essere riutilizzato max 25cm Attacco di scarico dell acqua solo DW03500 Collegare il tubo di scarico blu 11b al raccordo di scarico del sifone utilizzando i pezzi forniti in dotazione Eventualmente montare il sifone con il raccordo di scarico Attacco di alimentazione acqua Chiudere il rubinetto principale dell impianto idrico domestico Collegare la valvola di raccordo 6c alla tuba zione dell ...

Page 98: ... Purifier ed essere liberamente accessibile Eventuali modifiche al circuito elettrico possono essere effettuate solo da personale specializzato Temperatura di esercizio Temperatura ambiente ammessa da 10 a 43 C Ventilazione Non coprire per nessun motivo le aperture di ven tilazione e di sfiato Ciò provoca un aumento della potenza di raffreddamento richiesta e quindi un maggior consumo di corrente Mes...

Page 99: ...cipiente di raccolta In caso contrario il deflusso dell acqua è troppo debole e impedisce uno svuota mento completo Premere il selettore acqua fredda per circa 3 secondi per disattivare la funzione Acqua fredda Premere il tasto di erogazione per 3 secondi Per 1 minuto viene espulsa l acqua dal tubo di scarico Ripetere questa operazione fino a quando non esce più acqua Svuotamento del serbatoio dell ...

Page 100: ...u I Premere il selettore acqua fredda per circa 3 secondi per attivare la funzione di erogazione dell acqua fredda Per il riempimento completo di tutti e tre i serbatoi sono necessarie circa 2 ore Svuotare e riempire di nuovo i serbatoi come descritto nei capitoli Svuotamento dei ser batoi dell acqua e Riempimento dei serbatoi dell acqua L apparecchio è pronto per l uso quando entrambi i LED Acqua...

Page 101: ...lda LED acqua fredda Apparecchio in funzione Apparecchio in funzione 75 83 C 167 181 F 10 13 C 50 55 F 83 91 C 181 196 F 7 3 10 C 45 50 F 91 96 C 196 205 F 5 7 3 C 41 45 F Impostazione della quantità di acqua da erogare L apparecchio è preimpostato di fabbrica per eroga re una determinata quantità di acqua 120 ml Questa impostazione può essere modificata È possi bile scegliere fra tre quantità di e...

Page 102: ... è im portante per ottimizzare il consumo di corrente Installare l apparecchio in un ambiente asciutto e ben ventilato Non collocare l apparecchio in posizioni esposte ai raggi solari o vicino a fonti di calore ad es caloriferi o fornelli Sensore di luce Il sensore di luce 19 misura la luce diurna e al calare dell oscurità riduce automaticamente il con sumo energetico diminuendo la frequenza dei c...

Page 103: ...sparmio energetico Funzione di riscalda mento attivata Per disattivare la funzione premere il selettore acqua calda per circa 3 secondi Il LED dell acqua calda si spegne Per attivare la funzione premere di nuovo il se lettore acqua calda per circa 3 secondi Disattivazione attivazione della funzione di raffreddamento Anche la funzione di raffreddamento può essere disattivata per risparmiare energia...

Page 104: ...io nel recipiente preparato in precedenza Rimuovere il coperchio dell apparecchio 15 il coperchio del serbatoio 15a e il coperchio in termedio 15b 15 15b 15a Pulire il serbatoio dell acqua con un panno de tergente 29 nuovo Non utilizzare detergenti chimici o di altro tipo Applicare di nuovo il coperchio intermedio 15b il coperchio del serbatoio dell acqua 15a e il coperchio dell apparecchio 15 27 ...

Page 105: ...o Neo Sense filtro n 1 N di ordinazione BZ00NS1 6 mesi Filtro a membrana RO filtro n 2 N di ordinazione BZ00RO1 20 mesi Post filtro Carbon Block filtro n 3 N di ordinazione BZ00PC1 18 mesi Il filtro UV può essere sostituito solo dal personale del nostro Servizio di Assistenza Contattare il Servizio di Assistenza Importante I filtri vanno sostituiti non appena viene visualizzata la rispettiva richiesta d...

Page 106: ...necessario riattivare il rispettivo contatore Ciò viene visualizzato anche tramite una spia lampeggiante Per impostare il con tatore procedere nel modo seguente Dopo il cambio del filtro Neo Sense filtro n 1 premere contemporaneamente il pulsante sicurezza bambini e il selettore acqua calda per almeno 3 secondi Il nuovo contatore è ora attivato Dopo il cambio del filtro a membrana RO filtro n 2 premer...

Page 107: ...tituire uno dei filtri Sostituire il filtro se necessario L acqua scorre lentamente È ora di sostituire uno dei filtri Sostituire il filtro se necessario Il rubinetto di allacciamento dell acqua è chiuso Aprire il rubinetto L acqua è molto sporca È necessario installare un prefiltro nel sistema di tubazione Questo filtro è disponibile con il numero di ordinazione BZ00PF1 presso il Servizio di Assistenza...

Page 108: ...o lungo Accorciare il tubo flessibile di alimentazione acqua a max 5 metri Lo scarico dell acqua potrebbe essere guasto Contattare il Servizio di Assistenza Tutte le funzioni si arrestano improvvisamente durante il funzionamento L allacciamento dell acqua è stato chiuso Controllare il rubinetto di allaccia mento dell acqua L apparecchio è collegato alla rete elettrica Eventualmente collegare l appa...

Page 109: ...fino all avvenuto smaltimento Smaltimento Questo apparecchio dispone di contras segno ai sensi della direttiva europea 2002 96 CE in materia di apparecchi elet trici ed elettronici waste electrical and electronic equipment WEEE Questa direttiva definisce le norme per la raccol ta e il riciclaggio degli apparecchi dismes si valide su tutto il territorio dell Unione Europea Garanzia Per questo apparec...

Page 110: ... fredda C 5 9 di giorno 9 12 di notte Campo di temperature acqua calda C 89 94 di giorno 65 75 di notte Portata acqua fredda l min 1 8 Portata acqua calda l min 1 4 Portata acqua a temperatura ambiente l min 1 8 Tempo di riscaldamento di 1 0 l fino alla temperatura max temperatu ra di alimentazione 12 C min 20 Tempo di raffreddamento acqua fredda min 50 Tempo di riempimento tutti i serbatoi min ca ...

Page 111: ...109 it ...

Page 112: ... 120 Bediening 120 LED indicatie voor heet water en koud water 121 Verbruikshoeveelheid voor het waterverbruik instellen 121 Kinderslot 122 Energie besparen 122 Opstellingsplaats 122 Lichtsensor 122 Verlichting verbruikstoets uit inschakelen 123 Verwarmingsfunctie uit inschakelen 123 Koelfunctie uit inschakelen 123 Aan uit schakelaar 123 Verzorging en reiniging 123 Watertanks leegmaken en reinigen...

Page 113: ...erder gebruik volledig te laten drogen Draag het apparaat niet aan het stroomsnoer Sluit de Water Purifier alleen op een apart stop contact aan Trek de stekker van het apparaat uit het stopcon tact vóór reparaties controles of wanneer het wordt verplaatst Als de Water Purifier langdurig bijv tijdens va kantie niet wordt gebruikt dient u het water uit de tank te verwijderen de stekker van het appa ra...

Page 114: ...blauw 12 Toevoerslang rood wateraansluiting 13 Afvalwaterslang blauw 14 Aan uit schakelaar 15 Apparaatdeksel a Watertankdeksel Tussendeksel tank koud water b Watertank voor water van c kamertemperatuur Drukcompensatieopening d 16 Omlaaghouder 17 LED indicatie rood heet water 18 LED indicatie blauw koud water 19 Lichtsensor 20 Keuzetoets heet water Verlichte balk heet water a 21 Keuzetoets water op...

Page 115: ...evekoolfilter en een fijnfilter Het actieve koolfilter verbetert de smaak van het water Het fijnfilter verwijdert zeer kleine deeltjes zoals stof en andere vreemde deeltjes Het UV filter zorgt voor extra reiniging Het steriliseert door de UV straling en maakt een dubbele beveiliging tegen bacteriën en virussen mogelijk Daardoor heeft u de beschikking over absoluut zui ver en schoon water Bovendien heeft ...

Page 116: ...e elektrische installatie volgens de voorschriften is geaard Gebruik geen verlengkabels Alleen aansluiten op een apart stopcontact en niet in combinatie met andere apparaten Installeer de Water Purifier alleen in een vorst vrije ruimte Bescherm kunststof delen en kabels tegen hoge temperaturen Alleen aan koud leidingwater aansluiten Alleen aansluiten aan waterleidingnet dat voldoet aan de voorschri...

Page 117: ...o neerzet dat ook de opvangschaal 26 op een vaste ondergrond staat 26 Monteer de meegeleverde afstandshouder 9 9 Controleer of het tussendeksel 15b tijdens het vervoer niet weggegleden is Daarvoor ap paraatdeksel 15 en watertankdeksel 15a verwijderen 15 15a Controleer of het tussendeksel 15b goed op zijn plaats zit 15b ...

Page 118: ...lleen de meegeleverde onderdelen voor wateraansluiting en afvalwateraansluiting alleen DW03500 Trek de transparante beschermdoppen van de afvalwaterslang 13 blauw en de toevoer slang 12 rood los en steek op elke slang een koppeling Steek de afvalwaterslang 13 blauw met de koppeling op de slangcombinatie blauw 11b Steek de toevoerslang 12 rood met de koppe ling op de slangcombinatie rood 11a Instal...

Page 119: ...slang mag niet meer worden gebruikt max 25cm Afvalwateraansluiting alleen DW03500 Sluit de afvalwaterslang blauw 11b met be hulp van de meegeleverde onderdelen aan het afvoeraansluitstuk van de sifon aan Monteer eventueel de sifon met het afvoeraansluitstuk Wateraansluiting Sluit de hoofdkraan van de waterleiding Sluit het aansluitventiel 6c aan de koudwater leiding van de watervoorziening aan zie...

Page 120: ...topcontact moet dichtbij de Water Purifier zijn aangebracht en moet vrij bereikbaar zijn De aansluiting mag alleen door een vakman worden veranderd Bedrijfstemperatuur Toegestane kamertemperatuur 10 tot 43 C Ventilatie Dek in geen geval ventilatie en ontluchtingsopenin gen af De koeling moet anders harder werken en dat leidt tot een groter stroomverbruik In gebruik nemen Belangrijk Het apparaat moe...

Page 121: ...moet aflopen naar het op vangvat Anders wordt de doorstroming zwakker en wordt het volledig leegmaken belemmerd Houd de keuzetoets koud water ca 3 se conden ingedrukt om de koudwaterfunctie uit te schakelen Houd de verbruikstoets 3 seconden ingedrukt Er loopt een minuut lang water uit de leegmaakslang Herhaal deze handeling tot er geen water meer stroomt Tank voor heet water leegmaken Schakel de Wa...

Page 122: ...laar 14 op I Houd de keuzetoets koud water ca 3 se conden ingedrukt om de koudwaterfunctie in te schakelen Het duurt ca 2 uur tot alle drie de tanks weer ge vuld zijn Maak de tanks opnieuw leeg en vul ze weer zoals beschreven in het hoofdstuk Watertanks leegmaken en Watertanks vullen Het apparaat is gereed voor gebruik wanneer beide LED indicaties Heet water 17 en Koud water 18 volledig branden LE...

Page 123: ...n bedrijf Apparaat in bedrijf 75 83 C 167 181 F 10 13 C 50 55 F 83 91 C 181 196 F 7 3 10 C 45 50 F 91 96 C 196 205 F 5 7 3 C 41 45 F Verbruikshoeveelheid voor het waterver bruik instellen Het apparaat is in de fabriek op een bepaalde water verbruikshoeveelheid ingesteld 120 ml Deze instelling kan veranderd worden Er zijn drie keuzehoeveelheden 120 ml 200 ml en 300 ml LED heet water Verbruikshoevee...

Page 124: ...s De juiste opstellingsplaats is belangrijk voor het energieverbruik Plaats het apparaat in een droge goed verlichte ruimte Niet in de felle zon of in de buurt van een warm tebron verwarmingsradiator of kachel plaatsen Lichtsensor De lichtsensor 19 meet het daglicht en beperkt het energieverbruik bij duisternis automatisch door de frequentie van verwarmen en koelen te verminde ren Deze functie kan...

Page 125: ...sfunc tie ingeschakeld Houd de keuzetoets heet water ca 3 secon den ingedrukt om de functie uit te schakelen De LED indicatie heet water gaat uit Houd de keuzetoets heet water opnieuw ca 3 seconden ingedrukt om de functie in te schakelen Koelfunctie uit inschakelen U kunt de koelfunctie uitschakelen om energie te besparen LED koud water Koelfunctie uitgeschakeld energie besparen Koelfunctie ingesc...

Page 126: ...n het punt laat het hete water uit de tank in het klaar gezette vat lopen Verwijder het apparaatdeksel 15 het waterdek sel 15a en het tussendeksel 15 15b 15a Maak de watertank met een schone reiniging doek 29 schoon Gebruik geen chemische of andere reinigingsmiddelen Sluit het tussendeksel 15b het watertankdek sel 15a en het apparaatdeksel 15 weer 27 27b 28 27a Verwijder de leegmaakslang 28 en slu...

Page 127: ...e per dag Neo Sense filter filter nr 1 Bestelnummer BZ00NS1 Elke 6 maanden RO Membrane filter Filter Nr 2 Bestelnummer BZ00RO1 Elke 20 maanden Post Carbon Block filter Filter Nr 3 Bestelnummer BZ00PC1 Elke 18 maanden Het UV filter mag alleen door onze klantenservice worden vervangen Neem contact op met de klantenservice Belangrijk Het filter moet worden vervangen zodra dit wordt aangegeven Het apparaat ...

Page 128: ...ter moet de tijdtel ling van het filter opnieuw geactiveerd worden Dit wordt ook door een knipperend licht weergegeven Ga voor de instelling van de tijdtelling als volgt te werk Na het vervangen van het Neo Sense filter filter nr 1 Houd de drukknop kinderslot en de keu zetoets heet water tegelijkertijd minstens 3 seconden ingedrukt De nieuwe tijdtelling is geactiveerd Na het vervangen van het RO Memb...

Page 129: ...g het filter Het water stroomt langzamer Is het tijd om een van de filters te vervangen Vervang indien nodig het filter Is de waterkraan gesloten Open de waterkraan Is het water sterk vervuild Er moet een extra voorfilter in het leidingsysteem worden geïnstal leerd Dit is onder bestelnummer BZ00PF1 bij de klantenservice verkrijgbaar Er kan geen koud water worden gebruikt Brandt er minstens één LED van...

Page 130: ...ijn Kort de slang voor watertoevoer in tot maximaal 5 meter De wateruitloop kan defect zijn Neem contact op met de klantenservice Alle functies stoppen plotseling terwijl het apparaat in werking is Is het water plotseling onderbroken Controleer de waterkraan Is het apparaat aan het stroomcir cuit aangesloten Sluit het apparaat indien nodig aan volgens de gegevens op het typeplaatje Het apparaat le...

Page 131: ...ring Dit apparaat is gemarkeerd overeenkom stig de Europese Richtlijn 2002 96 EG betreffende oude elektrische en elektro nische apparatuur waste electrical and electronic equipment WEEE De richt lijn bevat het kader voor een in de hele EU geldige regeling betreffende inname en verwerking van oude apparaten Garantie Voor dit apparaat gelden de garantievoorwaarden die worden uitgegeven door de verte...

Page 132: ...ater C 5 9 overdag 9 12 s nachts Temperatuurbereik heet water C 89 94 overdag 65 75 s nachts Doorstroomhoeveelheid koud water l min 1 8 Doorstroomhoeveelheid heet water l min 1 4 Doorstroomhoeveelheid water op kamertemperatuur l min 1 8 Verwarmingstijd 1 0 l tot max temperatuur aanvoertemperatuur 12 C min 20 Afkoeltijd koud water min 50 Vultijd alle tanks min ca 120 Bedrijfsdruk MPa 0 14 0 83 1 4 ...

Page 133: ...131 nl ...

Page 134: ...ación LED para agua caliente y agua fría 143 Ajuste de la cantidad dispensada de agua 144 Seguro para niños 144 Ahorro de energía 145 Emplazamiento 145 Sensor de luz 145 Activación desactivación de la iluminación de la tecla de dispensación 145 Activación desactivación de la función de calentamiento 145 Activación desactivación de la función de refrigeración 146 Interruptor de conexión y desconexi...

Page 135: ...hufar el aparato cortar la ten sión y dejar que se sequen ambos por completo antes de proseguir con el empleo No llevar el aparato cogiéndolo por el cable de alimentación El Water Purifier hay que enchufarlo únicamente a una caja de enchufe separada Antes de proceder a la reparación o a la inspec ción del aparato o antes de cambiarlo de sitio hay que desenchufarlo Si el Water Purifier no es empleado...

Page 136: ...ua residual azul 14 Interruptor de conexión y desconexión 15 Tapa del aparato a Tapa del depósito de agua Tapa intermedia depósito de agua fría b Depósito de agua para agua temperatura c ambiente Apertura de compensación de presión d 16 Pisador 17 Indicación LED roja agua caliente 18 Indicación LED azul agua fría 19 Sensor de luz 20 Tecla de selección de agua caliente Barra luminosa de agua calien...

Page 137: ...tro de bloque de postcarbón filtro n 3 Éste se com pone de un filtro de carbón activo y de un filtro fino El filtro de carbón activo mejora el sabor del agua El filtro fino elimina partículas diminu tas como el polvo y otros cuerpos extraños El filtro ultravioleta permite obtener una lim pieza adicional Este filtro esteriliza por medio de la radiación ultravioleta y hace posible una protección doble contra...

Page 138: ...instalado como es debido el sistema de conductor protector de la instala ción eléctrica doméstica No emplear cables de prolongación Conectar sólo a una caja de enchufe separada y no junto a otros aparatos Instalar el Water Purifier sólo en recintos protegi dos contra las heladas Proteger los elementos de plástico y los cables contra temperaturas elevadas Conectar sólo con agua corriente fría Conect...

Page 139: ...e también la bandeja colectora 26 quede sobre una base firme 26 Montar los distanciadores adjuntos 9 9 Comprobar que la tapa intermedia 15b no se ha desplazado durante el transporte Para ello Retirar la tapa del aparato 15 y la tapa del de pósito de agua 15a 15 15a Controlar que la tapa intermedia 15b sienta correctamente 15b ...

Page 140: ...ión de agua re sidual sólo DW03500 hay que emplear únicamente las piezas adjuntas Quitar los casquetes protectores transparentes del tubo del agua residual 13 azul y del tubo de entrada 12 rojo y colocar un acoplamiento en cada caso Empalmar el tubo de agua residual 13 azul con el acoplamiento al tubo azul de la combina ción de tubos 11b Empalmar el tubo de entrada 12 rojo con el acoplamiento al t...

Page 141: ...ubo anterior no debe emplearse más max 25cm Conexión de agua residual sólo DW03500 Empalmar el tubo de agua residual azul 11b al empalme de salida del sifón con ayuda de las piezas adjuntas Dado el caso montar un sifón con empalme de salida Toma de agua Cerrar la llave de paso del suministro doméstico de agua Conectar la válvula de conexión 6c a la tubería de agua fría del suministro doméstico de ...

Page 142: ...a El aparato hay que conectarlo únicamente a una caja de enchufe separada La caja de enchufe tiene que encontrarse cerca del Water Purifier y tiene que ser posible acceder a ella libremente Cualquier cambio en la conexión tiene que ser llevado a cabo por un profesional Temperatura de funcionamiento Temperatura ambiente permitida 10 hasta 43 C Ventilación Las aperturas de aireación y de desaireación...

Page 143: ... Vaciado de los depósitos para agua fría y para agua a temperatura ambiente Conectar la entrada de agua a la válvula de co nexión 6c Empalmar el extremo recto del tubo de vaciado adjunto 28 a la salida de agua 24 Introducir el otro extremo en un recipiente grande y limpio con una capacidad de 2 litros como mínimo Importante El tubo de vaciado 28 tiene que estar en desnivel con respecto al recipien...

Page 144: ...irar el tubo de vaciado 28 y cerrar la apertu ra con el cierre de seguridad rojo 27a Desplazar hacia arriba la puerta corrediza 27 Retirar la bandeja de recogida con la rejilla 26 vaciarla y enjuagarla Llenado de los depósitos de agua Abrir de nuevo la entrada de agua Enchufar el aparato y poner aI el interruptor de conexión desconexión 14 Mantener pulsada la tecla de selección agua fría durante u...

Page 145: ...a luminosa de la tecla de selección ajustada Ambas parpadean rápi damente poco antes de que pare la dispensación Indicación LED para agua caliente y agua fría Cuando se iluminan las dos indicaciones LED infe riores en rojo para agua caliente y en azul para fría ello significa que son operativas las funciones de refrigeración y de calentamiento Los LEDs 2 3 y 4 indican la temperatura correspondiente...

Page 146: ...rante un mínimo de tres segundos Todos los LEDs se iluminan dos veces El ajuste ha quedado guardado Seguro para niños Después de pulsar la tecla de selección agua ca liente hay que pulsar la tecla de dispensación antes de que transcurran 4 segundos En caso contrario el aparato cambia automáticamente de nuevo a la función de agua fría Para que los niños no puedan escaldarse con el agua caliente el ...

Page 147: ... selección temperatura ambiente durante un mínimo de tres segundos Todos los LEDs se iluminan dos veces para indicar que el ajuste está guardado Activación desactivación de la ilumina ción de la tecla de dispensación La iluminación de la tecla de dispensación puede desactivarse para ahorrar energía Pulsar simultáneamente las teclas de selección agua fría y agua caliente al menos durante 3 segundos...

Page 148: ...n 14 con objeto de ahorrar energía Limpieza y conservación Peligro de electrocución Antes de la limpieza hay que desconectar el en chufe de la red No sumergir jamás en agua el aparato No emplear ningún limpiador de vapor No emplear agentes limpiadores abrasivos Para la limpieza no rociar con agua ni emplear benceno Limpiar la carcasa por fuera pasando un paño húmedo Retirar la bandeja de recogida ...

Page 149: ...do 28 y cerrar la apertu ra con el cierre de seguridad rojo 27a Desplazar hacia arriba la puerta corrediza 27 Abrir de nuevo la entrada de agua Enchufar el aparato y poner aI el interruptor de conexión desconexión 14 Pulsar la tecla de selección agua fría Dura aproximadamente unas 2 horas hasta que los tres depósitos están llenos otra vez El aparato está listo para el funcionamiento cuando las dos...

Page 150: ...nse filtro n 1 Número de pedido BZ00NS1 Cada 6 meses Filtro de membrana de ósmosis inversa filtro n 2 Número de pedido BZ00RO1 Cada 20 meses Filtro de bloque de postcarbón filtro n 3 Número de pedido BZ00PC1 Cada 18 meses El filtro ultravioleta puede ser recambiado exclusivamente por nues tro servicio técnico Por favor póngase en contacto con el servicio técnico Importante El filtro hay que recambiarlo...

Page 151: ...correspondiente Esto se indica también por medio de una luz parpadean te Para ajustar la cuenta de tiempo proceda como se indica a continuación Después del recambio del filtro Neo Sense filtro n 1 Pulsar simultáneamente el botón seguro para niños y la tecla de selección agua ca liente durante 3 segundos como mínimo La cuenta de tiempo ha sido activada Después del recambio del filtro de membrana de ós...

Page 152: ...s preciso recambie el filtro correspondiente El agua fluye más lentamente Es tiempo de cambiar uno de los filtros Si es preciso recambie el filtro correspondiente Está cerrada la llave de la toma de agua Abra la llave de la toma de agua El agua está muy sucia Es necesario montar adicional mente un filtro previo en el sis tema Éste puede obtenerse del servicio técnico con el número de pedido BZ00PF1 No ...

Page 153: ...minis tro de agua sea demasiado largo Acorte el tubo para el suminis tro del agua a un máximo de 5 metros La salida de agua puede ser defectuosa Póngase en contacto con el servi cio técnico Todas las funciones se detie nen súbitamente durante el funcionamiento Se ha cortado el agua súbitamente Compruebe la llave de la toma de agua Está conectado el aparato a la red eléctrica Dado el caso conecte e...

Page 154: ...icos waste electrical and electronic equipment WEEE La directiva propor ciona el marco general válido en todo el ámbito de la Unión Europea para la reti rada y la reutilización de los residuos de los aparatos eléctricos y electrónicos Garantía Para este aparato rigen las condiciones de garantía establecidas por las correspondientes Sociedades Nacionales Éstas pueden solicitarse al distribuidor en ...

Page 155: ...2 por la noche Rango de temperatura agua caliente C 89 94 por el día 65 75 por la noche Volumen de paso de agua fría l min 1 8 Volumen de paso agua caliente l min 1 4 Volumen de paso agua temperatura ambiente l min 1 8 Tiempo de calentamiento de 1 0 l a la temperatura máxima tempera tura de entrada 12 C min 20 Tiempo de refrigeración agua fría min 50 Tiempo de llenado todos los depósitos min aprox...

Page 156: ...Sıcak su ve soğuk su LED göstergeleri 163 Su dolumu için dolum miktarının ayarlanması 163 Çocuk emniyeti 164 Enerji tasarrufu 164 Konum 164 Işık sensoru 164 Dolum tuşu ışıklandırmasının açılıp kapatılması 165 Isıtma fonksiyonunun açılması kapatılması 165 Soğutma fonksiyonunun açılması kapatılması 165 Açma Kapatma Şalteri 165 Temizlik ve bakım işlemleri 165 Su depolarının boşaltılmaları ve temizlen...

Page 157: ...a talimatlarını itinalı bir biçimde okuyunuz talimatlara uygun bir biçimde davranınız ve talimatları saklayınız Bu Water Purifier cihazı ev kullanımı için geliştirilmiş olup ticari kullanım için öngö rülmemiştir Bu kullanma talimatı tarafından aksesu arlar açısından farklılıklar gösteren farklı modeller tarif edilmektedir Elektrik bağlantı kablosunun veya fişinin ıslanmış olmaları halinde cihazın fiş...

Page 158: ... kırmızı Su bağlantısı b Atık su hortumu mavi 12 Besleme hortumu kırmızı Su bağlantısı 13 Atık su hortumu mavi 14 Açma Kapatma Şalteri 15 Cihaz kapağı a Su deposu kapağı Ara kapak Soğuk su deposu b Su deposu Oda sıcaklığında su için c Basınç dengeleme yeri d 16 Bastırma parçası 17 LED gösterge kırmızı Sıcak su 18 LED gösterge mavi Soğuk su 19 Işık sensoru 20 Sıcak su seçme tuşu Sıcak su ışık çubuğ...

Page 159: ...rbon filtresinden ve bir ince filtreden oluşmaktadır Aktif karbon Filtresi tarafından suyun tadı iyileştirilmektedir İnce Filtre tara fından ise toz ve diğer yabancı cisimler gibi en küçük partiküller uzaklaştırılmaktadır MÖ Filtresi tarafından artı temizlik sağlan maktadır Bu filtre tarafından MÖ ışınları saye sinde bakteriler ile virüslere karşı çift güvenlik sağlanmaktadır Size böylelikle her daim...

Page 160: ...ının koruyucu iletken sisteminin aslına uygun olarak tesis edildiğini denetleyiniz Uzatma kabloları kullanmayınız Başka cihazların bağlı olmadıkları münferit bir prize takınız Water Purifier cihazını don tutmayan bir mekâna tesis ediniz Plastik parçaları ile kabloları yüksek ısı derecele rinden koruyunuz Cihazı sadece soğuk şebeke suyuna bağlayınız Cihazı sadece ilgili ülkenin yönetmelik hükümle ri...

Page 161: ...ey üzerine denk gelmesi biçiminde kurulumunu sağlayınız 26 Birlikte teslim edilen mesafe parçasını 9 yerine takınız 9 Ara kapağının 15b taşıma sırasında yerinden kayıp kaymadığını kontrol ediniz Bunun için Cihaz kapağını 15 ve su deposu kapağını 15a yerinden alınız 15 15a Ara kapağın 15b doğru olarak yerine oturmuş olmasını kontrol ediniz 15b ...

Page 162: ... bağlantısı için sadece birlikte teslim edilen parçaları kullanınız sadece DW03500 Atık su hortumu 13 mavi ve su besleme hor tumu 12 kırmızı üzerlerinde bulunan şeffaf koruma tapalarını çıkartınız ve üzerlerine birer adet bağlantı parçası takınız Atık su hortumunu 13 mavi bağlantı parçası ile birlikte mavi hortum kombinasyonuna takınız 11b Su besleme hortumunu 12 kırmızı bağlantı parçası ile birli...

Page 163: ... bir daha kullanılmamalıdır max 25cm Atık su bağlantısı sadece DW03500 Mavi atık su hortumunu 11b birlikte teslim edilen parçalar ile sifon kısmının tahliye manşo nuna takınız Gerektiği durumlarda sifonu tahliye manşonu ile birlikte monte ediniz Su bağlantısı Ev su girişinin ana vanasını kapatınız Bağlantı valfını 6c ev su girişinin soğuk su kıs mına takınız Resimler a ve b de gösterildiği gibi a ...

Page 164: ...nmemesi gerekmektedir Bağlantı üzerinde tadilatlar sadece bir uzman kişi tarafından yapılabilmektedir İşletme sıcaklığı İzin verilen oda sıcaklığı 10 ile 43 C derece arası Havalandırma Cihazın havalandırma ve hava tahliye yerlerini hiçbir zaman kapatmayınız Aksi takdirde soğutma sistemi nin göstermesi gerektiği aşırı performans nedeniyle elektrik sarfiyatı artmaktadır İlk çalıştırma işlemi Önemli C...

Page 165: ... yönelik bir meyil i olmalıdır Aksi takdirde hortum akış mik tarı zayıflayacaktır ve su deposunun tamamen boşal mamasına sebep olacaktır Seçim tuşunu soğuk su takribin 3 saniye için basılı tutunuz ve bu şekilde soğuk su fonksiyo nunu kapatınız Su doldurma tuşunu 3 saniye için basılı tutunuz Su tahliye hortumundan 1 dakika süresince su çıkacaktır Bu işlemi su gelmeyene dek tekrarlayınız Sıcak su dep...

Page 166: ...u takriben 3 saniye için basılı tutunuz ve bu şekilde soğuk su fonksi yonunu açınız Üç adet su depolarının tümünün doldurulmaları tak riben 2 saat sürmektedir Bunun ardından su depolarını su depolarının boşaltılmaları bölümünde tarif edildiği gibi yeniden boşaltınız ve su depolarının doldurul maları bölümünde tarif edildiği gibi yeniden doldurunuz Su depolarının dolmaları ardından her iki LED göst...

Page 167: ...haz çalışmaktadır Cihaz çalışmaktadır 75 83 C 167 181 F 10 13 C 50 55 F 83 91 C 181 196 F 7 3 10 C 45 50 F 91 96 C 196 205 F 5 7 3 C 41 45 F Su dolumu için dolum miktarının ayarlanması Bu cihaz fabrika tarafından belirli bir dolum miktarı na göre ayarlanmıştır 120 ml Bu ayar değiştirilebilmektedir Bunun için üç adet farklı ayar seçeneği bulunmaktadır 120 ml 200 ml ve 300 ml LED sıcak su Dolum mikt...

Page 168: ...lmektedir Enerji tasarrufu Konum Doğru kurulum konumunun seçimi eneri tüketimi bakımından önemlidir Cihazı kuru ve iyi havalandıran bir yere kurunuz Cihazı doğrudan güneşin altına veya ısı kaynak larının yakınına kurmayınız mesela kalorifer peteği ocak Işık sensoru Işık sensoru 19 tarafından gün ışığı ölçülerek gün karardığında ısıtma ve soğutma işleminin sıklığı azaltılarak otomatik olarak enerji...

Page 169: ...tma fonksiyonu kapalı Enerji tasarrufu Isıtma fonksiyonu açık Kapatmak için seçme tuşunu sıcak su takri ben 3 saniye basılı tutunuz Sıcak su LED göstergesi sönecektir Açmak için seçme tuşunu sıcak su takriben 3 saniye basılı tutunuz Soğutma fonksiyonunun açılması kapatılması Soğutma fonksiyonunun da enerji tasarrufu için kapatılması mümkündür LED soğuk su Soğutma fonksiyonu kapalı Enerji tasarrufu...

Page 170: ...ümüne dek olmak üzere tatbik ediniz Cihaz kapağını 15 su deposu kapağını 15a ve ara kapağı 15b yerlerinden alınız 15 15b 15a Su deposunu yeni temizleme bezi 29 ile siliniz Kimyasal nitelikte veya diğer türlerde temizleme maddeleri kullanmayınız Ara kapağı 15b su deposu kapağını 15a ve cihaz kapağını 15 yeniden yerlerine koyunuz 27 27b 28 27a Su tahliye hortumunu 28 yerinden çıkartınız ve kırmızı e...

Page 171: ...yda bir kez RO Membran Filtresi Filtre No 2 Sipariş numarası BZ00RO1 beher 20 ayda bir kez Post Carbon Blok Filtresi Filtre No 3 Sipariş numarası BZ00PC1 beher 18 ayda bir kez MÖ Filtresi sadece bizim yetkili servisimiz tarafından değiştirilebil mektedir Bunun için lütfen yetkili servisimiz ile bağlantı kurunuz Önemli Filtre değişimi gereksiniminin gösterge tarafından belirtilir belirtilmez ilgili...

Page 172: ...emli Beher filtre değişiminin ardından ilgili filtrenin zaman sayacının yeniden aktif konuma getirilmesi gerekmektedir Bu durum aynı zamanda yanıp sönen ışık ile işaret edilmektedir Zaman sayacının ayarlanması için lütfen aşağıda tarif edildiği gibi hareket ediniz Değişim işleminin ardından Neo Sense Filtresi Filtre No 1 Tuş çocuk emniyeti ve seçim tuşu sıcak su aynı anda olmak üzere en az 3 saniye ...

Page 173: ...eyiniz Filtre değiştirme zamanı geldi mi Gerekiyor ise filtreyi değiştiriniz Su daha yavaş akmaktadır Filtre değiştirme zamanı geldi mi Gerekiyor ise filtreyi değiştiriniz Su bağlantı vanası kapalı mı Su bağlantı vanasını açınız Su çok mu kirli Bu durumda su iletim sistemine bir ön filtrenin tesis edilmesi gerekmektedir Bu filtre BZ00PF1 sipariş numarası altında yetkili servisten temin edilebilmektedi...

Page 174: ...dir Su besleme hortumunu azami olarak 5 metreye kadar kısaltınız Su çıkışı arızalı olabilmektedir Lütfen yetkili servis ile temasa geçiniz Cihaz çalıştığı sırada birden tüm fonksiyonlar durmaktadır Su bir anda kapatıldı mı Su besleme bağlantısını kontrol ediniz Cihaz elektrik şebekesine bağlı mı Gerektiği durumda cihazı üzerin de bulunan tip levhası bilgileri doğrultusunda elektrik şebekesi ne bağ...

Page 175: ...inin borularına zarar vermeyiniz Tasfiye Bu cihaz ömrünü doldurmuŞ elektrikli ve elektronik cihazlar ile ilgili Avrupa yönet meliği 2002 96 EG ye waste electrical and electronic equipment WEEE uygun Şekilde iŞaretlenmiŞtir Bu yönetmelik eski cihazların geri alımı ve değerlendiril mesi ile ilgili AB çapındaki uygulamaların çerçevesini belirtmektedir Garanti Bu cihaz için yutdışındaki mümessillikleri...

Page 176: ... 12 gece Sıcak su ısı derecesi alanı C 89 94 gündüz 65 75 gece Soğuk su akış miktarı litre dakika 1 8 Sıcak su akış miktarı litre dakika 1 4 Oda sıcaklığında akış miktarı litre dakika 1 8 Isıtma süresi 1 0 l azami ısı derecesine olmak üzere giriş ısı derecesi 12 C dakika 20 Soğutma süresi soğuk su dakika 50 Dolum süresi tüm depoların dakika takriben 120 İşletim basıncı MPa 0 14 0 83 1 4 8 3 bar So...

Page 177: ...175 tr ...

Page 178: ...ga 186 Kontrolka LED gorącej i zimnej wody 187 Ustawianie ilości odbieranej wody 187 Zabezpieczenie przed dziećmi 188 Oszczędzanie energii 188 Lokalizacja 188 Czujnik światła 188 Włączanie i wyłączanie podświetlenia przycisku odbioru 189 Włączanie i wyłączanie funkcji ogrzewania 189 Włączanie i wyłączanie funkcji chłodzenia 190 Włącznik wyłącznik 190 Pielęgnacja i czyszczenie 190 Opróżnianie i czy...

Page 179: ...iowy z gniazda Urządzenie podłączać i użytkować tylko zgodnie z danymi na tabliczce znamionowej Używać tylko pod warunkiem że urządzenie i przewód zasilający nie są uszkodzone Urządzenia używać tylko w pomieszczeniach za mkniętych i w temperaturze pokojowej Osoby również dzieci o upośledzeniach fi zycznych psychicznych lub umysłowych albo z niewystarczającym doświadczeniem i wiedzą nie mogą obsługi...

Page 180: ...ik wyłącznik 15 Pokrywa urządzenia a Pokrywa zbiornika wody Pokrywa pośrednia zbiornik zimnej wody b Zbiornik wody woda w temperaturze c pokojowej Otwór do kompensacji ciśnienia d 16 Dociskacz 17 Kontrolka LED czerwona gorąca woda 18 Kontrolka LED niebieska zimna woda 19 Czujnik światła 20 Przycisk wyboru gorącej wody Pasek świetlny gorącej wody a 21 Przycisk wyboru wody w temperaturze pokojowej P...

Page 181: ...z węglem aktyw nym i filtra dokładnego Filtr z węglem aktyw nym polepsza smak wody Filtr dokładny usuwa najdrobniejsze cząstki stałe takie jak pył i inne ciała obce Filtr ultrafioletowy zapewnia dodatkowe czyszczenie Dokonuje on sterylizacji za pomocą promieniowania ultrafioletowego i umożliwia podwójne zabezpieczenie przed bakteriami i wirusami Zapewnia to całkowicie czystą wodę Ponadto istnieją róż...

Page 182: ...i elektrycznej budynku jest prawidło wo zainstalowany Nie używać przedłużaczy Podłączać urządzenie wyłącznie do oddziel nego gniazda sieciowego i nie razem z innymi urządzeniami Water Purifier musi zostać zainstalowany w po mieszczeniu zabezpieczonym przed mrozem Chronić części z tworzywa sztucznego i przewo dy przed wysokimi temperaturami Podłączać tylko do zimnej wody wodociągowej Podłączać wyłąc...

Page 183: ... tak ustawione aby taca wychwytująca 26 spoczywała na mocnym podłożu 26 26 Zamontować dołączony element dystansowy 9 9 Sprawdzić czy pokrywa pośrednia 15 nie prze sunęła się podczas transportu W tym celu zdjąć pokrywę urządzenia 15 i pokrywę zbiornika wody 15a 15 15a Sprawdzić czy pokrywa pośrednia 15b jest pra widłowo osadzona 15b ...

Page 184: ...ja wodna Ważne Do podłączania wody i odprowadzania ścieków tyl ko DW03500 używać tylko dołączonych części Zdjąć przezroczyste zatyczki węża ścieków 13 niebieskiego i węża zasilania 12 czerwonego i podłączyć je do odpowiednich złączek Połączyć wąż ścieków 13 niebieski do niebie skiej złączki kombinacji węży 11b Połączyć wąż zasilania 12 czerwony do czer wonej złączki kombinacji węży 11a Ułożyć komb...

Page 185: ...wać dotychczasowego węża max 25cm Przyłącze wody ściekowej tylko DW03500 Połączyć niebieski wąż ścieków 11b za pomocą dołączonych części do króćca odpływowego sy fonu Ewentualnie zamontować syfon z króćcem odpływowym Przyłącze wody Zamknąć zawór główny budynkowego przyłącza wody Podłączyć zawór przyłączeniowy 6c do prze wodu zimnej wody zasilania budynku patrz ilustracje a i b a b 6c 6a 6a Ważne P...

Page 186: ...listę Przyłącze elektryczne Podłączać urządzenie tylko do oddzielnego gniazda Gniazdo musi znajdować się w pobliżu urządzenia Water Purifier i musi być swobodnie dostępne Zmiany przyłącza mogą być dokonywane tylko przez specjalistę Temperatura robocza Dopuszczalna temperatura pomieszczenia 10 do 43 C Wentylacja W żadnym wypadku nie wolno przykrywać otworów wentylacyjnych Inaczej chłodzenie musi dzi...

Page 187: ...owinien mieć spadek do naczynia W przeciwnym razie przepływ będzie za słaby i uniemożliwi kompletne opróżnienie wody Przez 3 sekundy przytrzymać naciśnięty przycisk wyboru zimnej wody aby wyłączyć funkcję zimnej wody Przytrzymać przycisk odbioru naciśnięty przez ponad 3 sekundy Przez 1 minutę wypływa woda z węża do opróżniania Dotąd powtarzać tę operację aż nie będzie wy pływać woda Opróżnianie zb...

Page 188: ...ozycji I Przez 3 sekundy przytrzymać naciśnięty przycisk wyboru zimnej wody aby włączyć funkcję zimnej wody Napełnienie wszystkich trzech zbiorników trwa ok 2 godziny Ponownie opróżnić i napełnić zbiorniku zgodnie z opisami w rozdziałach Opróżnianie zbiorników wody i Napełnianie zbiorników wody Urządzenie jest gotowe do pracy gdy świecą oby dwie diody świecące gorąca woda 17 i zimna woda 18 Dioda ...

Page 189: ...uje 75 83 C 167 181 F 10 13 C 50 55 F 83 91 C 181 196 F 7 3 10 C 45 50 F 91 96 C 196 205 F 5 7 3 C 41 45 F Ustawianie ilości odbieranej wody Urządzenie jest fabrycznie ustawione na określoną ilość pobieranej wody wynoszącą 120 ml To ustawienie można zmienić Są trzy możliwości ustawienia 120 ml 200 ml i 300 ml Dioda świecąca gorącej wody Ilość odbioru 120 ml 200 ml 300 ml W tym celu należy postąpić...

Page 190: ...zczędzanie energii Lokalizacja Prawidłowa lokalizacja jest ważna dla zużycia energii Ustawić urządzenie w suchym dobrze przewie trzanym pomieszczeniu Nie ustawiać bezpośrednio na słońcu lub w po bliżu źródła ciepła np grzejnika kuchenki Czujnik światła Czujnik światła 19 mierzy natężenie światła dziennego i automatycznie redukuje zużycie energii w ciemności przez obniżenie częstości procesu na grz...

Page 191: ...nie energii LED świeci Podświetlenie przycisku odbioru włączone Aby zapisać ustawienie przytrzymać przycisk wyboru temperatura pomieszczenia przez co najmniej trzy sekundy Wszystkie diody świecące zaświecają się dwukrot nie Ustawienie zostało zapamiętane Włączanie i wyłączanie funkcji ogrzewania Można wyłączyć funkcję ogrzewania w celu zaosz czędzenia energii jeżeli nie jest używana Dioda świecąca...

Page 192: ...eniem wyciągnąć wtyk z gniazdka Nigdy nie zanurzać urządzenia w wodzie Nie używać myjek parowych Nie stosować szorujących środków czyszczących Do czyszczenia nie natryskiwać wodą ani nie używać benzolu Czyścić obudowę od zewnątrz wilgotną ściereczką Wyjąć tacę wychwytująca 26 z kratką do odsta wiania opróżnić ją i wypłukać Taca wychwytu jąca z kratką do odstawiania można myć również w zmywarce do ...

Page 193: ...a Zdjąć wąż do opróżniania 28 i połączyć otwór z czerwonym zamknięciem zabezpieczającym 27a Przesunąć drzwi przesuwne 27 do góry Ponownie otworzyć dopływ wody Podłączyć urządzenie do gniazda i ustawić włącznik wy łącznik 14 w pozycji I Nacisnąć przycisk wyboru zimnej wody Napełnienie wszystkich trzech zbiorników trwa ok 2 godziny Urządzenie jest gotowe do pracy gdy świecą oby dwie diody świecące g...

Page 194: ...ody dziennie Filtr Neo Sense filtr nr 1 Numer katalogowy BZ00NS1 co 6 miesięcy Filtr membranowy RO filtr nr 2 Numer katalogowy BZ00RO1 co 20 miesięcy Blok Post Carbon filtr nr 3 Numer katalogowy BZ00PC1 co 18 miesięcy Filtr ultrafioletowy może zostać wymieniony wyłącznie przez nasz serwis Prosimy o skontaktowanie się z serwisem Ważne Wymiana filtra jest konieczna z chwilą pojawienia się wezwania do wym...

Page 195: ...u należy postępować w następujący sposób Po wymianie filtra Neo Sense filtra nr 1 Równocześnie nacisnąć i przytrzymać przez co najmniej 3 sekundy przycisk zabezpieczenie przed dziećmi i przycisk wyboru gorąca woda Licznik czasu został aktywowany ponownie Po wymianie filtra membranowego RO filtra nr 2 Równocześnie nacisnąć i przytrzymać przez co najmniej 3 sekundy przycisk zabezpiecze nie przed dziećmi...

Page 196: ...ltra W razie potrzeby wymienić filtr Woda przepływa wolniej Nadszedł czas wymiany filtra W razie potrzeby wymienić filtr Czy zawór przyłączeniowy wody jest zamknięty Otworzyć zawór przyłączeniowy wody Czy woda jest znacznie zanieczyszczona Należy zainstalować dodatkowy filtr wstępny w systemie przewodów Jest on dostępny w naszym serwisie pod numerem katalogowym BZ00PF1 Nie ma możliwości pobierania zim...

Page 197: ...ający wodą może być załamany Sprawdzić wąż zasilania wodą Wąż zasilający wodą może być za długi Skrócić wąż zasilania wodą do maksymalnie 5 metrów Wypływ wody może być uszkodzony Należy skontaktować się z serwisem Wszystkie funkcje nagle przestają działać podczas pracy Czy nie został nagle odcięty dopływ wody Sprawdzić zawór przyłączeniowy wody Czy urządzenie jest podłączone do obwodu elektryczneg...

Page 198: ...ży uszko dzić rur obiegu czynnika chłodniczego Utylizacja To urządzenie jest oznakowanie zgodnie z dyrektywą europejską 2002 96 WE w sprawie zużytego przętu elektrycznego i elektronicznego waste of electrical and electronic equipment WEEE Dyrektywa ta stwarza warunki ramowe dla przyjmowania zwrotów i utylizacji zużytych urządzeń w Unii Europejskiej Gwarancja Urządzenie podlega warunkom gwarancji w...

Page 199: ...a 9 12 w nocy Zakres temperatury gorącej wody C 89 94 w ciągu dnia 65 75 w nocy Natężenie przepływu zimnej wody l min 1 8 Natężenie przepływu gorącej wody l min 1 4 Natężenie przepływu wody w temperaturze pokojowej l min 1 8 Czas nagrzewania 1 0 l do temperatury maksymalnej temperatura zasilania 12 C min 20 Czas chłodzenia zimna woda min 50 Czas napełniania wszystkie zbiorniki min ok 120 Ciśnienie...

Page 200: ...198 ...

Page 201: ......

Page 202: ...Siemens Electrogeräte GmbH Carl Wery Str 34 81739 München Siemens Electrogeräte GmbH 03 09 www siemens homeappliances com 9000382966 ...

Reviews: