background image

Reference Manual 

Chapter 

7


Ruler E


Hardware Description 

Table 7.1- Measurement details. 


Ruler E600 

Ruler E 1200 

Remarks 

Example field-of-view 
(height x width) 

250 x 600 mm  

250 x 1200 mm 

Typical height x width. 

Stand-off 

415 mm 

280 mm 

Individual deviation may 
occur. 

Total height range 

450 mm 

1000 mm 

Individual deviation may 
occur. 

Width range 

450 – 820 mm 

500 – 1550 mm 

At stand-off level and at 

maximum distance from 
Ruler. Individual devia-

tions may occur.  

Sensor resolution 

1536 x 512 pixels  1024 x 512 pixels   

Height resolution, 

typical 

0.15 mm 

0.4 mm 

The sensor row resolu-

tion depends on the 
object distance from 

Ruler and on the 3D 

algorithm used.  

Max profile rate 

10000 profiles/s  10000 profiles/s 

Dependent on set-up 

and application. 


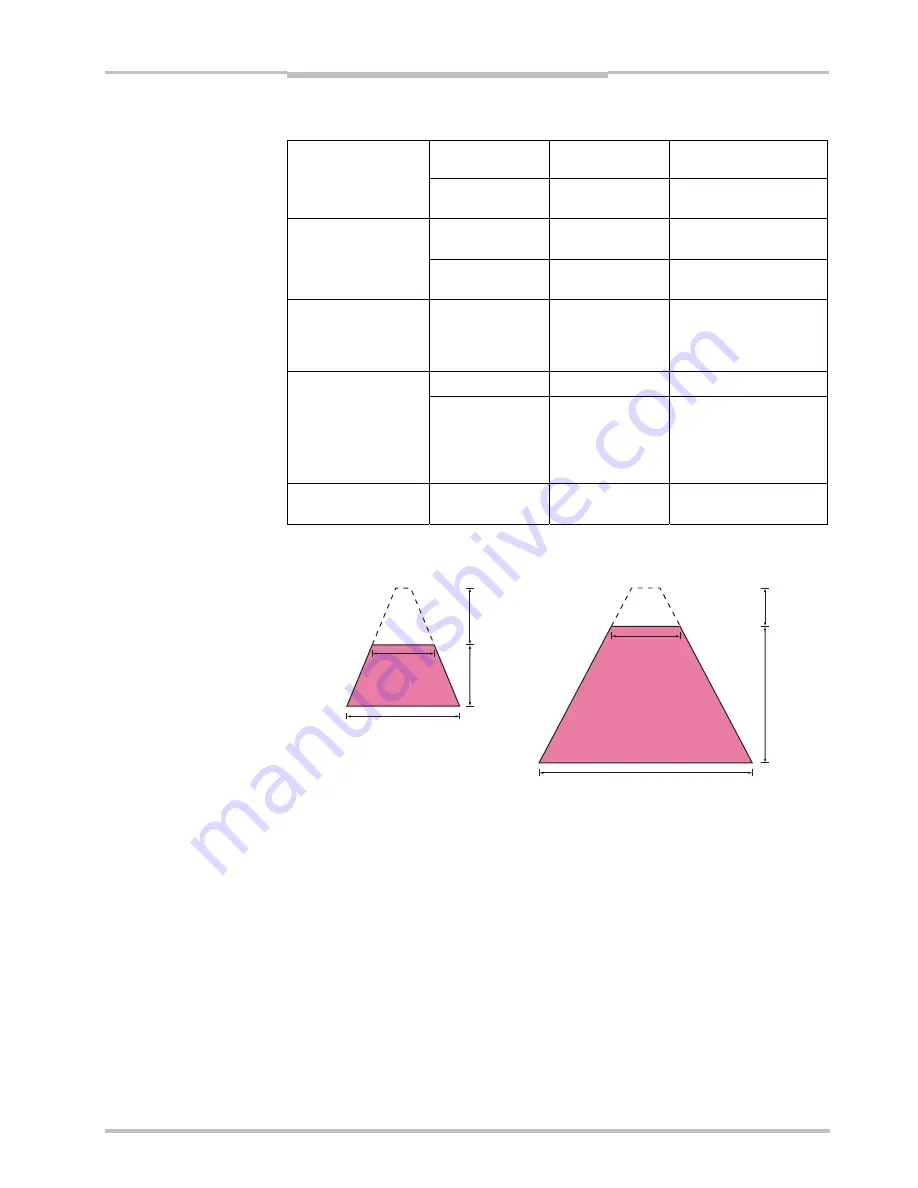
Figure 7.2 – Maximum field-of-views for Ruler E 600 and E 1200 

Ruler E 600 

Ruler E 1200 

280 mm 

415 mm 

500 mm 

450 mm 

450 mm 

1000 mm 

820 mm 

1550 mm 


SICK IVP • Industrial Sensors • www.sickivp.com • All rights reserved 

53


Summary of Contents for Ruler E

Page 1: ...R E F E R E N C E M A N U A L R u l e r E R e f e r e n c e M a n u a l...

Page 2: ...t in hazardous radiation exposure Turn off the laser power to the Ruler before maintenance The power to the laser in the Ruler must be turned off before any maintenance is per formed Failure to turn t...

Page 3: ...3 Horizontal Max and Threshold HorMaxThr 25 3 6 4 Hi res 3D Hi3D 26 3 7 Details on 3D Profiling Algorithms 27 4 Ranger Studio 31 4 1 Ranger Studio Main Window 31 4 2 Visualization Windows 32 4 2 1 Zo...

Page 4: ...et Up 52 7 2 Electrical Connections 54 7 3 Technical Data 56 7 4 Dimensional Drawings 57 Appendix 58 A Ruler E Models and Type Codes 58 B Recommended Network Cards 59 C Recommended Switches 60 D iCon...

Page 5: ...ted by detecting the laser in the image Depending on the model of the Ruler it can make two or three different types of meas urements Range Measures the height of the object along the laser line Inten...

Page 6: ...into production you must write such an application It is devel oped in for example Microsoft Visual Studio using one of the APIs delivered with the software for the camera Figure 1 2 Profiles are sent...

Page 7: ...io application that is delivered with the Ruler can be used for evaluating different set ups of the camera With Ranger Studio you can change the settings for the camera and instantly see how the chang...

Page 8: ...ption Figure 1 4 Threshold locates the laser in each column of the sensor image by searching for intensities above a certain level while Max searches for the maximum intensity in each column Which com...

Page 9: ...e Ruler and the object The further away the object the lower the accuracy This is because the object is viewed from a perspective and therefore a pixel at the bot tom of the image shows a larger area...

Page 10: ...to search for the profile The larger the image the longer it takes to search Therefore one way of increasing the performance of the Ruler is to use a smaller part of the sensor Figure 1 6 A small imag...

Page 11: ...placed in a buffer by the Ruler object When your application needs measurement data it requests data from the Ruler object which will then return a full buffer of profiles Figure 1 7 All communication...

Page 12: ...ggering is not used for triggering profiles the Ruler will measure in free running mode that is make measurements with a regular time interval determined by the Ruler s cycle time The actual distance...

Page 13: ...n a certain way for complete information please refer to http www fda gov cdrh For the Ruler this corresponds to the maximum light power measured through a 7 mm aperture 100 mm away from the laser ape...

Page 14: ...present in the system Lack of beam attenuator and emission indicator is accepted by CDRH according to Guid ance on Laser Products Conformance with IEC 60825 1 Am 2 and IEC 60601 2 22 Laser Notice No 5...

Page 15: ...familiar with Region of Interest External Triggering Cycle Time and Exposure Time Region of Interest The Region of Interest ROI is used to define what part of the sensor to be used in a measurement Th...

Page 16: ...number of pulses received on the pulse triggering inputs using an internal counter which is reset every time a measurement is made When you connect both In1 and In2 on the Ruler s Encoder connector t...

Page 17: ...of time When the exposure time is equal to the cycle time the Ruler only needs to go over the sensor once every cycle Therefore the shortest possible cycle time would be the same as the time it takes...

Page 18: ...recovering one lost package since the previous redundancy package was sent For exam ple if Redundancy frequency is set to 10 one package out of ten can be lost without losing any data The maximum pack...

Page 19: ...Image configuration component Image 1 is used for evaluation purposes when tuning in the sensor region and the exposure time for the 3D measurement configu ration To help setting the height of the RO...

Page 20: ...or column to acquire data from 0 1280 for Ruler E 600 0 768 for Ruler E 1200 Number of columns The number of columns to acquire a multiple of 8 256 1536 for Ruler E 600 Default value 1536 256 1024 for...

Page 21: ...er and the measured object The resolution on different dis tances from the Ruler using the Hi3D and Horizontal threshold with 2 thresholds is shown in the following figures 0 0 1 0 2 0 3 0 4 0 5 0 6 4...

Page 22: ...neighbors before the range algorithm is applied The morphology filter is used for reducing noise in the sensor image before the laser line is detected If both filters are used the morphology filter is...

Page 23: ...nt settings for the ROI The maximum speed with one and two thresholds enabled is shown in the following figure 0 1000 2000 3000 4000 5000 6000 7000 8000 9000 10000 0 100 200 300 400 500 HorThr Maximum...

Page 24: ...e the minimum light level to consider as a valid laser position 0 255 Note that a low setting of the threshold might increase the amount of noise Sub pixeling The resolution to use when computing the...

Page 25: ...cquire algorithm data from 16 512 Default value 128 Exposure time The time that the sensor is exposed to light microseconds Gain The amplification of the analog sensor data before AD conversion 1 No a...

Page 26: ...catter data Mode Mode 0 Range and Intensity 1 With Scatter valid only for S version Scatter offset Offset distance in percentage from the maximum position 0 99 Too low an offset gives scatter value in...

Page 27: ...line on that sensor column which is the range value Threshold Digitizing an analog signal by the means of a binary threshold is a common technique in signal image processing The signal in the previou...

Page 28: ...f a quarter of a pixel Multiple light peaks If several light peaks are above the threshold at the same sensor column the first peak found in the search direction is used to represent the impact positi...

Page 29: ...and Horizontal Max and Threshold components The calculation does not increase the time for the processing In cases when using two thresholds this filter is applied to both binary results independ entl...

Page 30: ...filter is applied before the median filter Figure 3 10 Applying a morphological filter to one column of the sensor image In a shrinking morphological filter of size Nx1 pixels the operation is define...

Page 31: ...indow Control bar Parameter editor Log 4 1 Ranger Studio Main Window The main window is the core of the application It consists of a menu bar a control bar with buttons and a log window Menu bar menus...

Page 32: ...er data is only be avail able in Rulers with the scatter option S version Figure 4 3 Visualization windows with range scatter and intensity images The visualization window always shows the measurement...

Page 33: ...lor Before generating the 3D surface the data is filtered by a small median filter to reduce noise peaks The 3D zoom window can be of use even if the data is intensity data Profile zoom Blue rectangle...

Page 34: ...If changing a parameter value fails an error message is shown in the log but the attempted value might still be seen in the editor In this case restart the parameter editor to receive the original va...

Page 35: ...surement method you plan to use Ranger Studio includes default parame er files for each measurement method t 1 Start Ranger Studio 2 Click Connect on the Control bar 3 Click Load Parameters in the Ran...

Page 36: ...e object closest to the sensor 2 Click Parameter Editor in the Ranger Studio 3 Select the Image 1 component in the parameter tree of the Parameter Editor 4 Select Measurement ROI overlay and change th...

Page 37: ...rs to improve the image quality and perform ance New 3D Profiles are being collected constantly overwriting what is displayed in the visuali zation window In order to get an entire 3D Image of the obj...

Page 38: ...Ruler send this amount of scans for each trig pulse after competion of previous collection of scans 4 Click Disconnect to synchronize the image buffers the parameter settings of the Ruler will remain...

Page 39: ...ed 3D data do as follows 1 Collect the data you want to save 2 Choose File Save buffer from the menu bar 3 Fill in a name for the files in the dialog box and click Save To load a file containing saved...

Page 40: ...in VB Net However the Ruler C API contains the same functions having the same names An example program showing how the Ruler C API is used can be found in Examples on page 48 You can also explore the...

Page 41: ...therefore the Ruler cannot be started NOTINITIALIZED STOPPED STARTED create object 5 2 Retrieving Measurement Data When retrieving the profiles with the Ruler object the measured values for each poin...

Page 42: ...ve occurred 24 26 Reserved ENCODER_B 27 Set if the signal on In2 on the Encoder connector is high Encoder Phase 2 ENCODER_A 28 Set if the signal on In1 on the Encoder connector is high Encoder Phase 1...

Page 43: ...time that is specified by the Timeout property If Timeout is set to 0 the method will return immediately if there is no buffer available If Timeout is set to 1 the method will never time out that is t...

Page 44: ...s the Scan height parameter in the parameter file for the camera Timeout Time in milliseconds before a call to RequestDataSeparate times out If set to 1 the method will never time out RulerMode Used f...

Page 45: ...ystem Transformation Translation The distance to move the origin of the Ruler s coordinate system along the x axis x and the z axis range Figure 5 4 Transforming the coordinate system When you have se...

Page 46: ...Figure 5 5 The FieldOfView property for a non rotated and a rotated Ruler The field of view in the Ruler object is thus a bounding box within which all point measured by the Ruler lies There is no gua...

Page 47: ...0 the measurement values will not be rectified When rectifying the x values in the resulting profile is first calculated from the Rectify Width property The range intensity or scatter value for each n...

Page 48: ...one buffer at a time and print out some statistics about the measurement speed The program will run until any key is pressed on the keyboard When compiling this program make sure that you link with th...

Page 49: ...har profiles width Start acquisition of profiles ret ruler start if ret 0 cout Ruler start failed ret endl delete ruler exit 1 int count 0 while _kbhit ret ruler requestDataSeparate profiles profiles...

Page 50: ...Ruler RulerNet MyRuler Dim res As ErrorCodes Dim points profiles As Integer Set the timeout for requesting data to 10 milliseconds ruler Timeout 10 Set the IP address of the Ruler unit we want to conn...

Page 51: ...f there is any buffers available If ruler AvailableBuffers 0 Then res ruler RequestDataSeparate id status Nothing x range intensity Nothing If res ErrorCodes E_ALL_OK Then Do data processing here Else...

Page 52: ...of view The Ruler delivers profiles at a rate determined by the camera parameter settings The maximum possible profile rate depends on the chosen measurement accuracy and se lected region of interest...

Page 53: ...off level and at maximum distance from Ruler Individual devia tions may occur Sensor resolution 1536 x 512 pixels 1024 x 512 pixels Height resolution typical 0 15 mm 0 4 mm The sensor row resolu tion...

Page 54: ...nctions LED When lit On The Ruler is powered Function The laser is armed meaning that there is power on the Laser Power Supply pin and the laser is either active or can be activated from an applicatio...

Page 55: ...l terminated 4 Yellow In1 Phase 1 RS422 TTL signal level terminated 5 Gray GND Ground 6 Pink Reserved 7 Blue In4 Monitor Enable 24 V 8 Red Out 2 Reserved B type Color is valid for cable type STL 1208...

Page 56: ...ype reserved 100mA total current of all digital outputs Weight 7 0 kg Dimensions lxhxd 420 x 163 x107 mm Power supply DC 24 V 20 separate pin for laser supply Current consumption 1 A Ripple 5 VPP Conn...

Page 57: ...Reference Manual Chapter 7 Ruler E Hardware Description 7 4 Dimensional Drawings Figure 7 4 Ruler E 600 and E 1200 not to scale SICK IVP Industrial Sensors www sickivp com All rights reserved 57...

Page 58: ...E600 B X RULER E2121 1 028 042 Ruler E600 SB X X RULER E2122 1 029 239 Ruler E1200 RULER E1111 1 028 041 Ruler E1200 S X RULER E1112 1 029 230 Ruler E1200 H X RULER E1211 1 029 231 Ruler E1200 B X RUL...

Page 59: ...using jumbo frames the maximum Ethernet frame size is 1518 bytes which includes 46 bytes used for headers This means that the maximum size for the data packages that the Ruler can send is 1472 bytes w...

Page 60: ...the IP address of a Ruler You start iCon Device Configuration by choosing Launch iCon Device Configuration from the Start menu Note You need to have administrator privileges on the PC to be able to us...

Page 61: ...ing but TTL signal levels ailure to follow these rules may damage the Ruler unit F Each Ruler E is delivered with an Encoder cable This cable has a M12 plug in one end and is open in the other Table E...

Page 62: ...is example the encoder is con nected for both forward and backward signals 1 8 5 4 7 6 3 2 Ruler 1 1 8 5 4 7 6 3 2 Ruler 2 5 10 6 1 8 SICK Stegman Encoder RS 422 Figure E 2 Wiring example Do not conne...

Page 63: ...uler units In this example the encoder is con nected for forward signals 1 8 5 4 7 6 3 2 Ruler 1 1 8 5 4 7 6 3 2 Ruler 2 5 10 6 1 8 SICK Stegman Encoder RS 422 Figure E 3 Wiring example forward signal...

Page 64: ...er to the Ruler Figure F 4 Laser Safety box for Ruler with laser class IIIb 3B B versions Figure F 5 Laser Safety box connectors and LEDs Lit if laser power supply is on Lit if device power is on Inpu...

Page 65: ...the key switch on the Laser safety box Technical Data Table F 4 Technical Data for the Laser Safety box External power supply and I O Laser power pin 8 To the Ruler Supply voltage Vs 24V 20 Ripple 5V...

Reviews: