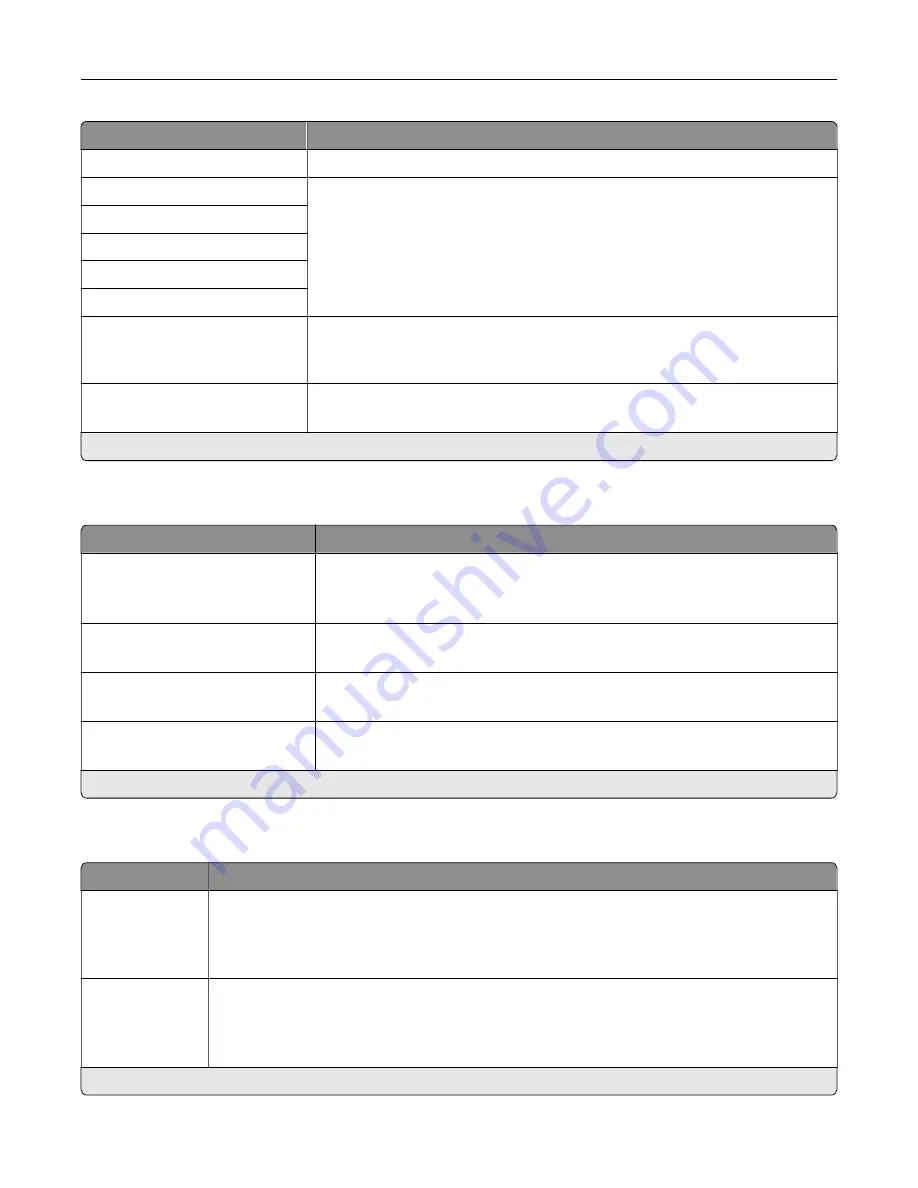
Menu item
Description
Local Domains
Specify domain names for HTTP and FTP servers.
HTTP Proxy IP Address
Configure the HTTP and FTP server settings.
FTP Proxy IP Address
HTTP Default IP Port
HTTPS Device Certificate
FTP Default IP Port
Timeout for HTTP/FTP
Requests
1–299 (30*)
Specify the amount of time before the server connection stops.
Retries for HTTP/FTP Requests
1–299 (3*)
Set the number of retries to connect to the HTTP/FTP server.
Note:
An asterisk (*) next to a value indicates the factory default setting.
ThinPrint
Menu item
Description
Enable ThinPrint
Off*
On
Print using ThinPrint.
Port Number
4000–4999 (4000*)
Set the port number for the ThinPrint server.
Bandwidth (bits/sec)
100–1000000 (0*)
Set the speed to transmit data in a ThinPrint environment.
Packet Size (kbytes)
0–64000 (0*)
Set the packet size for data transmission.
Note:
An asterisk (*) next to a value indicates the factory default setting.
USB
Menu item
Description
PCL SmartSwitch
Off
On*
Set the printer to switch to PCL emulation when a print job received through a USB port requires
it, regardless of the default printer language.
Note:
When this setting is disabled, the printer does not examine incoming data and uses the
default printer language specified in the Setup menu.
PS SmartSwitch
Off
On*
Set the printer to switch to PostScript emulation when a print job received through a USB port
requires it, regardless of the default printer language.
Note:
When this setting is disabled, the printer does not examine incoming data and uses the
default printer language specified in the Setup menu.
Note:
An asterisk (*) next to a value indicates the factory default setting.
Understanding the printer menus
68
Summary of Contents for MX-C507P
Page 1: ...DIGITAL FULL COLOR PRINTER MX C507P User s Guide September 2021 Machine type 5028 Model 6AH ...
Page 89: ...2 Remove the waste toner bottle 3 Remove the imaging kit Maintaining the printer 89 ...
Page 91: ...8 Insert the black toner cartridge 9 Insert the imaging kit Maintaining the printer 91 ...
Page 93: ...2 Remove the waste toner bottle 3 Remove the imaging kit Maintaining the printer 93 ...
Page 95: ...8 Insert the toner cartridges 9 Insert the new imaging kit Maintaining the printer 95 ...
Page 102: ...3 Remove the pick roller 4 Unpack the new pick roller Maintaining the printer 102 ...
Page 155: ...5 ISP extended cable 4 Install the ISP into its housing Upgrading and migrating 155 ...
Page 156: ...5 Attach the housing to the controller board access cover Upgrading and migrating 156 ...
Page 162: ...5 Open door B 6 Open door C Upgrading and migrating 162 ...


