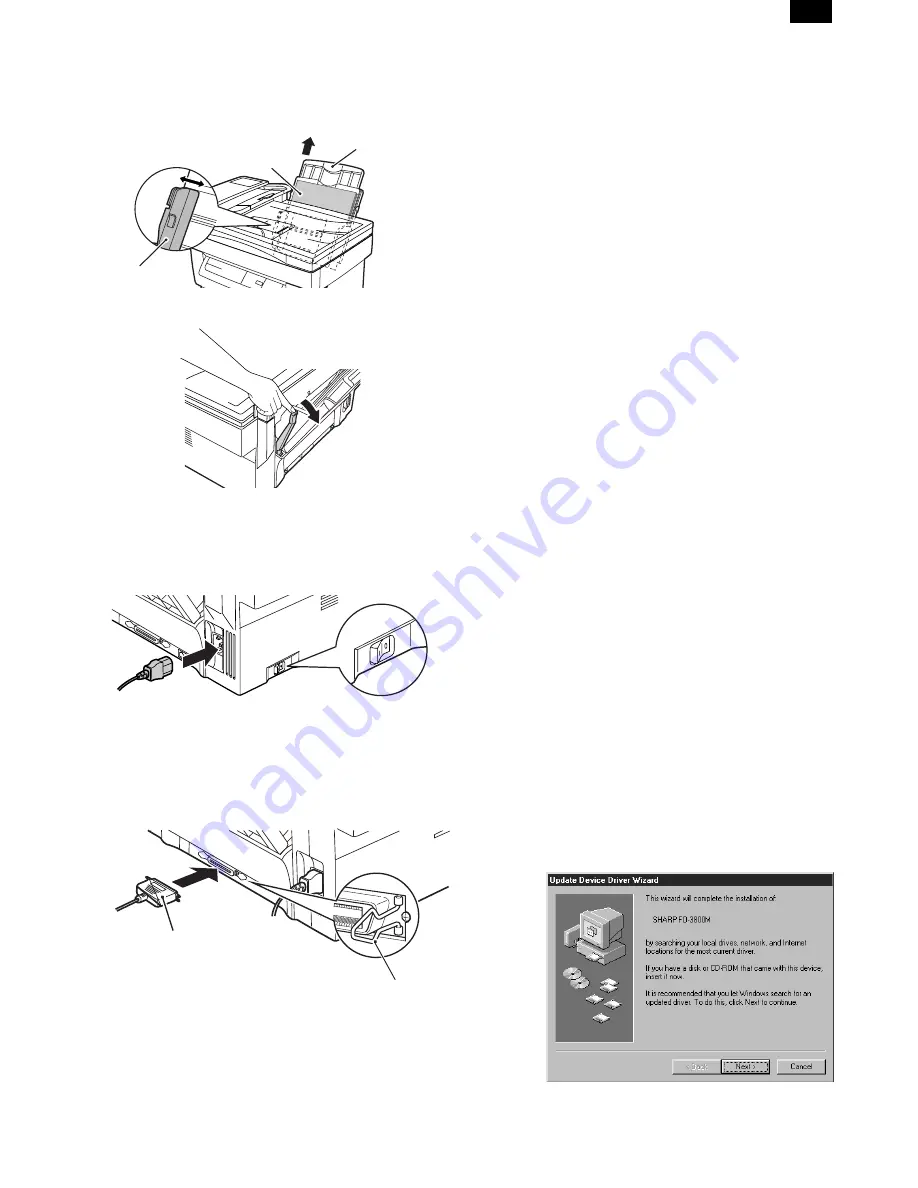
3) If extra-long paper (such as legal size) is used, raise the paper
support to support the paper. Fan the copy paper and place it into
the paper tray with the side to be printed facing toward you. Posi-
tion the paper along the right end of the paper tray. Then adjust
the paper guide to the paper width.
4) Make sure the paper release lever is pushed back. The paper will
be clamped by the paper feed roller inside the copier.
4. Cable connection
(1) Power cable
Ensure that the power switch of the copier is in the OFF position.
Insert the attached power cord into the power cord socket at the rear
of the copier.
(2) Interface cable
1) Check that the power switches of both the printer and the com-
puter are in the OFF position.
2) Plug the parallel interface cable into one of the printer interface
connectors (whichever connector you want to use). Fasten the two
bail chips at the side of the printer connector to hold the interface
connector in place.
3) Plug the other end of the cable into the parallel interface connec-
tor of your computer.
CAUTION: The printer sends and receives data bi-directionally and
at high speed. Some switch boxes and pass-through
devices cannot support high-speed, bi-directional trans-
fer of data, and using them may cause printing errors.
CAUTION: Some printer selectors (which allows to use two or more
computers and printers by selection) are not compatible
to this machine.
5. Installing the printer and TWAIN
(Scanner) driver software
(1) Checking the hardware and software
requirements
You will need the following hardware and software in order to install
the printer driver.
Computer type
IBM PC/AT or compatible computer equipped with ECP mode-
equivalent bi-directional parallel interface and CD-ROM drive
Windows type
Windows 3.1x, Windows 95, Windows 98, Windows NT 4.0
CPU 486DX 66MHz or better
Physical RAM
Windows 95, Windows 3.1x: 8MB (16MB or more is recommended.)
Windows NT 4.0: 12MB (16MB or more is recommended.)
Windows 98: 16MB (32MB or more is recommended.)
Virtual storage (swap file) 8MB or more
Display 640 x 480 dots (VGA) or better
Hard disk free space 11MB or more
CAUTION: The printer driver included in this product cannot be used
under Windows NT 3.5x, OS/2, pure MS-DOS and other
operating systems which are not described above.
(2) Installing the printer driver
The software for your machine is provided on the CD-ROM which
was packed with your machine.
Before installing the printer driver, be sure to check the following
items.
•
Is the machine connected properly to the computer?
•
Does the machine have paper?
•
Is there another GDI printer driver or Windows Printing System
printer driver already installed? If installed, change the printer port
setting.
a. Windows 95/Windows NT 4.0:
1) Load paper into the paper tray of the machine. For instructions on
loading paper, see the section LOADING COPY PAPER in the
copier operation manual.
2) Turn on the machine.
3) Turn on your computer and start Windows.
NOTE: Before installing the printer driver, be sure to close all other
applications which may be open.
4) When using Windows 95 on a personal computer with plug &
play*, the "Update Device Driver Wizard" window will appear. In-
sert the installation CD-ROM into the CD-ROM drive. Click the
Next button and follow the on-screen instructions. If the "Copying
Files" window appears during this operation, enter R:\ (if the CD-
ROM is designated as drive R), click the OK button and follow the
on-screen instructions.
•
If you use Windows 95 and the "New Hardware Found" window
will appear, select Driver from Disk Provided by Hardware
Manufacturer and then click the OK button. Proceed to step 6.
Paper guide
Side to be printed
Paper support
Interface connector
Cable
Connecter
Bail clip
FO-3800M
4 – 4


