background image

20

4. Running a test - Glucose

Test Procedure

1. 

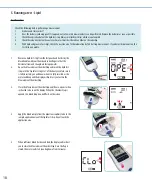
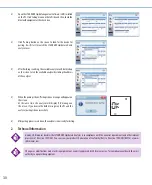
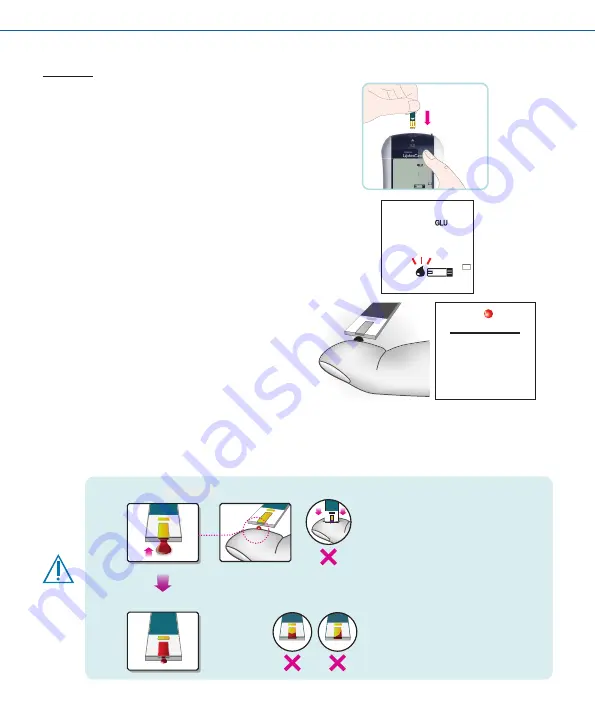
Remove a new glucose test strip from its container. Be sure to tightly 
replace the container cap immediately after removing a glucose test 
strip.

2. 

Insert the glucose test strip into the 'Glucose Test Strip Slot' of the 
Analyzer. The Analyzer will automatically enter the glucose testing 
mode.

BL

3. 

When the blood drop symbol fl ashes, you are ready to perform a 
glucose test.

BL

4. 

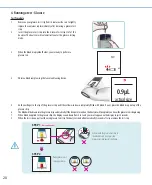
Obtain a blood sample using the lancet and lancing device.

0.9µL

actual size

5. 

Hold your fi nger to the tip of the glucose strip until the yellow window is completely fi lled with blood. Do not place the blood drop on top of the 
glucose strip.

6. 

The blood will be drawn into the glucose strip automatically. If the beeper is turned on, the Analyzer will beep to let you know the glucose test is beginning.

7. 

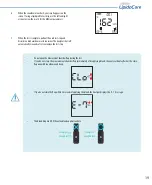
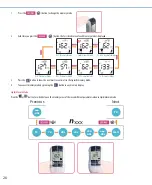
When blood is applied to the glucose strip, the display counts down from 5 to 1 and your result appears on the display in just 5 seconds.

8. 

When the test is done, pull out the used glucose test strip. The Analyzer shuts off  automatically 3 seconds after you remove the test strip.

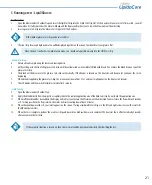
Narrow Channel

STEP 1

STEP 2

Gently touch the glucose test strip to 
the blood drop. Do not press the
glucose test strip against the finger.

Proper glucose test 
strip appearance.

Summary of Contents for STANDARD LipidoCare

Page 1: ...th the required preparations and the measurement procedure before performing the first measurement Also read the package insert of the lipid test strips to be used for the planned test If you cannot reach SD Biosensor Customer Care Service please contact your healthcare professional or local distributor You can also visit www sdbiosensor com for product demonstrations Thank you again for choosing ...

Page 2: ...se consult instructions for use EC REP Batch code Caution consult accompanying documents EC REP To discard it separately from other household waste Consult instructions for use EC REP To indicate the temperature limitations in which the transport package has to be kept and handled InVitrodiagnostic use EC REP Use by Expiry date Manufacturer EC REP Authorized Representative in the European Communit...

Page 3: ...ion 29 1 Data Trasfer 29 2 Technical Information 30 CHAPTER 7 Control Solution Test 31 1 Control Solution Test 31 2 Control Solution Test for Lipid 3 1 3 Control Solution Test for Glucose 32 4 Troubleshooting control solution 33 CHAPTER 8 Check Strip Test 33 1 How to Use a Lipid Check Strip 3 3 2 How to Use a STANDARD Glucose Check Strip 34 CHAPTER 9 Maintenance and Troubleshooting 34 1 Cleaning y...

Page 4: ... and the read lot specific information codechip also being considered Finally the result is displayed and simultaneously stored in the memory GLUCOSE The glucose test strip is designed with an electrode that measures glucose levels Glucose in the blood sample mixes with reagent on the test strip that causes a small electric current The amount of current that is created depends on how much glucose ...

Page 5: ...es and the test results stored in memory B Arrow Buttons Used for setup and review of memory moving to the right and left C ON OFF Button Press to turn Analyzer ON or OFF D Lipid test strip slot Insert a lipid test strip here E Measurement chamber flap Open to apply sample F GlucoseTest Strip Slot Insert a glucose test strip here L J K G H I G Battery compartment lid Provide access to the battery c...

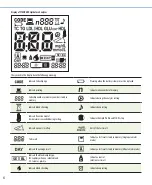
Page 6: ...L SE Indicate beep setting BL SE Indicate if environmental temperature is exceeded during testing BL SE Indicate the Lipid Profile andTC HDL strip BL SE Indicate open or close flap BL SE Unit of the test result BL SE Test result BL SE Indicate a test result stored in memory Single parameter mode BL SE Indicate the average result BL SE Indicate a test result stored in memory All parameter mode BL S...

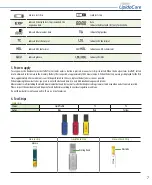
Page 7: ...life is expected at approximately 1000 measurements When the battery warning is displayed for the first time approximately 50 measurements can still be performed In this case replace the batteries as soon as possible When replacing the new batteries you must re enter the date and time Use only AAA alkaline manganese batteries Measurementresultsincludingtherelatedmeasurementdateandtimeaswellasallot...

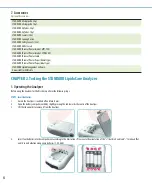
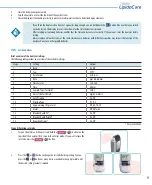
Page 8: ...D Lipid Manegement Software Universal Mini USB Cable CHAPTER 2 Testing the STANDARD LipidoCare Analyzer 1 Operating the Analyzer Before using the Analyzer for the first time perform the following steps STEP 1 Insert batteries 1 Ensure the Analyzer is switched off and turn it over 2 Open the battery compartment lid by slightly pressing the tab towards the centre of the Analyzer 3 Lift the lid upwar...

Page 9: ...ries STEP 2 Set the Analyzer Brief overview of the Analyzer settings The following table provides an overview of the available settings Stage Setting Options 1 Beep On Off 2 Year YYYY 3 Date Format m d d m 4 Date mm dd dd mm 5 Time Format 12h 24h 6 Time hh mm 7 Sample Type for Lipid SE BL 8 Unit of theTest Result mg dL mmol L 9 Auto Printing On Off 10 Printing Page P 1 P 2 11 Hypo warning for gluc...

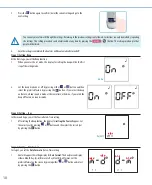
Page 10: ...on If you select the beep on feature a beep sound is made at the same time otherwise if you select the beep off feature no sound is made Stage 2 Setting Year In the second stage you set theYear in Date Time setting 1 After setting the Beep funtion the display for setting theYear will appear Set the correct year by pressing After setting the Beep funtion the display for or After setting the Beep fu...

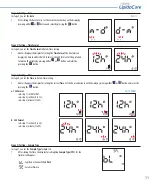
Page 11: ...r display the time in either the 12h format or the 24h format Set the preferred or display the time in either the 12h format or the 24h format Set the preferred button and select by pressing the button Stage 6 Setting Time In stage 6 you set the Time in Date Time setting 1 Next will appear the display for setting the current Time Set the hour and minute on the display by pressing either or button ...

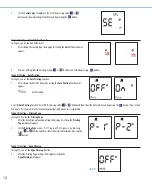
Page 12: ...ion will appear Auto Printing 2 Set the Auto Printing function On or Off by pressing either or button and then select the preferred feature by pressing the button If you set Auto Printing to On then your results will be automatically printed when a test is completed Stage 10 Setting Printing Page In stage 10 you set the Printing Page 1 After the Auto Printing function setting the display for setti...

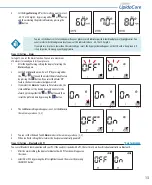
Page 13: ...first Alarm function On or Off by pressing either the or button and then select the preferred feature by pressing the button If you select the Alarm Off feature the Analyzer automatically powers off 3 If you select the Alarm on feature in first alarm mode the clock will blink Set the desired hour and minute for the alarm by pressing either the or button and then select the preferred time by pressi...

Page 14: ... Select ON or OFF by pressing the left or right button and then save it by pressing the ON OFF button BL BL STEP 3 Insert a codechip LipidTest Strip Coding The codechip provides the Analyzer with important information on the production specific characteristic of the respective lipid test strip to measure your results accurately The codechip is required when a new Lipid test strip package is opened...

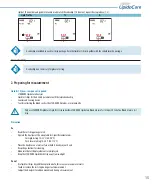
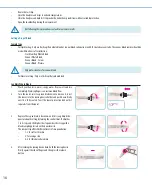
Page 15: ...STANDARD Ezi tube or micropipette Only use STANDARD LipidoCare LipidTest Strip and either STANDARD LipidoCare Blood GlucoseTest Strip or SD Codefree Blood Glucose test strip Precaution Do Read the test strip package insert Operate the Analyzer at the acceptable test specific temperatures For Lipid testing 18 32 C 64 90 F For Glucose testing 10 45 C 50 113 F Place the Analyzer on a level surface or...

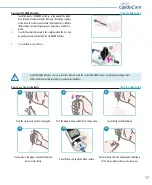
Page 16: ...nd dry completely Warming fingers can increase blood flow 2 Turn the lancet insert cap counterclockwise to remove it insert the lancet into the lancing device holder and push down firmly until it is fully seated Twist the lancet protective disk until it separates from the lancet 1 2 3 3 2 3 4 1 2 3 1 2 3 2 3 4 1 2 3 2 3 4 1 2 3 3 Replace the cap and turn it clockwise until it is snug Adjust the pu...

Page 17: ...D EziTube 3 Close the flap to start the test Used STANDARD EziTube can cause infection Please discard the used STANDARD EziTube according to local regulations Collect the blood sample carefully to try and avoid air bubbles How to use the micropipette Only for lipid testing 1 2 2 3 4 2 3 4 2 3 4 3 Place the tip securely on the micropipette Push the plunger down and hold it in this position Touch th...

Page 18: ...le with your thumb and index finger so that the horizontal lines and triangle are facing upwards 2 Open the Measurement Chamber Flap and insert the lipid test strip into the LipidTest Strip Slot of the Analyzer Make sure it is fully inserted you will know when it is fully inserted as the meter will beep and the display will instruct you to close the Measurement Chamber Flap BL BL 3 Close the Measu...

Page 19: ... automatically 3 seconds after you remove the test strip Do not open the Measurment chamber flap during the test If you do not close the measurement chamber flap immediately after applying blood the analyzer display flashes the close flap icon with countdown and beep If you do not close the flap within 20 seconds of applying the blood the Analyzer displays the E 7 message The blood drop must fill ...

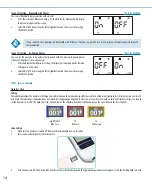
Page 20: ...tip of the glucose strip until the yellow window is completely filled with blood Do not place the blood drop on top of the glucose strip 6 Thebloodwillbedrawnintotheglucosestripautomatically Ifthebeeperisturnedon theAnalyzerwillbeeptoletyouknowtheglucosetestisbeginning 7 When blood is applied to the glucose strip the display counts down from 5 to 1 and your result appears on the display in just 5 ...

Page 21: ...e beeper is turned on the Analyzer will beep to let you know the test is beginning 7 When blood is applied to the glucose test strip the screen counts down from 5 to 1 and your result appears on the display in 5 seconds 8 The LCD display will then switch to lipid test mode after 3 seconds LipidTesting 9 Open the Measurement Chamber Flap 10 Apply the blood directly from the pipette or capillary tub...

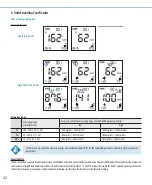
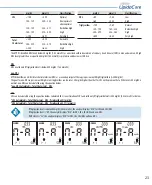
Page 22: ... HDL 25 95 0 65 2 46 25mg dL 0 65mmol L 95mg dL 2 46mmol L If the results are out of the measuring range the analyzer displays N A for the calculated parameters related to the measurement parameters ExpectedValue TheNationalHeart LungandBloodInstituteissuedtheThirdReportoftheNationalCholesterolEducationProgram NCEP ExpertPanelonDetection Evaluation andTreatmentofHighBloodCholesterolinAdults AdultT...

Page 23: ...ATP III identifies non HDL total cholesterol minus HDL as a secondary target of therapy in persons with high triglycerides 200 mg dL The goal for non HDL in persons with high serum triglycerides can be set at 30 mg dL higher than that for LDL on the premise that aVLDL level 30 mg dL is normal non HDL can be calculated using the equation below non HDL calculated Total Cholesterol HDL LDL LDL can be...

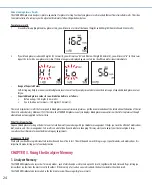
Page 24: ... plasma as per the recommendation of the International Federation of Clinical Chemistry and Laboratory Medicine IFCC Therefore the STANDARD LipidoCare analyzer displays blood glucose concentrations that refer to plasma although whole blood is always applied to the test strip WhatThis Means ForYou Frequent blood glucose testing is the best means to track how well you are doing with your diabetes ma...

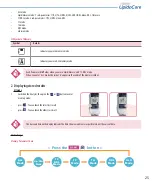
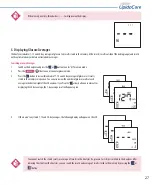
Page 25: ...in Lipid Glucose and TC HDL mode When you enter ALL mode the initial A appears in the center of the memory symbol 2 Displaying stored results All mode 1 Switch on the Analyzer then press the or button to enter memory mode press You can check the latest test result press You can check the oldest test result BL BL BL BL The date and time on the display indicates the time the measurement was performe...

Page 26: ... Mode HDL Parameter Mode GLU Parameter Mode ALL Parameter Mode 3 Press the button to show the next most recent result in that specific memory mode 4 You can exit memory mode by pressing the button in any memory display Lipid Glucose Mode Press the or button to switch between the memory areas of the seven different parameters when in Lipid Glucose mode TC TG HDL LDL LDL HDL non HDL TC Previous Next...

Page 27: ... three kinds of 7 15 and 30 day averages of glucose test results stored in the memory in sequence You can also review the number of glucose results at each average in the bottom right of the LCD window IfyouPressthe arrow button once more after displaying the 30 day average the 7 day average result will appear again BL 4 If there aren t any stored 7 15 and 30 day averages the following display wil...

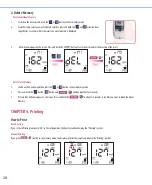
Page 28: ...esult BL BL BL DeleteTotal Memory 1 Switch on the Analyzer and then press the or button to enter memory mode 2 Press and hold the button button and button together for 3 seconds 3 All and dEL will now appear on the screen Press and hold the button for 3 seconds to confirm you want to blank the meter memory CHAPTER 4 Printing How to Print Auto Printing If you set Auto Printing function to ON in the...

Page 29: ...ion Only the 02LA20G model can be used to transfer data from an analyzer through Bluetooth The model number is indicated on the label of the analyzer 1 DataTrasfer The data measured by the analyzer can be transferred to a PC via Bluetooth 02LA20G model only If you want the analyzer to be paired with a PC the pairing step is necessary And the STANDARD Lipid Management Software LMS should be install...

Page 30: ...ppear on the screen At the same time the analyzer will display OK message on the screen If you receive the both messages on the PC and the analyzer pairing is done successfuly BL BL 6 After pairing processes are done the analyzer is now ready for testing 2 Technical Information Hereby SD Biosensor declares that STANDARD LipidoCare Analyzer is in compliance with the essential requirements and other...

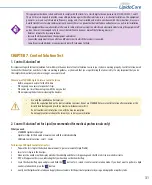
Page 31: ... simple check routinely to make sure you get an accurate result When to use STANDARD Lipid Glucose Control Solution Before using your Analyzer for the first time When you open a new vial or pouch of strips Whenever your result does not agree with the way you feel When replacing the batteries or cleaning the Analyzer Use only the specified Control Solution Check the expiration date on the control s...

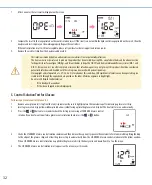
Page 32: ...ontrol Solution can be expected to give stable results through the expiration date printed on the label Minimize exposure to bright light Do not use SDB Lipid Control Solution If it is cloudy or has an odour If it has been shipped or stored improperly 3 Control SolutionTest for Glucose Performing a Glucose Control SolutionTest 1 Remove a new glucose test strip from the test strip container Be sure...

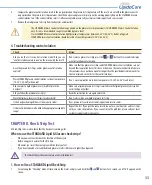
Page 33: ...specified period 6 months for the test strips and 3 months for the control solution Were STANDARD glucose control solutions at room temperature 18 30 C 64 86 F when used If not warm up cool down to room temperature 18 30 C 64 86 F and retest Did you insert a lipid or glucose test strip firmly into the Analyzer Make sure a lipid or glucose test strip is inserted into the lipid or glucose test strip...

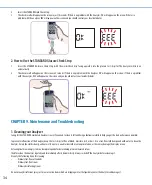
Page 34: ...bleshooting 1 Cleaning your Analyzer Caring for the STANDARD LipidoCare Analyzer is easy If you need to clean it follow these guidelines carefully to help you get the best performance possible To prevent malfunction of the Analyzer keep the test strip slot free of blood moisture dirt or dust Use a lint free cloth dampened with water to clean the Analyzer Ensure the cloth is damp and not wet Do not...

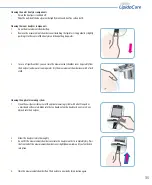
Page 35: ...separately from the Analyzer under warm running water Dry the measurement chamber cover with a fresh cloth Cleaning the optical measuring system 1 Clean the easily accessible areas of the optical measuring system with a lint free pad or a moistened cotton swab Make sure that no liquid enters the Analyzer Do not insert any objects into the Analyzer 2 Allow the Analyzer to dry thoroughly 3 Do not fi...

Page 36: ...red if it is exposed to sunlight Control solution 1 Do not use STANDARD Glucose Lipid Control Solution beyond the expiration date 2 ForSTANDARDGlucoseControlSolution storebetween8 30 C 46 86 F butnotrefrigerateorfreeze 3 For SDB Lipid Control Solution store upright and refrigerated at 2 8 C 36 46 F Stored under this condition SDB Lipid Control Solution can be expected to give stable results throug...

Page 37: ... description BL Warning Replace Battery Battery power is low If the battery is empty and you press the power button the battery icon will flash for 10 seconds and then the analyzer will turn off automatically 2 Error message Indication Error description In case of lipid test strip In case of glucose test strip Error Strip Error The lipid or glucose test strip is dirty used damaged or inserted impr...

Page 38: ...this means the year and or date are not set correctly Please refer to the section on setting the Analyzer Indication Error description Error Temperature Error If the environmental temperature is above or below the operation range of the Analyzer a thermo Analyzer icon will appear on the display Solution Move to an area between 18 32 C 64 90 F for lipid or 10 45 C 50 113 F for glucose wait for 30 m...

Page 39: ...r description Error Blood Error Measurement chamber flap is closed for testing without blood sample Solution Re test with sufficient blood sample Indication Error description Error Communication Error with codechip The Analyzer cannot communicate with the inserted codechip Solution Re insert the codechip If the error message persists please contact your local distributor Indication Error descripti...

Page 40: ... the diagnosis of diabetes 3 Extremes in hematocrit may affect test results Hematocrit levels less than 20 may cause falsely high readings Hematocrit levels greater than 60 may cause falsely low readings 4 Not intended for screening or diagnosis or for use on neonates 5 Never make significant changes to your diabetes control program or ignore physical symptoms without consulting with your healthca...

Page 41: ...L 0 6 33 3 mmol L Sample Fresh capillary whole blood Sample Size 0 9 µl TestTime 5 seconds Test Strip StorageTemperature 2 32 C 36 90 F Hematocrit 20 60 TestingTemperature 10 45 C 50 113 F Altitude Up to 3 776m 12 388 ft Calibration Plasma equivalent 4 Electromagnetic Compatibility This Analyzer meets the electromagnetic immunity requirements as per EN ISO 15197 Annex A The chosen basis for electr...

Page 42: ...te bin Follow all other locally applicable guidelines and regulations on health and safety Appendix 2 References 1 American Diabetes Association Standards of Medical Care in Diabetes 2013 Diabetes Care Volume 36 Supplement 1 January 2013 S11 S66 2 Siedel J Hagele EO Ziegenhorm J Wahlefeld AW Reagent for the enzymatic determination of serum total cholesterol with improved lipolytic efficiency Clin ...

Page 43: ...43 MEMO MEMO ...

Page 44: ...44 MEMO MEMO ...

Page 45: ...45 MEMO MEMO ...

Reviews: