background image

The Sapling Company, Inc.
1633 Republic Road
Huntingdon Valley, PA 19006
USA

+1 215.322.6063 P.
+1 215.322.8498 F.
www.sapling-inc.com

39

Sbdconfig Software - DST (continued)  

2. Once all of the DST settings are chosen, click the ‘Update Clock’ button to store the selected options or, when all the tabs have been 
programmed, click the ‘Load Clock’ button located on the menu bar to store all options.

• 

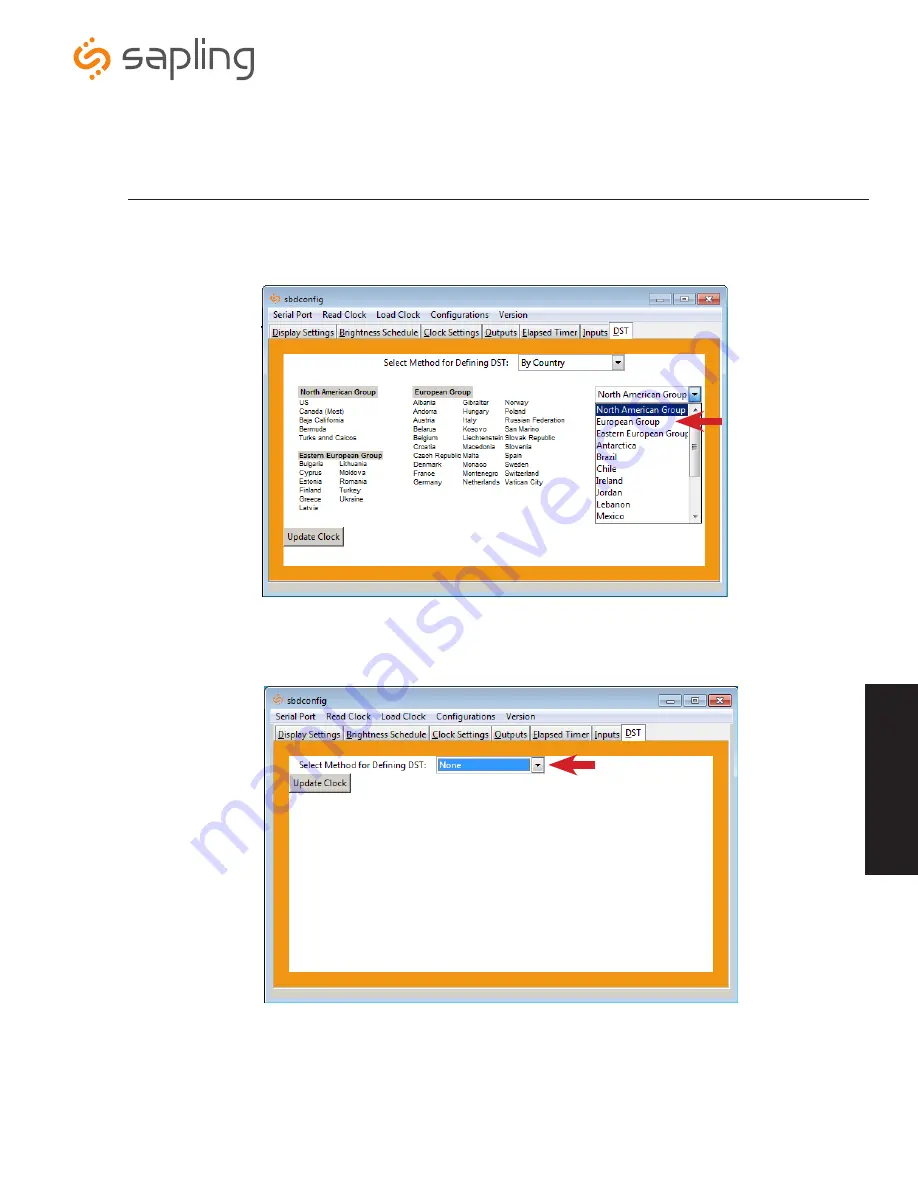
By Country: 

When this option is selected, Daylight Saving Time can be chosen by country. For example, Daylight Saving Time can be 

selected to follow the DST rules established in the United States. (Fig. 6)

• 

None: 

When this option is selected, Daylight Saving Time is not applied. (Fig. 7)

 Fig. 6

 Fig. 7

sb

dc

on

fig

.e

xe

so

ft

wa

re


Summary of Contents for SBL 3000 Series

Page 1: ...SBL 3000 Series Wireless Clock The Sapling Company Inc 1633 Republic Road Huntingdon Valley PA 19006 USA 1 215 322 6063 P 1 215 322 8498 F www sapling inc com Installation and Programming Manual V7...

Page 2: ...umper Settings 3300 Series 11 Using the Output Sync Relay on the SBL 3300 12 Temperature Sensor Wiring Optional 13 Buzzer Installation 3300 Series 14 Programming Setting the Time on the SBL 3300 Progr...

Page 3: ...Screws 4 6 19 x 1 2 Flat Head Screws 4 8 32 x 7 19 Screws 2 8 32 x 7 16 Screws Surface Mount 120VAC or 240VAC Kit Kit will be labeled D PK 3 110 S 120VAC or 240VAC Harness 18 AWG Black Green White Ki...

Page 4: ...The Sapling Company Inc 1633 Republic Road Huntingdon Valley PA 19006 USA 1 215 322 6063 P 1 215 322 8498 F www sapling inc com 4 ABS Surface Wall Mount Installation e w q r t y Installation...

Page 5: ...it and screw them through the four holes in the center of the inside of the housing and the four holes in the gang box Note If using a metal gang box a ground must be provided to the gang box 2 Feed W...

Page 6: ...The Sapling Company Inc 1633 Republic Road Huntingdon Valley PA 19006 USA 1 215 322 6063 P 1 215 322 8498 F www sapling inc com 6 ABS Double Mount Installation q t i a y r w w e u o Installation...

Page 7: ...one 1 of the four 4 metal mounting bracket screws in order to provide ground to the metal mounting bracket The metal mounting bracket MUST be secured by both the screws going to the switch box AND th...

Page 8: ...the underside of the base to secure the base to the metal mounting bracket 6 Connect switch box wires to clock harness Take the wiring harness supplied with the clock and make all necessary connection...

Page 9: ...on 120VAC or 240VAC 0 1A WHT 24VAC 0 35A YEL Note When setting up the jumpers Pin 1 Pin 2 must be jumpered together OR Pin 2 Pin 3 must be jumpered together Below are the Jumper Positions and what fun...

Page 10: ...Orange White 3 3V 0 1A Brown Brown White P1 Sync Inputs P2 User Inputs P3 Relay Output 4 3 2 1 Relay 1 N O Relay 2 N O Note When setting up the jumpers Pin 1 Pin 2 must be jumpered together OR Pin 2...

Page 11: ...4VAC Sync Dukane Reset Dukane Pulse Dry Contact 3 3VDC 20ma Common Common User Input 4 User Input 3 User Input 2 User Input 1 12VDC 40ma Each User Input is a Contact Closure J3 Relay Output 4 3 2 1 Re...

Page 12: ...19006 USA 1 215 322 6063 P 1 215 322 8498 F www sapling inc com 12 Using the Output Sync Relay SBL 3300 Series Only Intercom paging system or other device Wiring Information Output Relay Green White...

Page 13: ...emperature sensor will be sent to your clock when the clock is powered on For more information on how to make the SBL display temperature please see the section labeled Web Interface Display Settings...

Page 14: ...lack wire should be in hole 8 3 Attach the short green connector to the J3 Relay Output ports 4 Confirm that the wires are attached to holes 1 and 2 The yellow wire should be in hole 1 The black wire...

Page 15: ...button to select a Setting Hold the button down to scroll through the Settings 4 To return to time while in an Option simultaneously press the top and bottom buttons Option 1 Set Year This option will...

Page 16: ...ttom button to scroll between E or d Option E will enable the current USA Daylight Saving Time schedule seen below DST starts 2nd Sunday of March at 2 00 am DST ends 1st Sunday of November at 2 00 am...

Page 17: ...is selected press the top button to continue on to Option 9 Option 9 Set the Clock Number This option allows the user to choose a specific clock number in order to easily identify a specific clock wi...

Page 18: ...n to option 14 If a user chooses to disable d the Loss of Communication Alert when the top button is pressed the user will be taken to option 15 Option 14 Set the Loss of Communication Alert This opti...

Page 19: ...lse from 6 00 25 to 6 24 25 AM and PM 07 National Time Rauland 2 The hourly correction is for 25 seconds every hour from XX 00 00 to XX 00 25 The daily correction 6 a m 6 p m is 25 seconds on 35 secon...

Page 20: ...osure Press the bottom button to scroll between 00 59 Once a user selects the Once a Day Pulse Output Minute s press the top button to continue on to Option 23 Option 23 Once a Day Pulse Output Second...

Page 21: ...scroll between 00 23 Once a user selects the Once a Day Pulse Input Hour press the top button to continue on to Option 32 Option 32 Once a Day Pulse Input Minutes If the Once a Day Pulse Option 9 set...

Page 22: ...ve Test 09 Diagnostic 9 Overrides diagnostics and returns to master clock time 03 Diagnostic 3 Manufacturing Default and set hands to 12 Table 5 Option 40 Activation Diagnostic Mode This option allows...

Page 23: ...Hardware and Sound 7 Click on Device Manager under Devices and Printers Installing the sbdconfig exe Software Instructions continued on next page Please Note The sbdconfig exe software only works wit...

Page 24: ...the USB Serial Converter and a new window will open If the USB Serial Converter has not appeared look for a new item called USB Half UART under the Device Manager category Other Devices Within five m...

Page 25: ...with the digital clock or copy the software to the desktop 14 Open the SBDconfig software click on Serial Port in the menu bar Configure Serial Port Match the Com port on the SBDconfig software to the...

Page 26: ...15 Make sure that the Com port number matches the number you saw on the Device Manager then click apply The SBL 3000 settings are ready to be configured 16 Click the Read Clock button The default set...

Page 27: ...uration After a user sets the serial port s settings on the Sbdconfig software this option will save a particular configuration to a computer in order to upload it to a different clock Save Configurat...

Page 28: ...has a previously configured clock and connects it to a computer this option will read and upload the settings to the Sbdconfig software program Once the Read Clock button is clicked another window wil...

Page 29: ...ure sensor was installed on the clock the clock will display the temperature for the number of seconds entered in the box After the selected amount of time passes the clock will change to show the Tim...

Page 30: ...ternate brightness levels the time of day that the brightness level will change and the level of brightness the clock will display High Medium Low or Off In addition a user has the option to schedule...

Page 31: ...in a certain section of a facility Here a user will input a number 1 99 to designate the zone of the clock Blink Colon After The colon on the digital clock display has the ability to blink in order to...

Page 32: ...to program the following settings 2 Once the Relay 1 Output settings are chosen click the Update Clock button to store the selected options or when all the tabs have been programmed click the Load Clo...

Page 33: ...o start Press the button programmed for Start Stop to begin Count Down Go to Count Down and Start This option will make the clock display the count down function and begin counting down from a specifi...

Page 34: ...the relay will be closed for The maximum number of seconds is 9 Instructions continued on next page At end of Countdown go to This option allows a user to choose between having the clock display the t...

Page 35: ...ghts dialog box is open adjusting the lights on buttons 2 3 and 4 will only have an affect when button 1 is pushed No Change When selected a particular button s settings will remain unaltered from its...

Page 36: ...t A Start Stop input needs to be applied to begin Count Up Go to Count Up and Start This option will make the clock display the count up function and begin counting up from zero as soon as the button...

Page 37: ...many seconds a relay will be closed for At end of Countdown go to This option allows a user to choose between having the clock display the time or start a count up when a countdown completes 2 Once al...

Page 38: ...r example Daylight Saving Time can begin on the second Sunday in March at 2AM and ends on the first Sunday in November at 2AM Fig 5 Fig 5 Select Method for Defining DST This drop down allows a user to...

Page 39: ...the selected options or when all the tabs have been programmed click the Load Clock button located on the menu bar to store all options By Country When this option is selected Daylight Saving Time can...

Page 40: ...corner of the display to indicate PM or disappear to indicate AM When the display is set to the 24 hour format the full 24 hour time will appear on the display no other lights should appear Some exam...

Page 41: ...o be opened How do I take advantage of the SBL 3200 or 3300 chronograph functions Sapling s Elapsed Timer controls all chronograph functions of the SBL 3200 3300 and must be ordered for this functiona...

Page 42: ...lock does not receive the signal Take the clock within close proximity to the transmitter and power the clock If the clock does not correct call Sapling technical support I have a location with a marg...

Page 43: ...nd on the user is encouraged to try to correct the interference by one or more of the following measures Reorient or relocate the receiving antenna Increase the separation between the equipment and re...

Reviews: