


21
§
3
3
.
.
1
1
4
4
S
S
e
e
t
t
t
t
i
i
n
n
g
g
B
B
a
a
t
t
t
t
e
e
r
r
y
y
T
T
e
e
s
s
t
t
S
S
c
c
h
h
e
e
d
d
u
u
l
l
e
e
This section describes how to set a schedule (number of days) to run an automatic battery test. The test is
carried out automatically when the specified number of days has elapsed.
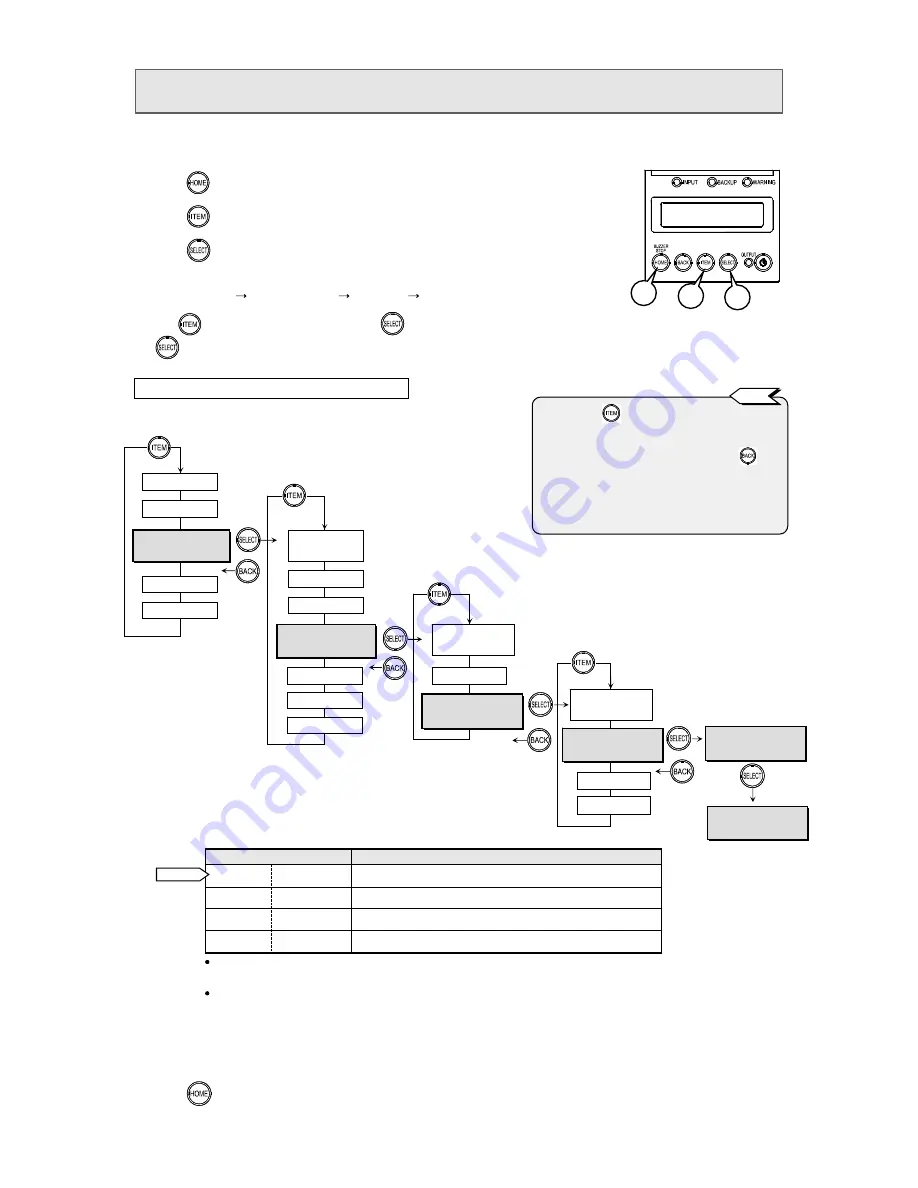
①
Press
to display the LCD screen.
②
Press
to change the home menu to the one shown below.
③
Press
to accept it.
④
In the same way, follow the figure below to make selection at each level, as follows:
“Home menu” “Settings group” “Settings” “Values”
⑤
Use
to switch values, and then press
to select a desired value. When the confirmation screen appears, press
again to accept the value.
⑥
Press
to return to the home menu.
Settings group
Settings
Home menu
STATUS
MEASUREMENT
SETTING
MAINTENANCE
CONTROL
SET BATTERY
BATT TST Period
SET I/F
SET FUNCTION
SET SYSTEM
BATT TST Period
>> 180 Days
Values
30 Days
1
2
3
Details on settings and values
Value
Description
180 Days
180 days Run battery test automatically every 180 days.
90 Days
90 days
Run battery test automatically every 90 days.
30 Days
30 days
Run battery test automatically every 30 days.
None
No
Do not run battery test automatically.
This function is available only when “
Auto
” is set in §3.3 “Setting Frequency”.
If “
50Hz
” or “
60Hz
” is set, the battery test will not be performed.
When power management software is used, battery test is performed according to
the schedule set by the power management software.
If you set to the different value from power management software by the
procedures above, the value is once changed. However, when you display the value
again, the value set by the power management software is displayed.
[SELECT] = OK
[BACK] = Cancel
Default
STATUS
Example: Set battery test interval to “
90 Days
”
Confirm
Accept
S E T T I N G
SET IN/OUT
SETTING
SET BATTERY
BATT TST Period
90 Days
None
SET OPERATION
SET BATTERY
BATLV Timing
BATT TST Length
BATT TST Period
>> 90 Days
SET DEFAULT
*1
*2
*3
*4
*1. Pressing
repeatedly cycles through the
displayed items. If you miss a desired item,
just keep on pressing until you see it again.
*2. To return to the previous level, press
.
*3. When you switch to the values screen, the
value shown is the current value, which is
indicated by “
> >
” .
*4. When a value has been changed and accepted,
it is indicated by “
>>
” (current value).
Tip


