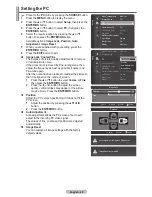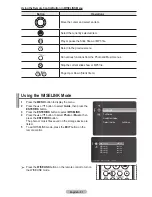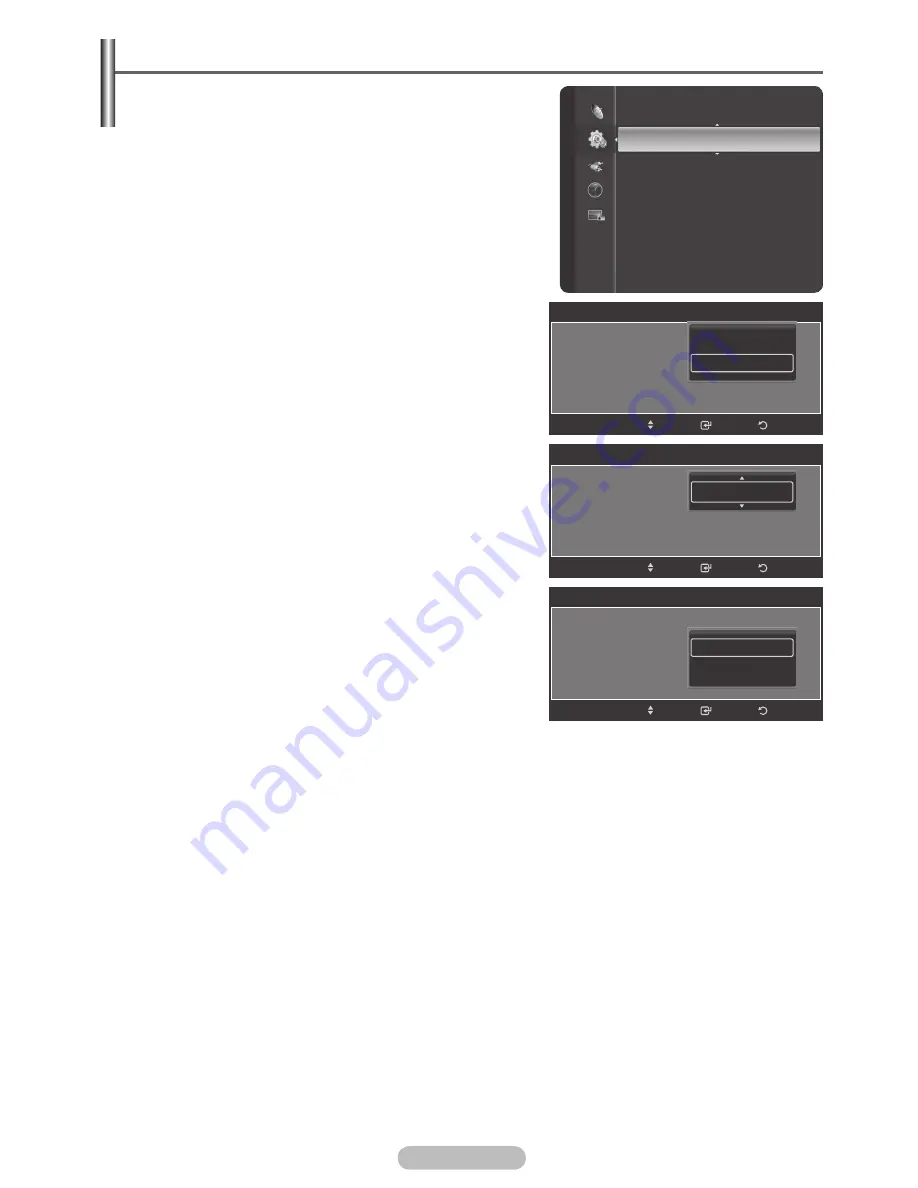
background image

English - 3

8

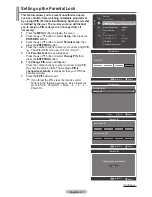
Activating the Child Lock

This feature allows you to prevent unauthorized users, 

such as children, from watching unsuitable programmes 

by muting out video and audio. Child Lock cannot be 

released using the buttons on the side.Only the remote 

control can release the Child Lock setting, so keep the 

remote control away from children.

1

  Press the 

MENU

 button to display the menu.

2

  Press the ▲ or ▼ button to select 

Setup

, then press the 

ENTER/OK

 button.

3

  Press the ▲ or ▼ button to select 

Child Lock

.

4

  Press the 

ENTER/OK

 button to select 

On

 or 

Off

. Press the 

ENTER/OK

 button.

5

  Press the ▲ or ▼ button to select 

Channel

, then press 

the 

ENTER/OK

 button and select the channels you want 

to lock, then press the 

ENTER/OK

 button.

6

  Press the ▲ or ▼ button to select 

Lock

, then press the 

ENTER/OK

 button to select Unlocked or Locked.

7

  Repeat steps for each channel to be locked or unlocked.

8

  Press the 

EXIT

 button to exit.

➢ 

While viewing a Analog channel , the 

Child Lock


function can be selected.

Setup

Timer 2 

: Inactivated

Timer 3 

: Inactivated

Child Lock 


Subtitle

Game Mode 

: Off 

Parental Lock

Menu Transparency  : Medium
Energy Saving 

: Off

PC

Home theat

r

e PC 

: Off

Child Lock

Child Lock 

On 

Channel 

: Air 1

Lock 

: Unlocked

Return

Enter

Off

On

Move

Child Lock

Child Lock 

: On 

Channel 

: Air 1

Lock 

: Unlocked

Return

Enter

Move

Child Lock

Child Lock 

: On 

Channel 

: Air 1

Lock 

: Unlocked

Return

Enter

Unlocked
Locked

Move

ATV1

BN68-01314A-00Eng.indd   38

2007-07-26   ¿ÀÈÄ 11:40:35

Summary of Contents for LA40F81BD

Page 1: ...untry AUSTRALIA CHINA HONG KONG INDIA INDONESIA JAPAN MALAYSIA PHILIPPINES SINGAPORE THAILAND TAIWAN VIETNAM SOUTH AFRICA U A E Customer Care Centre 1300 362 603 800 810 5858 010 6475 1880 3698 4698 3030 8282 1800 1100 11 0800 112 8888 0120 327 527 1800 88 9999 1800 10 SAMSUNG 7267864 1800 SAMSUNG 7267864 1800 29 3232 02 689 3232 0800 329 999 1 800 588 889 0860 7267864 SAMSUNG 800SAMSUNG 7267864 8...

Page 2: ...he LCD TV in 4 3 format for a long period of time may leave traces of borders displayed on the left right and center of the screen caused by the difference of light emission on the screen Playing a DVD or a game console may cause a similar effect to the screen Damages caused by the above effect are not covered by the Warranty Displaying still images from Video games and PC for longer than a certai...

Page 3: ...es 33 Selecting the Sound Mode depending on the model 34 Function Description Setting the Time 35 Menu Transparency Energy Saving HDMI Black Level Film Mode Light Effect Blue Screen Melody Function Help 37 Activating the Child Lock 38 Setting the Subtitle 39 Using the Game Mode 40 Setting up the Parental Lock 41 Wall mount adjustment Sold separately 43 Upgrading the Software 44 Over the Air Downlo...

Page 4: ...ontact a technician for assistance when installing the wall mounted bracket Samsung Electronics is not responsible for any damage to the product or injury to yourself or others if you elect to install the TV on your own Do not install your Wall Mount Kit while your TV is turned on It may result in personal injury due to electric shock Remove the stand and cover the bottom hole with a cap and faste...

Page 5: ...and buttons on the remote control 4 Press to change channels In the on screen menu use the buttons as you use the and buttons on the remote control Without the Remote Control you can turn on the TV by using the Channel buttons 5 Power Indicator Blinks and turns off when the power is on and lights up in stand by mode 6 Remote Control Sensor Aim the remote control towards this spot on the TV 7 Speak...

Page 6: ...evice with HDMI output These inputs can also be used as a DVI connection with separate analog audio inputs An optional HDMI DVI cable will be necessary to make this connection When using the optional HDMI DVI adapter the DVI analog audio inputs on your TV allow you to receive left and right audio from your DVI device Not compatible with PC When connecting this product via HDMI or DVI to a Set Top ...

Page 7: ...a set of headphones if you wish to watch a television programme without disturbing the other people in the room Prolonged use of headphones at a high volume may damage your hearing 8 S VIDEO or VIDEO AUDIO L R Video S Video or Video and audio inputs for external devices such as a camcorder or VCR 9 PC IN AUDIO Connect to the video and audio output jack on your PC 0 DIGITAL AUDIO OUT OPTICAL Connec...

Page 8: ...R on the remote Available source selection Previous channel Press to switch to your favourite channels a Records for Live Broadcasting b VCR DVD Function Rewind Stop Play Pause Fast Forward c Next channel Previous channel d Exit the on screen menu e Control the cursor in the menu f Use to see information on the current broadcast g TOOLS Use to quickly select frequently used functions Anynet Runs t...

Page 9: ... front of the set 2 Press the button on the front of the set You also can press the POWER button or the TV button on the remote control to turn the TV on The programme that you were watching last is reselected automatically 3 Press the numeric button 0 9 or channel up down button on the remote control or button on the right side of the set When you switch the set on for the very first time you wil...

Page 10: ...e ENTER OK button The message Set current date and time is displayed If you select Auto Select the time zone in which you live is displayed then go to step 8 6 Press the or button to move to Month Day Year Hour Minute or am pm Set the date and time you want bypressing the or button then press the ENTER OK button You can set the month day year hour and minute directly by pressing the number buttons...

Page 11: ...atically set see pages 35 36 to set the clock 10 The message Enjoy your watching is displayed When you have finished press the ENTER OK button Even if the ENTER OK button is not pressed the message will automatically disappear after several seconds Viewing the Display The display identifies the current channel and the status of certain audio video settings Press the INFO button on the remote contr...

Page 12: ...ingle button press 1 Press the TOOLS button The TOOLS menu will appear 2 Press the button to select a menu then press the ENTER OK button 3 Press the ENTER OK buttons to display change or use the selected items For a more detailed description of each function refer to the corresponding page Device List see page 63 Picture Setting see page 26 Sound Setting see page 33 Sleep Timer see page 36 Delete...

Page 13: ...ect Input then press the ENTER OK button 3 Press the ENTER OK button again to select Source List 4 Press the or button to select the signal source then press the ENTER OK button Available signal sources TV AV1 AV2 S Video Component1 Component2 PC HDMI1 HDMI2 DVI HDMI3 USB You can select these options simply by pressing the SOURCE button on the remote control Source List Edit Name Input TV AV1 AV2 ...

Page 14: ...evice names VCR DVD D VHS Cable STB HD STB Satellite STB PVR STB AV Receiver DVD Receiver Game Camcorder DVD Combo DVD HDD Recorder PC Internet TV Recv Interactive TV Recv VOD STB TV 6 Press the EXIT button to exit When a PC with a resolution of 1920 x 1080 60Hz is connected to the HDMI IN 1 port you should set the HDMI1 mode to PC in the Source List of the Input mode If the HDMI1 mode is not PC i...

Page 15: ...ress the or button to select Guide Press the ENTER OK button 3 Press the or button to select Default Guide then press the ENTER OK button 4 Select Now Next or Full Guide using the or button and press the ENTER OK button 5 Press the EXIT button to exit You can select these options by simply pressing the GUIDE button on the remote control WISELINK Full Guide Now Next Guide Default Guide Full Guide G...

Page 16: ...analog channels which can vary in reception quality from snowy to clear digital HDTV channels have either perfect reception quality or you will not receive them at all So unlike analog channels you cannot fine tune a digital channel You can however adjust your antenna to improve the reception of available digital channels 1 Press the MENU button to display the menu 2 Press the or button to select ...

Page 17: ... channel or S Cable channel Press the button then press the or button to select the required number You can also select the channel number directly by pressing the numeric buttons 0 9 If there is abnormal sound or no sound reselect the sound standard required Search When you do not know the channel numbers Press the or button to start the search The tuner scans the frequency range until the first ...

Page 18: ...g the CH LIST button on the remote control Using the Colour buttons on the Remote with the Channel List Green Zoom Enlarges or shrinks a channel number Yellow Select Selects multiple channel lists Blue Option Displays the Add or Delete Add Favourite or Delete Favourite Timer Viewing and Channel Name Edit menus A gray coloured channel refers to a deleted channel The Add menu only appears for delete...

Page 19: ...All added channels will be shown on Added Channels menu 8 Press the or button to select a channel to delete then press the blue button Press the ENTER OK button to select Delete 9 Press the EXIT button to exit You can also delete a channel in the Added Channels menu in the same manner You can select these options simply by pressing the CH LIST button on the remote control Continued Channel Channel...

Page 20: ...ed Channels then press the ENTER OK Button 7 Press the or button to select a channel as a favourite channel then press the blue button 8 Press the or button to select Add to Favourite then press the ENTER OK button The symbol will be displayed and the channel will be set as a favourite 9 To cancel your favourite channel selection press the blue button when a favourite channel is selected Press the...

Page 21: ...can also reserve a program in the All Channels or Favourite menus using the same procedures For information on how to confirm a viewing reservation refer to page 22 You can select these options simply by pressing the CH LIST button on the remote control Digital Program Guide and Viewing Reservation When a digital channel is selected and you press the button the Program Guide for the channel appear...

Page 22: ...to select Cancel schedules then press the ENTER OK button 8 Press the or button to select OK then press the ENTER OK button The viewing reservation has been cancelled 9 Press the EXIT button to exit Programed Menu Change Info Select to change a viewing reservation Cancel schedules Select to cancel a viewing reservation Information Select to view a viewing reservation You can select these options s...

Page 23: ... English and Characters Green button You can delete an already entered character Yellow button You can enter a blank space Blue button Press this button to finish renaming a channel 7 When you have finished press the blue button to assign the new name 8 Press the EXIT button to exit The names of digital broadcasting channels are automatically assigned and thus cannot be assigned by users Channel C...

Page 24: ...NTER OK button 4 To obtain a sharp and clear picture and good sound quality press the or button until you reach the optimal setting Press the ENTER OK button To reset the fine tuning to 0 select Reset by pressing the or button Press the ENTER OK button 5 Press the EXIT button to exit Fine tuned channels that have been saved are marked with an asterisk on the right hand side of the channel number i...

Page 25: ...MENU button to display the menu 2 Press the or button to select Channel then press the ENTER OK button 3 Press the or button to select LNA then press the ENTER OK button 4 Select Off or On by pressing the or button then press the ENTER OK button 5 Press the EXIT button to exit Depending on areas factory mode of LNA will be set up as On or Off Channel Fine Tune Signal Strength LNA On Channel Fine T...

Page 26: ...ry depending on the input source ex RF Video Component PC or HDMI 5 Press the EXIT button to exit You can select these options simply by pressing the P MODE button on the remote control Choose Dynamic for viewing the TV during the day or when there is bright light in the room Choose Standard for general TV watching mode Choose Movie when viewing the movie Mode Dynamic Contrast 100 Brightness 45 Sh...

Page 27: ...nt Use this function to adjust the colour of objects making them more red or green for a more natural look when RF 60Hz AV 60Hz S Video 60Hz compone nt HDMI signals are input Colour Tone Cool2 Cool1 Normal Warm1 Warm2 When the picture mode is set to Dynamic or Standard Warm1 and Warm2 cannot be selected Picture Reset Reset All Reset Picture Mode Reset All All the picture values return to default s...

Page 28: ... that the optimal contrast is provided Gamma 3 3 You can adjust the middle brightness of pictures Press the or button until you reach the optimal setting Colour Space You can set the colour reproduction space for the input signal to Auto or Wide White Balance R Offset G Offset B Offset R Gain G Gain B Gain Reset You can adjust the colour temperature for more natural picture colours R Offset G Offs...

Page 29: ... Scan Use this function to see the full image without cutting off the picture when HDMI 1080i 1080p 720p or Component 1080i 1080p 720p or DTV 1080i 1080p signals are input 5 Press the EXIT button to exit You can change the picture size simply by pressing the P SIZE button on the remote control 16 9 and 4 3 are available in all modes Zoom1 and Zoom2 are available in ATV DTV Component 480i 480p 576i...

Page 30: ...rer for a more vivid on screen picture When you select Standard or Movie in Picture Mode the Active Colour automatically changes to Off and it is deactivated When the Picture Mode is set to Dynamic the Active Colour is activated regardless of the Picture Mode setting DNIe Off On This TV includes the DNIe function so as to provide a high visual quality If you set DNIe to on you can view the screen ...

Page 31: ...V broadcasts on the PIP screen sub picture when the main picture is from an external device connected to HDMI1 2 3 Component1 2 PC or AV1 2 S Video Main picture Sub picture Component 1 2 HDMI 1 2 3 PC AV1 2 S Video Analog TV broadcasts only You can select these options simply by pressing the PIP button on the remote control If the main picture is 60Hzexcept PC the PIP function cannot be used When ...

Page 32: ...to Double Window or Double Wide mode the screen size or alignment may slightly differ depending on the signal type Changing the PIP Channel 6 Press the or button to select Channel then press the ENTER OK button Press the or button at the bottom of the remote to select the desired channel in the PIP window then press the ENTER OK button The channel can be active when the sub picture is set to TV 7 ...

Page 33: ...f On Each broadcasting station has its own signal conditions and so it is not easy to adjust the volume every time the channel is changed This feature lets you automatically adjust the volume of the desired channel by lowering the sound output when the modulation signal is high or by raising the sound output when the modulation signal is low Internal Mute Off On If you want to hear the sound throu...

Page 34: ...AM Mono Normal NICAM Stereo NICAM stereo Mono Normal NICAM DUAL I II NICAM dual 1 NICAM dual 2 Mono Normal A2 Stereo Regular broadcast Standard audio Mono Normal use Bilingual or DUAL I II Dual I Dual II Stereo Stereo Mono Forced mono If the receiving conditions deteriorate listening will be easier if the mode is set to Mono If the stereo signal is weak and automatic switching occurs switch to Mon...

Page 35: ... 2 Press the or button to select Setup then press the ENTER OK button 3 Press the or button to select Clock then press the ENTER OK button 4 Press the ENTER OK button to select Clock Mode 5 Press the or button to select Manual then press the ENTER OK button 6 Press the or button to select Clock Set then press the ENTER OK button 7 Press the or button to move to Month Day Year Hour or Minute am pm ...

Page 36: ...d on by timer This function is only available in timer On mode and prevents overheating which may occur if a TV is on for too long time Setting the Sleep Timer The sleep timer automatically shuts off the TV after a preset time 30 60 90 120 150 and 180 minutes 1 Press the MENU button to display the menu 2 Press the or button to select Setup then press the ENTER OK button 3 Press the or button to se...

Page 37: ...lack Level Normal Low Use this function to adjust the Black Level of the picture while in HDMI mode Normal The screen gets brighter Low The screen gets darker This function is active only when the externel input connects to HDMI RGB signals Film Mode On Off You can automatically sense and process film signals and adjust the picture for optimum quality Film Mode is only available in the TV mode and...

Page 38: ...button to select Channel then press the ENTER OK button and select the channels you want to lock then press the ENTER OK button 6 Press the or button to select Lock then press the ENTER OK button to select Unlocked or Locked 7 Repeat steps for each channel to be locked or unlocked 8 Press the EXIT button to exit While viewing a Analog channel the Child Lock function can be selected Setup Timer 2 I...

Page 39: ...nu are displayed 6 Press the EXIT button to exit The Subtitle Language availability depends on your country if the signal does not include subtitle language the function is not active Setup Timer 3 Inactivated Child Lock Subtitle Game Mode Off Parental Lock Menu Transparency Medium Energy Saving Off PC Home theatre PC Off HDMI Black Level Normal Subtitle Subtitle On Subtitle Mode Normal Subtitle L...

Page 40: ... Game Mode is On with the selected source If Game Mode is On Picture Mode is automatically changed to Standard and users cannot change the mode Sound Mode is automatically changed to Custom and user can not chang the mode Adjust the sound using the equalizer The Reset in the Sound menu is activated Reset function initializes the Equalizer settings to the factory default setting The Channel menu is...

Page 41: ... Press the or button to select Change PIN then press the ENTER OK button 6 The Change PIN screen will appear Press the number buttons to enter your new 4 digit PIN Re enter the same 4 digits The message PIN is changed sucessfully is displayed then your PIN has been memorized 7 Press the EXIT button to exit If you forget the PIN press the remote control buttons in the following sequence which reset...

Page 42: ...Rating The Austraila screen for age rating G PG M MA AV R will appear 6 Press the or button to select an appropriate restriction 7 Press the ENTER OK button to activate the restriction selected The symbol is indicated Allow All Press to unlock all TV ratings Block All Press to lock all TV ratings 8 Press the EXIT button to exit While viewing a DTV channel the Parental Lock function can be selected...

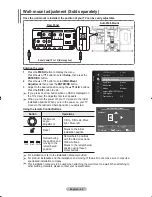
Page 43: ...nt angle adjustment Tilt Up Tilt Down Move right Move left Reset Moves to the initial installation position Red Green Yellow Remembering the position and moving to the remembered position Remembers 3 positions with the Red Green and Yellow buttons Moves to the remembered position using these 3 colour buttons For installation refer to the Installation Manual provided For product installation and th...

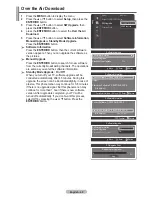
Page 44: ... take up to 30 seconds is displayed 5 If the firmware on the USB is properly recognized the message Upgrade version xxxx to version xxxx The system would be reset after upgrade is displayed Press the or button to select OK then press the ENTER OK button The upgrade starts Please be careful not to disconnect the power or remove the USB drive while upgrades are being applied The TV will shut off and...

Page 45: ...tes During this upgrade the screen can be illuminatedslightly in case of plasma This phenomenon may continue for 3 5 minutes if there is no upgrade signal But this phenomenon may continue for more than 1 hour if there is new software version After upgrade is completed your TV will be turned off automatically If you don t want this process select Off by pressing the or button Press the ENTER OK but...

Page 46: ...er 1 First click on Control Panel on the Windows start menu 2 When the control panel window appears click on Appearance and Themes and a display dialog box will appear When the control panel window appears click on Display and a display dialog box will appear Navigate to the Settings tab on the display dialog box The correct size setting resolution Optimum 1920 X 1080 If a vertical frequency optio...

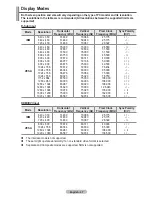
Page 47: ... 077 46 875 57 672 48 364 56 476 60 023 67 500 60 000 63 981 74 620 79 976 75 000 66 587 70 000 72 809 75 000 70 000 60 317 72 188 75 000 72 000 60 000 70 069 75 029 75 000 60 000 60 020 70 000 75 025 60 000 59 934 28 560 31 500 31 500 45 500 40 000 50 000 49 500 78 434 65 000 75 000 78 750 108 000 108 000 108 000 1 28 943 135 000 162 000 138 500 HDMI DVI Input Mode Resolution Horizontal Frequency...

Page 48: ...ER OK button 2 Press the or button to adjust the screen quality vertical stripes may appear or the picture may be blurry Press the ENTER OK button Position Adjust the PC s screen positioning if it does not fit the TV screen 1 Adjust the position by pressing the button 2 Press the ENTER OK button Auto Adjustment Auto adjustment allows the PC screen of set to self adjust to the incoming PC video sig...

Page 49: ... the menu 2 Press the ENTER OK button to select Picture 3 Press the or button to select Size then press the ENTER OK button 4 Press the or button to select the screen format you want then press the ENTER OK button 5 Press the EXIT button to exit 16 9 Sets the picture to 16 9 wide mode 4 3 Set the picture in 4 3 format You can change the picture size simply by pressing the P SIZE button on the remo...

Page 50: ... French or Spanish if necessary Folder or file names can not exceed 128 characters If exceeded they won t function When the files stored in the USB is over 440MB if you select Delete All the TV will be abnormal You can delete it in the computer The file system only supports the FAT16 32 Certain types of USB Digital camera and audio devices may not be compatible with this TV WISELINK supports USB M...

Page 51: ...enu 2 Press the or button to select Guide then press the ENTER OK button 3 Press the ENTER OK button to select WISELINK 4 Press the or button to select Photo or Music then press the ENTER OK button The photo or music files saved on the storage device are listed 5 To exit WISELINK mode press the EXIT button on the remote control Press the WISELINK button on the remote control to turn on the WISELIN...

Page 52: ...ts such as gif or tif will not be displayed Folders are displayed first and they are followed by all JPEG files in the current folder The folders and JPEG files are sorted in alphabetical order If the photo is displayed in full screen you can zoom in and out or rotate the photo on the screen Refer to pages 55 57 If the size of a photo file is too big the playing of the background music may be inte...

Page 53: ...ff on page 58 Background Music Setting You can set the background music Refer to Background Music Setting on page 58 Delete You can delete a photo JPEG file Refer to Deleting the Photo files on page 59 Continued Zoom Out Zoom In x2 Rotate 90 Start Slide Show Zoom Rotate Background Music On Background Music Setting Delete Picture Mode Dynamic Sound Mode Custom Information Adjust Enter Move Do you w...

Page 54: ...Show then press the ENTER OK button Slide show displays all JPEG files in the selected folder at a pre set speed During the slide show files are displayed in order from the currently shown file MP3 files can be automatically played during the slide show if the Background Music is set to On To enable this function MP3 files and other photo files must be located in the same folder on the memory devi...

Page 55: ... photo in full screen 4 Press the TOOLS button Press the or button to select Zoom then press the ENTER OK button Each time the or button is pressed the photo size decreases or increases x1 x2 x4 x1 Restore the photo to its original size x2 Zoom in to the photo x2 x4 Zoom in to the photo x4 Continued Start Slide Show Start Slide Speed Normal Zoom Rotate Background Music On Background Music Setting ...

Page 56: ... remote control to turn on the WISELINK mode Zoom function information icon Displayed at the top left of the screen Icon Current OSD Function Zoom x 1 Restore a photo to its original size Zoom x 2 Zoom in to a photo x2 Zoom x 4 Zoom in to a photo x4 Pan Up Pan up to view the upper part of a zoomed in photo Pan Down Pan down to view the lower part of a zoomed in photo Pan Left Pan left to view the ...

Page 57: ...y from 90 degrees to 270 degrees is not allowed 5 To exit WISELINK mode press the EXIT button on the remote control The rotated file is not saved If you have select ZOOM the Rotate function is deactivate Press the WISELINK button on the remote control to turn on the WISELINK mode The Rotating function information icon Displayed at the top left of the screen Icon Current OSD Function Rotating 270 T...

Page 58: ...ly selected photo in full screen 4 Press the TOOLS button Press the or button to select Background Music Setting then press the ENTER OK button The music MP3 files are listed 5 Press the or button to select a particular music file and press the yellow button The mark appears to the left of the selected music MP3 Repeat the above operation to select multiple music files 6 Press the ENTER OK button ...

Page 59: ...d 6 To exit WISELINK mode press the EXIT button on the remote control You cannot remove the following files PTP connected digital camera picture files Read only files While removing files don t remove the USB memory device You cannot recover a deleted photo file Removing read only files When removing any read only files the screen to the right appears Press the or button to select Yes then press t...

Page 60: ...music files in the folder To select a file on the next page press the REW or FF button Pressing the or button while playing a music file will let you play another music file in the same folder To play back the files repeatedly change the setting by referring to page 61 4 Press the PLAY PAUSE button while playing an MP3 file to pause the file Press the STOP button to stop playback 5 To exit WISELIN...

Page 61: ...e mode to WISELINK select a memory device that you have installed Refer to page 50 51 2 Press the or button to select Music then press the ENTER OK button MP3 files and existing folders are displayed 3 Press the or button to select a music then press the blue button Press the or button to select Repeat mode then press the or button to select On To cancel Repeat mode select Off 4 To exit WISELINK m...

Page 62: ...INK button on the remote control to turn on the WISELINK mode Deleting Multiple Music Files 1 In the Music list press the or button to select a music file to be deleted and press the yellow button The mark appears to the left of the selected music file Repeat the above operation to select multiple music files 2 Press the blue button press the or button to select Delete selected File and press the ...

Page 63: ...Optical cable between Digital Audio Out Optical on your TV and Digital Audio Input on the Home Theatre Connect only one Home Theatre When following the connection above the Optical jack only outputs 2 channel audio You will only hear sound from the Home Theatre s Front Left and Right speakers and the subwoofer If you want to hear 5 1 channel audio connect the DIGITAL AUDIO OUT OPTICAL jack on the ...

Page 64: ...lly when the TV is Turned Off 3 Press the or button to select Auto Turn Off then press the ENTER OK button 4 Press the or button to select On then press the ENTER OK button The Auto Turn Off function is enabled If you select Off the Auto Turn Off function is cancelled Press the EXIT button to exit The active source on the TV remote must be set to TV to use the Anynet function If you set the Anynet...

Page 65: ...ave selected an external device by pressing the SOURCE button you cannot use the Anynet function Make sure to switch to an external Anynet device by using the Anynet button Anynet Menu The Anynet menu changes depending on the type and status of the Anynet devices connected to the TV Anynet Menu Description View TV Switches from Anynet to TV broadcast mode Device List Displays the Anynet device lis...

Page 66: ...n Anynet Mode Device Type Operating Status Available Buttons Anynet Device After switching to the device when the menu of the corresponding device is displayed on the screen Numeric buttons ENTER buttons Colour buttons EXIT button After switching to the device while playing a file Backward search Forward search Stop Play Pause Device with built in Tuner After switching to the device when you are w...

Page 67: ...t a certain condition Searching channels operating WISELINK When connecting or removing the HDMI cable please make sure to search devices again or restart your TV Check if the Anynet Function of Anynet device is set on I want to start Anynet Check if the Anynet device is properly connected to the TV and check if the Anynet HDMI CEC is set to On in the Anynet Setup menu Press the TV button on the T...

Page 68: ...ode LIST FLOF If you press it in the LIST mode it switches into the List save mode In the List save mode you can save teletext page into list using the store button 6 sub page Used to display the available sub page 7 page up Used to display the next teletext page 8 page down Used to display the previous teletext page 9 cancel Used to display the broadcast when searching for a page 0 reveal Used to...

Page 69: ...nt page number or search indications Date and time Text Status information FASTEXT information Teletext information is often divided between several pages displayed in sequence which can be accessed by Entering the page number Selecting a title in a list Selecting a coloured heading FASTEXT system Press the RETURN button to exit from the teletext display ...

Page 70: ...up repeat steps 2 3 and 4 but try one of the other codes listed for your brand of VCR If no other codes are listed try each VCR code 000 through 080 Note on Using Remote Control Modes VCR When your remote control is in VCR mode the volume buttons still control your TV s volume Setting Up the Remote to Operate Your Cable Box 1 Turn off your cable box 2 Press the CABLE button on your TV s remote con...

Page 71: ...des DVD When your remote control is in DVD mode the volume buttons still control your TV s volume Setting Up the Remote to Operate Your Set Top Box 1 Turn off your STB 2 Press the STB button on your TV s remote control 3 Press the SET button on your TV s remote control 4 Using the number buttons on your remote control enter three digits of the STB code listed on page 73 of this manual for your bra...

Page 72: ...70 025 038 025 081 082 083 021 056 059 007 008 018 021 026 037 062 006 036 073 074 075 076 021 006 021 024 025 034 005 019 041 075 Brand MITSUBISHI MONTGOMERY WARD MTC MULTITECH NEC OPTIMUS PANASONIC PENTAX PENTEX RESEARCH PHILCO PHILIPS PIONEER PORTLAND PROSCAN QUARTZ QUASAR RADIO SHACK REALISTIC RCA SANSUI SANYO SCOTT SEARS SHARP SHIMTOM SIGNATURE SONY SYLVANIA SYMPHONIC TANDY TASHIKA TATUNG TEA...

Page 73: ...GHES NETWORK IQ IQ PRISM JANEIL JERROID JVC Code 023 043 018 034 019 035 015 016 017 019 022 045 060 061 062 065 066 067 068 074 069 070 069 018 024 032 027 025 069 070 071 069 069 065 046 047 048 063 064 069 056 022 015 017 020 020 059 063 069 070 Brand LG Goldstar MAGNAVOX MEMOREX MOTOROLA MACOM MITSUBISHI NEXT LEVEL PHILIPS PRIMESTAR PANASONIC PAYSAT PROSCAN RCA RADIOSHACK REALISTIC STS STAR TR...

Page 74: ...74 122 123 027 065 077 078 079 082 080 125 081 095 066 146 067 068 090 060 061 089 133 135 069 074 074 064 113 071 073 091 110 089 092 091 022 033 115 116 073 051 108 109 073 059 100 106 107 074 075 025 031 057 058 054 055 056 076 093 074 094 073 Brand NORCENT NEXT BASE NEC NANTAUS NESA OPTOMEDIA ELECTRONICS OPTIVIEW ONKYO PHILCO PRINCETON PROSCAN PANASONIC PHILIPS ROTEL RIO RCA RAITE ROWA SAMPO S...

Page 75: ...nal cable is firmly connected to the PC or video sources Check that the PC or video sources are turned on On PC mode Not Supported Mode message is displayed Check the maximum resolution and the frequency of the video adaptor Compare these values with the data in the Display Modes The damaged picture appears in the corner of the screen If Just Scan is selected in some external devices the damaged p...

Page 76: ...vironmental Considerations Operating Temperature Operating Humidity Storage Temperature Storage Humidity 10 C to 40 C 50 F to 104 F 10 to 80 non condensing 20 C to 45 C 4 F to 113 F 5 to 95 non condensing 10 C to 40 C 50 F to 104 F 10 to 80 non condensing 20 C to 45 C 4 F to 113 F 5 to 95 non condensing 10 C to 40 C 50 F to 104 F 10 to 80 non condensing 20 C to 45 C 4 F to 113 F 5 to 95 non conden...

Page 77: ......
Page 78: ...This page is intentionally left blank ...

Reviews: