Operating Instructions
Samsung Electronics
4-3
A
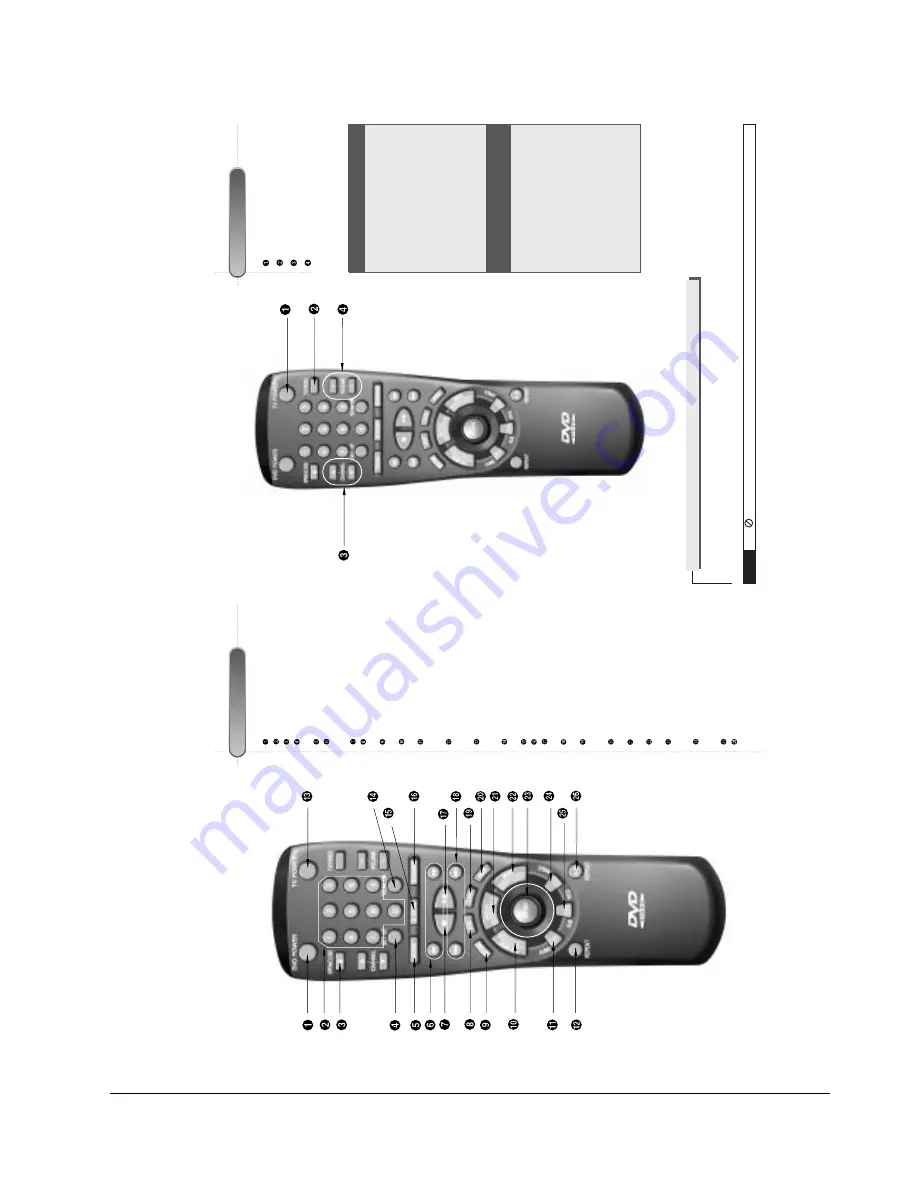
Tour of the Remote Contr
ol
DVD Function Buttons
DVD POWER Button
NUMBER Buttons
OPEN/CLOSE Button
SETUP
Button
• Brings up the DVD player
’s Setup menu.
ZOOM Button
SEARCH Buttons
•
Allows you to search forward/backward
through a disc.
ST
OP
Button
STEP
Button
•
Advances playback one frame at a time.
RETURN Button
• Returns to a previous menu.
T
OP
MENU Button
•
Accesses a music or video display directly
.
AUDIO Button
•
Use this button to access various audio
functions on a disc.
REPEA
T Button
•
Allows you to repeat play a title, chapter
,
track, or disc.
TV POWER Button
•
Use to set the remote to control a compati
-
ble
TV
.
VOLUME CON. Button
•
T
o control the master volume of the player
.
3D SOUND Button
BOOKMARK Button
PLA
Y/P
AUSE Button
• Begin/Pause disc play
.
SKIP
Buttons
• Use to skip the title, chapter
, or track.
CLEAR Button
•
Use to remove menus or status displays
from the screen.
MODE Button
•
Allows you to program a specific order
.
DISPLA
Y
Button
• Displays the current disc mode.
MENU Button
• Brings up the Disc menu.
ENTER/DIRECTION Button
(UP/DOWN or LEFT/RIGHT Button)
•
This button functions as a toggle switch.
ANGLE Button
•
Use to access various camera angles on a
DVD.
SUBTITLE Button
A-B REPEA
T Button
•
Use to mark a segment to repeat between
A
and B.
A
Tour of the Remote Contr
ol (Cont’d)
TV Function Buttons
TV POWER Button
TV/VIDEO Selection Button
CHANNEL
UP/DOWN Buttons
VOLUME UP/DOWN Buttons
NOTE
This icon indicates an invalid button press.
If remote doesn’t operate
properly:
1.
Open the battery cover on
the back of the remote.
2.
Insert two
AA
batteries.
Make sure that the polari
-
ties (+ and -) are aligned
correctly
.
3.
Replace the battery cover
.
•
Check the po - of the
batteries (Dry-Cell)
•
Check if the batteries are
drained.
•
Check if remote sensor is
blocked by obstacles.
•
Check if there is any fluores
-
cent lighting nearby
.
Install Batteries in the Remote
T
o Connect Headphones (not included) (DVD-909 only)
Connect headphones with a standard stereo plug to the headphone jack (M6).
•
Before connecting, set headphone volume at minimum.
Then adjust to a suitable volume.
Summary of Contents for DVD-709
Page 23: ...Reference Information 2 16 Samsung Electronics MEMO ...
Page 57: ...5 18 Samsung Electronics Disassembly Reaasembly MEMO ...
Page 97: ...Exploded Views and Parts List 8 8 Samsung Electronics MEMO ...
Page 109: ...9 12 Samsung Electronics Electrical Parts List MEMO ...
Page 115: ...PCB Diagrams 11 2 Samsung Electronics 11 1 Main COMPONENT SIDE SOLDER SIDE ...
Page 116: ...PCB Diagrams Samsung Electronics 11 3 11 2 Jack ...
Page 119: ...Wiring Diagram 12 2 Samsung Electronics MEMO ...
Page 121: ...Schematic Diagrams 13 2 Samsung Electronics 13 1 S M P S ...
Page 122: ...Schematic Diagrams Samsung Electronics 13 3 13 2 Main Power Supply ...
Page 123: ...Schematic Diagrams 13 4 Samsung Electronics 13 3 Main Micom ...
Page 124: ...Schematic Diagrams Samsung Electronics 13 5 13 4 Servo ...
Page 126: ...Schematic Diagrams Samsung Electronics 13 7 DVD 909 OPTION 13 6 Audio ...
Page 127: ...Schematic Diagrams 13 8 Samsung Electronics 13 7 5 1 Channel Audio DVD 909 Only ...
Page 128: ...Schematic Diagrams Samsung Electronics 13 9 13 8 RF ...
Page 129: ...Schematic Diagrams 13 10 Samsung Electronics 13 9 ZiVA ...
Page 130: ...Schematic Diagrams Samsung Electronics 13 11 13 10 DSP ...
Page 132: ...Schematic Diagrams Samsung Electronics 13 13 13 12 Component DVD 909 Only Option ...
Page 134: ...Schematic Diagrams Samsung Electronics 13 15 13 14 Mute ...
Page 136: ...Schematic Diagrams Samsung Electronics 13 17 13 17 Deck ...
Page 137: ...Schematic Diagrams 13 18 Samsung Electronics 13 18 Remote Control ...
Page 140: ...4 TABLE OF CONTENTS DVD YURO909 709 11 4 95 9 59 AM Page 4 ...


